Getting to know logical reasoning comes a long way when analyzing data. The IF statement is one of the cornerstones in MS Excel to carry out the logical analysis. It is to be noted that there are also another specialty IF statements available in MS Excel, that can be constructed to detect and carry out exclusive tasks. The IFERROR statement, for instance, runs a specific instruction when there is an error and runs another when there is not.
In this article, we would be diving deep into combining the different IF statements available in MS Excel and analyzing how their corresponding implications can be put into use to serve a specific purpose.
- Combining Two IF Statements
- Combining IFERROR with IF Statements
Combining Two IF Statements in Excel
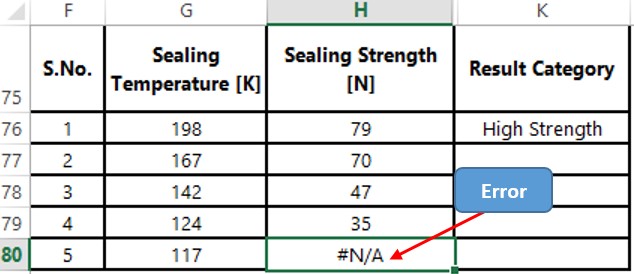
Following is the dataset which contains the results of the Sealing Strength [N] of a material tested at a wide range of Sealing Temperatures [K].
The objective here is to categorize the results into each of the below categories,
- High Strength – for values greater than 60N
- Moderate Strength – for values greater than 40N & below 60N
- Low Strength – for values lesser than 40N
Applying the above logic to the IF statement, it becomes clear that one ought to use multiple IF statements nested within one another to construct a formula that would check each of the entries in column H and assign a category that it falls under.
One shall get started by typing an equals sign (=) in cell K76, followed by typing IF and opening a round parenthesis as shown below. It can also be seen that the syntax of the formula also appears after the aforementioned is typed in versions of MS Excel after 2010.

Then click on the cell H76 which contains the sealing strength value that is to be verified, followed by including >60, since the first condition is to verify whether the value is above 60N or not.

If this logical test holds good, then the test result belongs to the High Strength category. So, the same can be typed within a pair of double quotes (“ “) as shown below.
What if the first logical test seems to be false, then we shall check whether the value meets the second condition for Moderate Strength by including an IF statement again under the value_if_false section as shown below. This time the test is to find whether the value is >40N.

Well, now I hope you are getting the hang of it. So, if the value within the cell does not satisfy the conditions for High Strength & Moderate Strength, then it is obvious that it falls under the third category – Low Strength.
So, the same shall be given in the value_if_false section of the second IF statement followed by closing 2 round parentheses (since there are two open round parentheses), rather than nesting another IF statement within it.
Hit ENTER and the formula constructed shall return the result for the sealing strength value in cell H76.

Combining IFERROR with IF Statements:
Suppose the dataset contains an erroneous value such as the one present in the cell H80 below, then one can deploy a specialty IF statement that deals exclusively with the errors – the IFERROR statement.

Copy the formula from K76, paste it to K80 & double click on the cell to edit the formula. Include IFERROR after the equals sign (=) as shown below.
Now include a comma (,) after the final closing parenthesis as shown below & type Incorrect Value within double quotes.
Hit ENTER & the formula indicates that there’s an incorrect value in the data provided.

Conclusion
Have a look at this article to know about comparing 2 columns using VLOOKUP in MS Excel. There are numerous equally interesting & informative articles in QuickExcel that serve to be a great asset to those who pursue their journey to excel in MS Excel. Whilst you continue to enjoy those, hasta luego!
