The Rangely style
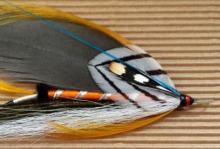
The Rangeley Style of streamer tying is the style used by Carrie Stevens to tie her famous Grey Ghost pattern. This unique features of this style of tying are that the wing components are assembled and glued together before attaching to the hook, and that the wings are not mounted on top of the hook shank but slightly down the sides of the hook shank.
The Rangeley Style of streamer tying is the style used by Carrie Stevens to tie her famous Grey Ghost pattern. This unique features of this style of tying are that the wing components are assembled and glued together before attaching to the hook, and that the wings are not mounted on top of the hook shank but slightly down the sides of the hook shank. If shoulders and cheeks are used on the pattern, these are cemented onto the wing assemblies beforehand as well. In this feature, I'll illustrate this method of streamer tying using a variation of one of my favorite patterns, The Ripogenous Smelt. The Rip Smelt, as it's affectionately called, was originated by Eddie Rief of Bangor, Maine, where he operates his fly shop. My dressing is a bit different from the original pattern:
Ripogenous Smelt
- Thread: black
- Tag: Flat Silver Tinsel
- Body: Burnt Orange Floss
- Tag: Flat Silver Tinsel
- Throat: 4 strands of peacock herl next to hook, then sparse white bucktail, both extending slightly beyond bend of hook, then a bunch of white hackle barbules, then a small golden pheasant crest, curving upwards.
- Wing: 2 Grizzly saddle hackles flanked by 2 light blue saddle hackles
- Shoulders: Dark barred teal flank
- Cheeks: Jungle Cock(Mr. Rief's original dressing doesn't have cheeks.)
Step By Step Tying Instructions
STEP 1: Start white thread above the point of the hook and tie in a section of flat silver tinsel. Wind the tinsel back towards the hook bend, then back 4 or 5 turns to create the tag. Secure the tinsel with a couple of turns of white thread on the bottom of the hook shank, then fold the tinsel back and secure with a couple of additional turns of white thread. Advance towards the eye of the hook with the white thread to a point approximately 3/8 to 1/2 inches from the eye, and tie in the floss for the body. The white thread base helps to keep the dark hook shank from showing through light-colored floss when wet. As an alternative to wrapping with white thread, you can also wrap the hook shank with flat silver mylar, which I often do.
STEP 2: Wind the floss towards the tag and then back to the tie in point, building a nicely-tapered body. Secure the floss with the white thread and cut off. Wind the flat silver tinsel forward to form the rib, and tie off where the floss was secured. Ending the body of the streamer at this point on the hook shank reduces the number of materials secured in the head area, enabling the tier to finish off the fly with a neat head. The wing assemblies will cover this area and won't be visible on the completed streamer.
STEP 3: Tie in 4 strands of peacock herl next to hook at the tie off point for the floss and ribbing, then tie in the sparse white bucktail at the same location. Advance the thread slightly, and tie in a bunch of white hackle barbules. You need to judge where the back of the head of your finished streamer will be, and continue tying in bunches of white hackle barbules, advancing the thread until you're in the correct location. At this point, tie in the golden pheasant crest, curving upwards slightly. You can also tie in a small bunch of white hackle barbules above the hook shank at this point if you'd like, though it's a matter of personal preference. This bunch of barbules on top will provide a "filler" for the space between hook shank and where the top halves of the 2 wing assemblies will touch, making it a bit easier to set the wings. Tie off the white thread and switch to black thread which will be used for the remainder of this pattern.
STEP 4: In this step, the wing/shoulder/cheek assemblies are constructed. After selecting an acceptable pair of grizzly and light blue saddle hackles, determine a left and a right hackle from both types. Strip the individual hackle fibers off each hackle until they are the proper length. Apply a light line of thick head cement along each grizzly hackle stem, from the base to slightly less than 1/3 the length. Align the light blue hackles on top of these and gently press them flush with the grizzly hackles. Allow the cement to dry a bit, and select and prepare the shoulder feathers. These feathers should be 1/3 the length of the wing, and slightly wider than the saddle hackles. Cement these onto the hackle pairs in the same manner as above, but use a line of cement that is only as long as the jungle cock that will cover it. This is important because too much cement will ruin the appearance of the completed streamer. The final step of wing assembly is to cement the jungle cock nails to each wing. When the cement has dried sufficiently, proceed to the next step. Some streamer tyers find it desireable to only cement the wing hackles together, and apply the shoulders and cheeks individually after the wings are tied in. This approach allows you to make minor adjustments to cover unsightly gaps between the wing assemblies.
STEP 5: The final step is to attach the wing assemblies to the hook shank. The wing assemblies are not attached directly on top of the hook shank, as in many streamer patterns, but slightly down along the sides. Place each wing assembly along the hook shank, slightly above center, and secure with a couple of loose wraps of thread. I normally start with the "far" wing and get that set to my liking, before tying in the "near" wing. Before binding the wings on firmly, take a moment to view the streamer from the eye end of the hook to be sure the wings are mounted vertically, and not teetering off to one side or another. When you're satisfied with the vertical alignment, apply some firm wraps of thread to lock the wings in place. Build a neat head, and apply head cement. That's it! The Ripogenous Smelt tied in the Rangeley Style!
Read more about why you should register.
More content from the front page
Since you got this far …
… I have a small favor to ask.
Long story short
Support the Global FlyFisher through several different channels, including PayPal.
Long story longer
The Global FlyFisher has been online since the mid-90's and has been free to access for everybody since day one – and will stay free for as long as I run it.
But that doesn't mean that it's free to run.
It costs money to drive a large site like this.
See more details about what you can do to help in this blog post.


Comments
Long hooks
Hi. I am a new tyer out of California and I saw this Streamer online and would love to try tying it but can't find the long hooks. Can you help me please? It's the Grey ghost fly. Thx!
John