Pav Bhaji Recipe
Sep 14, 2023
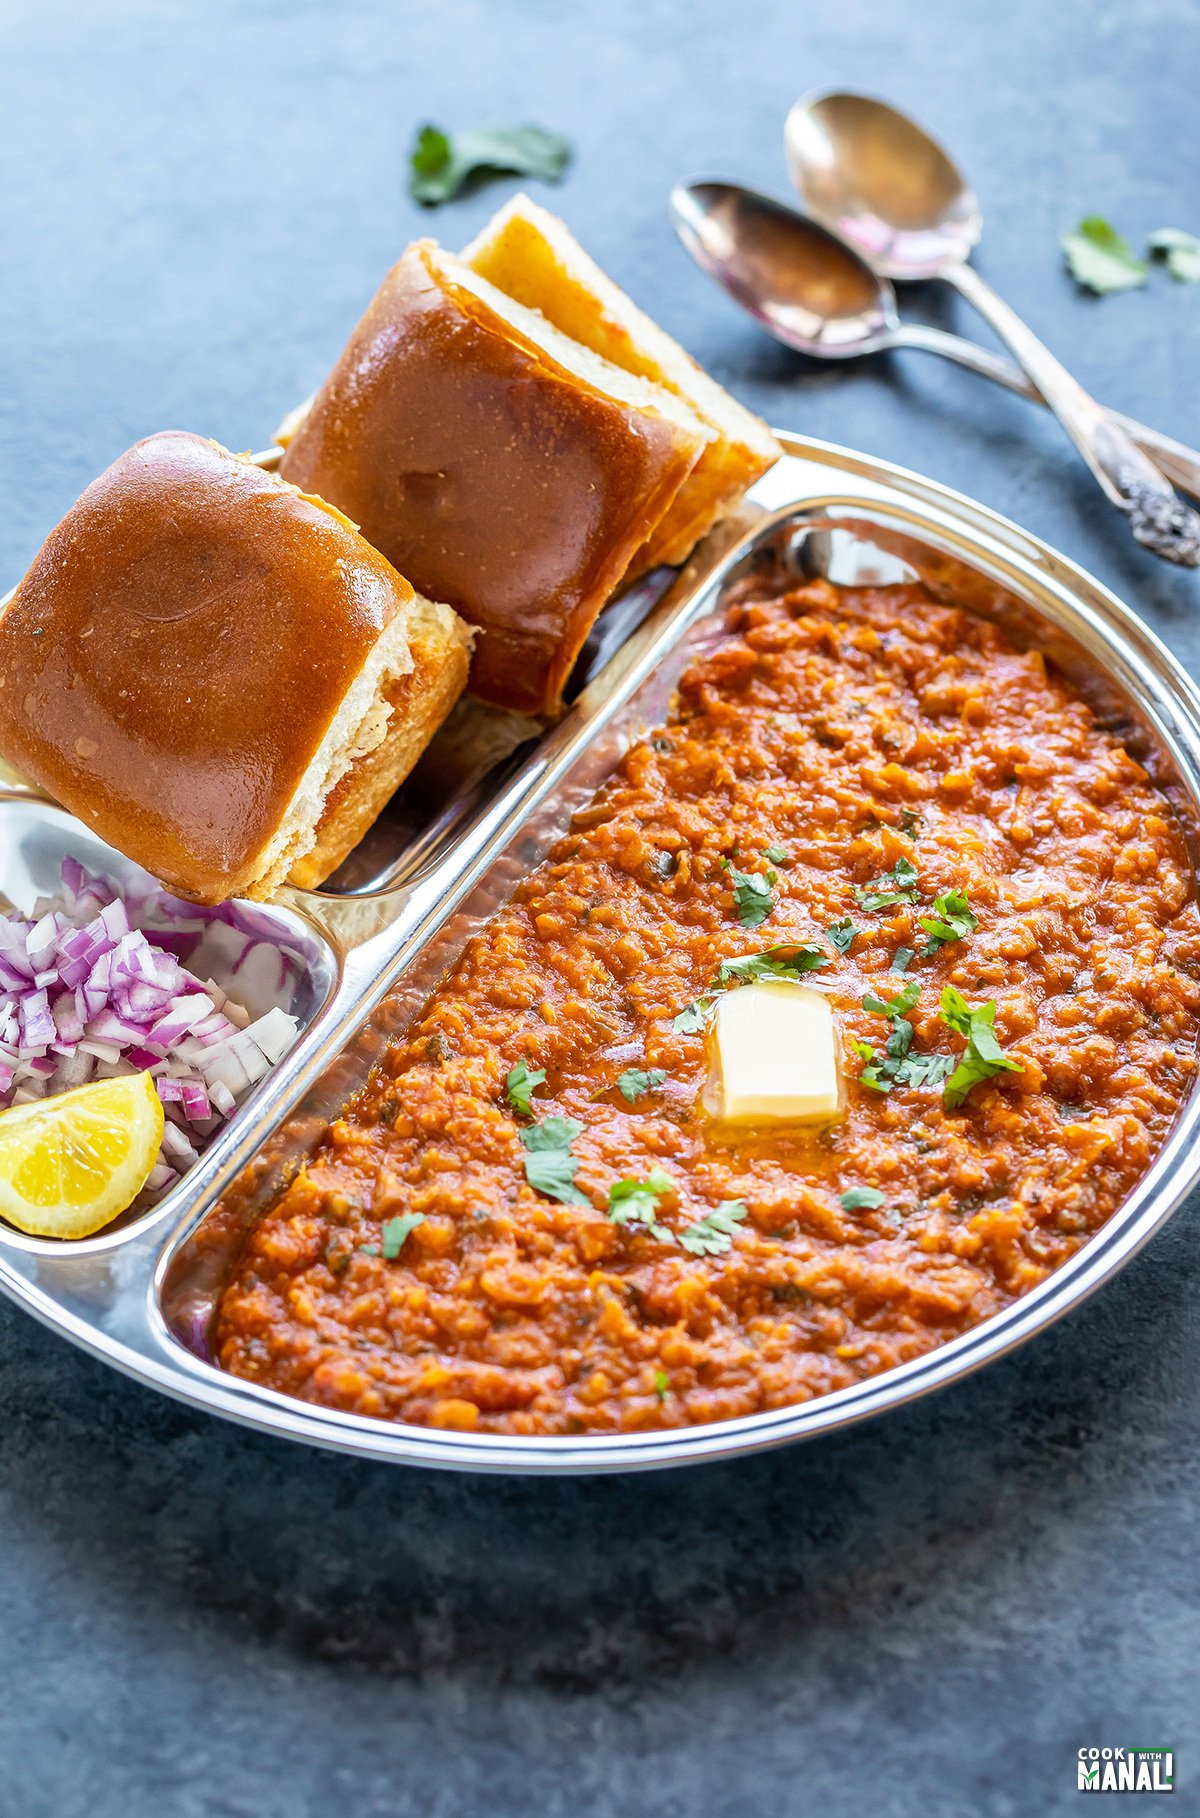
One of the most popular Indian Street Food - Pav Bhaji has a medley of spicy mashed veggies topped with lots of butter, cilantro, lemon juice and served with eggless dinner rolls!
This post may contain affiliate links. Please read our disclosure policy.
Pav Bhaji is popular Indian street food where dinner rolls/buns are served with spicy mashed veggies topped with dollop of butter. Street food doesn’t get better than this!
This Pav Bhaji Recipe is spicy, so flavorful and can be easily made vegan by replacing butter with vegan butter. If you have never had this in your life, you are seriously missing out!
Indian street food is my favorite kind of food. It’s something that I can eat everyday and still not get bored of it. EVER. I can’t handle too much spice but somehow my tolerance level magically increases when I go to India and eat from those street vendors! I really don’t know how it happens but it happens every single time especially when it comes to things like aloo tikki or samosa chaat.
Ever since I can remember, I have been a huge pav bhaji fan. You can find it pretty much everywhere in India but if you want to taste the best pav bhaji , go to Mumbai!
That’s where this dish originated from and the one at Juhu Beach is so good, trust me! I ate pav bhaji all my life but can still not forget the one I had in Mumbai. I think next time I go home, I will make a trip to Mumbai only for the food!
I have never met anyone who doesn’t like this dish and even if I meet someone who doesn’t like it, I will be very surprised. It’s soooo good and tasty, how can you not love it?
Table of contents
What is Pav Bhaji?
Pav Bhaji is popular Indian street food originating from Mumbai.
It has spicy mashed vegetables served with dinner rolls. Pav refers to the bread and bhaji means vegetables.
A special blend of spices known as pav bhaji masala is used to flavor the dish, which is finished with lots of butter and cilantro!
It came into existence in 1800s when cotton mill workers in the city had to work for long hours and would often miss their meals and remain hungry. So pav bhaji was that easy quick meal which was invented to feed these workers during those times.
There are different types of pav bhaji depending on how it’s made. There’s Jain version which is minus the onion and garlic. Then there’s Kathiyawadi Pav Bhaji which uses some local spices and is popular in the Kathiawar region in Gujarat. There’s also Khada Pav bhaji where vegetables are not mashed (khada=straight).
Ingredients
There are 2 parts to this recipe – the pav and the bhaji.
Ingredients for The Bhaji (other than basic staples like onion, tomato, ginger, garlic & green chili).
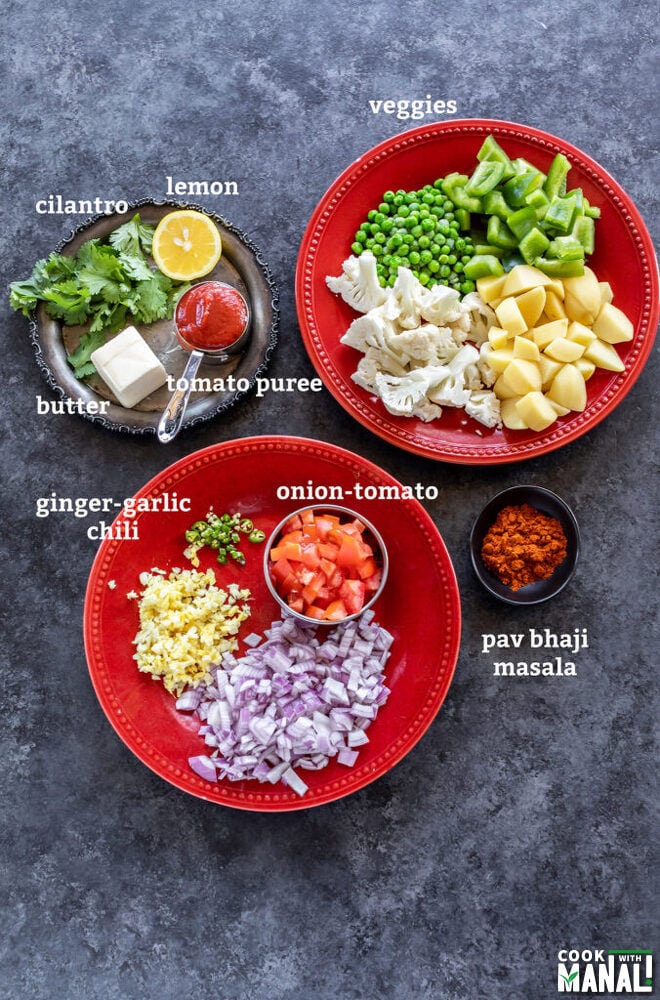

- Vegetables: bhaji is made with mixed vegetables and the most commonly used vegetables in pav bhaji are potatoes, cauliflower, green pepper, peas. Carrots, beets, beans are also commonly used.
- Pav bhaji masala: the main flavor in the bhaji comes from a special blend of spices known as pav bhaji masala. You can either get it from Indian grocery store (I like Everest) or make it at home (see recipe below).
- Kashmiri red chili powder: this is added mainly for color. Do not confuse it with regular chili powder, this one isn’t hot.
- Butter: there’s no good pav bhaji without lots of butter! I love using amul butter in my pav bhaji.
- Tomato puree: along with fresh tomatoes, I also like adding some store bought tomato puree for extra flavor. I would highly recommend not skipping it.
- Garnishes: to finish the pav bhaji, you would need a good squeeze of lemon juice and lots of cilantro.
The Pav: is basically eggless dinner rolls. You can find them at Indian grocery stores or you can also make them at home following the recipe for homemade pav. If you can’t find pav and don’t want to make them at home either, here are your options:
- Regular burger buns
- Dinner rolls
- Hawaiian dinner rolls
How to Make Pav Bhaji Masala (Homemade Pav Bhaji Masala)
You can get this masala easily at any Indian store. It’s a blend of spices like coriander, cumin seeds, fennel, cinnamon, amchur (dried mango powder) and more. I prefer Everest brand of pav bhaji masala, but you may use whatever you like!
To make pav bhaji masala, you would need:
- 4 tablespoons coriander seeds (20 grams)
- 2 tablespoon cumin seeds (18 grams)
- 5 dried red chilies (3-4 grams), adjust to taste
- 8 cloves
- 1 tablespoon fennel seeds (9 grams)
- 3 black cardamom
- 1 cinnamon stick, around 2 inches
- 1.5 teaspoon turmeric powder (6 grams)
- 2 teaspoon ground black pepper (6 grams)
- 1.5 tablespoon amchur (18 grams)
- ½ teaspoon ground ginger (1 gram)
- 2 teaspoon black salt (12 grams)
Dry roast coriander seeds, cumin seeds, dried red chilies, cloves, fennel seeds, black cardamom and cinnamon stick in a pan on medium heat until fragrant, around 3 to 4 minutes.
Let it cool and then transfer spices to a spice grinder. Stir turmeric powder, ground black pepper, amchur, ground ginger and black salt.
Grind until powdered and well combined. Store pav bhaji masala in an airtight container at room temperature and use as required. This makes around 100 grams of pav bhaji masala.
How to Make Pav Bhaji – Step by Step Instructions
1- Boil the veggies first and keep them ready.
2- Heat 1 tablespoon of butter and oil in a large pot on medium heat. Once the butter melts and oil is hot, add the cumin seeds and let them sizzle.
3- Add the chopped onions and mix. I like to use my food processor to chop them really fine.
4- Cook the onions for around 4 minutes until golden brown in color. Add the finely chopped ginger, garlic and green chili. Again, I used my food processor to chop them really fine.
Cook the ginger-garlic-green chili for 1 minute.
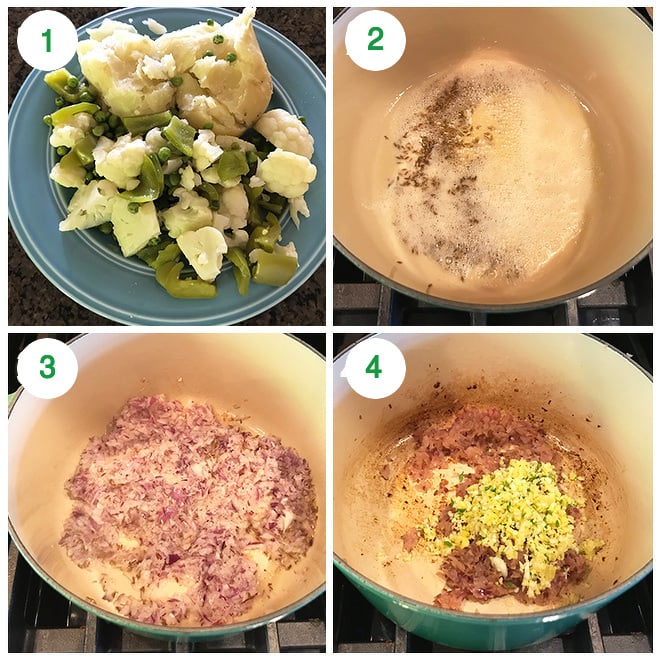

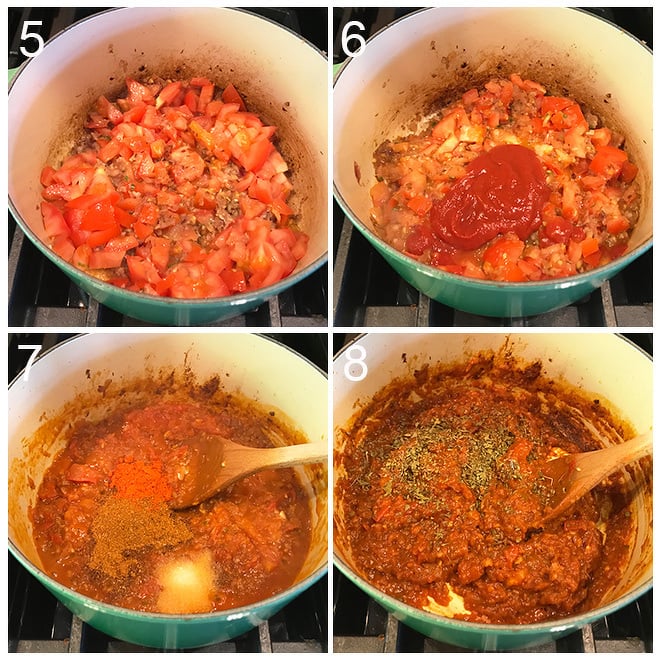
5- Add chopped tomatoes and mix well. Let the tomatoes cook for 2 minutes.
6- Add tomato puree, 1/4 cup water and 1/4 teaspoon salt. Cover the pan and let the tomato cook for 6 minutes until softened and completely cooked.
7- Add the pav bhaji masala, Kashmiri red chili powder, red chili powder and remaining 1 teaspoon of salt. You may also add 1/2 teaspoon of sugar here (optional).
8- Mix well and then add in 2 teaspoons of kasuri methi (dried fenugreek leaves).

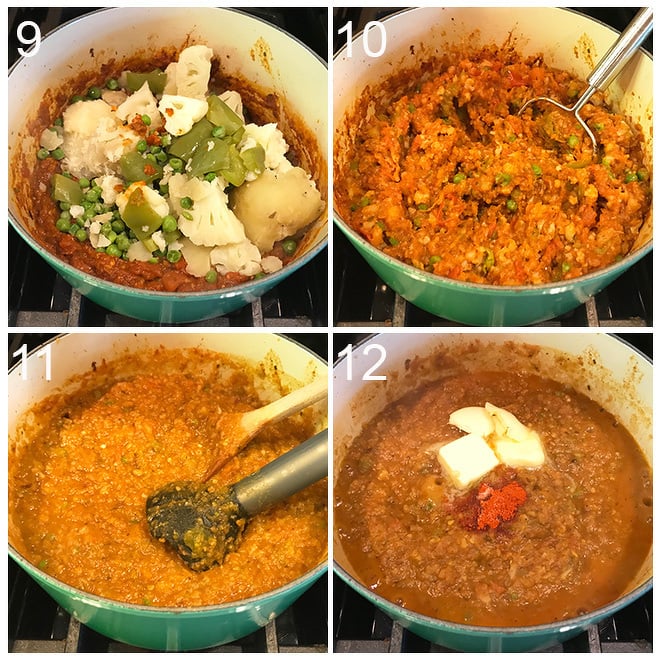
9- Stir in the boiled veggies and mix.
10- Using a potato masher, mash the veggies until they are completely mixed with the masala.
11- Add the remaining 3/4 – 1 cup water and mix. I used an immersion blender to blend the veggies to a paste like consistency, this is optional. You may keep them as such.
Cover the pot and set heat to low. Let the bhaji simmer on low heat for 15 minutes.
12- Open the pot and add in the remaining 2 tablespoons of butter.

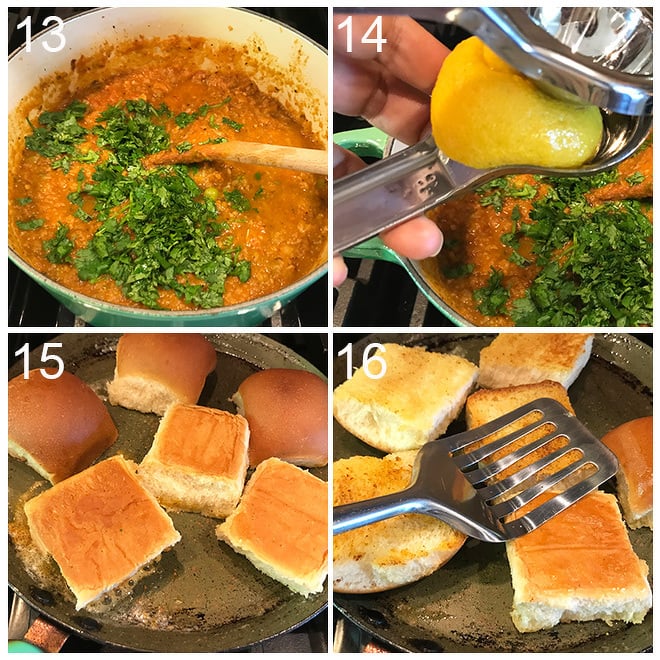
13- Add a generous amount of chopped cilantro.
14- Then add in juice of 1 large lemon. Let the bhaji simmer for 2 more minutes and then remove pan from heat.
15- To toast the pav, melt butter on a pan. Sprinkle some pav bhaji masala on top of the butter and then place the buns on the pan.
16- Press to toast the pav until crisp and golden brown from both sides.

Serving Suggestions
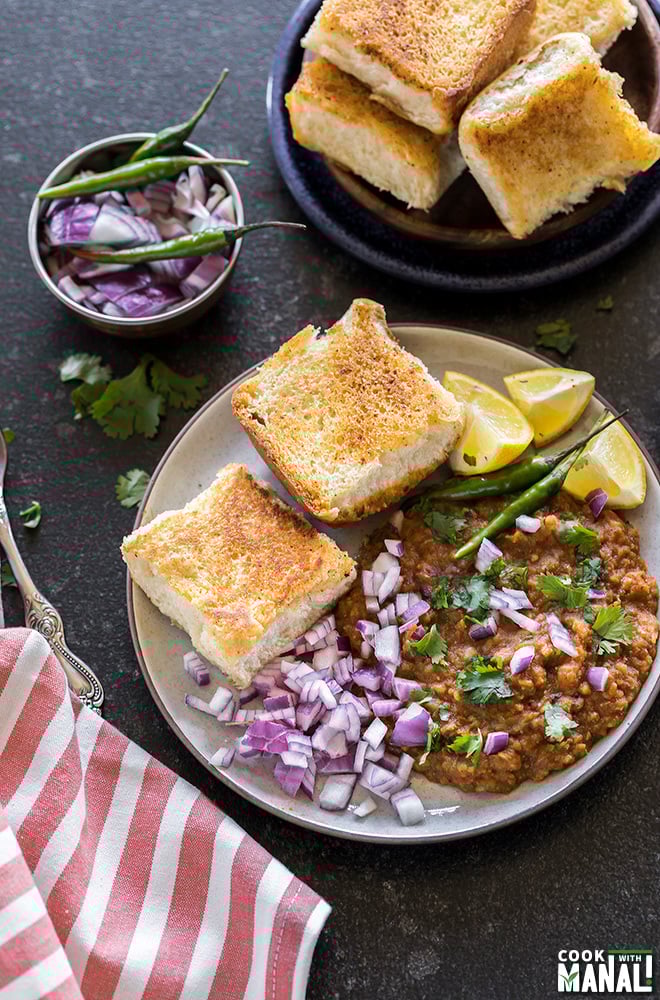
To serve the pav bhaji, place ladle full of bhaji in a plate. Top the bhaji with a dollop of Amul butter. Serve with 2 pavs and a side of chopped onions and a lemon wedge. I like to serve with lots of onions on the sides, it tastes really amazing that way!
If you are planning to serve other things alongside pav bhaji, I would recommend Tawa Pulao, Paneer Tikka, Cucumber Raita. These all will be great additions.

Tips to Make the Best Pav Bhaji
- Use lots of butter and kasuri methi! Preferably use Amul butter in your bhaji.
- A generous squeeze of lemon juice is must before serving.
- Garnish with lots of cilantro.
- Use fresh ginger and garlic, the store bought ginger-garlic paste won’t give the same flavor.
- When toasting the pav/bun, add a pinch of pav bhaji masala and kasuri methi to the butter and then toast the pav.
- Don’t forget the chopped onions while serving the pav bhaji!
Frequently Asked Questions
It is made up for a number of whole spices like coriander seeds, cumin seeds, cloves, fennel seeds mixed with ground spices like amchur (dried mango powder), turmeric, black pepper. You can easily find pav bhaji masala at Indian grocery stores but it’s also easy to make it at home.
I love Everest pav bhaji masala personally but there are several others like MDH, Badshah etc. You can use the one you like!
Yes, just replace the butter with vegan butter.
This post has been updated from the recipe archives, first published in 2014.
Pav Bhaji Recipe (Mumbai Style)

For the Bhaji
- 2 large potatoes 385 grams, boiled
- 1/2 head of a small cauliflower 215 grams, boiled
- 1/2 of a large green pepper 135 grams, boiled
- 1/2 cup frozen green peas boiled
- 1 tablespoon vegetable oil
- 3 tablespoons butter unsalted, divided
- 1 teaspoon cumin seeds
- 2 medium red onion 230 grams, finely chopped
- 2 inch ginger 24 grams, finely chopped
- 7 cloves garlic 20 grams, finely chopped
- 2 green chilies finely chopped, adjust to taste
- 3 large tomatoes 425 grams, finely chopped
- 1/3 cup tomato puree store bought
- 1.25 teaspoon salt divided
- 1.25 cups water divided
- 1 tablespoon + 1 teaspoon pav bhaji masala or to taste
- 2 teaspoons Kashmiri red chili powder not hot, used mainly for color
- 1/2 teaspoon red chili powder or to taste
- 2 teaspoons kasuri methi also known as dried fenugreek leaves
- 3 tablespoons chopped cilantro
- juice of 1 large lemon
For the Pav
- 12-14 pav eggless dinner rolls
- butter to toast the pav
- pav bhaji masala to sprinkle
Make the Bhaji
- Boil the veggies first and keep them ready. I used my pressure cooker to boil them until they were soft and tender.
- Heat 1 tablespoon of butter and 1 tablespoon of oil in a large pot on medium heat. Once the butter melts and oil is hot, add the cumin seeds and let them sizzle.
- Add the chopped onions and mix. I like to use my food processor to chop them really fine.
- Cook the onions for around 4 minutes until golden brown in color.
- Add the finely chopped ginger, garlic and green chili. Again, I used my food processor to chop them really fine. Cook the ginger-garlic-green chili for 1 minute.
- Add chopped tomatoes and mix well. Let the tomatoes cook for 2 minutes.
- Add store bought tomato puree, 1/4 cup water and 1/4 teaspoon salt. Cover the pan and let the tomato cook for 6 minutes until softened and completely cooked.
- Add the pav bhaji masala, Kashmiri red chili powder, red chili powder and remaining 1 teaspoon of salt. You may also add 1/2 teaspoon of sugar here (optional).
- Mix well and then add in 2 teaspoons of kasuri methi (dried fenugreek leaves).
- Stir in the boiled veggies and mix. Using a potato masher, mash the veggies until they are completely mixed with the masala.
- Add the remaining 3/4 – 1 cup water and mix. I used an immersion blender to blend the veggies to a paste like consistency at this point but this is optional. You may keep them as such.
- Cover the pot and set heat to low. Let the bhaji simmer on low heat for 15 minutes.
- Open the pot and add in the remaining 2 tablespoons of butter.
- Add a generous amount of chopped cilantro.
- Then add in juice of 1 large lemon. Let the bhaji simmer for 2 more minutes and then remove pan from heat.
Toast the Pav
- To toast the pav, melt butter on a pan on medium heat. Sprinkle some pav bhaji masala on top of the butter and then place the buns on the pan.
- Press to toast the pav until crisp and golden brown from both sides.
Serve the Pav Bhaji
- To serve the pav bhaji, place ladle full of bhaji in a plate. Top the bhaji with a dollop of butter. Serve with 2 pavs and a side of chopped onions and a lemon wedge.
- To make it vegan, replace butter with vegan butter.
- Use lots of butter and kasuri methi! Preferably use Amul butter in your bhaji.
- A generous squeeze of lemon juice is must before serving.
- Garnish with lots of cilantro.
- Use fresh ginger and garlic, the store bought ginger-garlic paste won’t give the same flavor.
- When toasting the pav/bun, add a pinch of pav bhaji masala and kasuri methi to the butter and then toast the pav.
- Don’t forget the chopped onions while serving the pav bhaji.
Nutrition information is automatically calculated, so should only be used as an approximation.


Dear Manali
I have been doing this recipe out of your cookbook for years now, however my instant pot always says burn and I have to add more water, ending with a very liquidy version of the meal. So I decided to try the stovetop this time instead and wowwww DELICIOUS!!!! Even my husband was impressed. Thank you so much for all the work you put into your blog and these recipes cause I use them daily in my house.
Thanks Sofia, glad you enjoyed it! Sorry about the trouble with IP, some newer IP models are prone to the burn message unfortunately. Make sure to scrape the bottom of the pot with a spatula to remove any browned bits before adding water to the IP.
Lovedd it❤️⭐
Thanks Natasha
Hi Manali.
Is crushed tomatoes same as puree tomatoes?
no store bought crushed tomatoes are not fine as the puree, they have little chunks of tomato in them. For pav bhaji use pureed tomatoes.
Tried n tasted , amazing recipe ,i hv ever tried
Hi Manali, please suggest which potato is good for pav bhaji
russet potatoes or yukon gold!
Hi Manali, I love all your recipes. I have tried several recipes and they are all fool proof. Hats off to your efforts in putting together recipes with lots of details .
Can you please recommend a good store bought tomato puree ? I tried a few brands but I always feel it has some sort of strong flavor ( may be additives??)
Thanks in advance
try muir glen
Pav bhaji is that for how many people ?
it says serves 5 in the recipe card
Absolutely adored it! Huge thanks, Manali. Your recipes truly ignite creativity and are incredibly effortless to whip up.
Thank you for sharing this amazing recipe. Much appreciated!!! Everyone enjoyed!
so glad to hear Anu! Thanks for trying!
clear set of instructions made recipe sooo easy to cook. Thanks for sharing.
I revisit this recipe again and again–it’s the best!! Thank you for sharing.
glad to hear!
How long do you cook the veggies in the instant pot? Thank you so much!
around 7-8 minutes will work. I am Instant Pot Pav bhaji recipe in my cookbook
Loved it. Thank you Manali. Your recipes are so inspiring and easy to make.
Thanks Sunaya! glad you liked it
Thank you so much for this ❤️
Pav bhaji is love and I have never ever tried making this myself. Thank you so much for the steps and guide for us to try out this delicious recipe. I will try making it and I know my kids will surely love it.
Thank you for this great recipe! We really enjoyed this.
Hi Manali,
What pressure cooking time would you recommend for an Instant Pot to boil the veggies? Love all your recipes so far.
Thank you,
Gurpreet
8 minutes high pressure with natural release. I have a IP pav bhaji recipe in my cookbook
Thanks! This was great. My son just discovered Pav bhaji and wants it all the time.
I eye balled the amount of masala, veges etc- deseeded a jalapeño and added it to the veges.Otherwise pretty much followed the recipe procedure!!
Thank you for your pav bhaji recipe. I enjoyed it immensely. I prepared the meal without onions and garlic. I did not stick to the veggies in mentione in the recipe. Is pav bhaji unique in using only certain types of veggies?
Yes potatoes are the main vegetable used in pav bhaji, and cauliflower, peppers, beans, carrots are also often used. Some people also use beetroot for color.
I really want to make this but their is only one of me!! Is this freezable??
you can, don’t add the butter in that case. add later
Thanks! I do this in instant pot! use fenugreek powder and amchur powder! jaggery instead of sugar!
potato, tomato cauliflower, green chillies, ginger, garlic!
masala I use less res chillies- 5 will make my family fly!!
but great weekend one of recipe!
We live in UK but children love it!
Thank you so much MANALI
Pav bhaji is all time favorite for me and my family. but its a common problem that we can not maintain the same taste every time we cook it at home. but the way you have set an procedure step by step in your blog i hope i can achieve the consistency of same taste every time.
thanx again.
Awsome ……tried it many times and it comes out very tasty ….
Sorry forgot to rate
Thank you for your pav bhaji recipe.
I loved cooking it and family loved consuming it.
Please let me know where can I follow and find your recipes.
They were very easy to follow.
Look forward to your reply.
just keeping coming to my blog 🙂 I post 2-3 new recipes every week!
Very nice and easy method will try definitely thanks for putting your precious time and sharing take care and be safe
Very tasty pao bhaji
I made it, and oh my god so good! I tried chopping the onions in the food processor but it became an onion paste, but it still worked. Thanks for the recipe.
just pulse in bursts to chop the onions!
Delicious! The little details of the recipe are very useful. Had never got a pav bhaji masala this good before.
Awesome absolutely ?
Hey, Thank you for giving us this recipes. Me and my friend having a sleepover. That day we decided to cook pav bhaji. Thanks for your recipe we made most delicious pav bhaji. Had Blast! Thanks Keep Providing Us Such Wonderful recipes in future.
Delicious flavours! One of the best pav bhaji recipes out there up to me and my very indian husband. Haha I added 1 tsp amchur powder to give it a little more tanginess to our preferred taste the second time I made it and it turned out perfect to our liking. Thanks for this amazing recipe ! 🙂
One of my fav food it is..
After having looking to your recipe.. will try yours as well as it seems more tastier…
I absolutely loved your Pau bhaji! My husband said it tastes just like from the restaurant. If I am serving around 10 people, do I just double all the ingredients?
yes you may..be careful about doubling the pav bhaji masala. you can always add more later
Hi manali,
I always made pav bhaji according to your receipe. Everyone appreciate my pav bhaji.
Really thanks to you.Pl keep posting other street food receipe,it helps me lot.
Thanks
Luv u
You are welcome Rakhi! 🙂 Please let me know what kind of street food recipes you would like to see and I will try and post them!
I had pav Bhagwan in Mumbai this year for the first time. I have never before enjoyed anything so much. Thank you for this recipe I have yet to try it but I will very soon.
Hope you give this a try!
The receipe is awesome i’ll definetly gonna try this, thank you for sharing the receipe.. keep sharing like this…
Welcome Pooja!
Hi I tried so many recipe and it was ok.this time my husband really liked it.he wants to give you 6 stars.thanks for sharing.
haha I will take the 6 stars 🙂 Thank you Sejal!
Very nice. Came out awesome.
glad to hear that
Loved the receipe , made multiple times exact receipe and the receive always appreciation
Thank you!
Manali, Tried this today and was a big hit with my family. Thanks for the wonderful recipe.
Welcome Mala! 🙂 Glad you all enjoyed!
I’ve tried making pavbhagi so many times in so many different ways using different recipes…failing every time . For the first time in years, my family actually loved it and even took seconds! Thanks so much! Great recipe!!
you are welcome! so glad you all enjoyed it! 🙂
Hi Manali.. i prepared ur pavbhaji… awesome… My husband , me and 5yr old son had so many pav bz of ur tastiest bhaji recipe.. I loved it… Thank you so much…
You are welcome Nimi!! So happy you all enjoyed it!
Pav Bhaji is my all time favorite. I cannot wait to try it, thanks for sharing such an easy recipe.
Hey my bro, nice to talk to you and just want to the recipe was just mind blowing and the thing I liked the most was the was that you have showed everything step by step and just wanted to say this much.. bye, keep it up and remember that you have a bright future..??
Thanks but I am a girl 🙂
Manali I am from mumbai and after trying so many recipes and different brands of pav bhaji masala I was still looking for a good homemade masala recipe. I tried it today and your recipe turned out amazing. Thanks a lot for sharing this with us.
I would take that as a compliment coming from a Mumbaikar! 🙂 Welcome Shweta, I am so glad you enjoyed it!
this recipe is awesome. I like this pav bhaji recipe.
The first blog that catches my eye is the mouth melting Pav Bhaji. You have shared the methods very wisely with each and every detail on photos.