The post Deprecation of Splunk On-Call Phone Notifications to China (+86) appeared first on Knowledge Base.
]]>As you may know, we are all experiencing increased restrictions and regulations between the U.S. and China. As a company, Splunk has decided to no longer provide voice call notifications to responders in the +86 country code (China), effective September 29th, 2023.
In response, affected end-users are encouraged to configure personal paging policies to diversify their Splunk On-Call notification methods (i.e., SMS, Push, and Email notification methods). Please note that the Splunk On-Call product continues to be supported globally, and all functionality will be available to customers with responders outside of the +86 country code (China). Again, please be advised that we will be deprecating Splunk On-Call voice call notification service for +86 country code (China) effective on September 29th, 2023. We sincerely apologize for any inconvenience this may cause.
The post Deprecation of Splunk On-Call Phone Notifications to China (+86) appeared first on Knowledge Base.
]]>The post Big Panda Integration Guide appeared first on Knowledge Base.
]]>- Any level Splunk On-Call Account and Global or Alert Admin permissions
- Ability to create Big Panda Notification Webhooks
In Splunk On-Call
To start, navigate to the integrations tab in On-Call and select the Big Panda Integration. Next click “Enable Integration” and a new REST endpoint will be generated for your org.
In Big Panda
Follow this guide to create a notification webhook for the alert you’d like to send to On-Call in Big Panda: https://docs.bigpanda.io/reference/webhook
When you get to the point where you need to put in an endpoint that Big Panda will send the payload to, put in the endpoint from the On-Call Big Panda integration page with your desired routing_key filled in.
Once this is saved you should now receive incidents in On-Call from the webhook notification that was just configured in Big Panda!
The post Big Panda Integration Guide appeared first on Knowledge Base.
]]>The post How to Contact Splunk On-Call Support appeared first on Knowledge Base.
]]>There are three different ways to contact Splunk On-Call (formerly VictorOps) Support:
- Live Chat: If you are logged into your Splunk On-Call instance, you have the ability to Live Chat with the Splunk On-Call Support team via our in-product chat feature. This is the fastest, easiest way to reach Splunk On-Call Support. A Live Chat with a Technical Support Engineer will also open an On-Call Support case.
- Splunk Support Portal: If you have the correct permissions (an “entitlement”) you may open a Splunk On-Call support case in the Splunk Support Portal: https://login.splunk.com/ This path requires that you log into the Splunk Support Portal, which is a different login than the Splunk On-Call product login. If this is the first time you’ve accessed the portal, please follow the directions outlined below.
- Call Center: If you don’t have access to your On-Call instance or the Support Portal, please call our hotline to be routed to On-Call Support. This path will require you to specify that your question is for the Splunk On-Call product.
HOW TO CREATE A SPLUNK SUPPORT PORTAL LOGIN: When accessing the Splunk Support Portal for the first time, you will need to create a new Splunk login. It’s an easy process, and you can take that action now:
- Visit the Splunk Support Portal
- Select “sign up”
- Fill out the form on the far right under “Create Your Splunk Account”
CREATING A SUPPORT CASE IN THE SUPPORT PORTAL: You must log in to the Splunk Support Portal to create a Splunk On-Call Support Case.
FAQ
-
How do I create an account for the Splunk Support Portal?
- To create a Splunk Support Portal account, visit the “Create Account” link on the log-in page. Fill out the form in the far right corner and make sure to sign up with your company email.
-
I created a Splunk Support Portal but I do not have an option to open a case
- If you do not have an option to open a case in the support portal, please reach out via Live Chat in the Splunk On-Call portal. If you don’t have access to your On-Call instance, please call our hotline to be routed to On-Call Support.
-
I already have a Splunk Support Portal login and have the entitlements to open cases with Splunk Support. Will these entitlements carry over to Splunk On-Call support cases?
- Splunk On-Call support will not require entitlements to open a support case with Splunk On-Call support. However, access to open a ticket via the Support Portal does need to be granted in order to see the option to open a ticket with Splunk On-Call support.
- If you do not automatically see the option to open a support ticket with Splunk On-Call support within the Support Portal, please reach out via live chat in the Splunk On-Call platform. Please use the same email to live chat that you used to log into the Support Portal.
-
I already have a Splunk Support Portal login but I do not have entitlements, do I need entitlements to open a case with Splunk On-Call support?
- Splunk On-Call support will not require entitlements to open a support case with Splunk On-Call support. However, access to open a ticket does need to be granted in order to see the option to open a ticket with Splunk On-Call support.
- If you do not automatically see the option to open a support ticket with Splunk On-Call support within the Support Portal, please reach out live chat. Please use the same email to live chat that you used to log into the Support Portal.
-
I have a Splunk Core/Cloud login, is the Splunk Support Portal the same login information?
- No. The Splunk product logins are different than the Splunk Support Portal logins.
-
I have a Splunk Core/Cloud login that utilizes SSO, does the Splunk Support Portal use SSO?
- No. The Splunk product logins are different than the Splunk Support Portal logins. The Splunk Support Portal does not utilize SSO login.
The post How to Contact Splunk On-Call Support appeared first on Knowledge Base.
]]>The post Webex Teams Integration Guide appeared first on Knowledge Base.
]]>- Enterprise level Splunk On-Call Account and Global or Alert Admin permissions
- Webex Teams Account and Moderator permissions
In Webex Teams
To start, navigate to the Incoming Webhooks app on the Webex App Hub and click the green Connect button. Authenticate as required, then click Accept.
Occasionally, this opens a new Webex tab that spins incessantly. Disregard this, navigate back to the Incoming Webhooks app tab, and refresh. The green Connect button should be replaced with a Disconnect button and towards the bottom of the screen, you’ll be prompted to provide a Webhook name and to select a Space for the webhook.
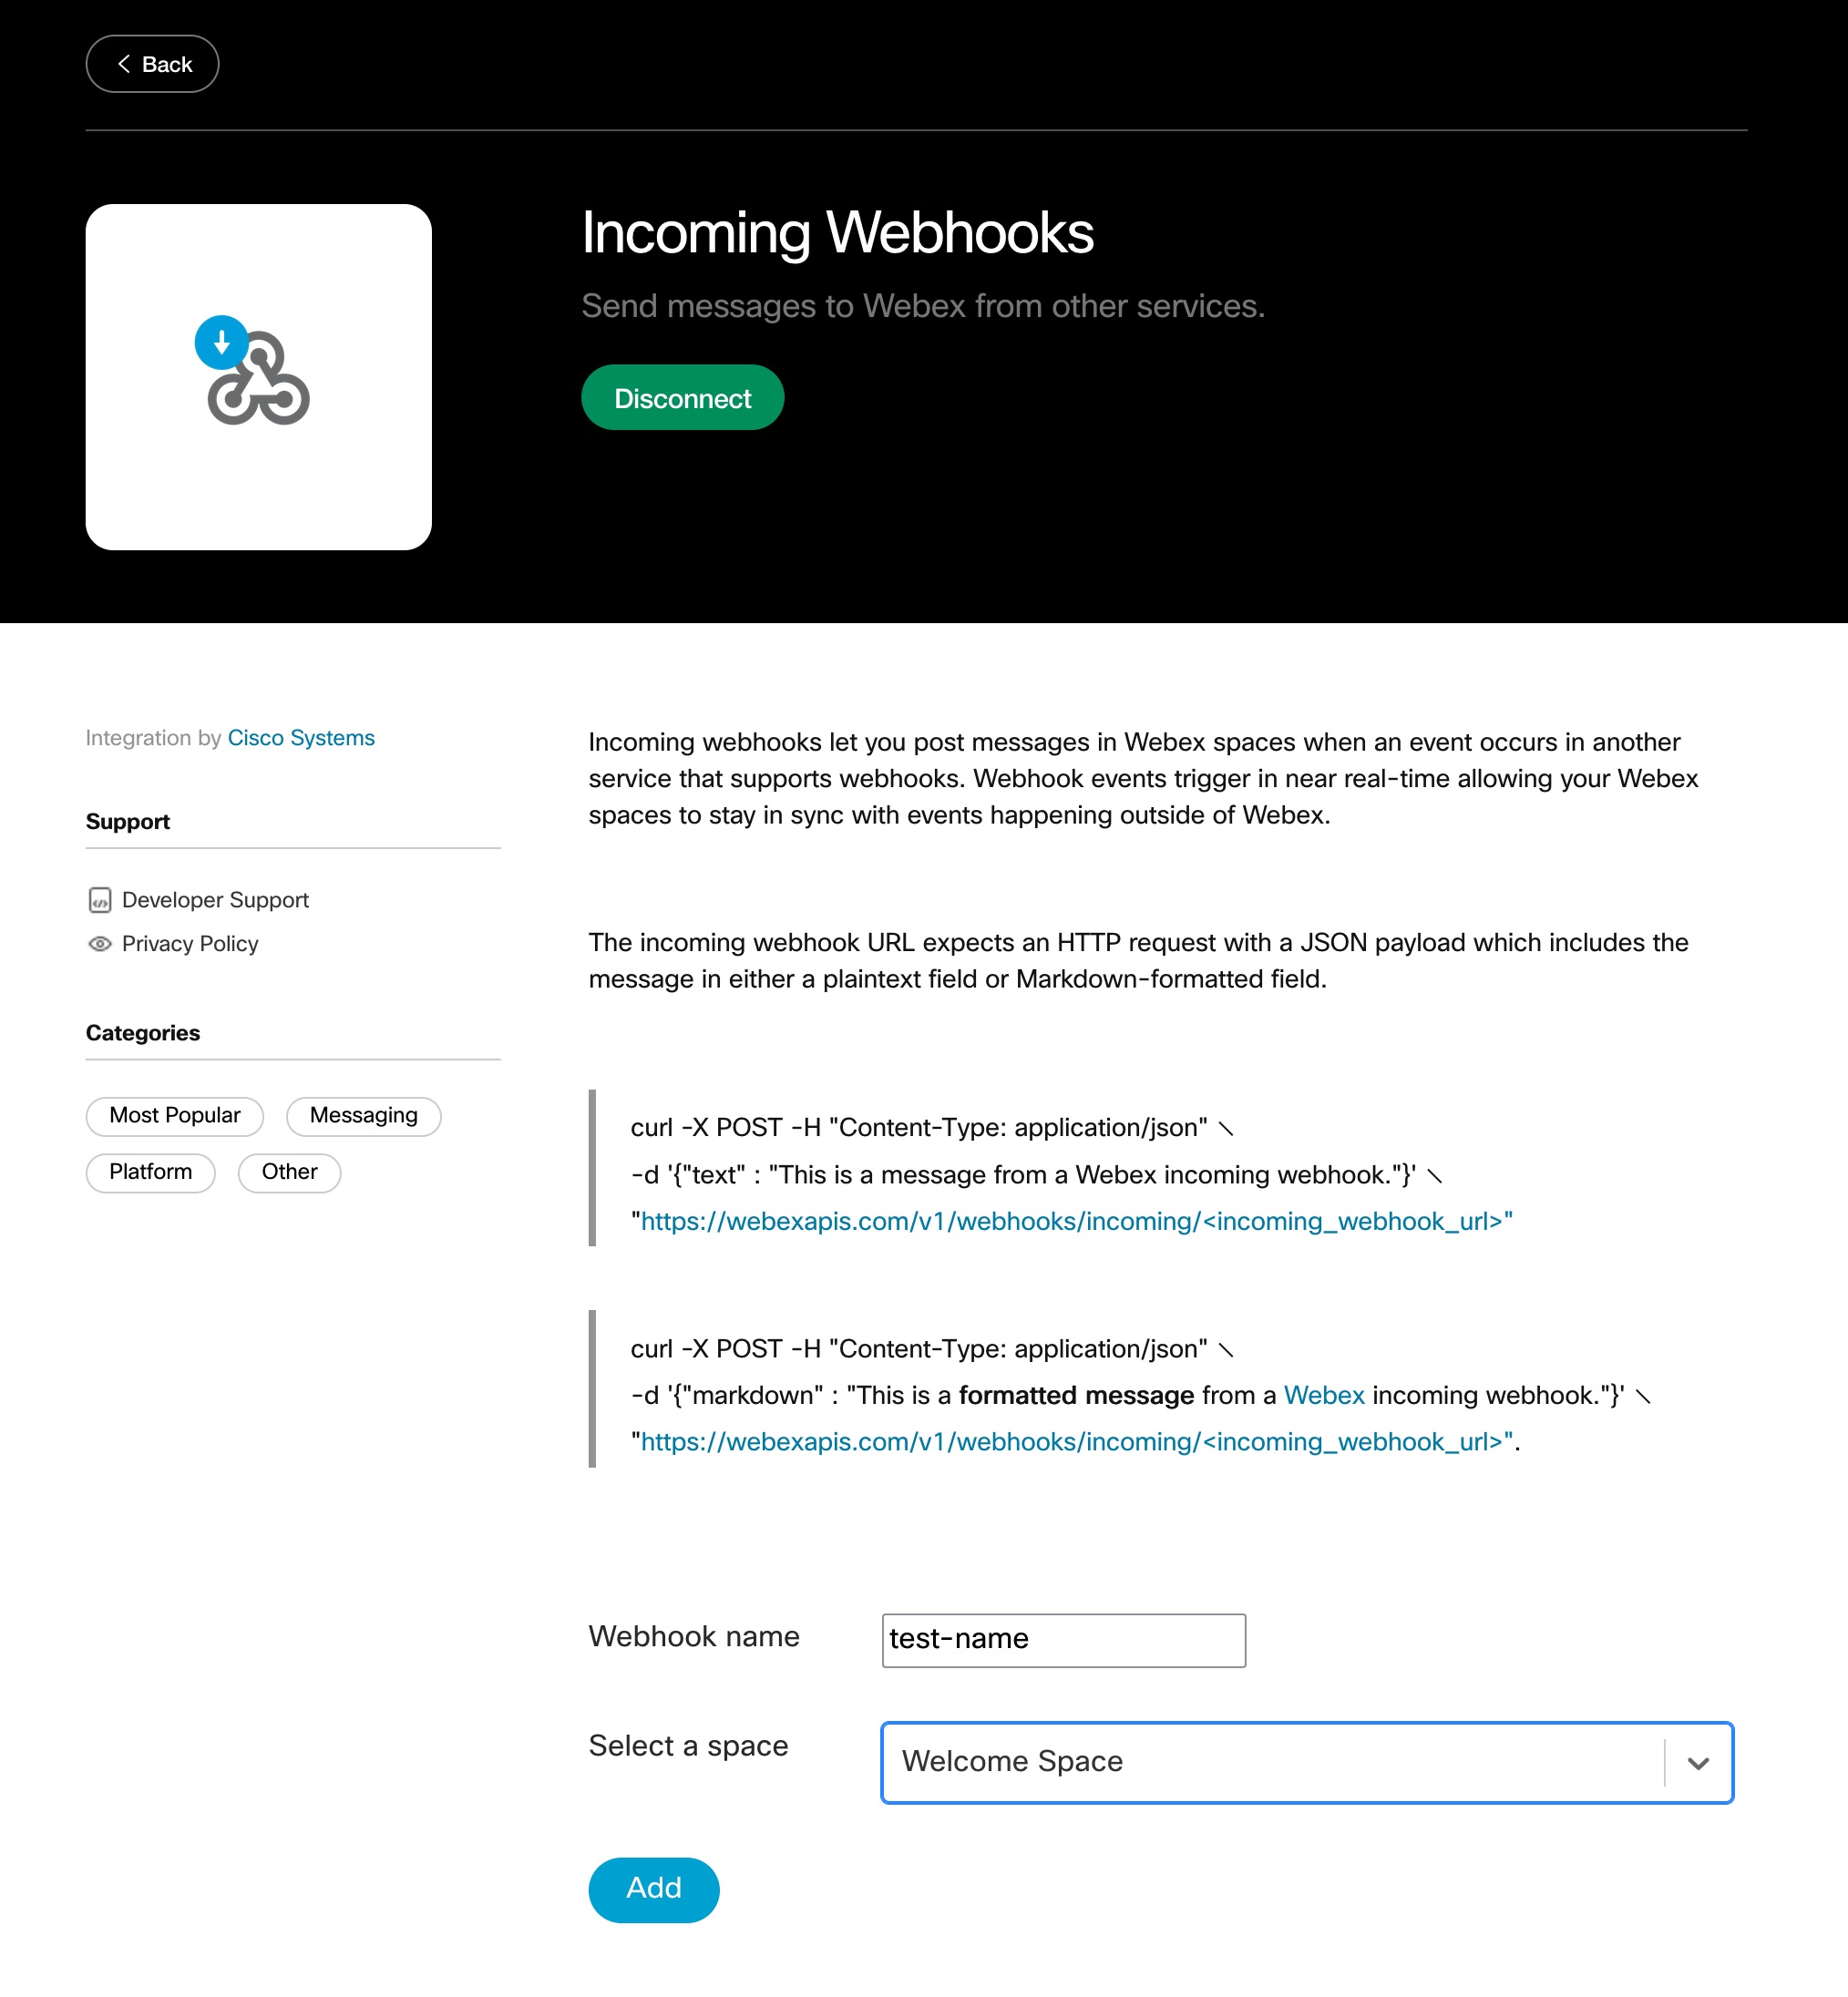
After providing these, click the Add button and copy the Webhook URL to your clipboard.
In Splunk On-Call
Navigate to Integrations >> Outgoing Webhooks and click the blue Add Webhook button to create a new one.
Below are our suggested values for the webhook:
Event: Incident-Triggered
Method: POST
Content Type: application/json
Custom Headers: none
To: <your Webhook URL copied from Webex>
Payload:
{
"markdown": "${{ALERT.entity_display_name}}<br>${{ALERT.state_message}}"
}
Lastly, click Save. An Outgoing Webhook will now be sent to your Webex Teams space when an incident is triggered in Splunk On-Call.
[Optional] Only send a notification to Webex for alerts directed to a specific routing key
With some configuration adjustments, it’s possible to reduce the scope of the Outgoing Webhook so that it only successfully posts a message in Webex Teams when your specified routing key is present in the Splunk On-Call incident.
To start, navigate back to the Outgoing Webhook you created under Integrations >> Outgoing Webhooks and edit the webhook. Navigate to the To field and highlight the portion following
https://webexapis.com/v1/webhooks/incoming/
It should be a random string looking something like Y2lzY29zcGFyazovL3VybjpURUFNOnVzLXdlc3QtMl9yL1dFQkhPT0svNTZhZDEzZmMtNWQyNi00YTA3LWI5OTgtNjJiNmQwZTc2NWNm.
Copy this random string to your clipboard and replace it with ${{ALERT.webexteams-field}}. The full URL should now look like
https://webexapis.com/v1/webhooks/incoming/${{ALERT.webexteams-field}}
Save your changes.
Next, navigate to the Alert Rules Engine under Settings >> Alert Rules Engine and click the blue Add Rule button.
In the top line, specify the routing_key you’d like to have trigger the message in Webex Teams. Next, skip down to the Transform these alert fields section and set the webexteams-field to the portion of the URL you copied earlier. The resulting rule should look similar to the below screenshot.
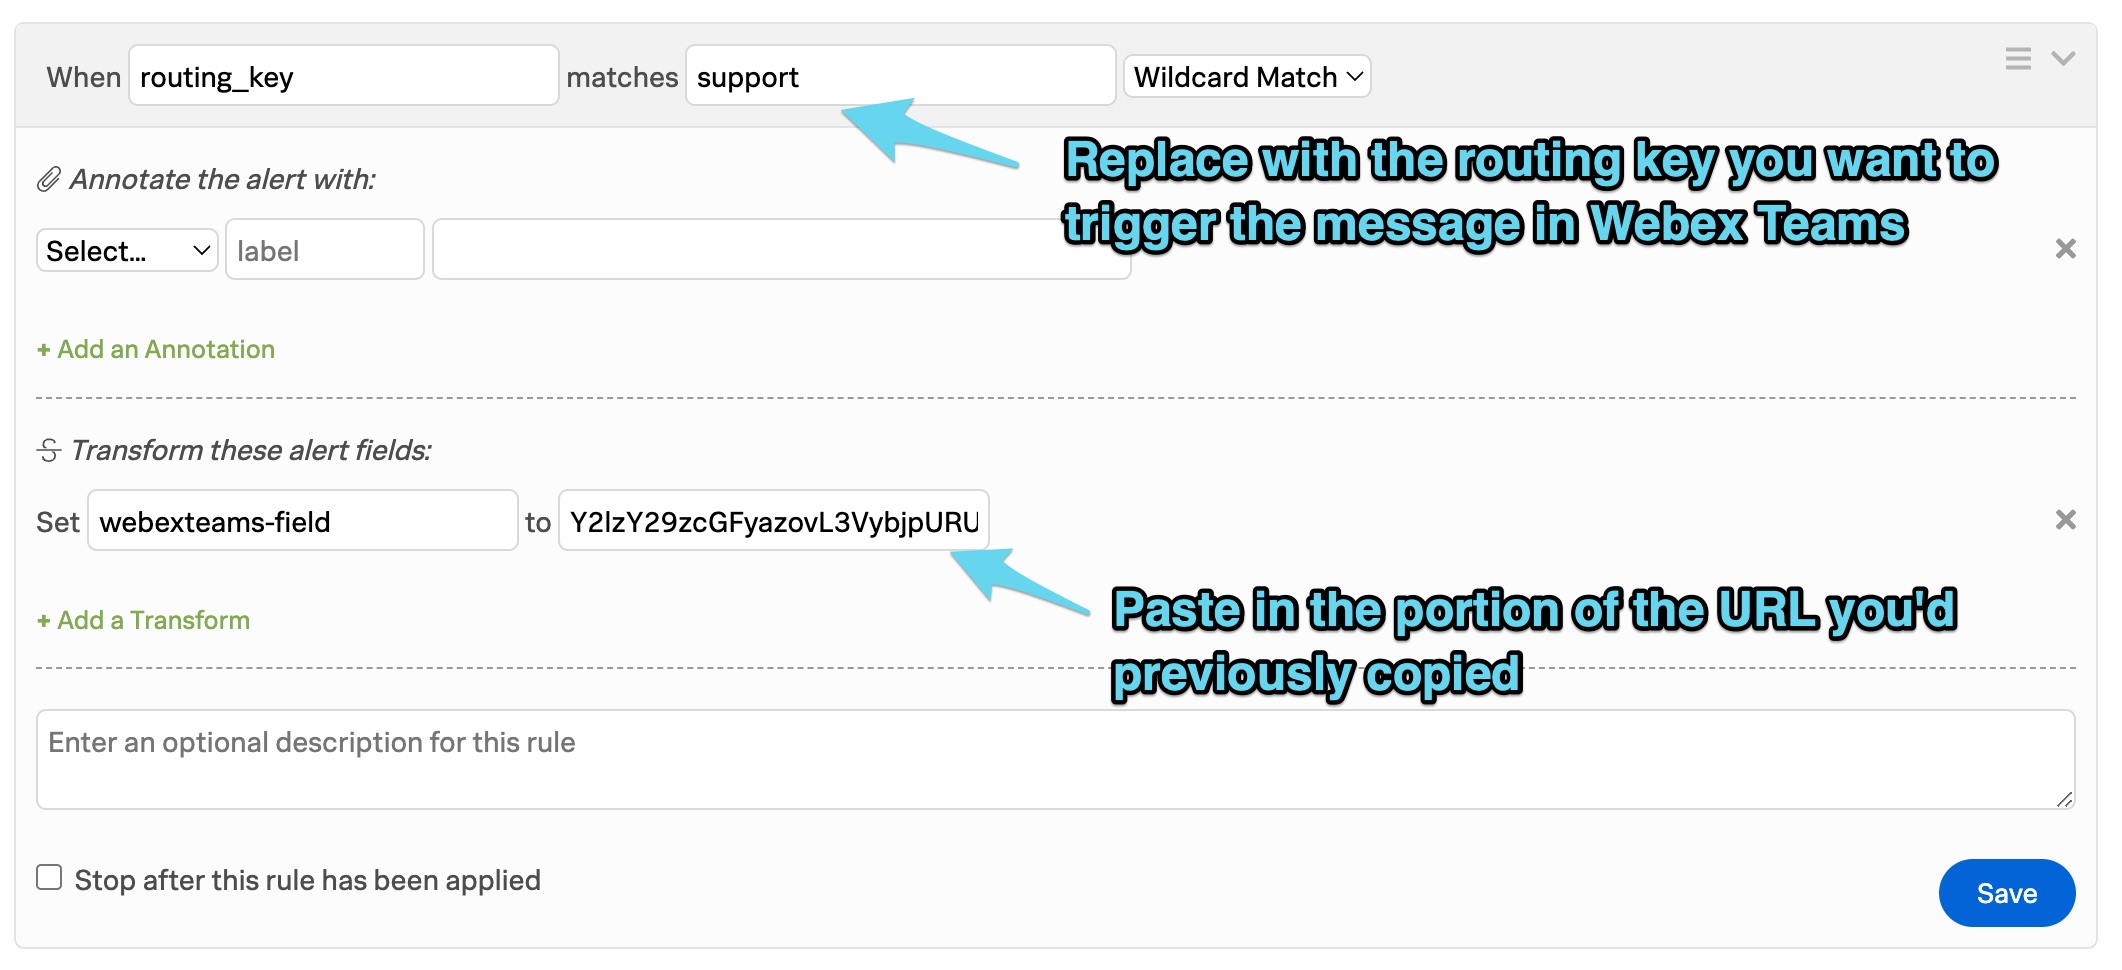
Click the blue Save button to save the rule. This optional configuration is now complete.
When the routing key you’ve specified is present on an alert, this alert rule will apply and create a field called webexteams-field with a value of the URL portion you pasted in. This webexteams-field value is then dynamically pulled in on the Outgoing Webhook, completing the URL and giving it a valid destination to send to. For all alerts that don’t contain this routing key, the webhook will be attempted and will fail as it will be directed to a URL of literally https://webexapis.com/v1/webhooks/incoming/${{ALERT.webexteams-field}}.
[Optional] Segment notifications to different Webex Teams spaces based on the routing key of the alert
This largely builds off of the previous “[Optional] Only send a notification to Webex for alerts directed to a specific routing key” section. This takes it a step further and walks through the creation of multiple Incoming Webhooks in Webex Teams that direct to different spaces.
To start, navigate back to the Incoming Webhooks page on the Webex App Hub. Provide a new webhook name, specify the space you want this to sent to, and click Add. Copy the resulting Webhook URL to your clipboard.
You can now scroll back up to the In Splunk On-Call section and resume following the instructions from there. You will complete both that and the [Optional] Only send a notification to Webex for alerts directed to a specific routing key section again, specifying the different routing key you’d like to send your Webex Space. Repeat these steps as necessary for all of the routing keys and spaces you’d like to integrate with.
The post Webex Teams Integration Guide appeared first on Knowledge Base.
]]>The post Auto-Pause & High Alert Lag appeared first on Knowledge Base.
]]>Auto-Pause is an On-Call security event that occurs when your On-Call instance has reached a total of 5,000 or more active incidents, defined as incidents that are in a Triggered or Acknowledged state. When Auto-Pause is triggered, all alert processing is halted and we begin to queue all incoming alerts to the instance. Alert Lag may soon follow due to this backlog. If your instance exceeds the 5,000 active incident threshold and Auto-Pause is triggered, communication with On-Call Support will be required to re-enable your account.
What is High Alert Lag?
High Alert Lag occurs when alerts are sent from a monitoring tool to your On-Call instance at a rate faster than our system can process them. This can happen without an organization being paused and can be caused by alerts that don’t create incidents, like a mass of INFO or RESOLVED alerts. Our alert processing limit is 150 alerts per minute (2 alerts per second).
What Causes Auto-Pause and Alert Lag?
Both Auto-Pause and Alert Lag are often a symptom of a repeating loop sending alerts from the monitoring tool upstream of Splunk On-Call, and we ask for you to investigate that tool as a potential cause of the issue. Auto-Pause specifically can also be triggered because too many alerts have piled up without being resolved, independent of an alert storm. Following best practices for incident management can help you avoid reaching these states.
Best Practices:
- Hygiene!
- Practice the art of taking action on your incidents and Resolving them as soon as possible.
- Perform periodic checks of active (Triggered or Acknowledged) incidents in the Timeline’s incident pane, which allows you to take action on individual incidents or resolve/acknowledge them all at once.
- Settings!
- If maintaining old incidents manually is not realistic for your organization, it might be useful to enable the Global Auto-Resolve feature on your instance. This will allow you to set active incidents to resolve after a specified period of time.
- If you have many alerts coming in that don’t necessarily need to page anyone, you can use the Alert Rules Engine to transform them into INFO alerts, which will appear on the timeline for tracking but not trigger an incident.
- Configuration!
- Get into the practice of sending system RESOLVE messages from your monitoring tools, in addition to the messages that create incidents. You can link these alerts by making sure they have an equivalent entity_id.
- Configuring your tools to make sure alerts for a single related event are associated will not only help with tracking but can also be extremely helpful in protecting you from Auto-Pause in the midst of an alert storm. This is done by leveraging our alert aggregation functionality to reduce the number of active incidents in an organization, which will use the entity_id field to allow for related alerts to roll up under an initial triggered incident, rather than creating new ones for each message.
- If setting entity_id in your monitoring tool is not an option, you can also leverage the Alert Rules Engine to manually set this field by matching on another related condition, specific to the incidents you want to aggregate.
- While alert aggregation can prevent you from Auto-Pause, it won’t prevent you from Alert Lag. Even a single incident can cause this state if many alerts are being aggregated under it. If possible, audit your monitoring tools to limit alerting to less than 150 messages per minute.
How to Get Out Of Auto-Pause
As soon as your organization reaches a state of Auto-Pause, you’ll receive an email from the Splunk On-Call Support team letting you know about the event. If you’ve been contacted about this, it is likely because you are a Global Admin of the respective instance, a Team Admin of the team with most of the incidents coming in, or are currently on-call.
The first step for you will be to identify the reason for the high amount of active incidents and resolve it. After that, all or most of the active incidents will need to be resolved within the organization, which can be done by either the Support team or on your own. Once we can confirm that an alert storm is no longer occurring, and all active incidents are resolved, there are two options to re-enable alerting:
- We can drop the queue of alerts waiting to be processed and unpause the instance. This is our recommendation but will result in missed alerts.
- We can unpause the instance and process alerts that have been queued up. This will allow them to go into your timeline, but will likely cause alert lag and another auto-pause event quickly, due to the sheer volume of potential alerts.
After deciding which option will be right for your organization, please let the Support Engineer that contacted you know what you’d like to do. They will take the appropriate actions (clear backlog with permission, resolve all incidents with permission, etc.), and notify you when your alerting has been re-enabled.
The post Auto-Pause & High Alert Lag appeared first on Knowledge Base.
]]>The post IMPORTANT – HOW TO CONTACT SPLUNK ON-CALL SUPPORT appeared first on Knowledge Base.
]]>Thank you for being a valued Splunk customer. We are excited to share some enhancements to the Support Experience.
The Splunk On-Call (formerly VictorOps) Support contact page is moving to join the Splunk Support Portal. You’ll receive the same world-class support from your Splunk On-Call Support Engineers.
PLEASE NOTE: This migration will NOT affect your login and access to your Splunk On-Call (formerly VictorOps) instance. On November 11th, end-users may contact Splunk On-Call Support via the following methods:
1. Live Chat: If you are logged into your Splunk On-Call instance, you will have the ability to Live Chat with the Splunk On-Call Support team.
2. Splunk Support Portal: You can open a Splunk On-Call support case in the Splunk Support Portal:https://login.splunk.com/
IMPORTANT CHANGES:
1. CREATE A SPLUNK LOGIN: When accessing Splunk Support Portal for the first time, you will need to create a new Splunk login. It’s an easy process, and you can take that action now:
- Visit the Splunk Support Portal
- Select “sign up”
- Fill out the form on the far right under “Create Your Splunk Account”
- CREATING A CASE: Starting on November 11th, you must log in to the Splunk Support Portal to create a Splunk On-Call Support Case. You may also chat with Support from the new chat widget within our product. Live Chat with a Technical Support Engineer will open an On-Call Support case.
- If you email Splunk On-Call Support after this change, you will receive an automated email pointing you towards the Splunk Support portal.
FAQ
-
When are these changes going live?
- November 11th, 2021 is when the changes will take place. On November 11th, in order to open a support ticket, the user will need to live chat in from the On-Call product or open a ticket in the Splunk Support Portal. Until November 11th, please still email spoc-support@splunk.com to open a support ticket with Splunk On-Call support.
-
How do I create an account for the Splunk Support Portal?
- To create a Splunk Support Portal account, visit the “Create Account” link on the log-in page. Fill out the form on the far right corner and make sure to sign up with your company email.
-
I created a Splunk Support Portal but I do not have an option to open a case
- If after November 11th you do not have an option to open a case in the support portal, please reach out via Live Chat in the Splunk On-Call portal. If you don’t have access to your On-Call instance, please call our hotline to be routed to On-Call Support.
- Please make sure the email you use to live chat with Splunk On-Call support is the same as the email you used to sign up for the Splunk Support Portal.
-
Will I still be able to live chat with Splunk On-Call Support?
- Yes! Live chat is available in the Splunk On-Call portal. There will no longer be the Intercom bubble but there will be a slightly different chat widget in the bottom right corner of your On-Call instance.
-
I already have a Splunk Support Portal login and have the entitlements to open cases with Splunk Support. Will these entitlements carry over to Splunk On-Call support cases?
- Splunk On-Call support will not require entitlements to open a support case with Splunk On-Call support. However, access to open a ticket via the Support Portal does need to be granted in order to see the option to open a ticket with Splunk On-Call support.
- If you do not automatically see the option to open a support ticket with Splunk On-Call support within the Support Portal, please reach out via live chat in the Splunk On-Call platform. Please use the same email to live chat that you used to log into the Support Portal.
-
I already have a Splunk Support Portal login but I do not have entitlements, do I need entitlements to open a case with Splunk On-Call support?
- Splunk On-Call support will not require entitlements to open a support case with Splunk On-Call support. However, access to open a ticket does need to be granted in order to see the option to open a ticket with Splunk On-Call support.
- If you do not automatically see the option to open a support ticket with Splunk On-Call support within the Support Portal, please reach out live chat. Please use the same email to live chat that you used to log into the Support Portal.
-
I have a Splunk Core/Cloud login, is the Splunk Support Portal the same login information?
- No. The Splunk product logins are different than the Splunk Support Portal logins.
-
I have a Splunk Core/Cloud login that utilizes SSO, does the Splunk Support Portal use SSO?
- No. The Splunk product logins are different than the Splunk Support Portal logins. The Splunk Support Portal does not utilize SSO login.
The post IMPORTANT – HOW TO CONTACT SPLUNK ON-CALL SUPPORT appeared first on Knowledge Base.
]]>The post Rapid7 Integration Guide appeared first on Knowledge Base.
]]>Splunk On-Call Version Required: Starter, Growth, or Enterprise
Rapid7 is here to help you reduce risk across your entire connected environment so your company can focus on what matters most. Whether you need to easily manage vulnerabilities, monitor for malicious behavior, investigate and shut down attacks, or automate your operations — Rapid7 has solutions and guidance for you.
In Splunk On-Call
From the main timeline select Integrations >> 3rd Party Integrations >> Rapid7
If the integration has not yet been enabled, click the “Enable Integration” button. Copy the “URL to notify” to your clipboard.
Once you have copied the URL to notify to your clipboard, click on Settings >> Routing Keys page to find your routing key configuration. Decide which routing_key will be used with this integration and make sure it is associated to the correct escalation policy/policies. For more information on routing keys or instructions on creating a new one, please see this article.
In Rapid7
Configuring the Data Exporter
- From your dashboard, select Data Collection on the left hand menu.
- When the Data Collection page appears, click the Setup Event Source dropdown and choose Add Event Source.
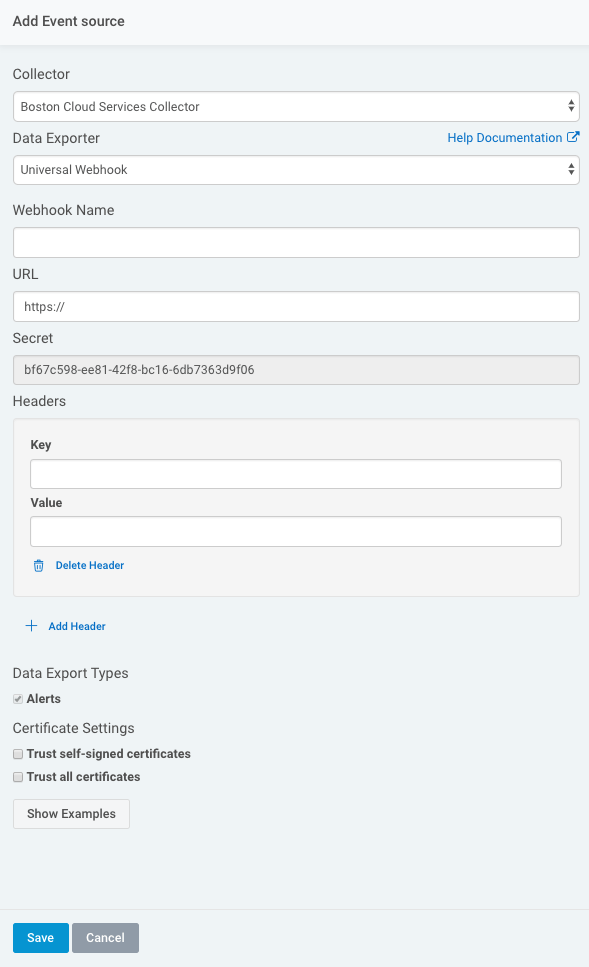
- From the “Security Data” section, click the Data Exporter icon. The “Add Event Source” panel appears.
- Choose your collector and event source. You can also name your event source if you want.
- Provide the URL that you previously copied from Splunk On-Call. For security reasons, Rapid7 recommends using HTTPS as the protocol whenever possible.
- If the secret is not already provided, enter in the “Secret” field.
- Optionally choose to export asset-specific Alerts from InsightIDR by checking the Alerts box.
- Optionally choose to trust all certificates and/or self-signed certificates by checking the appropriate boxes.
- Click Save.
The Data Exporter is now configured and will send two types of messages. The first is a test event to confirm the URL is working. This message will be sent whenever the webhook data exporter is started or if the configuration is changed. The second type is an idr_alert event. This type of message will be sent whenever an alert triggers in InsightIDR and contains information about the alert in the event. More details about each type of event can be found in Rapid7’s documentation here.
The post Rapid7 Integration Guide appeared first on Knowledge Base.
]]>The post Protected: Scout APM Integration Guide – DRAFT appeared first on Knowledge Base.
]]>This content is password protected. To view it please enter your password below:
The post Protected: Scout APM Integration Guide – DRAFT appeared first on Knowledge Base.
]]>The post Splunk Synthetic Monitoring Integration Guide appeared first on Knowledge Base.
]]>You must be an administrator in Splunk Synthetic Monitoring and a Global or Alert Admin in Splunk On-Call to establish this integration.
In Splunk On-Call
In Splunk On-Call, select Integrations >> Splunk Synthetic Monitoring
If the integration has not yet been enabled, click the “Enable Integration” button to generate your endpoint URL. Copy this URL to your clipboard.
In Splunk Synthetic Monitoring (Rigor)
From the Rigor Monitoring web portal, select the 3 dot menu next to your profile icon in the upper righthand corner and select Alert Webhooks.
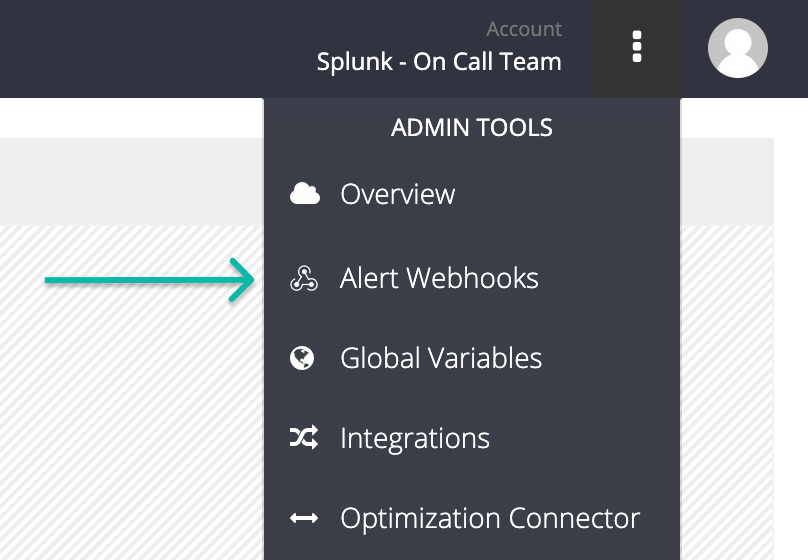
Click the + New button to create a new webhook and select Splunk On-Call as the type.
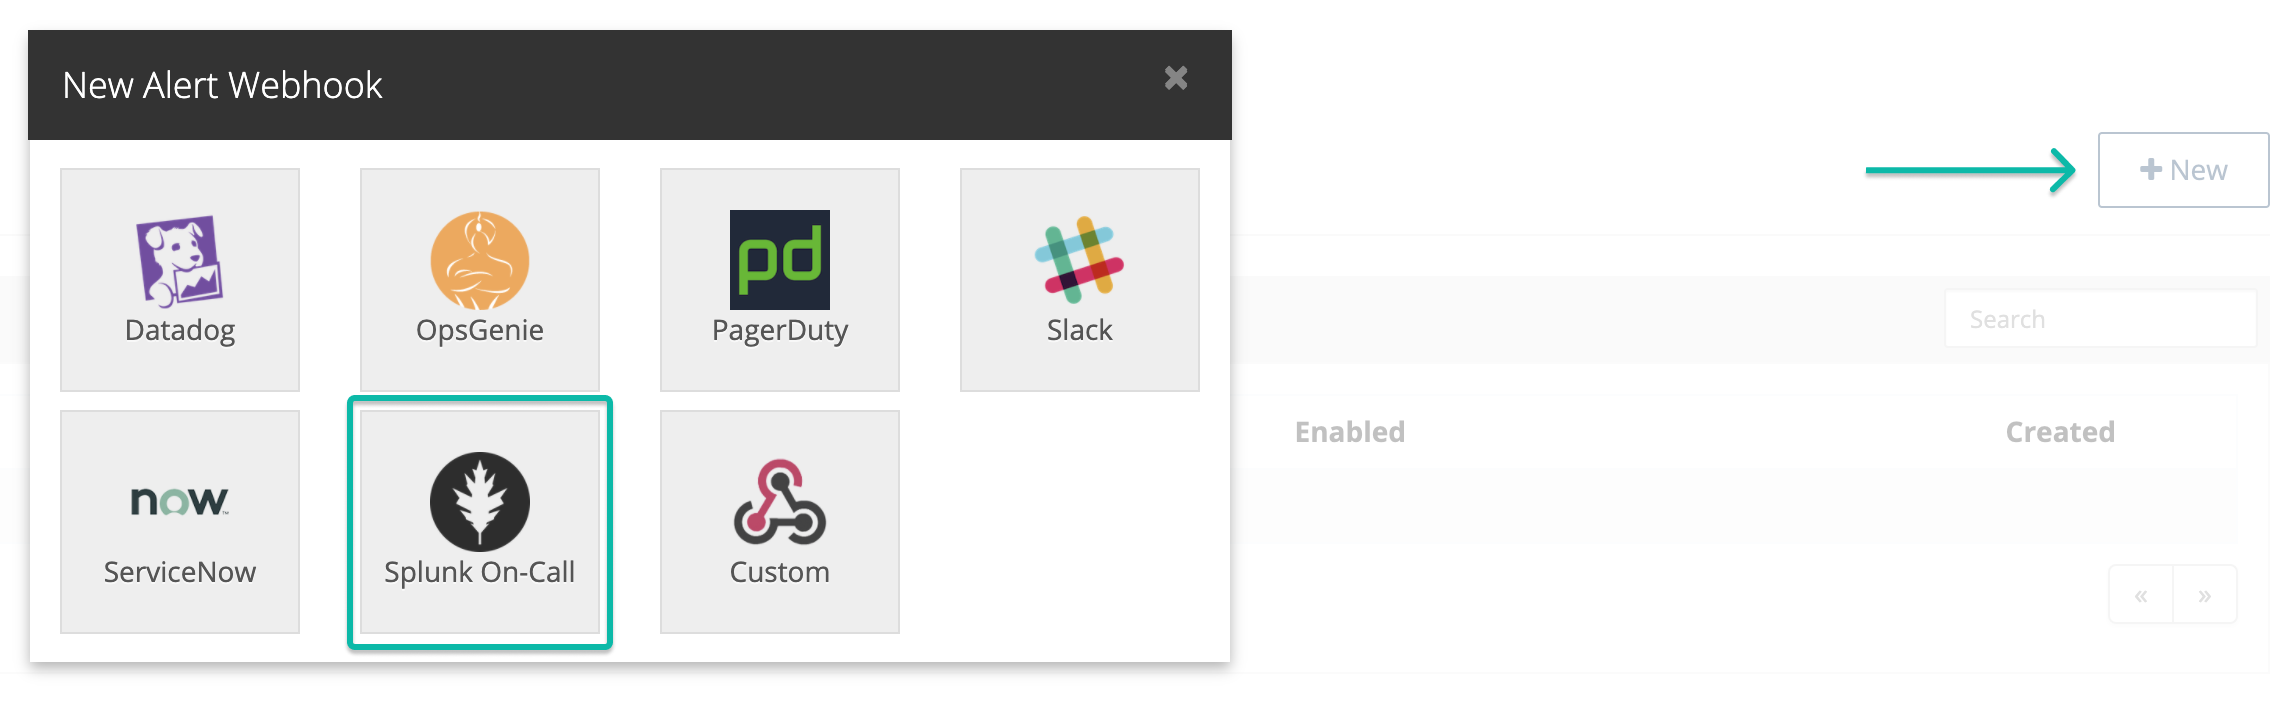
Give the webhook a name and specify your trigger or triggers. In the “send request to” box for each trigger, replace the default https://alert.victorops.com/integrations/<<YOUR_VICTOROPS_REST_ENDPOINT>> with the URL you’d previously copied.
On each trigger, also replace the trailing $routing_key value with the Splunk On-Call routing key you’d like this webhook to hit. For more information on routing keys, see this article.
You’re welcome to leave the payloads at their default values, or if you find it more appropriate, replace the default variables with ones more catered towards your use case.
Once finished, click the Test button to test the integration out. This will send and alert with your specified payloads into the Splunk On-Call timeline.
Lastly, hit the Create button at the bottom of the screen to save your Alert Webhook. Splunk Synthetic Monitoring will now send a notification to Splunk On-Call whenever the trigger conditions are met.
The post Splunk Synthetic Monitoring Integration Guide appeared first on Knowledge Base.
]]>The post Twilio SMS Integration Guide appeared first on Knowledge Base.
]]>In Splunk On-Call
Navigate to the Integrations Tab and under 3rd Party Integrations enable the Twilio Integration. Copy the API key to your clipboard for late.
Next, click on the API tab and make sure the API ID and KEY have been enabled.
In Twilio
First, you will need to purchase a Twilio phone number.
Once a number has been purchased in Twilio, the next step is to set up the SMS function.
Under Functions > Functions (Classic) > List, click “Add a New Function”. Name the Function Splunk-On-Call-SMS and name the path SpOC-SMS.
Under Configuration, the Event should be “Incoming Messages” and the code should be pasted from below:
NOTE: next to got.post be sure to replace the {VICTOROPS_TWILIO_SERVICE_API_KEY}/${ROUTING_KEY}
const qs = require('qs');
const got = require('got');
const _ = require('lodash');


exports.handler = function(context, event, callback) {
const {ROUTING_KEY, VICTOROPS_TWILIO_SERVICE_API_KEY} = context;
console.log(`${ROUTING_KEY} ${VICTOROPS_TWILIO_SERVICE_API_KEY}`);

var got = require('got');

let twiml = new Twilio.twiml.MessagingResponse();
twiml.message({ to: event.From }, 'Incident Created');

var alert = {
monitoring_tool: 'Twilio',
message_type: 'critical',
entity_display_name: `${event.Body}`,
state_message: `From ${event.From} -- ${event.Body}`,
entity_id: `${event.From}`
};

console.log(alert);

got.post(`https://alert.victorops.com/integrations/generic/20131114/alert/${VICTOROPS_TWILIO_SERVICE_API_KEY}/${ROUTING_KEY}`, {
body: alert,
headers: {
'accept': 'application/json',
'Content-Type': 'application/json'
},
json: true
}).then(function(response) {
console.log(response.body);
callback(null, twiml);

}).catch(function(error) {
console.log(error);
callback(error);
});
};
Save the Function.
Next, under Functions > Functions (Classic) > Configure check the box to Enable ACCOUNT_SID and AUTH_TOKEN. Then set up the Environment Variable and Dependencies.
NOTE: if you already have Live Call Routing set up with Environment Variables and Dependencies skip this step and keep your current configuration.
Environment Variables:
| VICTOROPS_API_ID | ******** |
| VICTOROPS_API_KEY | ********* |
| VICTOROPS_TWILIO_SERVICE_API_KEY | **************** |
Dependencies:
| xmldom | 0.1.27 |
| lodash | 4.17.10 |
| fs | 0.0.1-security |
| twilio | 3.6.3 |
| got | 9.6.0 |
| util | 0.11.0 |
Save the configuration.
Next, set up your phone number to be able to receive SMS messages. Under Messages, under Configure with select “Webhooks, TwiML, …”, under A message comes in select “Function”, under Service select”default”, and under Function Path select “/SpOC-SMS”.
Save the properties.
Test by sending an SMS to your Twilio phone number. Make sure whoever might get paged for the test is aware they will receive a test Splunk On-Call incident.
The post Twilio SMS Integration Guide appeared first on Knowledge Base.
]]>