Want to learn more about GitHub Copilot?
Explore our Docs >
The post Completing urgent fixes anywhere with GitHub Copilot coding agent and mobile appeared first on The GitHub Blog.
]]>In a video game, a single upgrade enhances your abilities, while combining multiple can create an unstoppable power-up. In the world of software development, this combined power does something similar: At GitHub, we believe it can empower developers with an incredible force to tackle any challenge, whether that’s fixing a critical bug, adding a new feature, or shipping your release to production.
My recent quest
“Stay a while and listen,” as the old Diablo line goes.
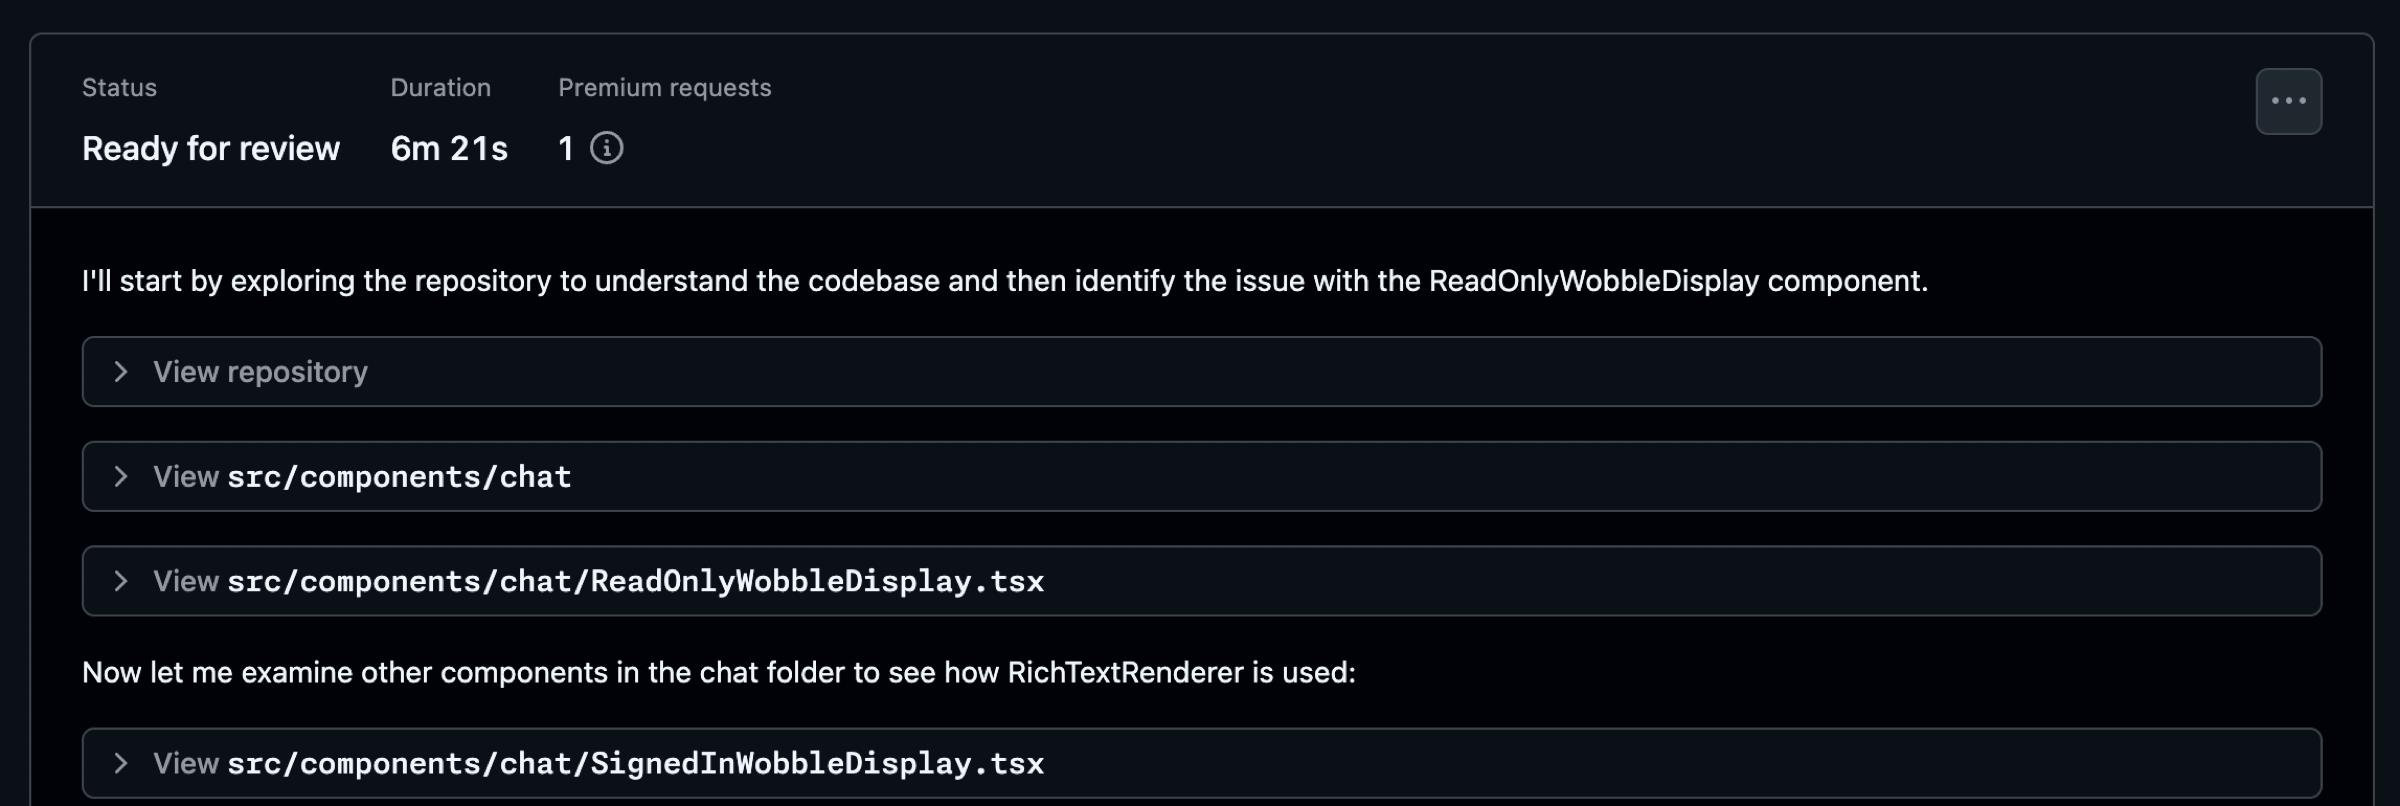
One morning, while on a walk, I received an urgent call. A critical feature on a website I collaborate on was displaying errors. This happened just before a high-visibility demo. I was miles from my laptop, and a traditional fix seemed hours away. That would be far too late to address this immediate need. Rolling back wasn’t an option, as it would remove functionality vital for the presentation.
The only tool I had available was my cell phone. Instead of rushing home, I realized I could leverage two powerful GitHub features: GitHub Copilot coding agent and the GitHub Mobile app. I could quickly create an issue on mobile and delegate the problem to Copilot, in order to expedite a resolution.
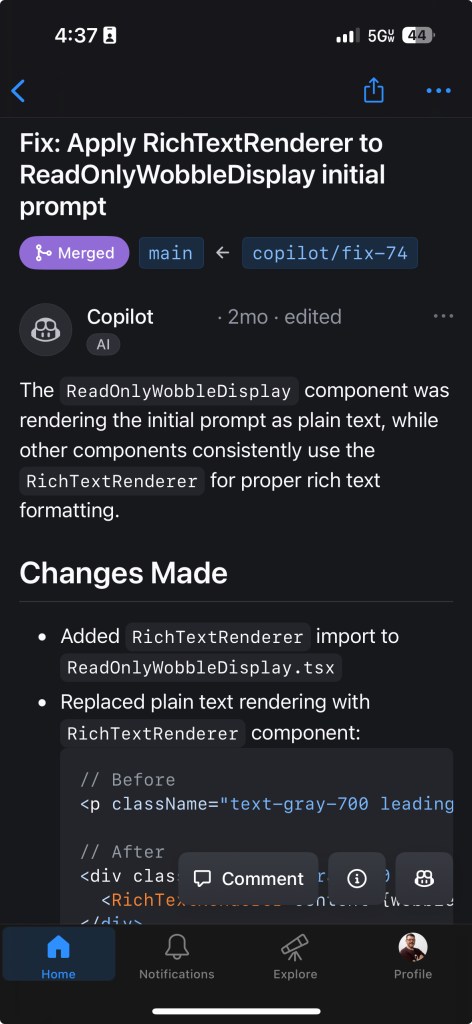
From GitHub Mobile, I scanned recent pull requests and identified a likely culprit: a pull request that added markdown rendering and a rich text editor. I created a new issue, describing the problem and referencing the suspicious pull requests, while also relying on my repository’s copilot-instructions to help guide the agent. With a few taps, I assigned the issue to GitHub Copilot coding agent.
Just six minutes later, a notification appeared on GitHub Mobile. GitHub Copilot had generated a pull request with a fix! I reviewed it immediately from my phone. It was a clear, simple solution to the problem. Leveraging existing workflows, I could even test the fix on a preview branch right from my mobile device.
Satisfied, I approved the pull request, which was deployed to production through automated workflows managed with GitHub Actions in my repository. By the time I reached my car, the director confirmed the issue was resolved, and they were ready to proceed with their demo.
This experience, all managed from my phone, revealed a powerful capability within the GitHub Platform. Combining these two features—GitHub Copilot coding agent and GitHub Mobile—unlocked a new ability for me, and prompted me to explore what other combinations within the platform could further power-up my work.
Here is a view from my phone using the GitHub Mobile app after reviewing the pull request and approving. We see a summary of Copilot’s fixes for the issue.
Using the right tool at the right time
It’s important to clarify that I’m not suggesting you delegate all development to Copilot from your mobile device, nor that every fix can be approved instantly from your phone. However, my experience highlights a crucial point: having the right tools for the right situation makes all the difference. GitHub Copilot as an AI pair programmer is a game-changer. By incorporating GitHub Copilot coding agent and GitHub Mobile into my workflow, alongside existing features like GitHub Issues and GitHub Actions, I’ve discovered a new level of efficiency. Here’s how you can gain this same power-up.
Keys to unlock this power-up
Key 1: Leverage instructions files
There is a plethora of knowledge available on how you can effectively use GitHub Copilot. One area you’ll certainly come across is custom instructions for GitHub Copilot. These instructions are the guidelines and rules that can influence the results you get from Copilot. A well-defined set of instructions can go a long way.
In my scenario, I used repository custom instructions to give Copilot additional context for understanding important information about my repository. This included the core purpose of the repository, the tech stack used, architecture constraints, coding standards, testing strategy, dependency management, observability, documentation, error handling, and more. It’s important to define the things that are important for GitHub Copilot to have and to understand about your project.
For me, identifying things like directory structure, coding standards, and project dependencies were important for identifying a fix with less churn. Custom instructions are written using markdown and including them provide specific guidance to GitHub Copilot Coding Agent, Copilot Chat, and Copilot code review. It’s important to note that instructions in this file apply to all chat requests for the repository. This file exists in the .github directory in your repository right off of the root level.
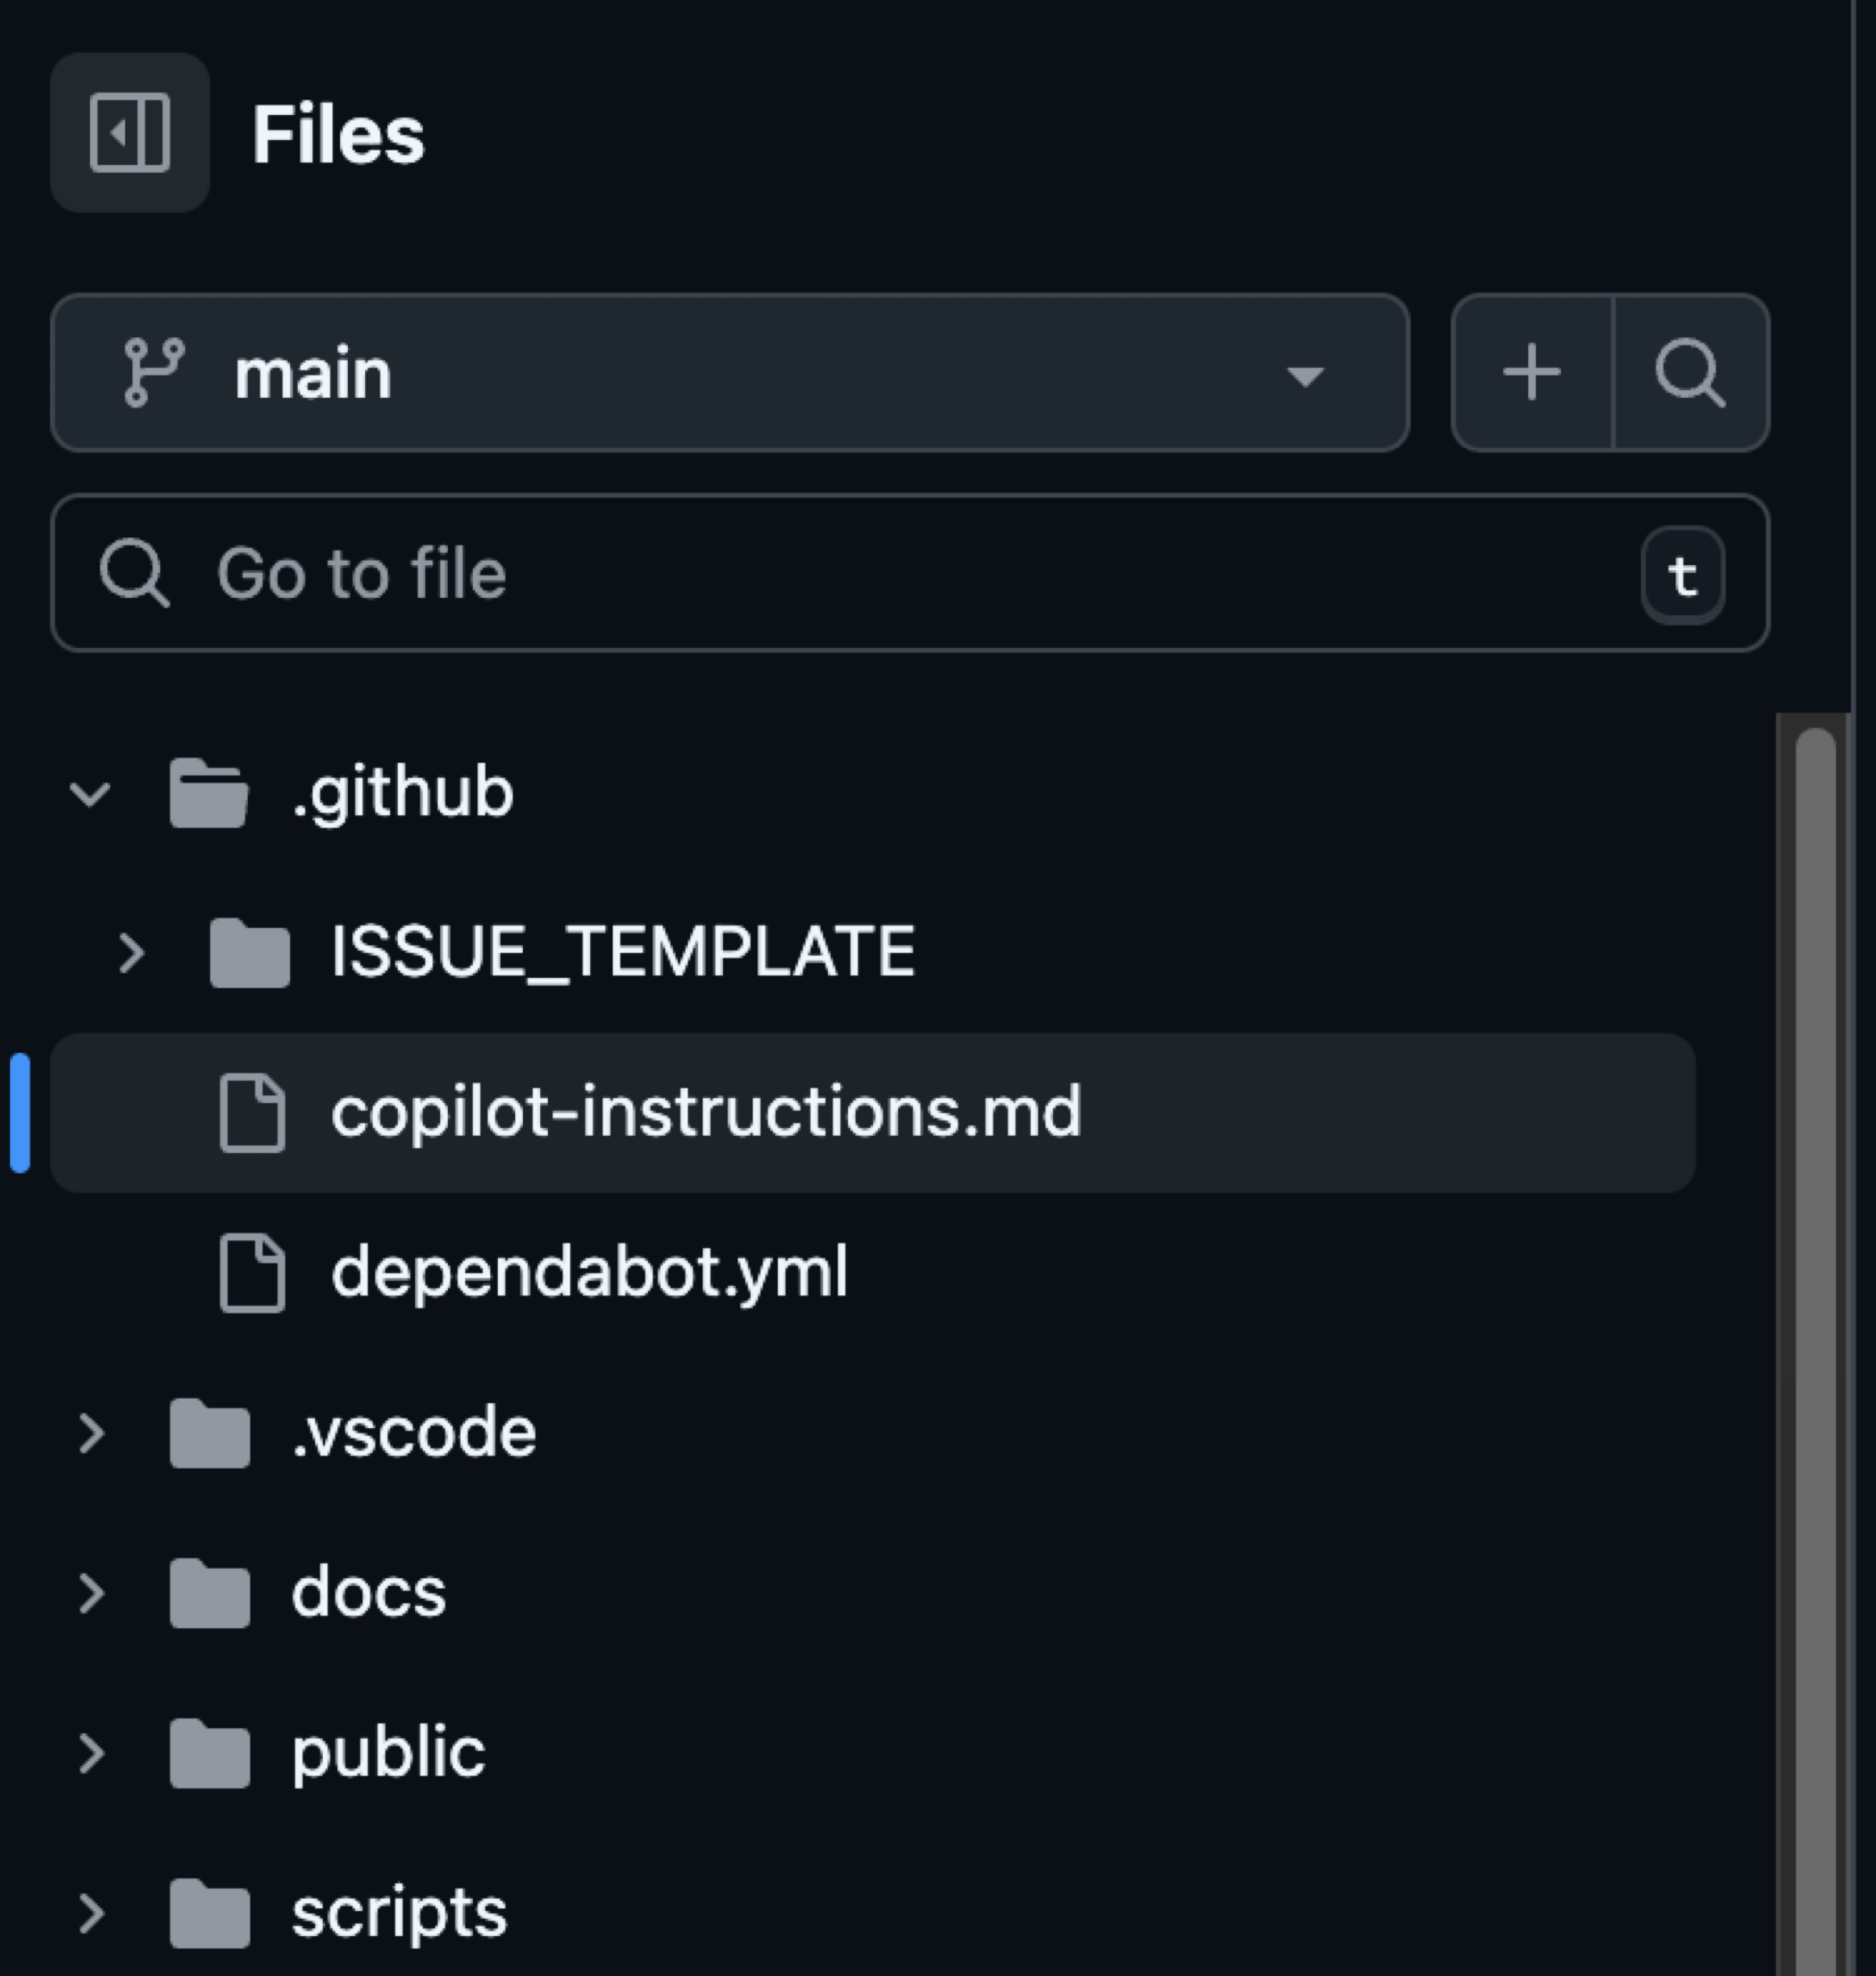
EXAMPLE: Here’s an example of an instructions file you might see in the .github/copilot-instructions.md file. Remember to tailor these to your project.
# Copilot Instructions
- Use Next.js App Router with React and TypeScript across the project.
- Use pnpm for all package management commands (not npm or yarn).
- Use Tailwind CSS v4 with a mobile-first approach; enhance with sm:/md:/lg:/xl: as needed.
- Prefer shadcn/ui components before creating new UI; place shadcn/ui in src/components/ui and shared components in src/components/shared.
- Always use next/link for internal navigation and next/image for images.
- Prefer server components by default; add "use client" only when needed (event handlers, browser APIs).
- Implement server actions where appropriate; place them in src/lib/actions.
- Put utilities in src/utils and Supabase utilities in src/utils/supabase; define shared types in src/types.
- Write tests with Vitest for critical business logic and components; place tests in __tests__ directories.
- Follow Next.js performance best practices and implement proper error boundaries and error handling.
- Use environment variables (NEXT_PUBLIC_ for client exposure); keep secrets server-side only.
- Use Vercel for deploys and GitHub Actions for CI/CD with pnpm scripts (pnpm dev/build/test).
- Keep code idiomatic: functional components + hooks, async/await for async, and idiomatic Next.js/React patterns.
## Folder structure reference (high-level)
```text
.
├─ app/ # Next.js App Router: route groups, page.tsx, layout.tsx, loading.tsx, error.tsx, route.ts
├─ public/ # Static assets served at /
├─ src/
│ ├─ components/
│ │ ├─ ui/ # shadcn/ui components
│ │ └─ shared/ # Shared app-specific components
│ ├─ lib/
│ │ └─ actions/ # Server actions ("use server") and server-side logic
│ ├─ utils/
│ │ ├─ supabase/ # Supabase client utilities (server-side)
│ │ └─ index.ts # General utilities (example)
│ └─ types/ # Shared TypeScript types
├─ __tests__/ # Vitest tests (or co-located __tests__ near source)
├─ docs/ # Project documentation
└─ .github/ # Workflows, issue templates, Copilot instructions
```
### Directory-specific conventions
- app/: Follow App Router conventions (page.tsx, layout.tsx, route.ts, loading.tsx, error.tsx). Use the Metadata API for SEO.
- src/components/ui: Prefer existing shadcn/ui components; extend consistently if needed.
- src/components/shared: Reusable app-specific components; keep presentational components server-rendered if possible.
- src/lib/actions: Mark server actions with "use server" and keep client-only imports out.
- src/utils/supabase: Reuse a shared Supabase client; do not re-instantiate ad hoc clients.
- __tests__: Use Vitest; write descriptive, focused tests for critical logic and components.
## Commands
- pnpm install — Install project dependencies.
- pnpm dev — Start the Next.js development server with hot reloading.
- pnpm build — Create a production build of the app.
- pnpm start — Run the production server locally from the built output (if defined).
- pnpm test — Run the Vitest test suite.
- pnpm lint — Lint the codebase (if defined in package.json).
- pnpm typecheck — Type-check the codebase using TypeScript only (no emit), if defined.
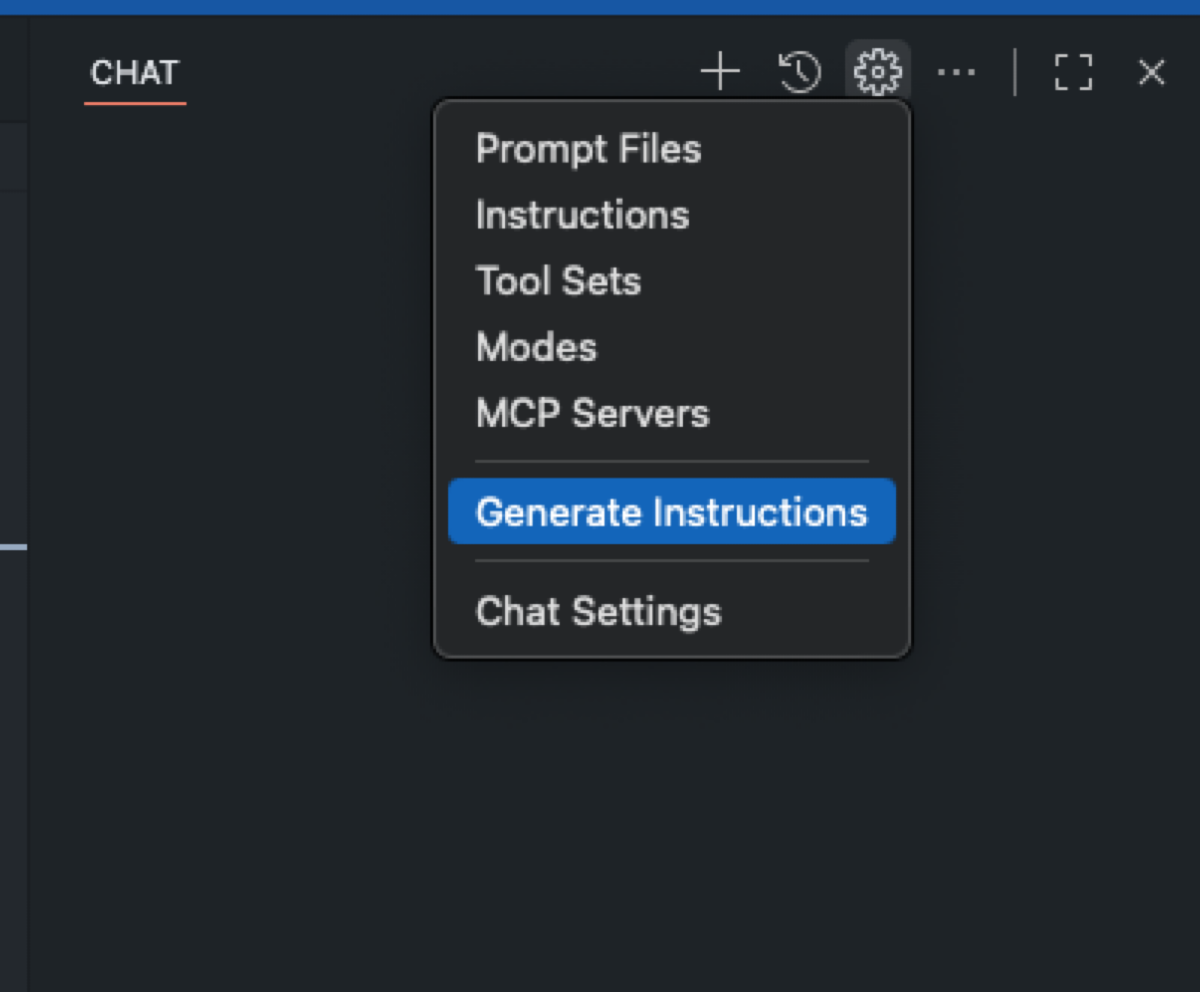
- pnpm format — Format files with Prettier (if defined).TIP: If you don’t already have an instructions file and are using VS Code, navigate to Configure Chat and choose Generate Instructions as noted at use custom instructions in VS Code.
In addition to repository-wide custom instructions, you can define path-specific custom instructions and make use of the applyTo keyword to target only the directories, file patterns, languages or task contexts you care about. Path-specific instructions files allow you to scope the guidance you provide to Copilot with details relevant to a specific scenario based on what is provided in the applyTo keyword.
EXAMPLE: Here is one example of a path specific instructions file that I use to ensure any components Copilot helps create follow already established conventions. A file like this gets placed in the .github/instructions folder as noted at adding repository custom instructions.
---
applyTo: "src/components/ui/**/*.tsx,src/components/shared/**/*.tsx"
---

- Prefer existing shadcn/ui components; check for an existing component before creating a new one.
- Style with Tailwind v4 using mobile-first classes; add responsive variants for larger screens.
- Use Lucide React icons (import from 'lucide-react'); avoid inline SVGs unless necessary.
- Ensure accessible interactions (keyboard focus, ARIA where applicable) and touch targets ≥44px.
- Avoid client components unless interactivity is required; keep pure presentational pieces server-rendered.
- Co-locate component tests in __tests__ where applicable; use Vitest.
IMPORTANT: When it comes to writing good instruction files, check out some community-contributed instructions, prompts, and more for examples and inspiration.
TAKEAWAY: Instructions help provide concrete context such as rules, standards, and preferences that GitHub Copilot can follow. Well written instructions noticeably improve the quality and relevance of its suggestions. By helping Copilot to internalize your project and coding standards, you’ll see higher-quality output and can finish tasks faster.
Key 2: Get acquainted with copilot coding agent
Treat Copilot coding agent like you would any team member: Everyone has skills and abilities in which they are strong, and those are the skills you want to leverage the most. Check out the post GitHub Copilot: Meet the new coding agent for more details on where the coding agent excels.
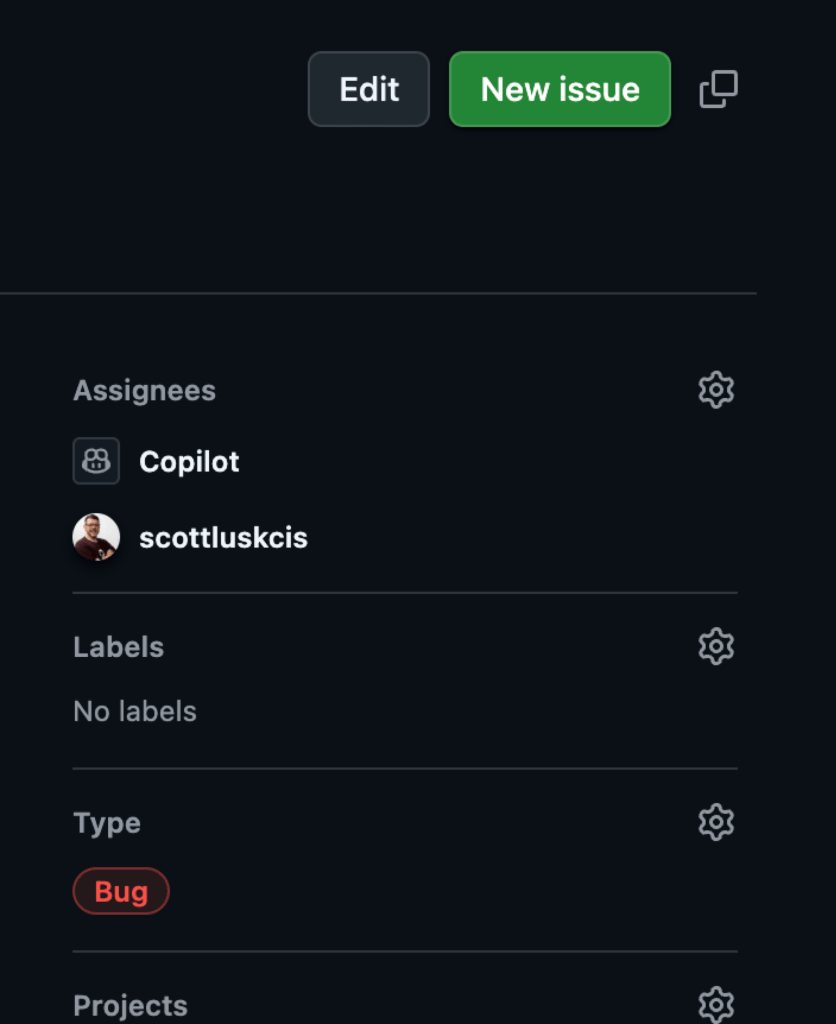
In order to become better acquainted with Copilot coding agent, assign Copilot to work on an issue, create a pull request, and track Copilot’s sessions in your repository. The more you know about what this teammate can do, the more comfortable you’ll get delegating tasks.
Just like the guidelines and rules you establish in the instructions files are important, it’s also important to provide specific instructions when creating issues to assign to Copilot.
When you create a new issue in your repository, before you assign it to Copilot, be sure that the description accomplishes the following:
- Gives the right context
- Is very intentional in what the issue is aimed to accomplish
- Is well-defined
After ensuring these criteria are met, then simply assign the issue to Copilot, and it will take it from there.

TIP: When providing details in areas such as your issue description, keep in mind you don’t have to specify anything you’ve already provided in your instructions file.
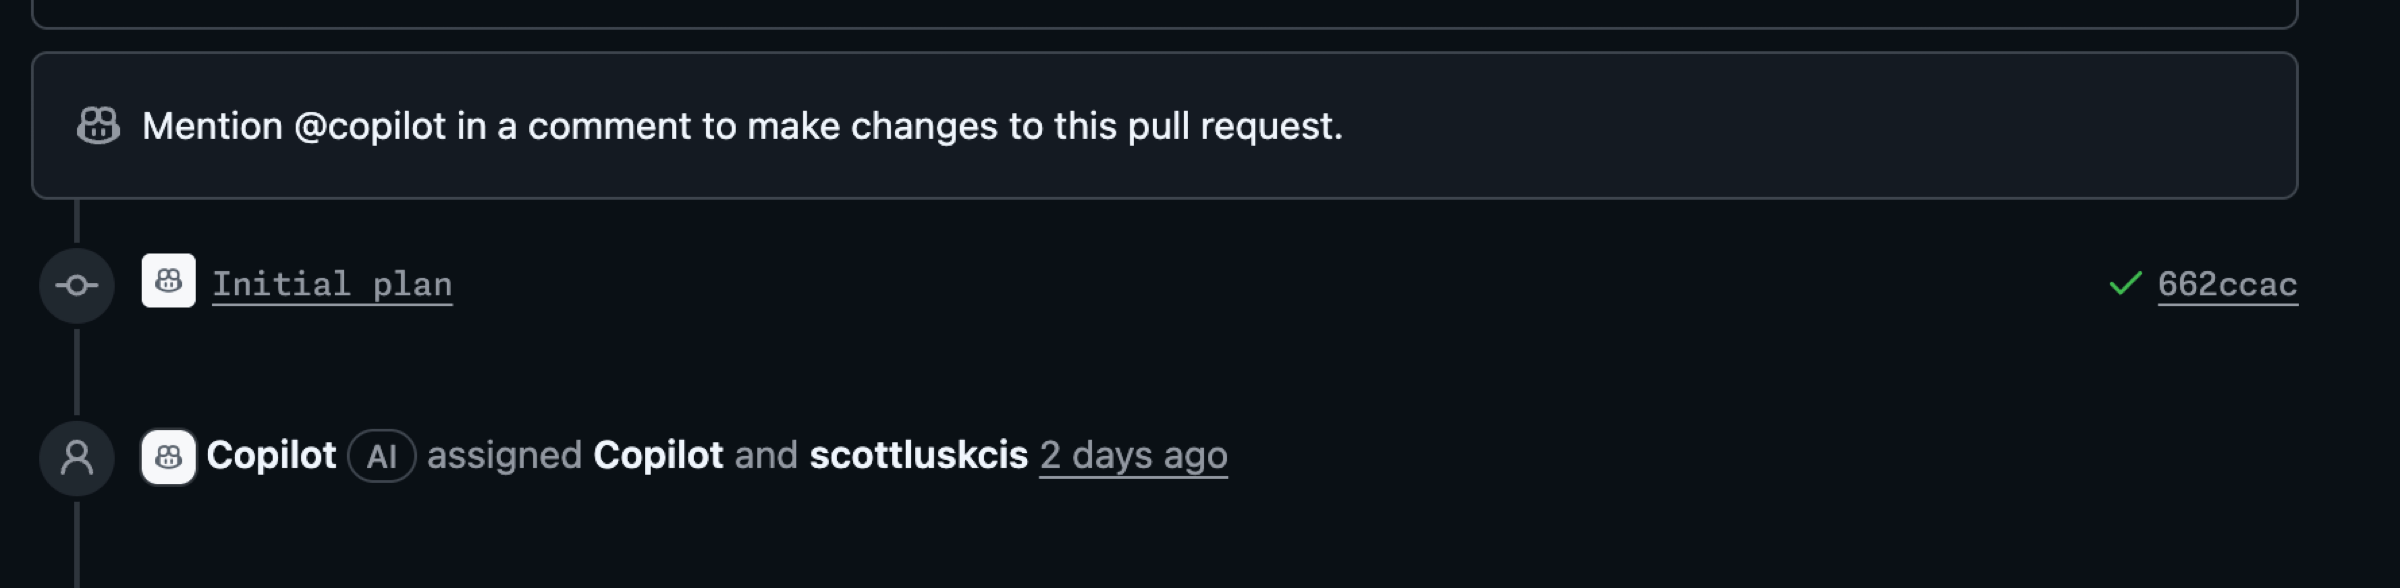
As Copilot works, you have the ability to view the session and understand how Copilot is approaching an issue. In this example, Copilot diagnosed the problem and notified me by requesting a pull request review in just over six minutes. Seeing how Copilot works helps you better understand ways you might tweak your approach and refine the results.
As Copilot works, be certain you review the work and chat with Copilot using @copilot in the comments to ask for changes. Don’t just blindly accept the changes and rubber stamp the pull request. Give this a good review.
TAKEAWAY: Ultimately, whatever you can delegate to GitHub Copilot coding agent frees up your focus for other critical tasks. This doesn’t mean you don’t review the results. Be very specific and intentional in the instructions you provide in areas such as issues.
Key 3: Establish best practices and automations
Another important aspect of the power-up I shared earlier is leveraging IssueOps and automations with GitHub Actions. IssueOps turns GitHub Issues into a controlled command interface for automation. These structured commands trigger GitHub Actions workflows that parse arguments, enforce auth/guardrails, run operational tasks (deploy, provision, migrate, etc.), and write results back to the issue for auditability. For more details on what IssueOps is, see the post IssueOps: Automate CI/CD (and more!) with GitHub Issues and Actions.
In my scenario, I used an issue template that I had previously created for bugs. This template helps me provide details and context, and saves me time when I create issues.
EXAMPLE: Issue templates are placed in the .github/ISSUE_TEMPLATE folder in your repository. See configuring issue templates for your repository for more details.
name: "Bug (Copilot Coding Agent-ready)"
description: "Report a bug with details so Copilot can propose a fix via PR."
title: "[Bug]: <short summary>"
labels: ["bug", "triage", "copilot-coding-agent"]
projects:
  - "my-org/1234"
assignees: []
body:
  - type: markdown
    attributes:
      value: |
        Thanks for reporting a bug! This template collects the details Copilot’s coding agent needs to propose a fix.

  - type: input
    id: environment
    attributes:
      label: Environment
      description: OS/Browser, device, app version/commit, and environment (local, preview, production).
      placeholder: "macOS 14, Chrome 126, iPhone 13; commit abc123 on preview"
    validations:
      required: true

  - type: textarea
    id: steps
    attributes:
      label: Reproduction steps (concise and deterministic)
      description: Provide a minimal, reliable sequence.
      placeholder: |
        1) Go to /app/<path>
        2) Click <button>
        3) Enter <value>
        4) Submit
        Expected: ...
        Actual: ...
    validations:
      required: true

  - type: textarea
    id: expected_actual
    attributes:
      label: Expected vs. actual behavior
      description: Describe exactly what you expected and what actually happened, including any error text.
      placeholder: |
        Expected:
        - ...
        Actual:
        - ...
    validations:
      required: true

  - type: textarea
    id: context_links
    attributes:
      label: Related context and references
      description: Link related issues/PRs, error monitoring (Sentry, logs), designs, or documentation.
      placeholder: |
        - Related issue: #123
        - PR that introduced regression: #456
        - Design reference: <Figma link>
        - Monitoring: <Sentry link>
    validations:
      required: false

  - type: textarea
    id: screenshots
    attributes:
      label: Screenshots or screen recordings (links)
      description: Optional, but very helpful for UI bugs.
      placeholder: "https://user-images.githubusercontent.com/... or Loom link"
    validations:
      required: false
TAKEAWAY: Leverage an IssueOps type of approach in your practices to help refine your process. This can help provide a solid foundation to start from and accelerate your work, especially when pairing with Copilot.
Embracing combined power
My journey, and the keys we’ve discussed, reveal a core truth: when you combine multiple GitHub features, you get more power. Integrating GitHub Copilot coding agent with GitHub Mobile, enhanced by precise instructions and IssueOps automations, has the power to transform how you build and fix. It’s not just the tools themselves, but the holistic approach they enable that supercharges your development workflow.
The GitHub Platform offers endless combinations for your developer adventure. Embrace this combined power, empower your team, and unlock new levels of efficiency and innovation in every project. What power-up will you discover that makes your team unstoppable?
The post Completing urgent fixes anywhere with GitHub Copilot coding agent and mobile appeared first on The GitHub Blog.
]]>The post How to create issues and pull requests in record time on GitHub appeared first on The GitHub Blog.
]]>Software development has always started with a conversation: What problem are we solving, why does it matter, and what does “finished” look like?
On GitHub, that conversation crystallizes in an issue. No matter what tools you’re using or who you’re working with, a well-designed issue still sets the agenda for pull requests (PR), reviews, tests, and deploys.
That principle hasn’t changed—but how we get from idea to issue to PR is changing fast, with Copilot helping to speed things up. By asking Copilot to draft an issue, you can quickly design a clear plan for moving forward. Then (and here’s the fun part) you can assign that issue directly to the new GitHub Copilot coding agent, which will asynchronously work to execute on the task at hand and give you a PR.
This is a new way of working. But the basic developer experience is simple, familiar and—dare I say—GitHubby.
In this blog, we’ll talk about:
- Why issues remain the backbone of work on GitHub—whether they’re written by you or drafted by Copilot.
- Best practices for building great issues when working with your team or Copilot.
- How a Copilot-oriented workflow helps you move faster, enforces consistency, and tees up the Copilot coding agent for hands‑off fixes.
Let’s jump in.
Why great issues and pull requests are critical
GitHub Issues and pull requests are some of the core building blocks on GitHub. Each issue describes a discrete piece of work, and offers helpful details, requirements, and more for whoever picks up that piece of work. PRs bundle the completed work for code reviews and merging.
Even in an AI‑accelerated workflow, these two artifacts are how present and future teams understand what happened and why.
Regardless of who (or what) authors them, well‑structured issues and pull requests deliver four key benefits:
- Shared context: One URL captures the problem statement, reproduction steps, and definition of done. Anyone joining next week—or next year—can catch up in minutes. And as we say at GitHub, if it doesn’t have a URL it didn’t happen.
- Async coordination: Whether teams are working across timezones, or simply looking to stay heads-down, meetings often add complexity and overhead. Issues free up time by letting developers work asynchronously, meeting only when it will add value.
- Audit and analytics: Labels, milestones, and templates feed dashboards, SLAs, and compliance reporting.
- Automation hooks: Actions workflows, project boards, and agentic tools rely on predictable metadata attached to every issue.
Miss the structure and every downstream step—human or AI—slows down. Need an example? Here’s an issue I’ve been looking at today (and no, I’m not going to name and shame anyone):
Issue #12609: Found broken link. Please fix!
…and that’s it! Just a title with no explanation in the body, no actual link, no context, no environment or version info, and no reproducible example or proposed fix.
As developers, we need well-crafted issues in order to dive into any project we get asked to do, and we need to write good issues to help teammates work effectively. AI is no exception: Large language models perform best when objectives, constraints, and success criteria are explicit. A vague prompt leads to vague output, whether it’s created by a human or a machine.
Here’s the thing: By allowing Copilot to assist with issue creation, you get to focus on clarity, not copy pasting, as Copilot locates the relevant references, builds out the initial issue structure, and even adds labels or project assignments.
The anatomy of a great GitHub Issue
Use this checklist when you create—or review—an issue (yes, Copilot writes these for you, but you’re still in charge):
- Action‑forward title: Lead with the noun and follow with the verb: “Login button – disable on Safari 17 beta” beats “Some login thing?”
- Problem or user story: Frame the pain: “As a shopper, I can’t click Buy on mobile Safari, so I abandon the cart and cry.”
- Expected vs. actual behavior: Two quick bullets: “Should render primary button” vs. “Button unclickable, no CSS pointer‑events.”
- Reproduction steps or visual evidence: GIFs, screenshots, or command-line specifics—whatever helps a teammate (or Copilot) quickly understand the problem.
- Acceptance criteria / definition of done: Straightforward pass/fail criteria, such as “all tests pass”, “Lighthouse score > 90”, “feature flag removed”.
- Scope and constraints: Guardrails to prevent yak‑shaving: perf budgets, browser list, no new dependencies.
- Metadata (labels, assignee, milestone, project): It’s the secret sauce that powers boards, filters, and Slack notifications.
Miss anything and async breaks down. Nail this format and Copilot—and your team—can move fast.
How to draft issues on GitHub faster with Copilot
Great issues share two traits: they’re fast to write and rich in context. GitHub Copilot’s Create Issue flow gives you both. Instead of hopping between fields or copy‑pasting snippets, you can open Copilot Chat and describe the problem in plain language:
"Create a bug report about a 500 error on the login form in octo-org/octo‑web."Copilot drafts the title, body, and even suggests labels and an assignee—drawing on your repository’s preferred template so the issue lands in the right format every time.
Here’s the step-by-step guide:
- Open Copilot Chat’s immersive view at github.com/copilot.
- Describe what you need. Mention the repo (
org/repo) or let Copilot infer it from where you last filed an issue. - Drop in a screenshot if a picture tells the story faster; Copilot will embed it in the draft and reference it in the description.
- Review the draft. Ask follow‑up prompts (“add repro steps,” “switch to the bug template”) or tweak the Markdown directly. Template switches keep your content—no rewriting required.
- Click Create when it looks good.
Tips for building great issues with GitHub Copilot
| What you do | How Copilot helps | Why it matters |
| Lead with context (expected vs. actual, repro steps) | Parses your wording into the right template sections. | Teammates (or Copilot) get clarity. |
| Attach evidence (screens, logs) | “Image‑to‑issue” persists the file in the issue body. | Future debuggers see exactly what you saw. |
| Tag next actions (“assign to Copilot”, “label frontend”) | Adds assignee, labels, milestones in one go. | Keeps boards tidy and workflows automated. |
| Batch related bugs in one prompt | Generates multiple drafts you can individually approve. | Zero tab switching when you’re in triage mode. |
How to turn an issue into a draft PR with the coding agent in GitHub Copilot
Ok—now that you have a clear issue in hand thanks to Copilot, you can assign it to Copilot via the coding agent (yes, it shows up like any teammate) or ask:
"Assign this to Copilot."When you hit Create, Copilot takes ownership and starts working on a fix—look for the 👀 reaction on the issue thread. Behind the scenes, here’s what happens:
- Copilot spins up a secure GitHub Actions workspace.
- It clones the repo, does a semantic code search (RAG‑style), and plots a fix plan.
- Commits roll into a draft PR you can watch in real time—no surprise force‑pushes.
- Your standard branch protections and CI gates still run, because we ♥️ you‑who‑likes‑passing‑tests.
Here’s why this is helpful:
- Parallelization: You review while Copilot writes, so dev cycles overlap nicely.
- Auditability: Every commit, diff, and comment is right there, so there’s no black‑box AI mystery.
- Guardrails: Same CODEOWNERS, same signing rules. Velocity without the cortisol.
Common questions, speedy answers
- “Won’t Copilot flood my repo with low‑quality issues?”
- “Can it update existing issues?”
- Not yet. Today is net‑new only; Update Issue is on the roadmap.
- “Does it understand my custom templates?”
- Yes! Copilot infers from your repo, and you can switch templates mid‑draft without losing your prompt context.
- “Mobile support?”
- Desktop for now; mobile is on the horizon (because phones exist).
Now it’s your turn
Next time your brain yells “Ugh, filing this bug will take longer than fixing it,” open Copilot Chat and let the robot handle the form fields while you capture intent. The faster you translate thought to issue to PR, the sooner users get features—and the sooner you get back to the fun bits.
Now go forth, issue wisely, and may your PRs get greenlit.
Happy coding!
The post How to create issues and pull requests in record time on GitHub appeared first on The GitHub Blog.
]]>The post The difference between coding agent and agent mode in GitHub Copilot appeared first on The GitHub Blog.
]]>“Give a dev a code completion and they’ll merge once. Teach a dev to wield an AI agent and they’ll empty the backlog before the coffee cools.“
GitHub Copilot started life in 2021 as the autocomplete sidekick that kept you in flow. Fast forward to 2025 and it now has two new and very different superpowers:
- Agent mode: a real‑time collaborator that sits in your editor, works with you, and edits files based on your needs.
- Coding agent: an asynchronous teammate that lives in the cloud, takes on issues, and sends you fully tested pull requests while you do other things.
While they’re both AI agents, they’re tuned for different parts in your day-to-day workflows. Since we’ve been getting a few questions, we’re breaking down what they are, when to reach for each, and—because we’re developers—offering some hands‑on tips.
TL;DR: The difference between agent mode and coding agent
- Agent mode = synchronous: Works inside VS Code (and now JetBrains/Eclipse/Xcode previews) as an autonomous collaborator that iterates on code, runs tests, and fixes its own mistakes in real time.
- Coding agent = asynchronous: Runs inside GitHub Actions (in public preview), picks up issues you assign (
assignee: Copilot), explores the repo, writes code, passes tests, and opens a pull request for your review. - Think of agent mode as the senior dev pair programming with you, and coding agent as the diligent teammate grinding through well‑scoped tickets.
- You can (and should) use both together: Prototype interactively in agent mode, then give follow‑up tasks to the coding agent.
Note: Both consume Copilot premium requests, but coding agent also uses Actions minutes.
Meet agent mode: Your real‑time collaborator
Agent mode transforms Copilot Chat into an orchestrator of tools (read_file, edit_file, run_in_terminal, etc.). Give it a natural‑language goal—“add OAuth to our Flask app and write tests”—and it plans, edits files, runs the test suite, reads failures, fixes them, and loops until green. You watch the steps, intervene when you like, and keep all changes local.
How to turn agent mode on
- Open Copilot Chat in VS Code.
- Select Agent from the mode dropdown.
- (Optional but smart) Click Tools → Manage to enable or disable capabilities and add MCP extensions.
Pro tips for using agent mode to the fullest extent
- Scope the outcome: “Generate a REST endpoint” beats “help?” Vagueness breeds hallucination, so be as clear as possible about what you want.
- Seed with context: Point it at the spec file or paste the schema so it doesn’t reinvent shapes.
- Iterate interactively: Let it run, but nudge when it veers—like pair programming with a skilled teammate who’s fast but needs occasional direction.
- Extend with MCP servers: If you need custom tools (database migrations, cloud deploys, etc.).
- Choose your model: OpenAI GPT‑4o for raw power, Anthropic Claude for longer context—swap via the model picker.
TLDR: Agent mode is like pair programming with a pro who writes code, runs tests, and fixes errors instantly, all within your editor.
Meet your coding agent: Your asynchronous teammate
Where agent mode lives in the IDE, coding agent lives in your repos. Assign an issue to Copilot, and it spins up a secure cloud workspace (via GitHub Actions), figures out a plan, edits code on its own branch, runs your tests/linters, and opens a pull request tagging you for review.
How to enable it
- Plan eligibility: Requires Copilot Pro+ or Copilot Enterprise.
- Flip the switch: Enterprise admins must enable “Copilot coding agent” in organization policies.
- Assign issues: Prompt coding agent with natural language by pointing it at an issue to get started.
### Feature: add dark‑mode toggle
assignees: Copilot- Watch the pull requests roll in—quick turnarounds for small tasks, thorough work on the complex ones.
Sweet‑spot tasks
- Low‑to‑medium complexity changes in well‑tested repositories.
- Adding or extending unit tests.
- Small refactors (rename a service, extract helpers).
- Documentation or typo fixes.
Not yet ideal for: massive rewrites, cross‑repo changes, codebases with 0% test coverage.
Pro tips for using coding agent in GitHub Copilot
- Write crisp acceptance criteria in the issue. The agent reads them like a spec.
- Link to files or functions the change touches; saves exploration time.
- Keep it atomic: one logical task per issue. Multiple smaller issues scale better than one behemoth.
- Leverage PR comments: Ask the agent for tweaks, then you can extract the logic into a separate function and add error handling.
- Mind your minutes: Heavy tasks consume Actions minutes and premium requests, so queue strategically.
And remember: GitHub Copilot coding agent follows your existing code style without complaints… yet.
Side by side: Picking the right tool
| Decision lens | Agent mode | Coding agent |
| Workflow pacing | Real‑time collaboration, conversational, and iterative | Fire and forget, background tasks |
| Interface | VS Code / JetBrains / Eclipse / Xcode chat | GitHub Issues or Copilot Chat → Monitored via pull requests |
| Typical tasks | Refactor, prototype, debug, migrate | Feature add, bug fix, extending tests, boring tasks and repetitive engineering chores |
| Human oversight | Continuous (you watch edits) | At pull request review checkpoint |
| Resource cost | Premium requests | Premium requests + Actions minutes |
| Best for | Exploring unknown code, tight feedback loops | Clearing backlog, parallelizing chores |
Get more done by using both
Before we dive into the tactical playbook, remember that Copilot’s superpowers aren’t either/or—they’re peanut butter and jelly. The magic really shows up when the real‑time, in‑editor agent mode meets the steady, background hustle of the coding agent.
With that, here are three proven pairings that let you wring every drop of productivity (and fun) out of both:
- Prototype in agent mode. Ship with coding agent.
- Use agent mode to spike a working feature branch.
- Open an issue describing polish tasks; assign to Copilot.
- Agent mode for spec generation. Coding agent for implementation.
- Ask agent mode to draft a design doc from code context.
- Fine‑tune it, then hand the ticket to coding agent to execute.
- Coding agent regression fix. Agent mode hot patch.
- If coding agent’s pull request introduces a build failure, open the branch locally and summon agent mode to diagnose and patch instantly.
These aren’t the only areas where you can use agent mode and coding agent to greater effect. But they do offer some examples to help you get started.
Safety and quality checklist
Excited to watch Copilot code circles around your backlog? Same—but let’s make sure the wheels don’t fall off at 120 mph. Before you hit merge, run through this quick pre‑flight to keep quality, security, and version‑control hygiene firmly on‑track.
- Tests green? Both agents rely on tests—invest in coverage or they’ll fly blind.
- Secrets safe? Coding agent runs in a secure ephemeral env; still, guard
.envfiles. - Review everything: Agents accelerate work; they don’t eliminate your responsibility as reviewer-of-record.
- Version control FTW: Agent mode edits locally in a branch, so commit early and often.
Common questions, quick answers
Still scratching your head about edge cases, quirky workflows, or editor allegiance? Below are the questions we hear most often when we demo these agents—served up in a lightning round so you can get back to shipping.
Q: Can coding agent fix that legacy Perl CGI script from 2002?
A: It can try—but without tests it’s like teaching a golden retriever calculus. Use agent mode to refactor first.
Q: Does agent mode support vim?
A: Not yet. But you can always :wq VS Code if you miss modal editing (ducks).
Q: How many issues can I throw at coding agent at once?
A: Multiple, but remember each consumes compute and your pull request queue tolerance. Treat it like coffee—great in moderation, disaster when the pot overflows.
Q: Can GitHub Copilot coding agent work with images?
A: Yes! Thanks to vision models, it can see screenshots of bugs or mockups included in GitHub issues, making visual bug reports much more effective.
Q: What about accessing external data sources?
A: With Model Context Protocol (MCP) support, GitHub Copilot coding agent can connect to external data and capabilities beyond GitHub.
Take this with you
- Agent mode = synchronous mastery inside your editor; coding agent = asynchronous work in issues and PRs on GitHub.
- Clear prompts, good tests, and small scopes remain the secret sauce.
- Use both agents in tandem to cover the full dev‑cycle—from “Hmm, what if…?” to “LGTM, ship it.”
- Keep humans in the loop for architecture choices, security reviews, and celebratory high‑fives.
AI agents won’t replace engineers; they’ll replace the boring parts of engineering. That means more time for inventive features, better code quality, and building what’s next. And isn’t that why we all love being developers? (Ok, maybe that’s just me.)
Happy building, and may your Actions minutes be plentiful and your pull request diff stats impressively tiny.
Want to learn more?
Try exploring our Docs on everything Copilot >
The post The difference between coding agent and agent mode in GitHub Copilot appeared first on The GitHub Blog.
]]>The post Exploring GitHub CLI: How to interact with GitHub’s GraphQL API endpoint appeared first on The GitHub Blog.
]]>You might have heard of the GitHub CLI and all of the awesome things you can do with it. However, one of its hidden superpowers is the ability to execute complex queries and mutations through GitHub’s GraphQL API. This post will walk you through what GitHub’s GraphQL API endpoint is and how to query it with the GitHub CLI.
What is GraphQL?
Let’s start with the basics: GraphQL is a query language for APIs and a runtime for executing those queries against your data. Unlike traditional REST APIs that provide fixed data structures from predefined endpoints, GraphQL allows clients to request exactly the data they need in a single request. This single-request approach reduces network overhead, speeds up application performance, and simplifies client-side logic by eliminating the need to reconcile multiple API responses—a capability that has been openly available since the specification was open sourced in 2015.
GraphQL operations come in two primary types: queries and mutations. Queries are read-only operations that retrieve data without making any changes—similar to GET requests in REST. Mutations, on the other hand, are used to modify server-side data (create, update, or delete)—comparable to POST, PATCH, PUT, and DELETE in REST APIs. This clear separation between reading and writing operations makes GraphQL interactions predictable while maintaining the flexibility to precisely specify what data should be returned after a change is made.
How is GraphQL used at GitHub?
GitHub implemented GraphQL in 2016 to address limitations of RESTful APIs. This adoption has significantly enhanced the developer experience when working with GitHub data. With the GraphQL endpoint, you can retrieve a repository’s issues, its labels, assignees, and comments with a single GraphQL query. Using our REST APIs, this would have otherwise taken several sets of nested calls.
Some GitHub data and operations are only accessible through the GraphQL API (such as discussions, projects, and some enterprise settings), others exclusively through REST APIs (such as querying actions workflows, runners, or logs), and some using either endpoint (such as repositories, issues, pull requests, and user information). GitHub’s GraphQL endpoint is accessible at api.github.com/graphql and you can explore the full schema in our GraphQL documentation or through the interactive GraphQL Explorer.
A key consideration when choosing between the REST API and the GraphQL API is how the rate limits are calculated. As a quick summary for how this is implemented:
- REST API: Limited by number of requests (typically 5,000 requests per hour for authenticated users and up to 15,000 for GitHub Apps installed in an Enterprise)
- GraphQL API: Limited by “points” (typically 5,000 points per hour for authenticated users but can go up to 10,000-12,500 points per hour for GitHub Apps)
Each GraphQL query costs at least one point, but the cost increases based on the complexity of your query (number of nodes requested, connections traversed, etc.). The GraphQL API provides a rateLimit field you can include in your queries to check your current limit status.
For scenarios where you need to fetch related data that would otherwise require multiple REST calls, GraphQL is often more rate limit friendly because:
- One complex GraphQL query might cost 5-10 points but replace 5-10 separate REST API calls.
- You avoid “over-fetching” data you don’t need, which indirectly helps with rate limits.
- The GraphQL API allows for more granular field selection, potentially reducing the complexity and point cost.
However, poorly optimized GraphQL queries that request large amounts of nested data could potentially use up your rate limit faster than equivalent REST requests—and quickly run into secondary rate limit issues.
A quick rule of thumb on deciding between which to use:
- For querying relational objects, such as GitHub Projects and their issues, GraphQL is often more effective, especially if it’s a discrete number of items.
- For bulk data of one type or single data points, such as pulling in a list of repository names in an organization, the REST API is often preferred.
Sometimes there isn’t a right or wrong answer; so as long as the object exists, try one out!
Why use GitHub CLI for GraphQL?
While many developers start with GitHub’s GraphQL Explorer on the web, curl, or other API querying tools, there’s a more streamlined approach: using built-in GraphQL support in the GitHub CLI. Before diving into the how-to, let’s understand why GitHub CLI is often my go-to tool for GraphQL queries and mutations:
- Authentication is handled automatically: No need to manage personal access tokens manually.
- Streamlined syntax: Simpler than crafting
curlcommands. - Local development friendly: Run queries and mutations right from your terminal.
- JSON processing: Built-in options for filtering and formatting results.
- Pagination support: Ability to work with cursor-based pagination in GraphQL responses.
- Consistent experience: Same tool you’re likely using for other GitHub tasks.
How to get started with gh api graphql
First, ensure you have GitHub CLI installed and authenticated with gh auth login. The basic syntax for making a GraphQL query with gh api graphql is:
gh api graphql -H X-Github-Next-Global-ID:1 -f query='
  query {
    viewer {
      login
      name
      bio
    }
  }
'
This simple query returns your GitHub username, the name you have defined in your profile, and your bio. The -f flag defines form variables, with query= being the GraphQL query itself.
Here’s our example output:
{
  "data": {
    "viewer": {
      "login": "joshjohanning",
      "name": "Josh Johanning",
      "bio": "DevOps Architect | GitHub"
    }
  }
}
Running queries and mutations
Basic query example
Let’s try something more practical—fetching information about a repository. To get started, we’ll use the following query:
gh api graphql -H X-Github-Next-Global-ID:1 -f query='
  query($owner:String!, $repo:String!) {
    repository(owner:$owner, name:$repo) {
      name
      description
      id
      stargazerCount
      forkCount
      issues(states:OPEN) {
        totalCount
      }
    }
  }
' -F owner=octocat -F repo=Hello-World
The -F flag sets variable values that are referenced in the query with $variable.
Here’s our example output:
{
  "data": {
    "repository": {
      "name": "Hello-World",
      "description": "My first repository on GitHub!",
      "id": "R_kgDOABPHjQ",
      "stargazerCount": 2894,
      "forkCount": 2843,
      "issues": {
        "totalCount": 1055
      }
    }
  }
}
💡 Tip: The -H X-Github-Next-Global-ID:1 parameter sets an HTTP header that instructs GitHub’s GraphQL API to use the new global node ID format rather than the legacy format. While your query will function without this header, including it prevents deprecation warnings when referencing node IDs (such as when passing repository.ID in subsequent operations). GitHub recommends adopting this format for all new integrations to ensure long-term compatibility.
|
Running mutations
Mutations work similarly. Here’s how to create a new issue:
gh api graphql -H X-Github-Next-Global-ID:1 -f query='
  mutation($repositoryId:ID!, $title:String!, $body:String) {
    createIssue(input:{repositoryId:$repositoryId, title:$title, body:$body}) {
      issue {
        url
        number
        title
        body
        state
      }
    }
  }
' -F repositoryId="R_kgDOABPHjQ" -F title="Creating issue with GraphQL" -F body="Issue body created via GraphQL\!"
Make sure to update the repositoryId parameter with the actual repository’s GraphQL ID (an example of returning a repository’s ID is shown in the basic query above!).
Here’s our example output:
{
  "data": {
    "createIssue": {
      "issue": {
        "url": "https://github.com/octocat/Hello-World/issues/3706",
        "number": 3706,
        "title": "Creating issue with GraphQL",
        "body": "Issue body created via GraphQL!",
        "state": "OPEN"
      }
    }
  }
}
Filtering GraphQL results
GitHub CLI supports JQ-style filtering for extracting specific parts of the response, which is invaluable when you need to parse just the repository names or URLs from a query for use in automation scripts. Here is an example of using the --jq flag:
gh api graphql -H X-Github-Next-Global-ID:1 -f query='
  query($owner:String!, $repo:String!) {
    repository(owner:$owner, name:$repo) {
      issues(first:3, states:OPEN) {
        nodes {
          number
          title
          url
        }
      }
    }
  }
' -F owner=octocat -F repo=Hello-World --jq '.data.repository.issues.nodes[]'
The --jq flag accepts JQ expressions to process JSON output. This query returns just the array of issues, without the surrounding GraphQL response structure.
Here’s our example output:
{
  "number": 26,
  "title": "test issue",
  "url": "https://github.com/octocat/Hello-World/issues/26"
}
{
  "number": 27,
  "title": "just for test",
  "url": "https://github.com/octocat/Hello-World/issues/27"
}
{
  "number": 28,
  "title": "Test",
  "url": "https://github.com/octocat/Hello-World/issues/28"
}
We could have modified the --jq flag to just return the issue URLs, like so:
gh api graphql -H X-Github-Next-Global-ID:1 -f query='
  query($owner:String!, $repo:String!) {
    repository(owner:$owner, name:$repo) {
      issues(first:3, states:OPEN) {
        nodes {
          number
          title
          url
        }
      }
    }
  }
' -F owner=octocat -F repo=Hello-World --jq '.data.repository.issues.nodes[].url'
Here’s our example output:
https://github.com/octocat/Hello-World/issues/26
https://github.com/octocat/Hello-World/issues/27
https://github.com/octocat/Hello-World/issues/28
Handling pagination
GitHub’s GraphQL API limits results to a maximum of 100 items per page, which means you’ll need pagination to retrieve larger datasets.
Pagination in GraphQL works by returning a “cursor” with each page of results, which acts as a pointer to where the next set of results should begin. When you request the next page, you provide this cursor to indicate where to start.
The easiest way to handle this pagination in the GitHub CLI is with the --paginate flag, which automatically collects all pages of results for you by managing these cursors behind the scenes. Here’s what that looks like in a query:
gh api graphql --paginate -H X-Github-Next-Global-ID:1 -f query='
  query($owner:String!, $repo:String!, $endCursor:String) {
    repository(owner:$owner, name:$repo) {
      issues(first:100, after:$endCursor, states:OPEN, orderBy:{field:CREATED_AT, direction:DESC}) {
        pageInfo {
          hasNextPage
          endCursor
        }
        nodes {
          number
          title
          createdAt
        }
      }
    }
  }
' -F owner=octocat -F repo=Hello-World
The pageInfo object with its hasNextPage and endCursor fields is essential for pagination. When you use the --paginate flag, GitHub CLI automatically uses these fields to fetch all available pages for your query, combining the results into a single response.
Here’s our example output:
{
  "data": {
    "repository": {
      "issues": {
        "pageInfo": {
          "hasNextPage": true,
          "endCursor": "Y3Vyc29yOnYyOpK5MjAyNC0xMi0zMFQxNDo0ODo0NC0wNjowMM6kunD3"
        },
        "nodes": [
          {
            "number": 3708,
            "title": "Creating issue with GraphQL once more",
            "createdAt": "2025-04-02T18:15:11Z",
            "author": {
              "login": "joshjohanning"
            }
          },
          {
            "number": 3707,
            "title": "Creating issue with GraphQL again",
            "createdAt": "2025-04-02T18:15:02Z",
            "author": {
              "login": "joshjohanning"
            }
          },
          {
            "number": 3706,
            "title": "Creating issue with GraphQL",
            "createdAt": "2025-04-02T18:14:37Z",
            "author": {
              "login": "joshjohanning"
            }
          },
          … and so on
        ]
      }
    }
  }
}
This approach works great for moderate amounts of data, but keep in mind that GitHub’s GraphQL API has rate limits, so extremely large queries might need to implement delays between requests.
💡 Important limitation: The --paginate flag can only handle pagination for a single connection at a time. For example, when listing repository issues as shown above, it can paginate through all issues, but cannot simultaneously paginate through each issue’s comments. For nested pagination, you’ll need to implement custom logic. |
Building complex scripts: Chaining GraphQL queries together
When working with GitHub’s GraphQL API, you often need to connect multiple queries to accomplish a complex task. Let’s look at how to chain GraphQL calls together using the GitHub CLI:
ISSUE_ID=$(gh api graphql -H X-Github-Next-Global-ID:1 -f query='
  query($owner: String!, $repo: String!, $issue_number: Int!) {
    repository(owner: $owner, name: $repo) {
      issue(number: $issue_number) {
        id
      }
    }
  }
' -F owner=joshjohanning -F repo=graphql-fun -F issue_number=1 --jq '.data.repository.issue.id')
gh api graphql -H GraphQL-Features:sub_issues -H X-Github-Next-Global-ID:1 -f query='
query($issueId: ID!) {
  node(id: $issueId) {
    ... on Issue {
      subIssuesSummary {
        total
        completed
        percentCompleted
      }
    }
  }
}' -F issueId="$ISSUE_ID"
Here’s what this shell script is doing:
- The first query captures an issue’s ID using the repository name and issue number
- The
--jqflag extracts just the ID value and stores it in a variable - The second query passes this ID to retrieve a summary of sub-issues
Here’s our example output:
{
  "data": {
    "node": {
      "subIssuesSummary": {
        "total": 3,
        "completed": 1,
        "percentCompleted": 33
      }
    }
  }
}
Take this with you
The gh api graphql command provides a convenient way to interact with GitHub’s GraphQL API directly from your terminal. It eliminates the need for token management, simplifies query syntax and formatting, and handles basic pagination that would otherwise be complex to implement. Whether you’re running complex queries or simple mutations, this approach offers a streamlined developer experience.
Next time you need to interact with GitHub’s GraphQL API, skip the GraphQL Explorer on the web and try the GitHub CLI approach. It might just become your preferred method for working with GitHub’s powerful GraphQL API capabilities.
The post Exploring GitHub CLI: How to interact with GitHub’s GraphQL API endpoint appeared first on The GitHub Blog.
]]>The post How to make your images in Markdown on GitHub adjust for dark mode and light mode appeared first on The GitHub Blog.
]]>GitHub supports dark mode and light mode, and as developers, we can make our README images look great in both themes. Here’s a quick guide to using the <picture> element in your GitHub Markdown files to dynamically switch images based on the user’s color scheme.
When developers switch to GitHub’s dark mode (or vice versa), standard images can look out of place, with bright backgrounds or clashing colors.
Instead of forcing a one-size-fits-all image, you can tailor your visuals to blend seamlessly with the theme. It’s a small change, but it can make your project look much more polished.
One snippet, two themes!
Here’s the magic snippet you can copy into your README (or any Markdown file):
<picture>
  <source media="(prefers-color-scheme: dark)" srcset="dark-mode-image.png">
  <source media="(prefers-color-scheme: light)" srcset="light-mode-image.png">
  <img alt="Fallback image description" src="default-image.png">
</picture>
Now, we say it’s magic, but let’s take a peek behind the curtain to show how it works:
- The
<picture>tag lets you define multiple image sources for different scenarios. - The
<source media="...">attribute matches the user’s color scheme.- When
media="(prefers-color-scheme: dark)", the browser loads thesrcsetimage when GitHub is in dark mode. - Similarly, when
media="(prefers-color-scheme: light)", the browser loads thesrcsetimage when GitHub is in light mode.
- When
- If the browser doesn’t support the
<picture>element, or the user’s system doesn’t match any defined media queries, the fallback<img>tag will be used.
You can use this approach in your repo README files, documentation hosted on GitHub, and any other Markdown files rendered on GitHub.com!
Demo
What’s better than a demo to help you get started? Here’s what this looks like in practice:
The post How to make your images in Markdown on GitHub adjust for dark mode and light mode appeared first on The GitHub Blog.
]]>The post Mastering GitHub Copilot: When to use AI agent mode appeared first on The GitHub Blog.
]]>Ever find yourself staring at an AI coding assistant, wondering why it’s not quite nailing what you need? Maybe it’s spitting out code that’s close but not quite right, or you’re stuck wrestling with a problem that spans multiple files, wishing it could just get the bigger picture. Often, when developers hit these snags, it’s less about the tool, and more about knowing how to use it.
So here’s the key question you should ask yourself: “Do I need a quick answer or a thoughtful conversation?” That’s the secret to unlocking AI coding tools like GitHub Copilot.
Because different aspects of Copilot serve different needs, and we’re here to help you discern when is the best time for agent mode and when you should be using Copilot Edits instead. Both are powerhouse Copilot features, built to supercharge your coding, but they shine in different scenarios.
Copilot Edits is your go-to for fast, precise tweaks—think refactoring a function, squashing a bug, or applying consistent changes across files without losing your flow.
Agent mode, on the other hand, steps up as your AI collaborator for thornier, multi-file challenges—analyzing your codebase, proposing architectural fixes, and even running terminal commands while you steer the ship and approve each move.
Figuring out which one fits your needs doesn’t just save time, it turns your AI assistant into a seamless extension of your own coding instincts.
Copilot command center: Your chat window
Before learning more about agent mode and Copilot Edits, it’s essential to understand the Copilot chat window in VS Code—your central hub for AI interactions.

This is where you can:
- Ask coding questions like “How do I implement JWT authentication in Node.js?”
- Use
/explainto understand complex code blocks - Debug issues with
/fix - Generate tests with
/tests - Access both Edits and agent mode features
With the chat window giving you a solid grasp of your code’s context, you’re in the driver’s seat to pick the perfect Copilot tool: Edits or agent mode, for whatever’s next.
Let me take you through a real-world example of how I’ve been using GitHub Copilot to evolve my personal website. It started with a simple idea: create an interactive terminal-style easter egg that showcases my skills in a developer-friendly way.
I began with a basic command processing function that handled a few simple commands:
function processCommand(command) {
try {
if (!command?.trim()) {
return 'Please enter a command. Type "more" for available commands.';
}

const sanitizedCommand = command.toLowerCase().trim();

switch (sanitizedCommand) {
case 'more':
return commands.more;
case 'about':
return commands.about;
case 'skills':
return commands.skills;
case 'projects':
return commands.projects;
case 'contact':
return commands.contact;
default:
return `Command not found: "${command}". Type 'more' for available commands.`;
}
} catch (error) {
console.error('[Terminal] Error processing command:', error);
return 'An error occurred while processing the command.';
}
}
Initially, I used Copilot Edits to quickly add new features. For instance, I wanted to add a ‘github’ command to showcase my repositories:

Copilot Edits made targeted changes to the switch statement in the processCommand function and added the new command to the commands object—a perfect example of quick, focused modifications to existing code.
As my terminal interface matured, I wanted to implement several interactive features that would require more comprehensive improvements. To get animation effects, keyboard navigation controls, and an extensible theming system that spanned multiple files to work together seamlessly, I turned to agent mode.
The agent mode advantage
When we designed agent mode, we didn’t want to create a tool that’s a simple AI feature: We wanted to create an AI that could pair with you! Rather than working on specific, limited changes where you might be reinventing the wheel, you’re now providing higher-level direction while the AI tackles the implementation details across multiple files or systems.
That being said, with agent mode, you’re still in control of the process. The AI has more latitude to explore your codebase and suggest comprehensive solutions, but you always review and approve the changes before they’re applied. It’s not about surrendering control, it’s about effectively delegating implementation details while you focus on the bigger picture.
What makes agent mode special:
- Codebase search: It searches your codebase to find relevant files without you explicitly specifying them.
- Self-iteration: It can iterate on its own output to complete your entire request in one go.
- Error identification and repair: It automatically recognizes and fixes errors in suggested code.
- Terminal command execution: It suggests and runs terminal commands with your permission.
- Build and run capabilities: It can build and run your application to check if changes work correctly.
I reach for agent mode when:
- Building complete features: “Add analytics tracking throughout the app”
- Navigating unfamiliar codebases: “Help me understand how authentication works in this project”
- Writing and verifying tests: “Write tests for the UserService and make sure they pass”
- Implementing terminal-heavy tasks: “Set up a new React project with TypeScript, Redux, and styled-components”
- Doing complex refactoring: “Refactor our API calls to use the new error handling pattern”
Continuing with my terminal easter egg, let’s say I want to implement a much more extensive upgrade with multiple features, like adding a typing animation effect for responses, command history navigation with up/down arrows, and tab completion for commands. At the same time, I want to create a new TerminalThemes.css file with different color scheme options that users can switch between with a ‘theme’ command.

This is where agent mode truly shines. The task spans multiple files, requires an understanding of the existing codebase, and involves creating entirely new functionality. Here, agent mode would:
- Search through the codebase to understand the terminal implementation.
- Create the new CSS file for themes.
- Add typing animation functionality to terminal responses.
- Implement keyboard handlers for history navigation.
- Build the tab completion system.
- Add the theme command to the switch statement.
- Test the implementation to ensure everything works correctly.
This is the beauty of agent mode: it has a complex understanding of patterns and relationships in different parts of the codebase! Agent mode can ensure that the typing animation did not interfere with existing functionality, check that the history navigation was compatible with the current command processing, and confirm that the theme switching properly modified the UI. It is precisely in this multi-file feature implementation with interlinking components that agent mode can shine compared to the more laser-focused Copilot Edits.
In the below episode of GitHub Checkout, you can see agent mode implementing a complete water consumption tracker feature in an iOS app. It not only writes the code but also builds, runs, and tests the app, all from a single prompt, without the developer needing to touch the editor directly.
The secret: use both together!
After many hours with both tools, here’s my takeaway: It’s not about picking one, or one being better than the other. It’s about wielding them together for different purposes. Copilot Edits and agent mode work well together to augment our coding abilities, whether that’s a more prompt-centric style of development with agent mode, or maintaining granular file edit control via Copilot Edits.
Regardless of which tool you are using, you are still the pilot, steering the AI to supercharge your own productivity. The more context you provide in your prompts, the better results you’ll get—and remember, you always have the final say on any suggested changes.
If you’re just jumping into the world of AI, check out our new Getting started with GitHub Copilot tutorial series, where we walk you through everything from initial setup to advanced techniques. It’s perfect for developers at any skill level who want to quickly become productive with AI-assisted coding.
Happy coding, everyone! 💻✨
How to get started
Want to try these features? Here’s my quick setup guide:
For Copilot Edits:
- Open VS Code and look for the Copilot Chat window.
- Click the “Edit with Copilot” button to open the Copilot Edits view.
- Add your relevant files to the working set. Copilot will only make changes to files in this set (unless it’s creating a new file).
- Type your prompt describing what changes you need.
- Review the “diff” of all proposed changes before accepting them.
For agent mode:
- Make sure you’re using VS Code version 1.99 or higher (as of original publish date, available in VS Code Insiders).
- Switch from “Edit” to “Agent” mode.
- Type your prompt, describing the complex task or feature you want to implement.
- Agent mode will work autonomously, but still require your approval for changes.
- For best results, consider using custom instructions to personalize how agent mode works with your codebase.
Try GitHub Copilot free
Ready to automate your dependency management with AI? Learn more about GitHub Copilot for Business or start your free trial of GitHub Enterprise today.
The post Mastering GitHub Copilot: When to use AI agent mode appeared first on The GitHub Blog.
]]>The post Video: How to create checklists in Markdown for easier task tracking appeared first on The GitHub Blog.
]]>Have you ever wondered how the cool cats of the internet make Markdown checklists in their GitHub repositories, issues, and pull requests? Me too. And I’m here to say: you too can be a cool cat.
Markdown checklists are handy for visualizing tasks that need to be done. Beyond that, GitHub can turn these checklists into task lists in your issues and pull requests to make your project tracking easier and better. Let’s learn how to make ‘em!
How to create a checklist in Markdown
Making a checklist is exactly like making a regular list in Markdown (a - starting each line), but you add [ ] or [x] after the -, like so:
A regular list:
- This is a list item
- This is another list item
A checklist:
- [ ] This is an unchecked item
- [x] This is a checked item
When the checklist is rendered, it looks like this:

Feel free to use the short Markdown checklist template above to get a list going for yourself.
Markdown checklists are a great way to keep track of tasks in your README files. For example, you could mark down which features might be missing or which aspects of your project need contributors. You can also use these checklists for documentation (like for noting docs coverage), notes, issues, or pull requests.
The best part: GitHub adds extra functionality to your Markdown checklists — and I’ll get to that right…now!
From checklist to task list
A task list on GitHub is a glorified Markdown checklist, allowing you to do even more project planning and tracking when it’s in an issue or pull request.
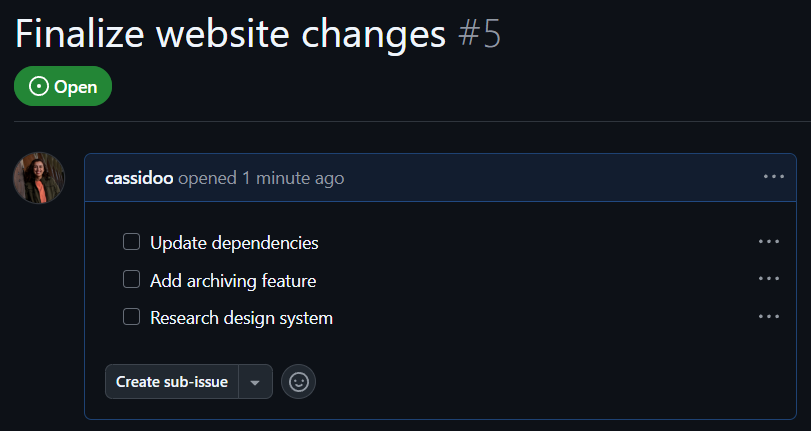
For example, let’s say you make an issue to add some features to a project of yours, like so:
- [ ] Update dependencies
- [ ] Add archiving feature
- [ ] Research design system
It will render like this in the issue:
It might look like a normal checklist, but if you hover over one of the bullet points, you’ll be able to drag and drop each task to re-order them:
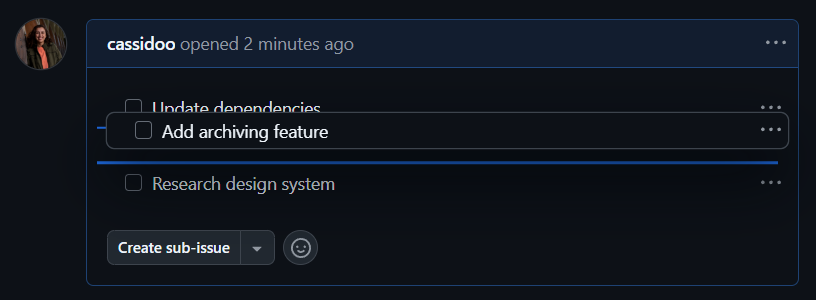
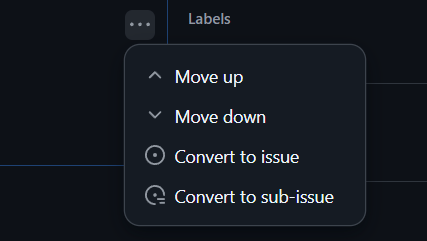
Or, if you hit the ... menu on the right side, you can turn each of the individual checklist items into its own issue, sub-issue, or re-order from there!
Turning those checklist items into issues and sub-issues means that you can turn that planned work into tracked tasks. Breaking down your existing issues into smaller pieces might seem daunting, but doing it in this way connects all the pieces together nicely as you break things up into more specific chunks.
And let’s just say you did the exact same thing, but in a pull request. You still have the ability to re-order the tasks, and it will render the same way as it does in the issue:
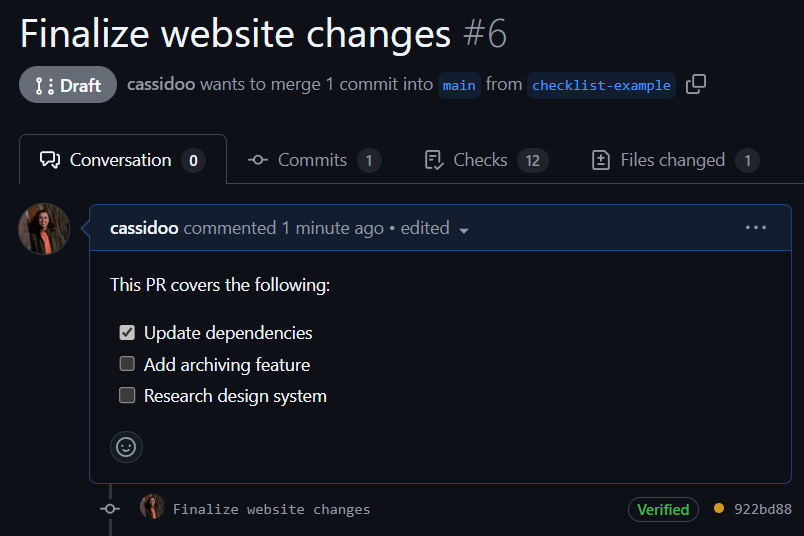
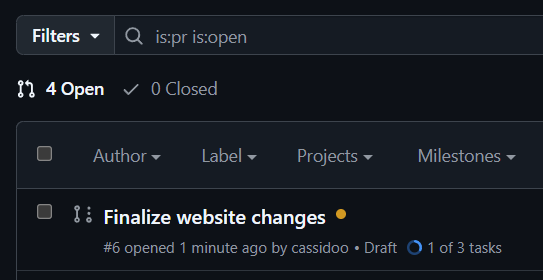
But now, because you’ve built this checklist in the pull request, you get more visibility into how many tasks have been completed and how many remain in the list of pull requests for your repository. Look just below the title of your pull request: You can see the status of your project right there!
Where can I learn more?
Love that you asked that question. Good job. Head over to the GitHub Docs to learn more about task lists on GitHub.
Happy coding!
The post Video: How to create checklists in Markdown for easier task tracking appeared first on The GitHub Blog.
]]>The post Video: How to run dependency audits with GitHub Copilot appeared first on The GitHub Blog.
]]>Every software project faces the inevitable challenge of dependency management. Over time, dependencies become outdated, leading to security vulnerabilities. Others go unused, needlessly bloating build times. For many development teams, addressing these issues means running manual scripts, reviewing output files, and hoping nothing falls through the cracks.
I recently transformed this error-prone manual process into an automated solution using a few tools on GitHub—GitHub Copilot, GitHub Actions, and Dependabot, to be specific (just in case you’re wondering). Here’s how you can do the same!
So, let’s jump in (and make sure to watch the video above, too!).
The problem with manual dependency audits
Most teams start with a simple approach to dependency management. This often includes a Bash script that runs periodically. Here’s what our manual script looks like:
#!/bin/bash
echo "Starting manual dependency audit..."

# List all dependencies
echo "Installed dependencies:"
npm list --depth=0 > deps.txt
cat deps.txt

# Check for outdated ones
echo -e "\nChecking outdated dependencies..."
npm outdated > outdated.txt
cat outdated.txt

# Guess at unused ones (very crude)
echo -e "\nLooking for potentially unused dependencies..."
for dep in $(npm list --depth=0 | grep '├──' | cut -d' ' -f2 | cut -d@ -f1); do
    if ! find . -type f -name "*.js" -o -name "*.tsx" -o -name "*.ts" | xargs grep -l "$dep" > /dev/null 2>&1; then
        echo "$dep might be unused"
    fi
done

echo "Done! Check deps.txt and outdated.txt manually. Phew that was a lot of work!"
This approach has several limitations, including:
- It’s manual, so someone has to remember to run it (and let’s be honest, I often forget to run these in my own codebases).
- The unused dependency check is crude, and often inaccurate.
- Results are scattered across multiple output files.
- It’s not integrated with workflows or CI/CD pipelines.
There has to be a better way than this—right?
How to simplify dependency audits on GitHub
Luckily there is, in fact, a better solution than manual Bash script if you’re working on GitHub—and it starts with using a combination of our AI developer tool, GitHub Copilot, our automation and CI/CD tool, GitHub Actions, and Dependabot, our automated dependency tool.
Here’s a step-by-step guide you can use to do this.
Step 1: Use GitHub Copilot to create the action
Agent mode takes GitHub Copilot from suggesting code to owning tasks, like transforming our bash script into a GitHub Actions workflow.
Here is our prompt:
“Create a GitHub Action for dependency auditing with depcheck and issue posting. And a separate Dependabot workflow for managing outdated dependencies.”

Remember our original bash script? With just a prompt, I shared the context (package.json and our manual script) and asked it to create an action that uses the dependency checker tool depcheck for more accurate detection of unused dependencies.
Step 2: GitHub Copilot writes the GitHub Action
To implement this GitHub Action, GitHub Copilot creates the new workflow file in .github/workflows/dependency-audit.yml. Here’s the workflow file Copilot helped create:
name: Dependency Audit
on:
  schedule:
    - cron: '0 0 * * 1'  # Run weekly on Mondays
  workflow_dispatch:  # Allow manual triggering

jobs:
  audit:
    runs-on: ubuntu-latest
    steps:
      - uses: actions/checkout@v4

      - name: Set up Node.js
        uses: actions/setup-node@v4
        with:
          node-version: '18'

      - name: Install dependencies
        run: npm ci

      - name: Install depcheck
        run: npm install -g depcheck

      - name: Run depcheck for unused dependencies
        run: depcheck --json > unused-deps.json

      - name: Run npm audit
        run: npm audit --json > security-audit.json

      - name: Generate report
        run: |
          echo "# Dependency Audit Report $(date)" > report.md
          echo "## Unused Dependencies" >> report.md
          cat unused-deps.json | jq -r '.dependencies[]' >> report.md
          echo "## Security Issues" >> report.md
          cat security-audit.json | jq '.metadata.vulnerabilities' >> report.md

      - name: Create issue if problems found
        uses: peter-evans/create-issue-from-file@v4
        if: ${{ success() }}
        with:
          title: Weekly Dependency Audit
          content-filepath: ./report.md
          labels: maintenance, dependencies
Step 3: Enable Dependabot
While our custom action focuses on finding unused dependencies, we can use Dependabot to automatically create pull requests for outdated packages. Dependabot can be configured either via a simple YAML file or automatically by turning it on from your repository settings. Here’s the YAML file that Copilot created:
# .github/dependabot.yml
version: 2
updates:
  - package-ecosystem: "npm"
    directory: "/"
    schedule:
      interval: "weekly"
    open-pull-requests-limit: 10
The result: a fully automated dependency audit
With that, our dependency management is now fully automated. Let’s recap how it works:
- Our custom action uses depcheck to accurately identify unused dependencies.
- Dependabot creates pull requests for outdated packages, complete with changelogs and risk assessments.
- Security vulnerabilities are detected and reported weekly.
- Everything is documented in GitHub Issues for team visibility.
This approach not only saves time but also significantly reduces the security risks and performance issues that stem from poorly managed dependencies.
By combining the AI capabilities of GitHub Copilot with GitHub Actions and Dependabot, we’ve turned a tedious manual task into an automated, integrated solution that keeps our codebase lean and secure. And I’ll take those time savings to do something more interesting, like unraveling the mystery of those weird goats in the TV show Severance. Or who knows, maybe I’ll finally figure out what macrodata refinement even means in that show (does anyone have any idea yet? Season two is killing me).
Try GitHub Copilot free and activate Dependabot
Learn more about GitHub Copilot for Business or start your free trial of GitHub Enterprise today.
The post Video: How to run dependency audits with GitHub Copilot appeared first on The GitHub Blog.
]]>The post GitHub’s top blogs of 2024 appeared first on The GitHub Blog.
]]>Choose your own adventure with AI models
GitHub Copilot has long leveraged different large language models (LLMs) for different use cases. Now, you can access these models to meet your own needs.
- Take a first look at OpenAI o1 in GitHub Copilot to see where it can add value to your day to day.
- Experiment with OpenAI o1-preview and o1-mini.
- Access Anthropic’s Claude 3.5 Sonnet, Google’s Gemini 1.5 Pro, and OpenAI’s o1-preview across many of GitHub Copilot’s surface areas and functions.
And by the way, this is now available to you for free. 
New from GitHub
2024 was all about empowering you to ship better code faster and smarter. Here are the launches that had the community buzzing:
- Try GitHub Models. We believe every developer (that’s you!) can be an AI engineer with the right tools and training. Access a number of AI models via a built-in playground that lets you test different prompts and model parameters, for free, right in GitHub. If you like what you’re seeing on the playground, you can easily bring the models to your developer environment in GitHub Codespaces and VS Code and start building.
- Unlock more possibilities with GitHub Copilot Extensions. Through a growing partner ecosystem, Copilot Extensions helps you use GitHub Copilot across third-party tools, services, and more (plus you can build your own!), all without leaving the IDE or GitHub.com.
- Work smarter with GitHub Copilot Enterprise. Our most advanced AI offering to date is customized to your organization’s knowledge and codebase, infusing GitHub Copilot throughout the software development lifecycle.
- Meet GitHub Copilot Workspace, the Copilot-native developer environment where any developer can go from idea to code to software, all in natural language. Sign up for the waitlist today, and we’ll email you when it’s your turn to try Copilot Workspace.
- Secure code more than three times faster with Copilot Autofix. Our vision for application security is a world where a vulnerability found means a vulnerability fixed. Copilot Autofix now includes security campaigns to help you remediate vulnerabilities at scale and pay down years of security debt with just a few clicks.
- Power faster, more efficient build systems thanks to Arm64 on GitHub Actions. This new addition to our suite of hosted runners provides power, performance, and sustainability improvements for all your GitHub Actions jobs. You can take advantage of Arm-based hardware hosted by GitHub to build and deploy your release assets anywhere Arm architecture is used.
Level up your skills
Keeping up with the always-changing technology landscape requires you to be a lifelong learner. Whether you’re looking to go deep in your current skillset or expand your knowledge to prepare for that next career move, we have resources to help you get there.
Git essentials
- Start with the fundamentals with our beginner’s guide to version control.
- Master the top 12 Git commands every developer must know.
- Showcase your new skills with a GitHub Certification!
AI for everyone
- Take a look behind the scenes at how AI code generation works.
- Learn tips, tricks, and best practices for using GitHub Copilot in your IDE.
- Think outside the box with 10 unexpected ways to use GitHub Copilot.
- Add a new language to your toolbox with AI coding tools.
The state of open source
The global developer community surged in size in 2024. (Did you know there are now 150M developers on GitHub?!) The Octoverse report highlighted the boom in data science and machine learning: Python overtook JavaScript as the most popular language on GitHub for the first time, and the use of Jupyter Notebooks skyrocketed.
Find out how your favorite tools fared and explore the hottest projects welcoming new contributors. Read the report.
 Stay connected
Like what you see? Don’t miss a beat in 2025. Subscribe to our newsletter, GitHub Insider, to keep up with the latest in software development.
We do newsletters, too
Discover tips, technical guides, and best practices in our biweekly newsletter just for developers. 
The post GitHub’s top blogs of 2024 appeared first on The GitHub Blog.
]]>The post Beginner’s guide to GitHub: Setting up and securing your profile appeared first on The GitHub Blog.
]]>So far in this series, we’ve covered the top Git commands every developer should know, creating repositories, uploading files and folders to your repository, adding code to your repository, creating your first pull request, and merging pull requests. Now it’s time to add a bit of security to your profile and a touch of personality.
Let’s get started!
Securing your GitHub account
Passwords by themselves are not completely secure. Passwords can be guessed or hacked by social engineering techniques such as phishing. Your passwords might also be more vulnerable if you reuse the same password for multiple sites and one of those other sites becomes compromised.
One of the best ways to improve the security of your account is to add two-factor authentication (2FA). Two-factor authentication makes it much more difficult for your account to be compromised, even if an attacker has your password. The way 2FA works, you will have to provide a second form of authentication when you log in with your username and password. This second form of authentication can be provided by an authenticator app, a text message, a hardware authentication device, or by using GitHub Mobile. If you’d like to read more about how 2FA works with GitHub, see the 2FA documentation.
Setting up 2FA on GitHub
In this section, we’re going to walk through setting up 2FA for your account on the web using an authenticator. The first step is to download an authenticator app. We recommend downloading the Microsoft Authenticator app.
Once you’ve done that, navigate to the appropriate settings page, and follow these steps:
- On GitHub, click your profile picture to open up the main menu.
- Click “Settings.”

-
From the menu on the left, click “Password and authentication.”

-
In the main window, click the green button that says “Enable two-factor authentication.” This loads the setup page for enabling 2FA.
Now, use the authenticator you downloaded to scan the QR code. The exact steps for adding the new account will vary depending on the authenticator app you’re using. After you scan the QR code, the app generates a code. Enter the code into the box on GitHub, and then click the green button that says “Continue.”

The screen will update to show you several recovery codes and instruct you to download them. You need to download these codes by clicking the green “Download” button. You should save these codes in a secure location.

One option for a secure location is a password manager. These codes will enable you to get back into your account if you are unable to verify your account using 2FA. Otherwise, you will lose access to your account if you cannot pass the 2FA when you are logging in from a new machine.
After you have downloaded and saved your codes, click the green “I have saved my recovery codes” button.
Congratulations! You successfully enabled 2FA on your account.

Personalizing your profile
Now that your account is more secure, it’s time for you to give it a bit more personality. You can do this by updating your profile README. Your profile README is a special file that acts as an “about me” page on your profile. It’s a great way to introduce yourself so others can get to know you better.
To create your profile README, first create a repository that matches your username.

When you create the repository, you’ll see a message reminding you to set the repository to public and initialize it with a README file to get started. Make sure that the “Public” option is selected, and check the box that says “Add a README file.” Once you’ve verified these items, click the green “Create repository” button at the bottom of the page.
After the profile is created, you should see a box on the right-hand side of the window that indicates this is a special repository. It serves as a reminder that the README.md content will appear on your public profile.
Click the “Edit README” button to begin editing your profile. This will open up the editor and you can edit your profile using Markdown. You can add text, images, animated GIFs, and emoticons as you see fit.
To get you started, here is a profile template. Scroll down to find the Markdown text, and click the copy button in the top-right corner of the template.

Navigate back to your profile’s README and paste in the template. Edit the template to make it yours and match your personal style. After you finish your edits, click the green “Commit changes” button at the top of the editor. Enter a commit message, and optionally a commit description. Then, click the green “Commit changes” button to push these changes to your repository.
Click your username at the top of the screen to navigate back to your main profile page. You should now see a nicely formatted and updated profile!
Your GitHub profile can be a living portfolio of your skills, projects, and interests. For more inspiration on customizing your profile, check out these GitHub Stars’ profiles: yabellini’s, levxyca’s, and omariosouto’s.
Your next steps
Now that you have secured your profile and a personalized README, you’re ready to make a strong impression on anyone who stumbles upon your profile. Let your personality shine and welcome to the community!
If you have any questions, pop them in the GitHub Community thread and we’ll be sure to respond.
Here are some more resources to help you on your GitHub journey:
*5 tips for making your GitHub profile page accessible
* About 2FA
* Configure 2FA
* About your profile
* Personalizing your profile
The post Beginner’s guide to GitHub: Setting up and securing your profile appeared first on The GitHub Blog.
]]>