Listen to our full conversation with Jason Lengstorf on The GitHub Podcast. And don’t miss the next episode by subscribing today!
The post Completing urgent fixes anywhere with GitHub Copilot coding agent and mobile appeared first on The GitHub Blog.
]]>In a video game, a single upgrade enhances your abilities, while combining multiple can create an unstoppable power-up. In the world of software development, this combined power does something similar: At GitHub, we believe it can empower developers with an incredible force to tackle any challenge, whether that’s fixing a critical bug, adding a new feature, or shipping your release to production.
My recent quest
“Stay a while and listen,” as the old Diablo line goes.
One morning, while on a walk, I received an urgent call. A critical feature on a website I collaborate on was displaying errors. This happened just before a high-visibility demo. I was miles from my laptop, and a traditional fix seemed hours away. That would be far too late to address this immediate need. Rolling back wasn’t an option, as it would remove functionality vital for the presentation.
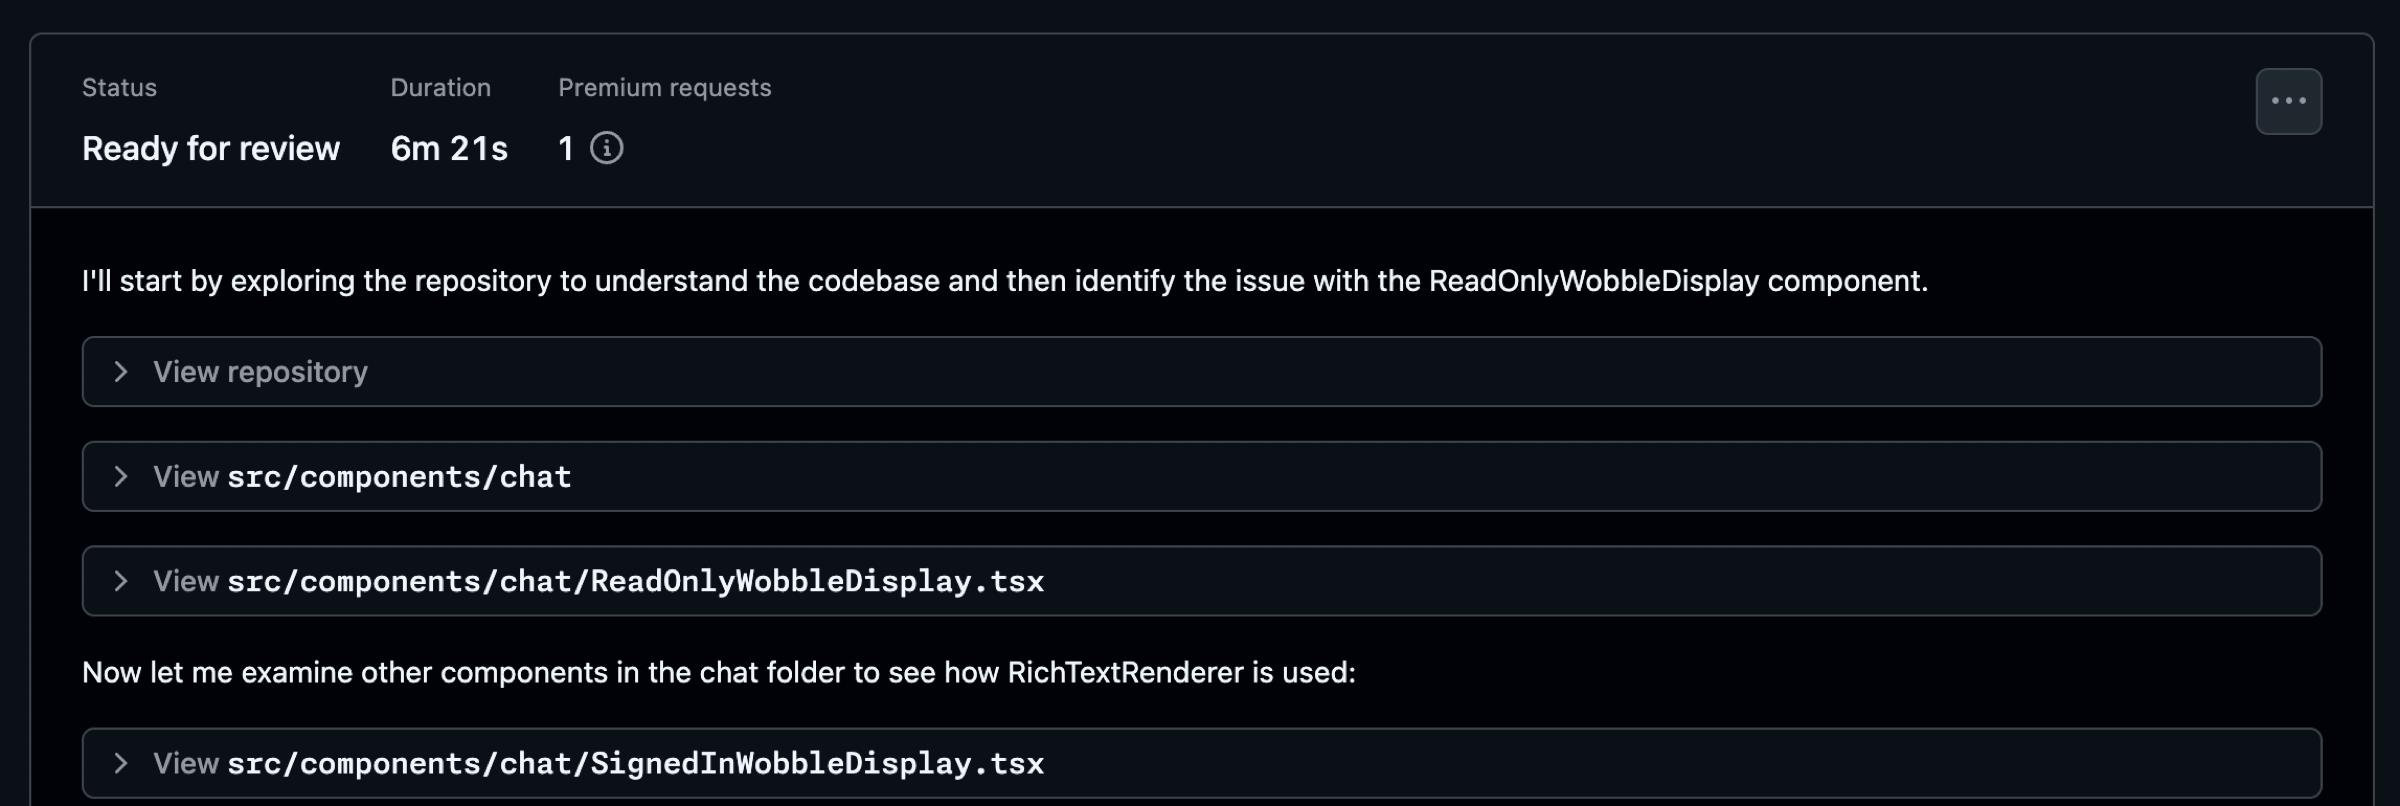
The only tool I had available was my cell phone. Instead of rushing home, I realized I could leverage two powerful GitHub features: GitHub Copilot coding agent and the GitHub Mobile app. I could quickly create an issue on mobile and delegate the problem to Copilot, in order to expedite a resolution.
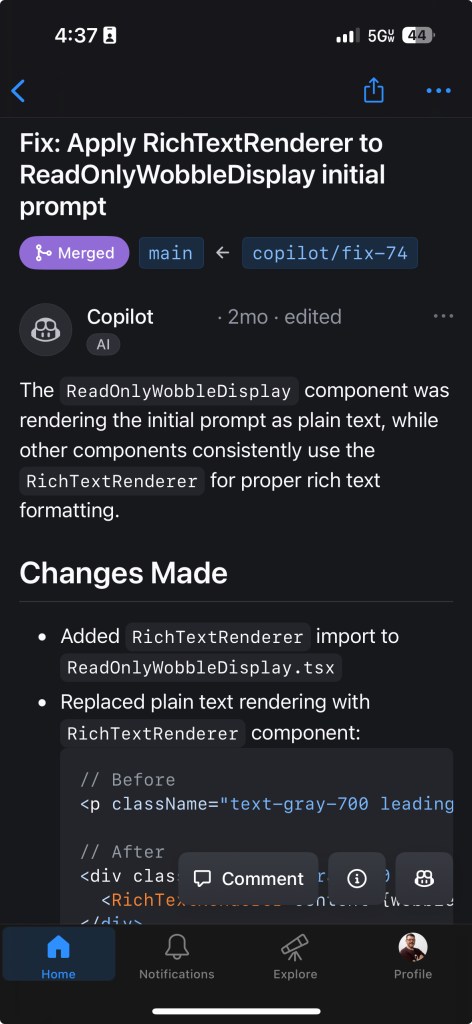
From GitHub Mobile, I scanned recent pull requests and identified a likely culprit: a pull request that added markdown rendering and a rich text editor. I created a new issue, describing the problem and referencing the suspicious pull requests, while also relying on my repository’s copilot-instructions to help guide the agent. With a few taps, I assigned the issue to GitHub Copilot coding agent.
Just six minutes later, a notification appeared on GitHub Mobile. GitHub Copilot had generated a pull request with a fix! I reviewed it immediately from my phone. It was a clear, simple solution to the problem. Leveraging existing workflows, I could even test the fix on a preview branch right from my mobile device.
Satisfied, I approved the pull request, which was deployed to production through automated workflows managed with GitHub Actions in my repository. By the time I reached my car, the director confirmed the issue was resolved, and they were ready to proceed with their demo.
This experience, all managed from my phone, revealed a powerful capability within the GitHub Platform. Combining these two features—GitHub Copilot coding agent and GitHub Mobile—unlocked a new ability for me, and prompted me to explore what other combinations within the platform could further power-up my work.
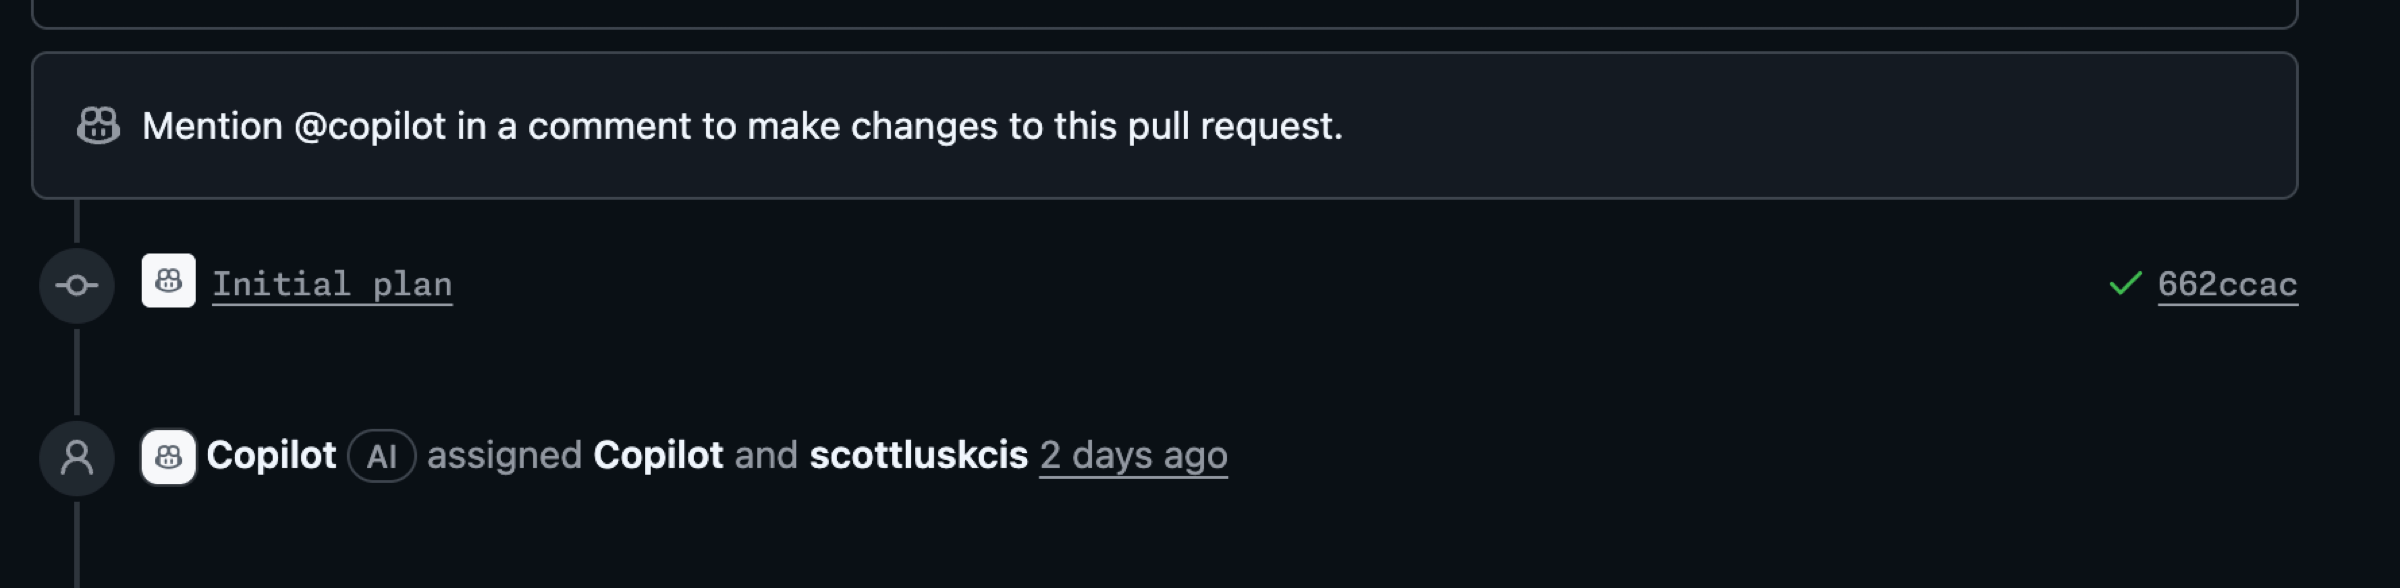
Here is a view from my phone using the GitHub Mobile app after reviewing the pull request and approving. We see a summary of Copilot’s fixes for the issue.
Using the right tool at the right time
It’s important to clarify that I’m not suggesting you delegate all development to Copilot from your mobile device, nor that every fix can be approved instantly from your phone. However, my experience highlights a crucial point: having the right tools for the right situation makes all the difference. GitHub Copilot as an AI pair programmer is a game-changer. By incorporating GitHub Copilot coding agent and GitHub Mobile into my workflow, alongside existing features like GitHub Issues and GitHub Actions, I’ve discovered a new level of efficiency. Here’s how you can gain this same power-up.
Keys to unlock this power-up
Key 1: Leverage instructions files
There is a plethora of knowledge available on how you can effectively use GitHub Copilot. One area you’ll certainly come across is custom instructions for GitHub Copilot. These instructions are the guidelines and rules that can influence the results you get from Copilot. A well-defined set of instructions can go a long way.
In my scenario, I used repository custom instructions to give Copilot additional context for understanding important information about my repository. This included the core purpose of the repository, the tech stack used, architecture constraints, coding standards, testing strategy, dependency management, observability, documentation, error handling, and more. It’s important to define the things that are important for GitHub Copilot to have and to understand about your project.
For me, identifying things like directory structure, coding standards, and project dependencies were important for identifying a fix with less churn. Custom instructions are written using markdown and including them provide specific guidance to GitHub Copilot Coding Agent, Copilot Chat, and Copilot code review. It’s important to note that instructions in this file apply to all chat requests for the repository. This file exists in the .github directory in your repository right off of the root level.
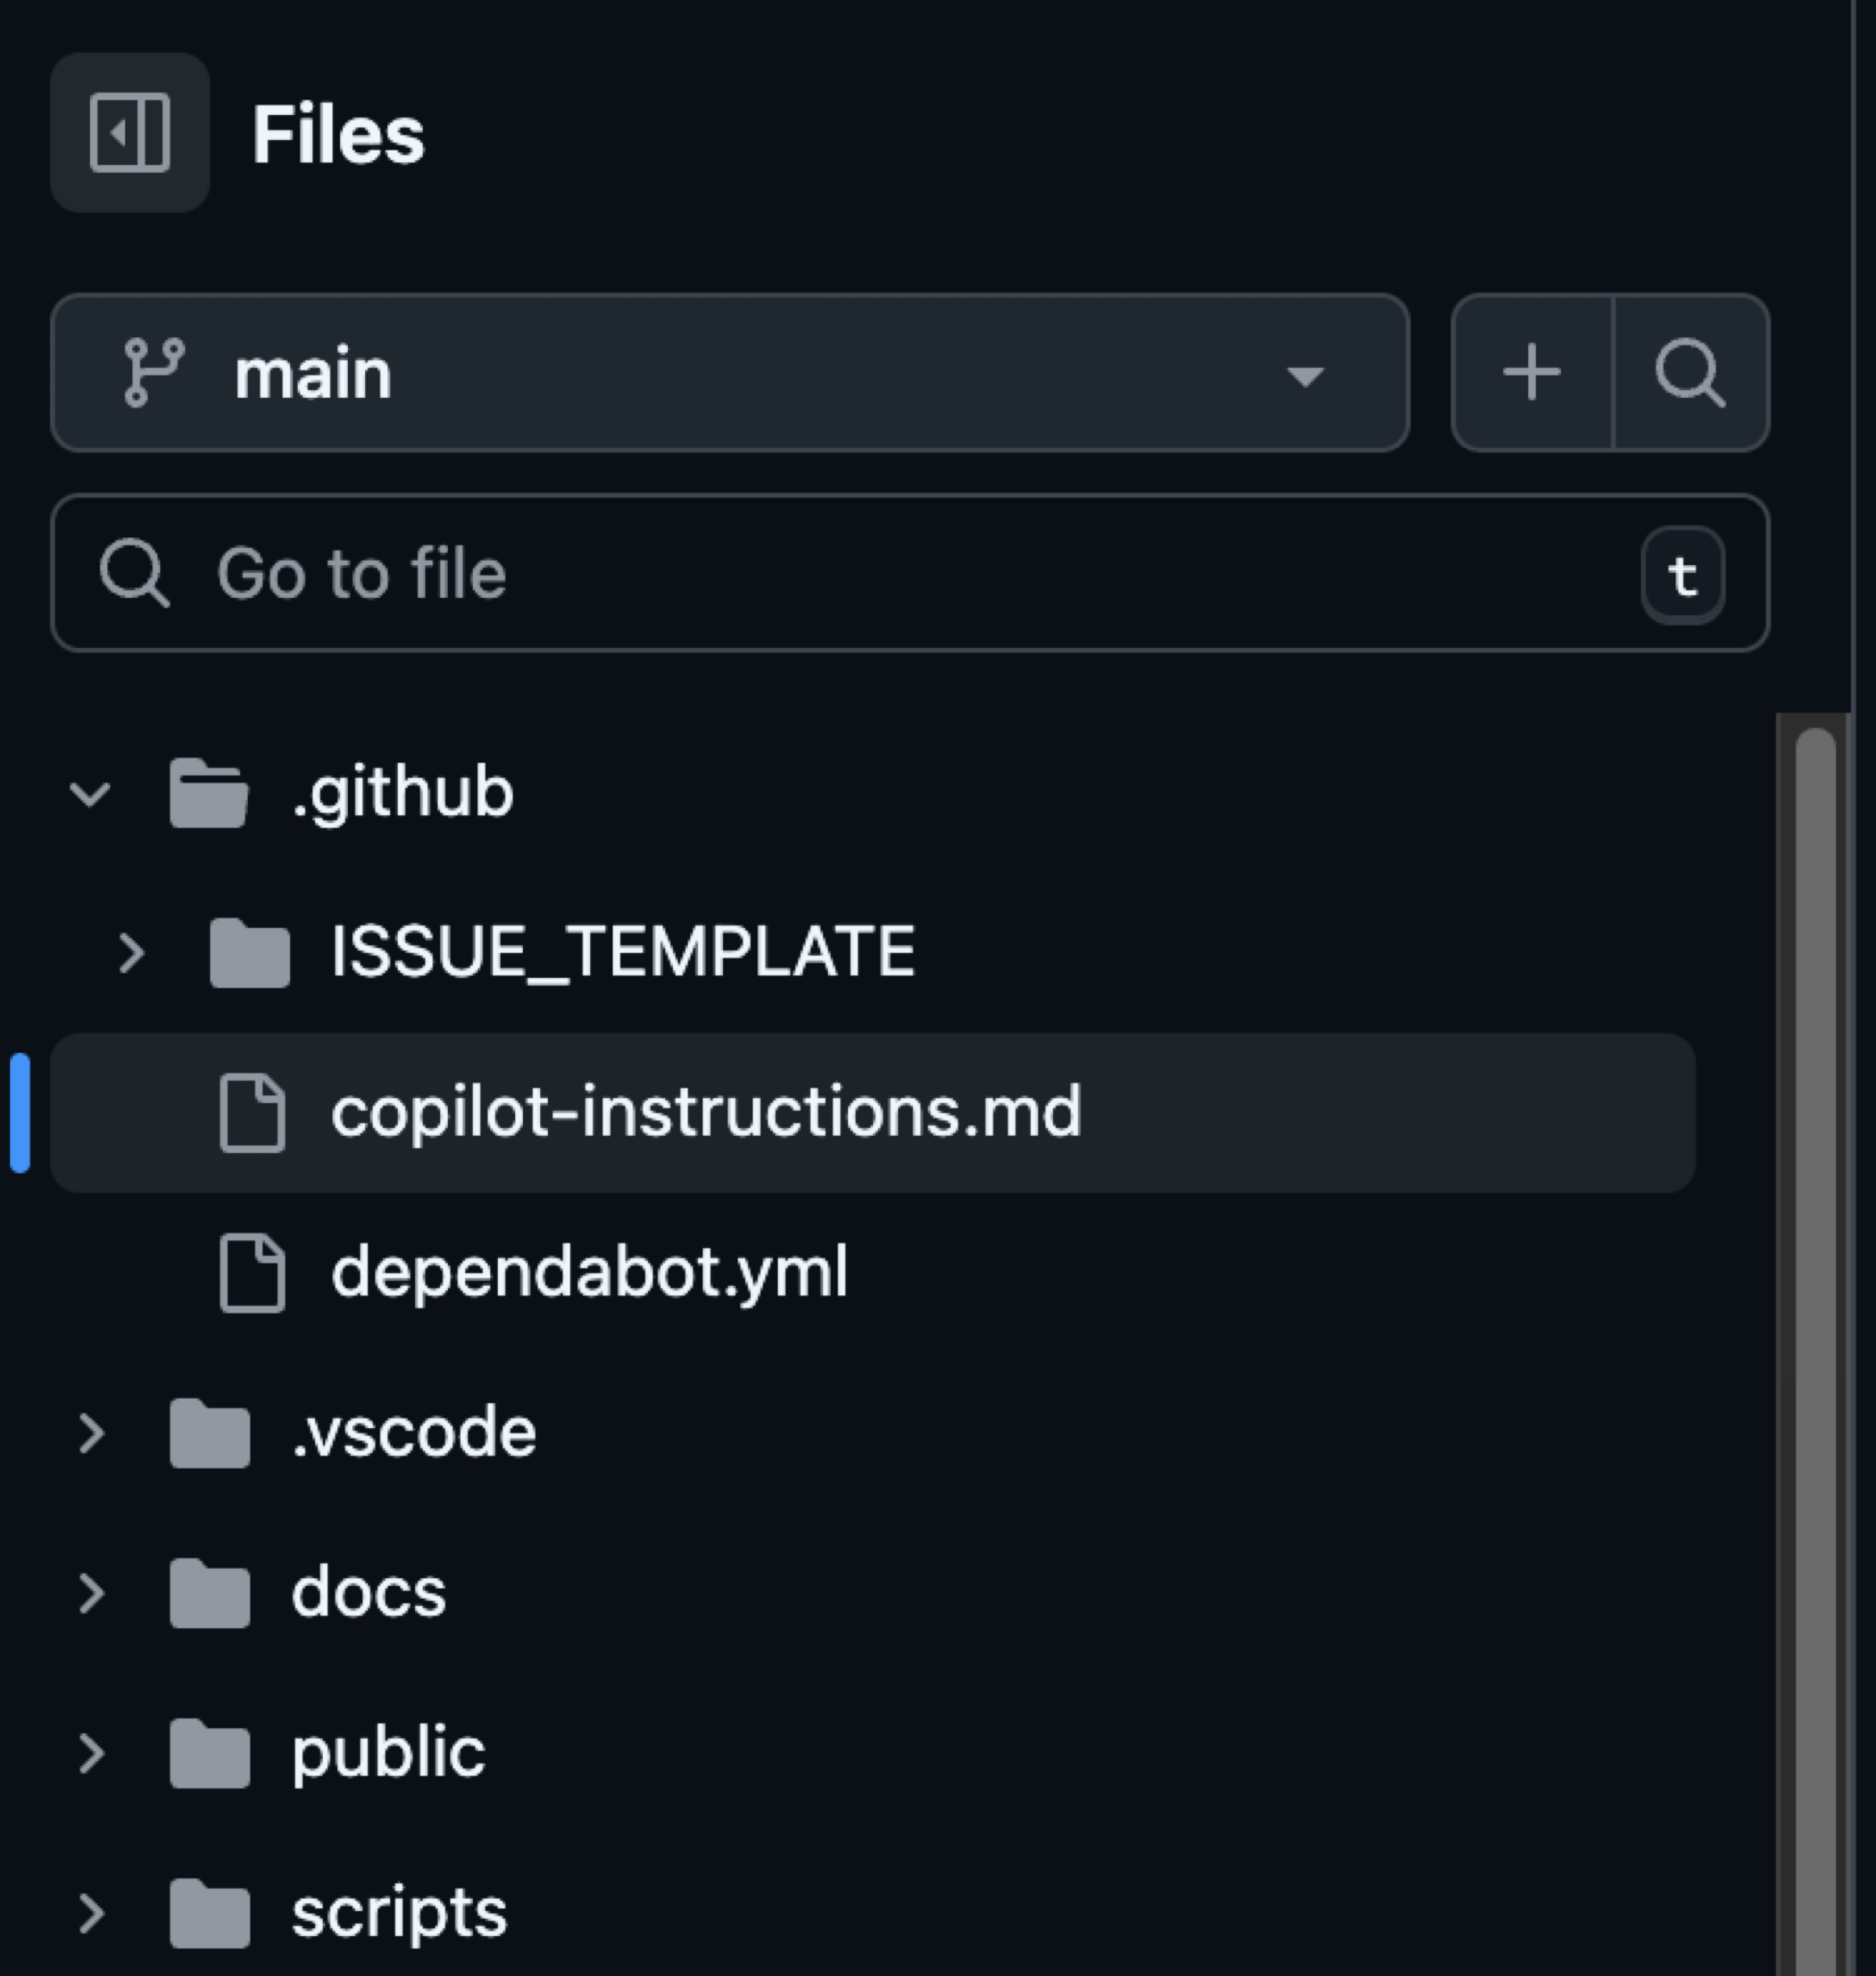
EXAMPLE: Here’s an example of an instructions file you might see in the .github/copilot-instructions.md file. Remember to tailor these to your project.
# Copilot Instructions
- Use Next.js App Router with React and TypeScript across the project.
- Use pnpm for all package management commands (not npm or yarn).
- Use Tailwind CSS v4 with a mobile-first approach; enhance with sm:/md:/lg:/xl: as needed.
- Prefer shadcn/ui components before creating new UI; place shadcn/ui in src/components/ui and shared components in src/components/shared.
- Always use next/link for internal navigation and next/image for images.
- Prefer server components by default; add "use client" only when needed (event handlers, browser APIs).
- Implement server actions where appropriate; place them in src/lib/actions.
- Put utilities in src/utils and Supabase utilities in src/utils/supabase; define shared types in src/types.
- Write tests with Vitest for critical business logic and components; place tests in __tests__ directories.
- Follow Next.js performance best practices and implement proper error boundaries and error handling.
- Use environment variables (NEXT_PUBLIC_ for client exposure); keep secrets server-side only.
- Use Vercel for deploys and GitHub Actions for CI/CD with pnpm scripts (pnpm dev/build/test).
- Keep code idiomatic: functional components + hooks, async/await for async, and idiomatic Next.js/React patterns.
## Folder structure reference (high-level)
```text
.
├─ app/ # Next.js App Router: route groups, page.tsx, layout.tsx, loading.tsx, error.tsx, route.ts
├─ public/ # Static assets served at /
├─ src/
│ ├─ components/
│ │ ├─ ui/ # shadcn/ui components
│ │ └─ shared/ # Shared app-specific components
│ ├─ lib/
│ │ └─ actions/ # Server actions ("use server") and server-side logic
│ ├─ utils/
│ │ ├─ supabase/ # Supabase client utilities (server-side)
│ │ └─ index.ts # General utilities (example)
│ └─ types/ # Shared TypeScript types
├─ __tests__/ # Vitest tests (or co-located __tests__ near source)
├─ docs/ # Project documentation
└─ .github/ # Workflows, issue templates, Copilot instructions
```
### Directory-specific conventions
- app/: Follow App Router conventions (page.tsx, layout.tsx, route.ts, loading.tsx, error.tsx). Use the Metadata API for SEO.
- src/components/ui: Prefer existing shadcn/ui components; extend consistently if needed.
- src/components/shared: Reusable app-specific components; keep presentational components server-rendered if possible.
- src/lib/actions: Mark server actions with "use server" and keep client-only imports out.
- src/utils/supabase: Reuse a shared Supabase client; do not re-instantiate ad hoc clients.
- __tests__: Use Vitest; write descriptive, focused tests for critical logic and components.
## Commands
- pnpm install — Install project dependencies.
- pnpm dev — Start the Next.js development server with hot reloading.
- pnpm build — Create a production build of the app.
- pnpm start — Run the production server locally from the built output (if defined).
- pnpm test — Run the Vitest test suite.
- pnpm lint — Lint the codebase (if defined in package.json).
- pnpm typecheck — Type-check the codebase using TypeScript only (no emit), if defined.
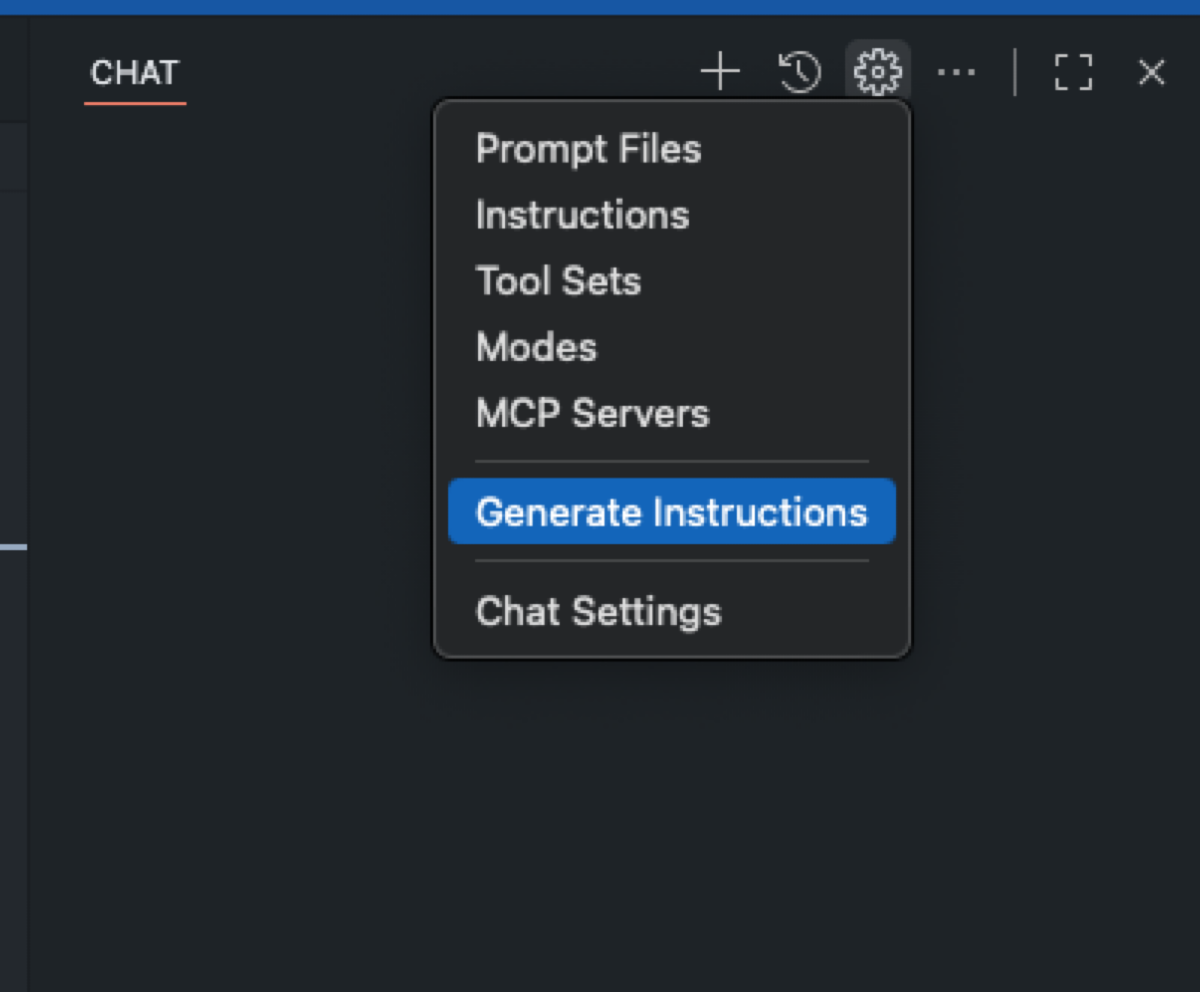
- pnpm format — Format files with Prettier (if defined).TIP: If you don’t already have an instructions file and are using VS Code, navigate to Configure Chat and choose Generate Instructions as noted at use custom instructions in VS Code.
In addition to repository-wide custom instructions, you can define path-specific custom instructions and make use of the applyTo keyword to target only the directories, file patterns, languages or task contexts you care about. Path-specific instructions files allow you to scope the guidance you provide to Copilot with details relevant to a specific scenario based on what is provided in the applyTo keyword.
EXAMPLE: Here is one example of a path specific instructions file that I use to ensure any components Copilot helps create follow already established conventions. A file like this gets placed in the .github/instructions folder as noted at adding repository custom instructions.
---
applyTo: "src/components/ui/**/*.tsx,src/components/shared/**/*.tsx"
---

- Prefer existing shadcn/ui components; check for an existing component before creating a new one.
- Style with Tailwind v4 using mobile-first classes; add responsive variants for larger screens.
- Use Lucide React icons (import from 'lucide-react'); avoid inline SVGs unless necessary.
- Ensure accessible interactions (keyboard focus, ARIA where applicable) and touch targets ≥44px.
- Avoid client components unless interactivity is required; keep pure presentational pieces server-rendered.
- Co-locate component tests in __tests__ where applicable; use Vitest.
IMPORTANT: When it comes to writing good instruction files, check out some community-contributed instructions, prompts, and more for examples and inspiration.
TAKEAWAY: Instructions help provide concrete context such as rules, standards, and preferences that GitHub Copilot can follow. Well written instructions noticeably improve the quality and relevance of its suggestions. By helping Copilot to internalize your project and coding standards, you’ll see higher-quality output and can finish tasks faster.
Key 2: Get acquainted with copilot coding agent
Treat Copilot coding agent like you would any team member: Everyone has skills and abilities in which they are strong, and those are the skills you want to leverage the most. Check out the post GitHub Copilot: Meet the new coding agent for more details on where the coding agent excels.
In order to become better acquainted with Copilot coding agent, assign Copilot to work on an issue, create a pull request, and track Copilot’s sessions in your repository. The more you know about what this teammate can do, the more comfortable you’ll get delegating tasks.
Just like the guidelines and rules you establish in the instructions files are important, it’s also important to provide specific instructions when creating issues to assign to Copilot.
When you create a new issue in your repository, before you assign it to Copilot, be sure that the description accomplishes the following:
- Gives the right context
- Is very intentional in what the issue is aimed to accomplish
- Is well-defined
After ensuring these criteria are met, then simply assign the issue to Copilot, and it will take it from there.

TIP: When providing details in areas such as your issue description, keep in mind you don’t have to specify anything you’ve already provided in your instructions file.
As Copilot works, you have the ability to view the session and understand how Copilot is approaching an issue. In this example, Copilot diagnosed the problem and notified me by requesting a pull request review in just over six minutes. Seeing how Copilot works helps you better understand ways you might tweak your approach and refine the results.
As Copilot works, be certain you review the work and chat with Copilot using @copilot in the comments to ask for changes. Don’t just blindly accept the changes and rubber stamp the pull request. Give this a good review.
TAKEAWAY: Ultimately, whatever you can delegate to GitHub Copilot coding agent frees up your focus for other critical tasks. This doesn’t mean you don’t review the results. Be very specific and intentional in the instructions you provide in areas such as issues.
Key 3: Establish best practices and automations
Another important aspect of the power-up I shared earlier is leveraging IssueOps and automations with GitHub Actions. IssueOps turns GitHub Issues into a controlled command interface for automation. These structured commands trigger GitHub Actions workflows that parse arguments, enforce auth/guardrails, run operational tasks (deploy, provision, migrate, etc.), and write results back to the issue for auditability. For more details on what IssueOps is, see the post IssueOps: Automate CI/CD (and more!) with GitHub Issues and Actions.
In my scenario, I used an issue template that I had previously created for bugs. This template helps me provide details and context, and saves me time when I create issues.
EXAMPLE: Issue templates are placed in the .github/ISSUE_TEMPLATE folder in your repository. See configuring issue templates for your repository for more details.
name: "Bug (Copilot Coding Agent-ready)"
description: "Report a bug with details so Copilot can propose a fix via PR."
title: "[Bug]: <short summary>"
labels: ["bug", "triage", "copilot-coding-agent"]
projects:
  - "my-org/1234"
assignees: []
body:
  - type: markdown
    attributes:
      value: |
        Thanks for reporting a bug! This template collects the details Copilot’s coding agent needs to propose a fix.

  - type: input
    id: environment
    attributes:
      label: Environment
      description: OS/Browser, device, app version/commit, and environment (local, preview, production).
      placeholder: "macOS 14, Chrome 126, iPhone 13; commit abc123 on preview"
    validations:
      required: true

  - type: textarea
    id: steps
    attributes:
      label: Reproduction steps (concise and deterministic)
      description: Provide a minimal, reliable sequence.
      placeholder: |
        1) Go to /app/<path>
        2) Click <button>
        3) Enter <value>
        4) Submit
        Expected: ...
        Actual: ...
    validations:
      required: true

  - type: textarea
    id: expected_actual
    attributes:
      label: Expected vs. actual behavior
      description: Describe exactly what you expected and what actually happened, including any error text.
      placeholder: |
        Expected:
        - ...
        Actual:
        - ...
    validations:
      required: true

  - type: textarea
    id: context_links
    attributes:
      label: Related context and references
      description: Link related issues/PRs, error monitoring (Sentry, logs), designs, or documentation.
      placeholder: |
        - Related issue: #123
        - PR that introduced regression: #456
        - Design reference: <Figma link>
        - Monitoring: <Sentry link>
    validations:
      required: false

  - type: textarea
    id: screenshots
    attributes:
      label: Screenshots or screen recordings (links)
      description: Optional, but very helpful for UI bugs.
      placeholder: "https://user-images.githubusercontent.com/... or Loom link"
    validations:
      required: false
TAKEAWAY: Leverage an IssueOps type of approach in your practices to help refine your process. This can help provide a solid foundation to start from and accelerate your work, especially when pairing with Copilot.
Embracing combined power
My journey, and the keys we’ve discussed, reveal a core truth: when you combine multiple GitHub features, you get more power. Integrating GitHub Copilot coding agent with GitHub Mobile, enhanced by precise instructions and IssueOps automations, has the power to transform how you build and fix. It’s not just the tools themselves, but the holistic approach they enable that supercharges your development workflow.
The GitHub Platform offers endless combinations for your developer adventure. Embrace this combined power, empower your team, and unlock new levels of efficiency and innovation in every project. What power-up will you discover that makes your team unstoppable?
The post Completing urgent fixes anywhere with GitHub Copilot coding agent and mobile appeared first on The GitHub Blog.
]]>The post Rediscovering joy in learning: Jason Lengstorf on the state of development appeared first on The GitHub Blog.
]]>I’ve been there. Staring at my screen at 11 p.m., panicked, trying to learn the latest framework because I’m convinced it’ll make or break my career. Jason Lengstorf thinks we’ve got this all wrong.
It feels like we’re scrambling to learn whatever thing we’re worried is gonna cost us our job if we don’t learn it really fast. A huge motivation for me is to try to remind everybody that this stuff can be fun. And having fun isn’t not working.
Jason Lengstorf, creator of CodeTV
We had the pleasure of hosting Jason Lengstorf, creator of “Learn with Jason” and the mastermind behind Code TV, where he makes what he calls “reality television for developers,” on a recent episode of The GitHub Podcast. With over 20 years in the industry, Jason’s perspective on learning, AI, and open source got me thinking about where we’ve been and where we’re headed.
Listen to the full podcast episode👇
Jason’s take resonates with me because I see (and feel) this anxiety everywhere. Every Slack channel I’m in, every conference hallway conversation. Some of us are running a bit scared instead of running curious. But Jason’s perspective, combined with his predictions about AI integration and the critical role of open source maintainers, paints a picture of an industry on the cusp of significant change.
Why I stopped panic-learning (and you should too)
Here’s Jason’s thesis: “Having fun isn’t not working. Having fun actually makes you more likely to retain stuff and more likely to stick through a project and finish it.”
When I first started building with AI tools, I treated every new model release like a pop quiz I hadn’t studied for. Sound familiar? But Jason’s approach with “Learn with Jason” flips this completely. Instead of cramming knowledge into developers’ heads, he creates space for exploration and discovery.
The difference shows up everywhere. When developers approach learning with curiosity rather than desperation, they absorb concepts more thoroughly. They contribute more meaningfully to projects. They actually finish what they start. And they share their knowledge instead of hoarding it.
Having fun actually makes you more likely to retain stuff and more likely to stick through a project and finish it and share it.
I’m guilty of this too. How many times have you bookmarked a tutorial “for later” because you were too stressed about keeping up to actually enjoy learning it? When we give ourselves permission to enjoy the process, we model healthy behaviors for the next generation of developers.
AI as a force multiplier (not a replacement)
Jason nailed it with this analogy: “A can of caulk and a plunger can get you part of the way there, but at some point, you need to hire a plumber.” That’s AI and developers in a nutshell.
All the YouTube videos in the world aren’t going to teach me how this stuff really works in 25 minutes. What we’re seeing in practice is that the tooling is acting similarly to the way that something like TypeScript suddenly enabled developers to intuit things about a code base.
Here’s what happened when Jason and Jack Harrington built an MCP (Model Context Protocol) server live on stream. The AI churned out code automatically. Everything looked perfect until they hit a bug: One missing component name in a config file.
Jack fixed it in seconds because he knew the system. Jason, despite 20 years of experience, would’ve needed to reverse-engineer the entire AI-generated codebase to debug it.
If you’re a skilled developer, this is gonna make you unbelievably fast. If you are not a skilled developer, it’s gonna give you a lot of tools to learn very quickly. If you have no interest in learning, it is going to get you into a big bad mess really, really fast.
That’s the difference AI makes: It amplifies what you already know, but can’t replace domain knowledge.
For skilled developers, it creates incredible leverage. For those learning, it accelerates the process. But for those hoping to bypass learning entirely? Jason’s right — it creates bigger problems faster.
The fact that MCP emerged as a shared standard gives me hope. Instead of every company launching their own incompatible AI integration system, we’re seeing convergence around shared protocols. This suggests the AI tooling ecosystem is maturing beyond the “new framework every week” phase.
The developers keeping our world running (and why they need our help)
Zod is the TypeScript schema validation library that’s become foundational to so much of our ecosystem. Yet, very few people know who builds Zod and how much of the AI stuff it’s powering, Jason says.
This brings to mind the XKCD comic about critical infrastructure maintained by “some random person in Nebraska who’s thanklessly maintaining it.” The reality is even more stark than the comic suggests:
- SQLite, which runs most local databases globally, is maintained by four people
- The global timezone database is managed by two people
- Colin McDonald maintains Zod, which powers countless AI applications and framework integrations
During Jason’s live coding challenges on CodeTV, participants consistently reach for the same open source tools: Tailwind, ShadCN/UI, Vue, Nuxt, React. We deploy to proprietary services and use proprietary AI models, but the building blocks, the things that actually create value, are largely gifts from individual maintainers and small teams.
This creates both opportunity and responsibility. As Jason notes, Zod is one of the few projects he sponsors on GitHub because he considers it “load bearing” for his work. Check your package.json right now. I bet you’ll find at least three dependencies maintained by people you’ve never heard of. More of us need to identify our own load-bearing dependencies and if able to, support them financially through GitHub Sponsors or other means.
The sustainability of open source isn’t just about individual kindness. It’s about the health of our entire industry. When critical infrastructure depends on unpaid volunteers, we’re building on unstable foundations.
The next wave of web innovation
I have a hunch that we are in a bit of a temporary lull that’s gonna lead to something really interesting.
The JavaScript ecosystem is in a curious state. We’ve hit what Jason calls “a weird spot” where instead of innovating, “we’re just arguing about whether or not the innovation we had was horrific.” Meanwhile, CSS is experiencing a boom with new browser capabilities arriving regularly.
But this apparent stagnation might be the calm before a significant storm. Jason looks at how AI will change UX fundamentals: “You don’t necessarily need as many navigation buttons and nested dropdowns and all this really complex information architecture stuff anymore. It’s gonna be more conversational.”
This doesn’t mean everything becomes a chat interface. People want varied interaction methods. Instead, we’ll need new approaches to component-based architecture that integrate with autonomous agents operating different parts of websites.
The convergence of local AI models running in browsers, standardized protocols like MCP, and the web’s necessity to adapt while maintaining core technologies creates a unique moment. We’re seeing early patterns emerge around bringing AI capabilities directly into web applications as first-class features.
For indie developers, this moment offers opportunities similar to the early JavaScript framework days. The same way edge functions made enterprise-level capabilities accessible to individual developers, AI tools are democratizing capabilities that were previously available only to large organizations.
Looking forward
Here’s what I’m taking from Jason: Stop learning out of fear. Start building with curiosity. Support the maintainers who power your apps. And when the next wave of web innovation hits (and it will), you’ll be ready because you’ve been having fun the whole time.
The developers who embrace learning for joy rather than fear will be best positioned to use AI tools effectively. Those who understand and support the open source infrastructure enabling their work will build on more stable foundations. And those who stay curious about emerging patterns will help shape what comes next.
The question isn’t whether you can keep up. It’s whether you’re enjoying the ride.
The post Rediscovering joy in learning: Jason Lengstorf on the state of development appeared first on The GitHub Blog.
]]>The post Why developer expertise matters more than ever in the age of AI appeared first on The GitHub Blog.
]]>| Editor’s note: This piece was originally published in our LinkedIn newsletter, Branching Out_. Sign up now for more career-focused content > |
AI tools seem to be everywhere. With the tap of a key, they provide ready answers to queries, autocomplete faster than our brains can, and even suggest entire blocks of code. Research has shown that GitHub Copilot enables developers to code up to 55% faster. Junior developers, specifically, may see a 27% to 39% increase in output with AI assistance according to MIT, showing even greater productivity gains from their adoption of AI than more experienced developers.
But here’s the question: you may be coding faster with AI, but when was the last time you asked yourself why before adopting a suggestion from an AI coding assistant?
Being a developer is not just about producing code. It’s about understanding why the code works, how it fits into the bigger picture, and what happens when things break down. The best developers know how to think critically about new problems and take a systems view of solving them. That kind of expertise is what keeps software resilient, scalable, and secure, especially as AI accelerates how quickly we ship. Without it, we risk building faster but breaking more.
Our CEO, Thomas Dohmke, put it bluntly at VivaTech: “Startups can launch with AI‑generated code, but they can’t scale without experienced developers.” Developer expertise is the multiplier on AI, not the bottleneck.
We’re not saying you have to reject AI to be a great developer. At GitHub, we believe AI is a superpower, one that helps you move faster and build better when used thoughtfully. Your role as a developer in the age of AI is to be the human-in-the-loop: the person who knows why code works, why it sometimes doesn’t, what the key requirements in your environment are, and how to debug, guide AI tools, and go beyond vibe coding.
After all, AI can help you write code a lot faster, but only developer expertise turns that speed into resilient, scalable, and secure software.
| TL;DR: AI pair‑programming makes you faster, but it can’t replace the judgment that keeps software safe and maintainable. This article offers three concrete ways to level‑up your expertises. |
AI’s productivity dividend + developer experience = greater impact
| Benefit | How human judgment multiplies the value |
|---|---|
| ⏱️ Faster commits (up to 55 % quicker task completion) | Devs run thoughtful code reviews, write tests, and surface edge cases so speed never comes at the cost of quality. |
| 🧠 Lower cognitive load | Freed-up mental bandwidth lets developers design better architectures, mentor teammates, and solve higher-order problems. |
| 🌱 Easier onboarding for juniors | Senior engineers provide context, establish standards, and turn AI suggestions into teachable moments building long-term expertise. |
| 🤖 Automated boilerplate | Devs tailor scaffolding to real project needs, question assumptions, and refactor early to keep tech-debt in check and systems secure. |
Speed without judgment can mean:
- Security vulnerabilities that static analysis can’t spot on its own.
- Architecture choices that don’t scale beyond the demo.
- Documentation drift that leaves humans and models guessing.
The remedy? Double down on the fundamentals that AI still can’t master.
Mastering the fundamentals: 3 key parts of your workflow to focus on when using AI
As the home for all developers, we’ve seen it again and again: becoming AI-savvy starts with the old-school basics. You know, the classic tools and features you used before AI became a thing (we know, it’s hard to remember such a time!). We believe that only by mastering the fundamentals can you get the most value, at scale, out of AI developer tools like GitHub Copilot.
A junior developer who jumps into their first AI-assisted project without having a foundational understanding of the basics (like pull requests, code reviews, and documentation) may ship fast, but without context or structure, they risk introducing bugs, missing edge cases, or confusing collaborators. That’s not an AI problem. It’s a fundamentals problem.
Let’s revisit the core skills every developer should bring to the table, AI or not. With the help of a few of our experts, we’ll show you how to level them up so you can dominate in the age of AI.
1. Push for excellence in the pull request
At the heart of developer collaboration, pull requests are about clearly communicating your intent, explaining your reasoning, and making it easier for others (humans and AI alike!) to engage with your work.
A well‑scoped PR communicates why a change exists—not just what changed. That context feeds human reviewers and Copilot alike.
As GitHub developer advocate Kedasha Kerr advises, start by keeping your pull requests small and focused. A tight, purposeful pull request is easier to review, less likely to introduce bugs, and faster to merge. It also gives your reviewers, as well as AI tools like Copilot, a clean scope to work with.
Your pull request description is where clarity counts. Don’t just list what changed—explain why it changed. Include links to related issues, conversations, or tracking tickets to give your teammates the full picture. If your changes span multiple files, suggest where to start reviewing. And be explicit about what kind of feedback you’re looking for: a quick sanity check? A deep dive? Let your reviewers know.
Before you ask for a review, review it yourself. Kedasha recommends running your tests, previewing your changes, and catching anything unclear or unpolished. This not only respects your reviewers’ time, it improves the quality of your code and deepens your understanding of the work.
A thoughtful pull request is a signal of craftsmanship. It builds trust with your team, strengthens your communication skills, and gives Copilot better context to support you going forward. That’s a win for you, your team, and your future self.
Here’s a quick 5‑item PR checklist to reference as you work:
- Scope ≤ 300 lines (or break it up).
- Title = verb + object (e.g., Refactor auth middleware to async).
- Description answers “why now?” and links to the issue.
- Highlight breaking changes with ⚠️ BREAKING in bold.
- Request specific feedback (e.g., Concurrency strategy OK?).
Drop this snippet into .github/pull_request_template.md and merge.
Learn more about creating a great pull request >
2. Rev up your code reviews
AI can generate code in seconds, but knowing how to review that code is where real expertise develops. Every pull request is a conversation: “I believe this improves the codebase, do you agree?” As GitHub staff engineer Sarah Vessels explains, good code reviews don’t just catch bugs; they teach, transfer knowledge, and help teams move faster with fewer costly mistakes.
And let’s be honest: as developers, we often read and review far more code than we actually write (and that’s ok!). No matter if code comes from a colleague or an AI tool, code reviews are a fundamental part of being a developer—and building a strong code review practice is critical, especially as the volume of code increases.
You should start by reviewing your own pull requests before assigning them to others. Leave comments where you’d have questions as a reviewer. This not only helps you spot problems early, but also provides helpful context for your teammates. Keep pull requests small and focused. The smaller the diff, the easier it is to review, debug, and even roll back if something breaks in production. In DevOps organizations, especially large ones, small, frequent commits also help reduce merge conflicts and keep deployment pipelines flowing smoothly.
As a reviewer, focus on clarity. Ask questions, challenge assumptions, and check how code handles edge cases or unexpected data. If you see a better solution, offer a specific example rather than just saying “this could be better.” Affirm good choices too: calling out strong design decisions helps reinforce shared standards and makes the review process less draining for authors.
Code reviews give you daily reps to build technical judgement, deepen your understanding of the codebase, and earn trust with your team. In an AI-powered world, they’re also a key way to level up by helping you slow down, ask the right questions, and spot patterns AI might miss.
Here are some heuristics to keep in mind when reviewing code:
- Read the tests first. They encode intent.
- Trace data flow for user input to DB writes to external calls.
- Look for hidden state in globals, singletons, and caches.
- Ask “What happens under load?” even if performance isn’t in scope.
- Celebrate good patterns to reinforce team standards.
Learn more about how to review code effectively >
3. Invest in documentation
Strong pull requests and code reviews help your team build better software today. But documentation makes it easier to build better software tomorrow. In the AI era, where code can be generated in seconds, clear, thorough documentation remains one of the most valuable—and overlooked—skills a developer can master.
Good documentation helps everyone stay aligned: your team, new contributors, stakeholders, and yes, even AI coding agents (docs make great context for any AI model, after all). The clearer your docs, the more effective AI tools like Copilot can be when generating code, tests, or summaries that rely on understanding your project’s structure. As GitHub’s software engineer Brittany Ellich and technical writer Sam Browning explain, well-structured docs accelerate onboarding, increase adoption, and make collaboration smoother by reducing back and forth.
The key is to keep your documentation clear, concise, and structured. Use plain language, focus on the information people actually need, and avoid overwhelming readers with too many edge cases or unnecessary details. Organize your docs with the Diátaxis framework, which breaks documentation into four categories:
- Tutorials for hands-on learning with step-by-step guides
- How-to guides for task-oriented steps with bulleted or numbered list
- Explanations for deeper understanding
- Reference for technical specs such as API specs
When your docs follow a clear structure, contributors know exactly where to find what they need and where to add new information as your project evolves.
In short: great documentation forces you to sharpen your own understanding of the system you’re building. That kind of clarity compounds over time and is exactly the kind of critical thinking that makes you a stronger developer.
Learn more about how to document your project effectively >
A level‑up dev toolkit
To make things simple, here’s a skills progression matrix to keep in mind no matter what level you’re at.
| Skill | Junior | Mid‑level | Senior |
|---|---|---|---|
| Pull requests | Describes what changed | Explains why and links issues | Anticipates perf/security impact & suggests review focus |
| Code reviews | Leaves 👍/👎 | Gives actionable comments | Mentors, models architecture trade‑offs |
| Documentation | Updates README | Writes task‑oriented guides | Curates docs as a product with metrics |
And here are some quick‑wins you can copy today:
.github/CODEOWNERSto auto‑route reviews- PR and issue templates for consistent context
- GitHub Skills course: Communicating with Markdown
The bottom line
In the end, AI is changing how we write code, and curiosity, judgment, and critical thinking are needed more than ever. The best developers don’t just accept what AI suggests. They ask why. They provide context. They understand the fundamentals. They think in systems, write with intention, and build with care.
So keep asking why. Stay curious. Continue learning. That’s what sets great developers apart—and it’s how you’ll survive and thrive in an AI-powered future.
Want to get started? Explore GitHub Copilot >
The post Why developer expertise matters more than ever in the age of AI appeared first on The GitHub Blog.
]]>The post How to create issues and pull requests in record time on GitHub appeared first on The GitHub Blog.
]]>Software development has always started with a conversation: What problem are we solving, why does it matter, and what does “finished” look like?
On GitHub, that conversation crystallizes in an issue. No matter what tools you’re using or who you’re working with, a well-designed issue still sets the agenda for pull requests (PR), reviews, tests, and deploys.
That principle hasn’t changed—but how we get from idea to issue to PR is changing fast, with Copilot helping to speed things up. By asking Copilot to draft an issue, you can quickly design a clear plan for moving forward. Then (and here’s the fun part) you can assign that issue directly to the new GitHub Copilot coding agent, which will asynchronously work to execute on the task at hand and give you a PR.
This is a new way of working. But the basic developer experience is simple, familiar and—dare I say—GitHubby.
In this blog, we’ll talk about:
- Why issues remain the backbone of work on GitHub—whether they’re written by you or drafted by Copilot.
- Best practices for building great issues when working with your team or Copilot.
- How a Copilot-oriented workflow helps you move faster, enforces consistency, and tees up the Copilot coding agent for hands‑off fixes.
Let’s jump in.
Why great issues and pull requests are critical
GitHub Issues and pull requests are some of the core building blocks on GitHub. Each issue describes a discrete piece of work, and offers helpful details, requirements, and more for whoever picks up that piece of work. PRs bundle the completed work for code reviews and merging.
Even in an AI‑accelerated workflow, these two artifacts are how present and future teams understand what happened and why.
Regardless of who (or what) authors them, well‑structured issues and pull requests deliver four key benefits:
- Shared context: One URL captures the problem statement, reproduction steps, and definition of done. Anyone joining next week—or next year—can catch up in minutes. And as we say at GitHub, if it doesn’t have a URL it didn’t happen.
- Async coordination: Whether teams are working across timezones, or simply looking to stay heads-down, meetings often add complexity and overhead. Issues free up time by letting developers work asynchronously, meeting only when it will add value.
- Audit and analytics: Labels, milestones, and templates feed dashboards, SLAs, and compliance reporting.
- Automation hooks: Actions workflows, project boards, and agentic tools rely on predictable metadata attached to every issue.
Miss the structure and every downstream step—human or AI—slows down. Need an example? Here’s an issue I’ve been looking at today (and no, I’m not going to name and shame anyone):
Issue #12609: Found broken link. Please fix!
…and that’s it! Just a title with no explanation in the body, no actual link, no context, no environment or version info, and no reproducible example or proposed fix.
As developers, we need well-crafted issues in order to dive into any project we get asked to do, and we need to write good issues to help teammates work effectively. AI is no exception: Large language models perform best when objectives, constraints, and success criteria are explicit. A vague prompt leads to vague output, whether it’s created by a human or a machine.
Here’s the thing: By allowing Copilot to assist with issue creation, you get to focus on clarity, not copy pasting, as Copilot locates the relevant references, builds out the initial issue structure, and even adds labels or project assignments.
The anatomy of a great GitHub Issue
Use this checklist when you create—or review—an issue (yes, Copilot writes these for you, but you’re still in charge):
- Action‑forward title: Lead with the noun and follow with the verb: “Login button – disable on Safari 17 beta” beats “Some login thing?”
- Problem or user story: Frame the pain: “As a shopper, I can’t click Buy on mobile Safari, so I abandon the cart and cry.”
- Expected vs. actual behavior: Two quick bullets: “Should render primary button” vs. “Button unclickable, no CSS pointer‑events.”
- Reproduction steps or visual evidence: GIFs, screenshots, or command-line specifics—whatever helps a teammate (or Copilot) quickly understand the problem.
- Acceptance criteria / definition of done: Straightforward pass/fail criteria, such as “all tests pass”, “Lighthouse score > 90”, “feature flag removed”.
- Scope and constraints: Guardrails to prevent yak‑shaving: perf budgets, browser list, no new dependencies.
- Metadata (labels, assignee, milestone, project): It’s the secret sauce that powers boards, filters, and Slack notifications.
Miss anything and async breaks down. Nail this format and Copilot—and your team—can move fast.
How to draft issues on GitHub faster with Copilot
Great issues share two traits: they’re fast to write and rich in context. GitHub Copilot’s Create Issue flow gives you both. Instead of hopping between fields or copy‑pasting snippets, you can open Copilot Chat and describe the problem in plain language:
"Create a bug report about a 500 error on the login form in octo-org/octo‑web."Copilot drafts the title, body, and even suggests labels and an assignee—drawing on your repository’s preferred template so the issue lands in the right format every time.
Here’s the step-by-step guide:
- Open Copilot Chat’s immersive view at github.com/copilot.
- Describe what you need. Mention the repo (
org/repo) or let Copilot infer it from where you last filed an issue. - Drop in a screenshot if a picture tells the story faster; Copilot will embed it in the draft and reference it in the description.
- Review the draft. Ask follow‑up prompts (“add repro steps,” “switch to the bug template”) or tweak the Markdown directly. Template switches keep your content—no rewriting required.
- Click Create when it looks good.
Tips for building great issues with GitHub Copilot
| What you do | How Copilot helps | Why it matters |
| Lead with context (expected vs. actual, repro steps) | Parses your wording into the right template sections. | Teammates (or Copilot) get clarity. |
| Attach evidence (screens, logs) | “Image‑to‑issue” persists the file in the issue body. | Future debuggers see exactly what you saw. |
| Tag next actions (“assign to Copilot”, “label frontend”) | Adds assignee, labels, milestones in one go. | Keeps boards tidy and workflows automated. |
| Batch related bugs in one prompt | Generates multiple drafts you can individually approve. | Zero tab switching when you’re in triage mode. |
How to turn an issue into a draft PR with the coding agent in GitHub Copilot
Ok—now that you have a clear issue in hand thanks to Copilot, you can assign it to Copilot via the coding agent (yes, it shows up like any teammate) or ask:
"Assign this to Copilot."When you hit Create, Copilot takes ownership and starts working on a fix—look for the 👀 reaction on the issue thread. Behind the scenes, here’s what happens:
- Copilot spins up a secure GitHub Actions workspace.
- It clones the repo, does a semantic code search (RAG‑style), and plots a fix plan.
- Commits roll into a draft PR you can watch in real time—no surprise force‑pushes.
- Your standard branch protections and CI gates still run, because we ♥️ you‑who‑likes‑passing‑tests.
Here’s why this is helpful:
- Parallelization: You review while Copilot writes, so dev cycles overlap nicely.
- Auditability: Every commit, diff, and comment is right there, so there’s no black‑box AI mystery.
- Guardrails: Same CODEOWNERS, same signing rules. Velocity without the cortisol.
Common questions, speedy answers
- “Won’t Copilot flood my repo with low‑quality issues?”
- “Can it update existing issues?”
- Not yet. Today is net‑new only; Update Issue is on the roadmap.
- “Does it understand my custom templates?”
- Yes! Copilot infers from your repo, and you can switch templates mid‑draft without losing your prompt context.
- “Mobile support?”
- Desktop for now; mobile is on the horizon (because phones exist).
Now it’s your turn
Next time your brain yells “Ugh, filing this bug will take longer than fixing it,” open Copilot Chat and let the robot handle the form fields while you capture intent. The faster you translate thought to issue to PR, the sooner users get features—and the sooner you get back to the fun bits.
Now go forth, issue wisely, and may your PRs get greenlit.
Happy coding!
Want to learn more about GitHub Copilot?
Explore our Docs >
The post How to create issues and pull requests in record time on GitHub appeared first on The GitHub Blog.
]]>The post The difference between coding agent and agent mode in GitHub Copilot appeared first on The GitHub Blog.
]]>“Give a dev a code completion and they’ll merge once. Teach a dev to wield an AI agent and they’ll empty the backlog before the coffee cools.“
GitHub Copilot started life in 2021 as the autocomplete sidekick that kept you in flow. Fast forward to 2025 and it now has two new and very different superpowers:
- Agent mode: a real‑time collaborator that sits in your editor, works with you, and edits files based on your needs.
- Coding agent: an asynchronous teammate that lives in the cloud, takes on issues, and sends you fully tested pull requests while you do other things.
While they’re both AI agents, they’re tuned for different parts in your day-to-day workflows. Since we’ve been getting a few questions, we’re breaking down what they are, when to reach for each, and—because we’re developers—offering some hands‑on tips.
TL;DR: The difference between agent mode and coding agent
- Agent mode = synchronous: Works inside VS Code (and now JetBrains/Eclipse/Xcode previews) as an autonomous collaborator that iterates on code, runs tests, and fixes its own mistakes in real time.
- Coding agent = asynchronous: Runs inside GitHub Actions (in public preview), picks up issues you assign (
assignee: Copilot), explores the repo, writes code, passes tests, and opens a pull request for your review. - Think of agent mode as the senior dev pair programming with you, and coding agent as the diligent teammate grinding through well‑scoped tickets.
- You can (and should) use both together: Prototype interactively in agent mode, then give follow‑up tasks to the coding agent.
Note: Both consume Copilot premium requests, but coding agent also uses Actions minutes.
Meet agent mode: Your real‑time collaborator
Agent mode transforms Copilot Chat into an orchestrator of tools (read_file, edit_file, run_in_terminal, etc.). Give it a natural‑language goal—“add OAuth to our Flask app and write tests”—and it plans, edits files, runs the test suite, reads failures, fixes them, and loops until green. You watch the steps, intervene when you like, and keep all changes local.
How to turn agent mode on
- Open Copilot Chat in VS Code.
- Select Agent from the mode dropdown.
- (Optional but smart) Click Tools → Manage to enable or disable capabilities and add MCP extensions.
Pro tips for using agent mode to the fullest extent
- Scope the outcome: “Generate a REST endpoint” beats “help?” Vagueness breeds hallucination, so be as clear as possible about what you want.
- Seed with context: Point it at the spec file or paste the schema so it doesn’t reinvent shapes.
- Iterate interactively: Let it run, but nudge when it veers—like pair programming with a skilled teammate who’s fast but needs occasional direction.
- Extend with MCP servers: If you need custom tools (database migrations, cloud deploys, etc.).
- Choose your model: OpenAI GPT‑4o for raw power, Anthropic Claude for longer context—swap via the model picker.
TLDR: Agent mode is like pair programming with a pro who writes code, runs tests, and fixes errors instantly, all within your editor.
Meet your coding agent: Your asynchronous teammate
Where agent mode lives in the IDE, coding agent lives in your repos. Assign an issue to Copilot, and it spins up a secure cloud workspace (via GitHub Actions), figures out a plan, edits code on its own branch, runs your tests/linters, and opens a pull request tagging you for review.
How to enable it
- Plan eligibility: Requires Copilot Pro+ or Copilot Enterprise.
- Flip the switch: Enterprise admins must enable “Copilot coding agent” in organization policies.
- Assign issues: Prompt coding agent with natural language by pointing it at an issue to get started.
### Feature: add dark‑mode toggle
assignees: Copilot- Watch the pull requests roll in—quick turnarounds for small tasks, thorough work on the complex ones.
Sweet‑spot tasks
- Low‑to‑medium complexity changes in well‑tested repositories.
- Adding or extending unit tests.
- Small refactors (rename a service, extract helpers).
- Documentation or typo fixes.
Not yet ideal for: massive rewrites, cross‑repo changes, codebases with 0% test coverage.
Pro tips for using coding agent in GitHub Copilot
- Write crisp acceptance criteria in the issue. The agent reads them like a spec.
- Link to files or functions the change touches; saves exploration time.
- Keep it atomic: one logical task per issue. Multiple smaller issues scale better than one behemoth.
- Leverage PR comments: Ask the agent for tweaks, then you can extract the logic into a separate function and add error handling.
- Mind your minutes: Heavy tasks consume Actions minutes and premium requests, so queue strategically.
And remember: GitHub Copilot coding agent follows your existing code style without complaints… yet.
Side by side: Picking the right tool
| Decision lens | Agent mode | Coding agent |
| Workflow pacing | Real‑time collaboration, conversational, and iterative | Fire and forget, background tasks |
| Interface | VS Code / JetBrains / Eclipse / Xcode chat | GitHub Issues or Copilot Chat → Monitored via pull requests |
| Typical tasks | Refactor, prototype, debug, migrate | Feature add, bug fix, extending tests, boring tasks and repetitive engineering chores |
| Human oversight | Continuous (you watch edits) | At pull request review checkpoint |
| Resource cost | Premium requests | Premium requests + Actions minutes |
| Best for | Exploring unknown code, tight feedback loops | Clearing backlog, parallelizing chores |
Get more done by using both
Before we dive into the tactical playbook, remember that Copilot’s superpowers aren’t either/or—they’re peanut butter and jelly. The magic really shows up when the real‑time, in‑editor agent mode meets the steady, background hustle of the coding agent.
With that, here are three proven pairings that let you wring every drop of productivity (and fun) out of both:
- Prototype in agent mode. Ship with coding agent.
- Use agent mode to spike a working feature branch.
- Open an issue describing polish tasks; assign to Copilot.
- Agent mode for spec generation. Coding agent for implementation.
- Ask agent mode to draft a design doc from code context.
- Fine‑tune it, then hand the ticket to coding agent to execute.
- Coding agent regression fix. Agent mode hot patch.
- If coding agent’s pull request introduces a build failure, open the branch locally and summon agent mode to diagnose and patch instantly.
These aren’t the only areas where you can use agent mode and coding agent to greater effect. But they do offer some examples to help you get started.
Safety and quality checklist
Excited to watch Copilot code circles around your backlog? Same—but let’s make sure the wheels don’t fall off at 120 mph. Before you hit merge, run through this quick pre‑flight to keep quality, security, and version‑control hygiene firmly on‑track.
- Tests green? Both agents rely on tests—invest in coverage or they’ll fly blind.
- Secrets safe? Coding agent runs in a secure ephemeral env; still, guard
.envfiles. - Review everything: Agents accelerate work; they don’t eliminate your responsibility as reviewer-of-record.
- Version control FTW: Agent mode edits locally in a branch, so commit early and often.
Common questions, quick answers
Still scratching your head about edge cases, quirky workflows, or editor allegiance? Below are the questions we hear most often when we demo these agents—served up in a lightning round so you can get back to shipping.
Q: Can coding agent fix that legacy Perl CGI script from 2002?
A: It can try—but without tests it’s like teaching a golden retriever calculus. Use agent mode to refactor first.
Q: Does agent mode support vim?
A: Not yet. But you can always :wq VS Code if you miss modal editing (ducks).
Q: How many issues can I throw at coding agent at once?
A: Multiple, but remember each consumes compute and your pull request queue tolerance. Treat it like coffee—great in moderation, disaster when the pot overflows.
Q: Can GitHub Copilot coding agent work with images?
A: Yes! Thanks to vision models, it can see screenshots of bugs or mockups included in GitHub issues, making visual bug reports much more effective.
Q: What about accessing external data sources?
A: With Model Context Protocol (MCP) support, GitHub Copilot coding agent can connect to external data and capabilities beyond GitHub.
Take this with you
- Agent mode = synchronous mastery inside your editor; coding agent = asynchronous work in issues and PRs on GitHub.
- Clear prompts, good tests, and small scopes remain the secret sauce.
- Use both agents in tandem to cover the full dev‑cycle—from “Hmm, what if…?” to “LGTM, ship it.”
- Keep humans in the loop for architecture choices, security reviews, and celebratory high‑fives.
AI agents won’t replace engineers; they’ll replace the boring parts of engineering. That means more time for inventive features, better code quality, and building what’s next. And isn’t that why we all love being developers? (Ok, maybe that’s just me.)
Happy building, and may your Actions minutes be plentiful and your pull request diff stats impressively tiny.
Want to learn more?
Try exploring our Docs on everything Copilot >
The post The difference between coding agent and agent mode in GitHub Copilot appeared first on The GitHub Blog.
]]>The post How to thrive as a junior engineer: Tips and insights appeared first on The GitHub Blog.
]]>Starting an engineering career can be both exciting and overwhelming—I know, I’ve been there. Life comes at you fast; bugs get reported, features get requested, meetings get scheduled. You have to navigate uncertainty, learn fast, and grow from mistakes—which happen, and that’s ok!
Below I’ll share lessons from my journey—from beginning my career at a startup to then growing from junior to mid-level engineer at GitHub in just 2.5 years—to hopefully help early-in-career engineers succeed in any company.
How you can help yourself grow as a junior engineer
Growth as a junior engineer comes down to actively seeking out learning opportunities and taking responsibility for your progress. Here are a few strategies that helped me progress quickly, from asking the right questions to making my work visible and building connections with my team.
Embrace the learning curve
Asking questions is a strength, not a weakness. What really brought me forward was embracing every learning opportunity. I soaked up knowledge like a sponge. I exposed what I didn’t know daily, which helped me fill the gaps fast. It’s tempting to prove yourself by figuring everything out alone, but asking questions isn’t ignorance—it’s curiosity and initiative. Before asking for help on a problem, I also set a one-hour limit, which gave me time to try to find answers independently, while avoiding getting stuck in an endless loop of frustration.
That said, knowing what to ask can be really helpful. While asking questions should be a regular habit, having a few key questions in your back pocket is a great way to get started and guide those early conversations. Here are a few questions I think every junior engineer could benefit from asking their mentors or teammates:
- Are there any common mistakes you see juniors make and how can I avoid them?
- How do you approach debugging when things aren’t working as expected?
- How do we prioritize tasks when everything feels urgent?
- Are there any habits or practices that have helped you level up in your career?
And a question to ask yourself:
- Am I taking the time to learn from my mistakes and finding ways to do better next time?
Make growth and progress visible
“Proof or it didn’t happen” is a common phrase and it’s true: Showcasing your work and progress is essential. Find ways to share what you’re learning, whether it’s writing about challenges you’ve overcome, contributing to documentation, or suggesting improvements to established processes through your fresh perspective.
Before I started working at GitHub, I was at a small startup. In a team of six to eight engineers, it was impossible for achievements to go unnoticed. But in a larger company, it doesn’t always work the same way. Doing great work is still vital, but with so many projects, meetings, and moving parts, it can be easy to get overlooked in the hustle and bustle.
It took me some time to get the hang of this, but eventually I developed a knack for it. If I got stuck on some undocumented functionality, I made sure to update the docs and let the team know. Or, if I was tackling a tricky bug that required a lot of cross-team collaboration, I’d summarize everything we discovered so that it would be easier for others to pick up later.
Close a gnarly bug that was passed around for centuries? Adjust the team’s project board to make it more efficient? I post about it in Slack and highlight its impact.
Communicate your way to success
Good teamwork isn’t just about solving complex problems—it’s about bringing the team along for the ride. It’s not just about getting things done: It’s about getting them done together.
Keep your communication clear, simple, and make sure progress, blockers, and decisions are easy to track.
Found a hack for a tricky problem? Write a team post about it! Led a cross-team discussion to create clarity on a vague problem? Create an entry in the decision log! Your team, stakeholders, and the future you will be grateful.
Build a network
Networking is more than making small talk at events, it’s about building strong, authentic relationships with your coworkers.
Lean on senior engineers for guidance: they’ve been there, done that. Dive into internal communities, contribute and learn from them, set up cross-team coffee chats and volunteer to pair. And don’t just take, help others shine too. Share your knowledge, support your teammates and you’ll be known as the go-to person who makes the team stronger.
This doesn’t only help your teammates, but also boosts your visibility. This can show up in peer reviews and play a big role when it’s time for promotions.
Focus on depth before breadth
In the beginning, I thought I had to master the entire software delivery process: write a Rails backend, build a React frontend, and somehow wing the AWS part. Spoiler alert: that didn’t happen.
I quickly realized that trying to juggle all of that led to a lot of half-understood concepts and not much real progress. Instead, I focused on the skills I needed right away, building depth before branching out. With so many technologies and moving parts, it’s easy to nibble at everything without real progress. That doesn’t mean stifling curiosity—you need it in this industry—but sometimes, you have to put your blinkers on and tackle what’s in front of you first.
Fight imposter syndrome
Who hasn’t had that sneaky thought, “What if they find out I don’t know as much as they think I do?” Imposter syndrome can quietly undermine your confidence, making you hesitate to collaborate, speak up, or advocate for yourself. Over time, it can hold you back from promotions and make you less effective as a collaborator.
Be aware when it starts to sneak in, and take steps to address it early. Ask mentors and peers for perspective, track your wins (you’ll be surprised how many add up), and remind yourself that growth comes from embracing the journey, not from being perfect.
How teams can help early-in-profession engineers succeed
Helping junior engineers succeed is about creating a space where they feel supported, challenged, and confident to grow. In this section, we’ll look at how you can help your teammates thrive by being patient, giving them useful feedback, and encouraging them to figure things out on their own.
Don’t get annoyed, get patient
Learning new concepts can be overwhelming, and sometimes juniors may forget answers you’ve already provided.
When this happens, rather than getting frustrated, take a step back and consider why they might be struggling. Offer ways to help them track information better, and try explaining things in a different way to help the key points stick. This might mean pairing with them for a hands-on session, offering different learning resources like articles, videos, or blogs, or even suggesting a stretch assignment that challenges them while providing a learning opportunity. Everyone learns differently—it’s all about finding what clicks for them.
Acknowledge that it’s hard
Stuff is hard and it takes time to get the hang of things. Acknowledge that—it will give the junior engineers hope. Don’t brush things off as “easy” or tell them to “just do it”—offer useful tools or a nudge in the right direction instead. They need to feel safe messing up because mistakes are part of learning.
Do you want someone who confidently takes on tasks or someone who’s too scared to ask questions? Yeah, I thought so.
Enable junior teammates
Give juniors the tools to become more self-reliant and encourage learning by doing. Point them toward common bug causes, encourage them to Google and explore, but be there when they get stuck. Don’t just hand them answers—guide them to figure things out.
At the same time, don’t throw them into a massive project and expect them to sink or swim. Chances are, they’ll sink and that’s a confidence killer. Instead, give them tasks that gradually increase in complexity, while making sure they have the support they need.
Give positive feedback
Constructive criticism is important, but so is positive feedback. When they write clean code, use a tool well, or make a smart decision—tell them!
Help them see how much they’ve grown. Imposter syndrome is real and you can help push it back. Acknowledging progress keeps them motivated, and a little encouragement goes a long way.
There is always room for growth
Being a developer means constantly learning and growing. While there will be challenging moments — whether you’re a junior developer or mentoring one — every experience is an opportunity to improve.
If you’re looking to further your career or develop new skills, check out the Career Growth section on the GitHub Blog for resources and opportunities to keep evolving.
Welcome to the community!
Just getting started? Check out GitHub for Beginners to learn more.
The post How to thrive as a junior engineer: Tips and insights appeared first on The GitHub Blog.
]]>The post Documentation done right: A developer’s guide appeared first on The GitHub Blog.
]]>With all the work involved in creating and maintaining a project, sometimes writing documentation can slip through the cracks. However, good docs are a huge asset to any project. Consider the benefits:
- Better collaboration: Clear, consistent documentation ensures everyone’s on the same page, from your immediate team to outside stakeholders. Additionally, docs promote independent problem solving, saving core contributors the time and effort of answering every question.
- Smoother onboarding: By providing ways to get started, explaining core concepts, and including tutorial-style content, good documentation allows new team members to ramp up quickly.
- Increased adoption: The easier it is to understand, set up, and run your project, the more likely someone will use it.
With these benefits in mind, let’s take a look at some important principles of documentation, then dive into how you can quickly create effective docs for your project.
Key tenets of documentation
There are three key principles you should follow as you document your project.
Keep it clear
Use plain language that’s easy to understand. The goal is to make your documentation as accessible as possible. A good guideline is to ask yourself if there are any acronyms or technical terms in your documentation that some folks in your target audience won’t understand. If that’s the case, either swap them for simpler language, or make sure they’re defined in your document.
Keep it concise
Document only necessary information. Trying to cover every possible edge case will overwhelm your readers. Instead, write docs that help the vast majority of readers get started, understand core concepts, and use your project.
Additionally, keep each document focused on a particular topic or task. If you find yourself including information that isn’t strictly necessary, move it into separate, smaller documents and link to them when it’s helpful.
Keep it structured
Consider the structure of each document as you write it to make sure it is easy to scan and understand:
- Put the most important information first to help readers quickly understand if a document is relevant to them.
- Use headings and a table of contents to tell your readers where to find specific information. We suggest using documentation templates with common headings to quickly and consistently create structured content.
- Use text highlighting like boldface and formatting elements like bulleted lists to help readers scan content. Aim for 10% or less text highlighting to make sure emphasized text stands out.
- Be consistent with your styling. For example, if you put important terminology in bold in one document, do the same in your other content.
Organizing your documentation
Just as there are principles to follow when writing individual documents, you should also follow a framework for organizing documents in your repo.
There are many approaches to organizing documentation in your repo, but one that we’ve used for several projects and recommend is the Diátaxis framework. This is a systematic approach to organizing all the documents relevant to your project.
Applying a systematic approach to documenting your repositories can make it easier for users to know where to go to find the information that they need. This reduces frustration and gets folks contributing to your project faster.
Diátaxis divides documents based on their purpose into four categories:
- Tutorials: Learning-oriented documents
- How-to guides: Goal-oriented instructions for specific tasks
- Explanation: Discussions providing understanding of the project
- Reference: Technical specifications and information
Each document in your repository should fit into one of these categories. This helps users quickly find the appropriate resource for their current situation, whether they need to learn a new concept, solve a specific problem, understand underlying principles, or look up technical details.
This can also be a helpful guide to identify which documentation your repository is missing. Is there a tool your repository uses that doesn’t have a reference document? Are there enough tutorials for contributors to get started with your repository? Are there how-to guides to explain some of the common tasks that need to be accomplished within your repository?
Organizing your documentation according to this framework helps ensure you’re taking a holistic approach to building and maintaining key content for your project.
The post Documentation done right: A developer’s guide appeared first on The GitHub Blog.
]]>The post GitHub Issues search now supports nested queries and boolean operators: Here’s how we (re)built it appeared first on The GitHub Blog.
]]>Originally, Issues search was limited by a simple, flat structure of queries. But with advanced search syntax, you can now construct searches using logical AND/OR operators and nested parentheses, pinpointing the exact set of issues you care about.
Building this feature presented significant challenges: ensuring backward compatibility with existing searches, maintaining performance under high query volume, and crafting a user-friendly experience for nested searches. We’re excited to take you behind the scenes to share how we took this long-requested feature from idea to production.
Here’s what you can do with the new syntax and how it works behind the scenes
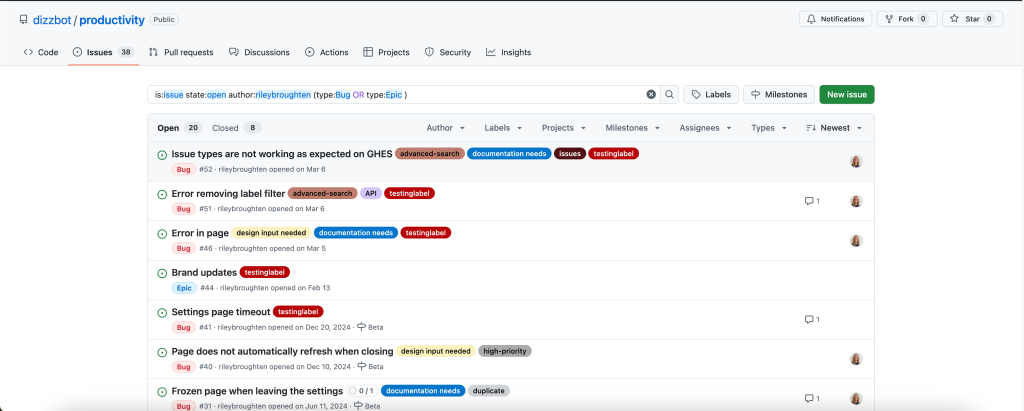
Issues search now supports building queries with logical AND/OR operators across all fields, with the ability to nest query terms. For example is:issue state:open author:rileybroughten (type:Bug OR type:Epic) finds all issues that are open AND were authored by rileybroughten AND are either of type bug or epic.
How did we get here?
Previously, as mentioned, Issues search only supported a flat list of query fields and terms, which were implicitly joined by a logical AND. For example, the query assignee:@me label:support new-project translated to “give me all issues that are assigned to me AND have the label support AND contain the text new-project.”
But the developer community has been asking for more flexibility in issue search, repeatedly, for nearly a decade now. They wanted to be able to find all issues that had either the label support or the label question, using the query label:support OR label:question. So, we shipped an enhancement towards this request in 2021, when we enabled an OR style search using a comma-separated list of values.
However, they still wanted the flexibility to search this way across all issue fields, and not just the labels field. So we got to work.
Technical architecture and implementation
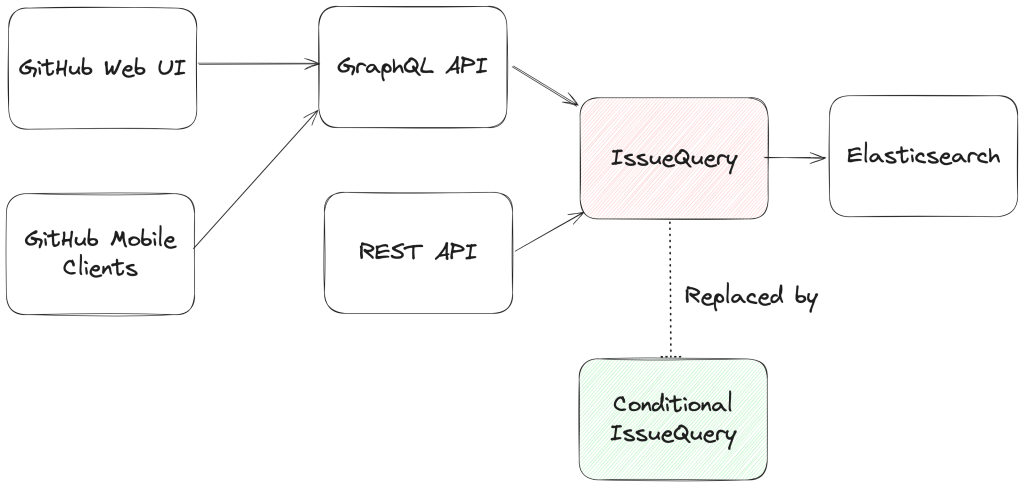
From an architectural perspective, we swapped out the existing search module for Issues (IssuesQuery), with a new search module (ConditionalIssuesQuery), that was capable of handling nested queries while continuing to support existing query formats.
This involved rewriting IssueQuery, the search module that parsed query strings and mapped them into Elasticsearch queries.
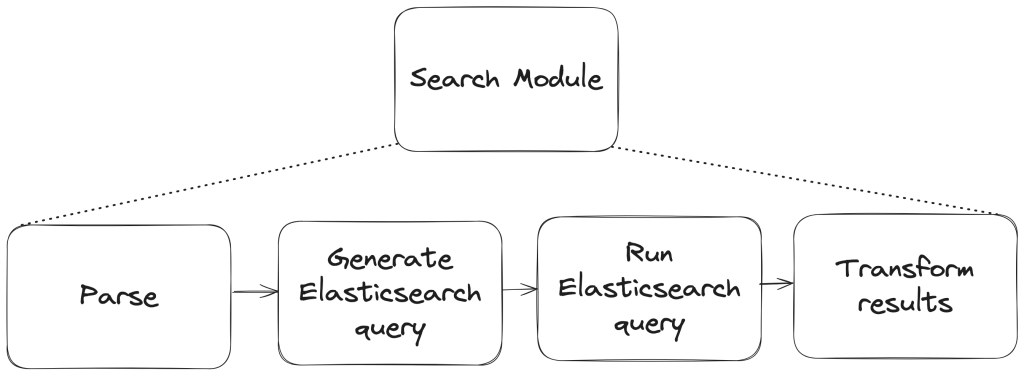
To build a new search module, we first needed to understand the existing search module, and how a single search query flowed through the system. At a high level, when a user performs a search, there are three stages in its execution:
- Parse: Breaking the user input string into a structure that is easier to process (like a list or a tree)
- Query: Transforming the parsed structure into an Elasticsearch query document, and making a query against Elasticsearch.
- Normalize: Mapping the results obtained from Elasticsearch (JSON) into Ruby objects for easy access and pruning the results to remove records that had since been removed from the database.
Each stage presented its own challenges, which we’ll explore in more detail below. The Normalize step remained unchanged during the re-write, so we won’t dive into that one.
Parse stage
The user input string (the search phrase) is first parsed into an intermediate structure. The search phrase could include:
- Query terms: The relevant words the user is trying to find more information about (ex: “models”)
- Search filters: These restrict the set of returned search documents based on some criteria (ex: “assignee:Deborah-Digges”)
Example search phrase:
- Find all issues assigned to me that contain the word “codespaces”:
is:issue assignee:@me codespaces
- Find all issues with the label documentation that are assigned to me:
assignee:@me label:documentation
The old parsing method: flat list
When only flat, simple queries were supported, it was sufficient to parse the user’s search string into a list of search terms and filters, which would then be passed along to the next stage of the search process.
The new parsing method: abstract syntax tree
As nested queries may be recursive, parsing the search string into a list was no longer sufficient. We changed this component to parse the user’s search string into an Abstract Syntax Tree (AST) using the parsing library parslet.
We defined a grammar (a PEG or Parsing Expression Grammar) to represent the structure of a search string. The grammar supports both the existing query syntax and the new nested query syntax, to allow for backward compatibility.
A simplified grammar for a boolean expression described by a PEG grammar for the parslet parser is shown below:
class Parser < Parslet::Parser
  rule(:space)  { match[" "].repeat(1) }
  rule(:space?) { space.maybe }

  rule(:lparen) { str("(") >> space? }
  rule(:rparen) { str(")") >> space? }

  rule(:and_operator) { str("and") >> space? }
  rule(:or_operator)  { str("or")  >> space? }

  rule(:var) { str("var") >> match["0-9"].repeat(1).as(:var) >> space? }

  # The primary rule deals with parentheses.
  rule(:primary) { lparen >> or_operation >> rparen | var }

  # Note that following rules are both right-recursive.
  rule(:and_operation) {
    (primary.as(:left) >> and_operator >>
      and_operation.as(:right)).as(:and) |
    primary }

  rule(:or_operation)  {
    (and_operation.as(:left) >> or_operator >>
      or_operation.as(:right)).as(:or) |
    and_operation }

  # We start at the lowest precedence rule.
  root(:or_operation)
end
For example, this user search string:is:issue AND (author:deborah-digges OR author:monalisa )
would be parsed into the following AST:
{
  "root": {
    "and": {
      "left": {
        "filter_term": {
          "attribute": "is",
          "value": [
            {
              "filter_value": "issue"
            }
          ]
        }
      },
      "right": {
        "or": {
          "left": {
            "filter_term": {
              "attribute": "author",
              "value": [
                {
                  "filter_value": "deborah-digges"
                }
              ]
            }
          },
          "right": {
            "filter_term": {
              "attribute": "author",
              "value": [
                {
                  "filter_value": "monalisa"
                }
              ]
            }
          }
        }
      }
    }
  }
}
Query
Once the query is parsed into an intermediate structure, the next steps are to:
- Transform this intermediate structure into a query document that Elasticsearch understands
- Execute the query against Elasticsearch to obtain results
Executing the query in step 2 remained the same between the old and new systems, so let’s only go over the differences in building the query document below.
The old query generation: linear mapping of filter terms using filter classes
Each filter term (Ex: label:documentation) has a class that knows how to convert it into a snippet of an Elasticsearch query document. During query document generation, the correct class for each filter term is invoked to construct the overall query document.
The new query generation: recursive AST traversal to generate Elasticsearch bool query
We recursively traversed the AST generated during parsing to build an equivalent Elasticsearch query document. The nested structure and boolean operators map nicely to Elasticsearch’s boolean query with the AND, OR, and NOT operators mapping to the must, should, and should_not clauses.
We re-used the building blocks for the smaller pieces of query generation to recursively construct a nested query document during the tree traversal.
Continuing from the example in the parsing stage, the AST would be transformed into a query document that looked like this:
{
  "query": {
    "bool": {
      "must": [
        {
          "bool": {
            "must": [
              {
                "bool": {
                  "must": {
                    "prefix": {
                      "_index": "issues"
                    }
                  }
                }
              },
              {
                "bool": {
                  "should": {
                    "terms": {
                      "author_id": [
                        "<DEBORAH_DIGGES_AUTHOR_ID>",
                        "<MONALISA_AUTHOR_ID>"
                      ]
                    }
                  }
                }
              }
            ]
          }
        }
      ]
    }
    // SOME TERMS OMITTED FOR BREVITY
  }
}
With this new query document, we execute a search against Elasticsearch. This search now supports logical AND/OR operators and parentheses to search for issues in a more fine-grained manner.
Considerations
Issues is one of the oldest and most heavily -used features on GitHub. Changing core functionality like Issues search, a feature with an average of nearly 2000 queries per second (QPS)—that’s almost 160M queries a day!—presented a number of challenges to overcome.
Ensuring backward compatibility
Issue searches are often bookmarked, shared among users, and linked in documents, making them important artifacts for developers and teams. Therefore, we wanted to introduce this new capability for nested search queries without breaking existing queries for users.
We validated the new search system before it even reached users by:
- Testing extensively: We ran our new search module against all unit and integration tests for the existing search module. To ensure that the GraphQL and REST API contracts remained unchanged, we ran the tests for the search endpoint both with the feature flag for the new search system enabled and disabled.
- Validating correctness in production with dark-shipping: For 1% of issue searches, we ran the user’s search against both the existing and new search systems in a background job, and logged differences in responses. By analyzing these differences we were able to fix bugs and missed edge cases before they reached our users.
- We weren’t sure at the outset how to define “differences,” but we settled on “number of results” for the first iteration. In general, it seemed that we could determine whether a user would be surprised by the results of their search against the new search capability if a search returned a different number of results when they were run within a second or less of each other.
Preventing performance degradation
We expected more complex nested queries to use more resources on the backend than simpler queries, so we needed to establish a realistic baseline for nested queries, while ensuring no regression in the performance of existing, simpler ones.
For 1% of Issue searches, we ran equivalent queries against both the existing and the new search systems. We used scientist, GitHub’s open source Ruby library, for carefully refactoring critical paths, to compare the performance of equivalent queries to ensure that there was no regression.
Preserving user experience
We didn’t want users to have a worse experience than before just because more complex searches were possible.
We collaborated closely with product and design teams to ensure usability didn’t decrease as we added this feature by:
- Limiting the number of nested levels in a query to five. From customer interviews, we found this to be a sweet spot for both utility and usability.
- Providing helpful UI/UX cues: We highlight the AND/OR keywords in search queries, and provide users with the same auto-complete feature for filter terms in the UI that they were accustomed to for simple flat queries.
Minimizing risk to existing users
For a feature that is used by millions of users a day, we needed to be intentional about rolling it out in a way that minimized risk to users.
We built confidence in our system by:
- Limiting blast radius: To gradually build confidence, we only integrated the new system in the GraphQL API and the Issues tab for a repository in the UI to start. This gave us time to collect, respond to, and incorporate feedback without risking a degraded experience for all consumers. Once we were happy with its performance, we rolled it out to the Issues dashboard and the REST API.
- Testing internally and with trusted partners: As with every feature we build at GitHub, we tested this feature internally for the entire period of its development by shipping it to our own team during the early days, and then gradually rolling it out to all GitHub employees. We then shipped it to trusted partners to gather initial user feedback.
And there you have it, that’s how we built, validated, and shipped the new and improved Issues search!
Feedback
Want to try out this exciting new functionality? Head to our docs to learn about how to use boolean operators and parentheses to search for the issues you care about!
If you have any feedback for this feature, please drop us a note on our community discussions.
Acknowledgements
Special thanks to AJ Schuster, Riley Broughten, Stephanie Goldstein, Eric Jorgensen Mike Melanson and Laura Lindeman for the feedback on several iterations of this blog post!
The post GitHub Issues search now supports nested queries and boolean operators: Here’s how we (re)built it appeared first on The GitHub Blog.
]]>The post Exploring GitHub CLI: How to interact with GitHub’s GraphQL API endpoint appeared first on The GitHub Blog.
]]>You might have heard of the GitHub CLI and all of the awesome things you can do with it. However, one of its hidden superpowers is the ability to execute complex queries and mutations through GitHub’s GraphQL API. This post will walk you through what GitHub’s GraphQL API endpoint is and how to query it with the GitHub CLI.
What is GraphQL?
Let’s start with the basics: GraphQL is a query language for APIs and a runtime for executing those queries against your data. Unlike traditional REST APIs that provide fixed data structures from predefined endpoints, GraphQL allows clients to request exactly the data they need in a single request. This single-request approach reduces network overhead, speeds up application performance, and simplifies client-side logic by eliminating the need to reconcile multiple API responses—a capability that has been openly available since the specification was open sourced in 2015.
GraphQL operations come in two primary types: queries and mutations. Queries are read-only operations that retrieve data without making any changes—similar to GET requests in REST. Mutations, on the other hand, are used to modify server-side data (create, update, or delete)—comparable to POST, PATCH, PUT, and DELETE in REST APIs. This clear separation between reading and writing operations makes GraphQL interactions predictable while maintaining the flexibility to precisely specify what data should be returned after a change is made.
How is GraphQL used at GitHub?
GitHub implemented GraphQL in 2016 to address limitations of RESTful APIs. This adoption has significantly enhanced the developer experience when working with GitHub data. With the GraphQL endpoint, you can retrieve a repository’s issues, its labels, assignees, and comments with a single GraphQL query. Using our REST APIs, this would have otherwise taken several sets of nested calls.
Some GitHub data and operations are only accessible through the GraphQL API (such as discussions, projects, and some enterprise settings), others exclusively through REST APIs (such as querying actions workflows, runners, or logs), and some using either endpoint (such as repositories, issues, pull requests, and user information). GitHub’s GraphQL endpoint is accessible at api.github.com/graphql and you can explore the full schema in our GraphQL documentation or through the interactive GraphQL Explorer.
A key consideration when choosing between the REST API and the GraphQL API is how the rate limits are calculated. As a quick summary for how this is implemented:
- REST API: Limited by number of requests (typically 5,000 requests per hour for authenticated users and up to 15,000 for GitHub Apps installed in an Enterprise)
- GraphQL API: Limited by “points” (typically 5,000 points per hour for authenticated users but can go up to 10,000-12,500 points per hour for GitHub Apps)
Each GraphQL query costs at least one point, but the cost increases based on the complexity of your query (number of nodes requested, connections traversed, etc.). The GraphQL API provides a rateLimit field you can include in your queries to check your current limit status.
For scenarios where you need to fetch related data that would otherwise require multiple REST calls, GraphQL is often more rate limit friendly because:
- One complex GraphQL query might cost 5-10 points but replace 5-10 separate REST API calls.
- You avoid “over-fetching” data you don’t need, which indirectly helps with rate limits.
- The GraphQL API allows for more granular field selection, potentially reducing the complexity and point cost.
However, poorly optimized GraphQL queries that request large amounts of nested data could potentially use up your rate limit faster than equivalent REST requests—and quickly run into secondary rate limit issues.
A quick rule of thumb on deciding between which to use:
- For querying relational objects, such as GitHub Projects and their issues, GraphQL is often more effective, especially if it’s a discrete number of items.
- For bulk data of one type or single data points, such as pulling in a list of repository names in an organization, the REST API is often preferred.
Sometimes there isn’t a right or wrong answer; so as long as the object exists, try one out!
Why use GitHub CLI for GraphQL?
While many developers start with GitHub’s GraphQL Explorer on the web, curl, or other API querying tools, there’s a more streamlined approach: using built-in GraphQL support in the GitHub CLI. Before diving into the how-to, let’s understand why GitHub CLI is often my go-to tool for GraphQL queries and mutations:
- Authentication is handled automatically: No need to manage personal access tokens manually.
- Streamlined syntax: Simpler than crafting
curlcommands. - Local development friendly: Run queries and mutations right from your terminal.
- JSON processing: Built-in options for filtering and formatting results.
- Pagination support: Ability to work with cursor-based pagination in GraphQL responses.
- Consistent experience: Same tool you’re likely using for other GitHub tasks.
How to get started with gh api graphql
First, ensure you have GitHub CLI installed and authenticated with gh auth login. The basic syntax for making a GraphQL query with gh api graphql is:
gh api graphql -H X-Github-Next-Global-ID:1 -f query='
  query {
    viewer {
      login
      name
      bio
    }
  }
'
This simple query returns your GitHub username, the name you have defined in your profile, and your bio. The -f flag defines form variables, with query= being the GraphQL query itself.
Here’s our example output:
{
  "data": {
    "viewer": {
      "login": "joshjohanning",
      "name": "Josh Johanning",
      "bio": "DevOps Architect | GitHub"
    }
  }
}
Running queries and mutations
Basic query example
Let’s try something more practical—fetching information about a repository. To get started, we’ll use the following query:
gh api graphql -H X-Github-Next-Global-ID:1 -f query='
  query($owner:String!, $repo:String!) {
    repository(owner:$owner, name:$repo) {
      name
      description
      id
      stargazerCount
      forkCount
      issues(states:OPEN) {
        totalCount
      }
    }
  }
' -F owner=octocat -F repo=Hello-World
The -F flag sets variable values that are referenced in the query with $variable.
Here’s our example output:
{
  "data": {
    "repository": {
      "name": "Hello-World",
      "description": "My first repository on GitHub!",
      "id": "R_kgDOABPHjQ",
      "stargazerCount": 2894,
      "forkCount": 2843,
      "issues": {
        "totalCount": 1055
      }
    }
  }
}
💡 Tip: The -H X-Github-Next-Global-ID:1 parameter sets an HTTP header that instructs GitHub’s GraphQL API to use the new global node ID format rather than the legacy format. While your query will function without this header, including it prevents deprecation warnings when referencing node IDs (such as when passing repository.ID in subsequent operations). GitHub recommends adopting this format for all new integrations to ensure long-term compatibility.
|
Running mutations
Mutations work similarly. Here’s how to create a new issue:
gh api graphql -H X-Github-Next-Global-ID:1 -f query='
  mutation($repositoryId:ID!, $title:String!, $body:String) {
    createIssue(input:{repositoryId:$repositoryId, title:$title, body:$body}) {
      issue {
        url
        number
        title
        body
        state
      }
    }
  }
' -F repositoryId="R_kgDOABPHjQ" -F title="Creating issue with GraphQL" -F body="Issue body created via GraphQL\!"
Make sure to update the repositoryId parameter with the actual repository’s GraphQL ID (an example of returning a repository’s ID is shown in the basic query above!).
Here’s our example output:
{
  "data": {
    "createIssue": {
      "issue": {
        "url": "https://github.com/octocat/Hello-World/issues/3706",
        "number": 3706,
        "title": "Creating issue with GraphQL",
        "body": "Issue body created via GraphQL!",
        "state": "OPEN"
      }
    }
  }
}
Filtering GraphQL results
GitHub CLI supports JQ-style filtering for extracting specific parts of the response, which is invaluable when you need to parse just the repository names or URLs from a query for use in automation scripts. Here is an example of using the --jq flag:
gh api graphql -H X-Github-Next-Global-ID:1 -f query='
  query($owner:String!, $repo:String!) {
    repository(owner:$owner, name:$repo) {
      issues(first:3, states:OPEN) {
        nodes {
          number
          title
          url
        }
      }
    }
  }
' -F owner=octocat -F repo=Hello-World --jq '.data.repository.issues.nodes[]'
The --jq flag accepts JQ expressions to process JSON output. This query returns just the array of issues, without the surrounding GraphQL response structure.
Here’s our example output:
{
  "number": 26,
  "title": "test issue",
  "url": "https://github.com/octocat/Hello-World/issues/26"
}
{
  "number": 27,
  "title": "just for test",
  "url": "https://github.com/octocat/Hello-World/issues/27"
}
{
  "number": 28,
  "title": "Test",
  "url": "https://github.com/octocat/Hello-World/issues/28"
}
We could have modified the --jq flag to just return the issue URLs, like so:
gh api graphql -H X-Github-Next-Global-ID:1 -f query='
  query($owner:String!, $repo:String!) {
    repository(owner:$owner, name:$repo) {
      issues(first:3, states:OPEN) {
        nodes {
          number
          title
          url
        }
      }
    }
  }
' -F owner=octocat -F repo=Hello-World --jq '.data.repository.issues.nodes[].url'
Here’s our example output:
https://github.com/octocat/Hello-World/issues/26
https://github.com/octocat/Hello-World/issues/27
https://github.com/octocat/Hello-World/issues/28
Handling pagination
GitHub’s GraphQL API limits results to a maximum of 100 items per page, which means you’ll need pagination to retrieve larger datasets.
Pagination in GraphQL works by returning a “cursor” with each page of results, which acts as a pointer to where the next set of results should begin. When you request the next page, you provide this cursor to indicate where to start.
The easiest way to handle this pagination in the GitHub CLI is with the --paginate flag, which automatically collects all pages of results for you by managing these cursors behind the scenes. Here’s what that looks like in a query:
gh api graphql --paginate -H X-Github-Next-Global-ID:1 -f query='
  query($owner:String!, $repo:String!, $endCursor:String) {
    repository(owner:$owner, name:$repo) {
      issues(first:100, after:$endCursor, states:OPEN, orderBy:{field:CREATED_AT, direction:DESC}) {
        pageInfo {
          hasNextPage
          endCursor
        }
        nodes {
          number
          title
          createdAt
        }
      }
    }
  }
' -F owner=octocat -F repo=Hello-World
The pageInfo object with its hasNextPage and endCursor fields is essential for pagination. When you use the --paginate flag, GitHub CLI automatically uses these fields to fetch all available pages for your query, combining the results into a single response.
Here’s our example output:
{
  "data": {
    "repository": {
      "issues": {
        "pageInfo": {
          "hasNextPage": true,
          "endCursor": "Y3Vyc29yOnYyOpK5MjAyNC0xMi0zMFQxNDo0ODo0NC0wNjowMM6kunD3"
        },
        "nodes": [
          {
            "number": 3708,
            "title": "Creating issue with GraphQL once more",
            "createdAt": "2025-04-02T18:15:11Z",
            "author": {
              "login": "joshjohanning"
            }
          },
          {
            "number": 3707,
            "title": "Creating issue with GraphQL again",
            "createdAt": "2025-04-02T18:15:02Z",
            "author": {
              "login": "joshjohanning"
            }
          },
          {
            "number": 3706,
            "title": "Creating issue with GraphQL",
            "createdAt": "2025-04-02T18:14:37Z",
            "author": {
              "login": "joshjohanning"
            }
          },
          … and so on
        ]
      }
    }
  }
}
This approach works great for moderate amounts of data, but keep in mind that GitHub’s GraphQL API has rate limits, so extremely large queries might need to implement delays between requests.
💡 Important limitation: The --paginate flag can only handle pagination for a single connection at a time. For example, when listing repository issues as shown above, it can paginate through all issues, but cannot simultaneously paginate through each issue’s comments. For nested pagination, you’ll need to implement custom logic. |
Building complex scripts: Chaining GraphQL queries together
When working with GitHub’s GraphQL API, you often need to connect multiple queries to accomplish a complex task. Let’s look at how to chain GraphQL calls together using the GitHub CLI:
ISSUE_ID=$(gh api graphql -H X-Github-Next-Global-ID:1 -f query='
  query($owner: String!, $repo: String!, $issue_number: Int!) {
    repository(owner: $owner, name: $repo) {
      issue(number: $issue_number) {
        id
      }
    }
  }
' -F owner=joshjohanning -F repo=graphql-fun -F issue_number=1 --jq '.data.repository.issue.id')
gh api graphql -H GraphQL-Features:sub_issues -H X-Github-Next-Global-ID:1 -f query='
query($issueId: ID!) {
  node(id: $issueId) {
    ... on Issue {
      subIssuesSummary {
        total
        completed
        percentCompleted
      }
    }
  }
}' -F issueId="$ISSUE_ID"
Here’s what this shell script is doing:
- The first query captures an issue’s ID using the repository name and issue number
- The
--jqflag extracts just the ID value and stores it in a variable - The second query passes this ID to retrieve a summary of sub-issues
Here’s our example output:
{
  "data": {
    "node": {
      "subIssuesSummary": {
        "total": 3,
        "completed": 1,
        "percentCompleted": 33
      }
    }
  }
}
Take this with you
The gh api graphql command provides a convenient way to interact with GitHub’s GraphQL API directly from your terminal. It eliminates the need for token management, simplifies query syntax and formatting, and handles basic pagination that would otherwise be complex to implement. Whether you’re running complex queries or simple mutations, this approach offers a streamlined developer experience.
Next time you need to interact with GitHub’s GraphQL API, skip the GraphQL Explorer on the web and try the GitHub CLI approach. It might just become your preferred method for working with GitHub’s powerful GraphQL API capabilities.
The post Exploring GitHub CLI: How to interact with GitHub’s GraphQL API endpoint appeared first on The GitHub Blog.
]]>The post How to make your images in Markdown on GitHub adjust for dark mode and light mode appeared first on The GitHub Blog.
]]>GitHub supports dark mode and light mode, and as developers, we can make our README images look great in both themes. Here’s a quick guide to using the <picture> element in your GitHub Markdown files to dynamically switch images based on the user’s color scheme.
When developers switch to GitHub’s dark mode (or vice versa), standard images can look out of place, with bright backgrounds or clashing colors.
Instead of forcing a one-size-fits-all image, you can tailor your visuals to blend seamlessly with the theme. It’s a small change, but it can make your project look much more polished.
One snippet, two themes!
Here’s the magic snippet you can copy into your README (or any Markdown file):
<picture>
  <source media="(prefers-color-scheme: dark)" srcset="dark-mode-image.png">
  <source media="(prefers-color-scheme: light)" srcset="light-mode-image.png">
  <img alt="Fallback image description" src="default-image.png">
</picture>
Now, we say it’s magic, but let’s take a peek behind the curtain to show how it works:
- The
<picture>tag lets you define multiple image sources for different scenarios. - The
<source media="...">attribute matches the user’s color scheme.- When
media="(prefers-color-scheme: dark)", the browser loads thesrcsetimage when GitHub is in dark mode. - Similarly, when
media="(prefers-color-scheme: light)", the browser loads thesrcsetimage when GitHub is in light mode.
- When
- If the browser doesn’t support the
<picture>element, or the user’s system doesn’t match any defined media queries, the fallback<img>tag will be used.
You can use this approach in your repo README files, documentation hosted on GitHub, and any other Markdown files rendered on GitHub.com!
Demo
What’s better than a demo to help you get started? Here’s what this looks like in practice:
The post How to make your images in Markdown on GitHub adjust for dark mode and light mode appeared first on The GitHub Blog.
]]>