Want to receive content like this twice a month, right in your inbox? Sign up for the newsletter now >
The post GitHub Issues search now supports nested queries and boolean operators: Here’s how we (re)built it appeared first on The GitHub Blog.
]]>Originally, Issues search was limited by a simple, flat structure of queries. But with advanced search syntax, you can now construct searches using logical AND/OR operators and nested parentheses, pinpointing the exact set of issues you care about.
Building this feature presented significant challenges: ensuring backward compatibility with existing searches, maintaining performance under high query volume, and crafting a user-friendly experience for nested searches. We’re excited to take you behind the scenes to share how we took this long-requested feature from idea to production.
Here’s what you can do with the new syntax and how it works behind the scenes
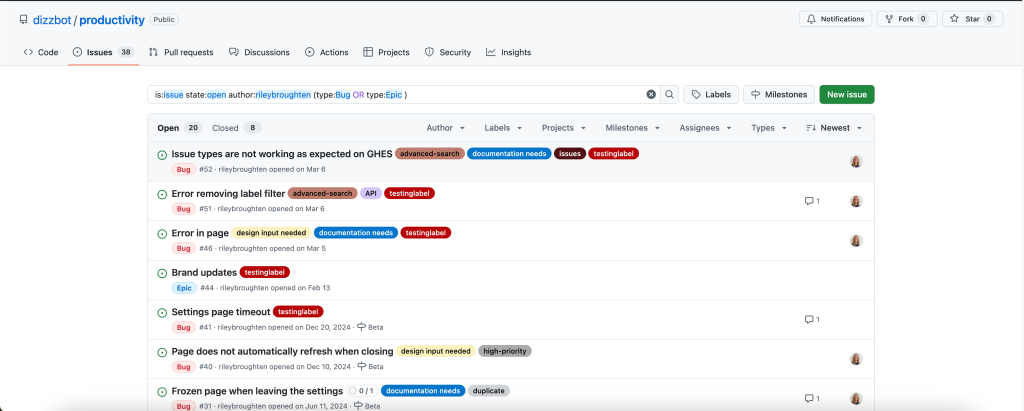
Issues search now supports building queries with logical AND/OR operators across all fields, with the ability to nest query terms. For example is:issue state:open author:rileybroughten (type:Bug OR type:Epic) finds all issues that are open AND were authored by rileybroughten AND are either of type bug or epic.
How did we get here?
Previously, as mentioned, Issues search only supported a flat list of query fields and terms, which were implicitly joined by a logical AND. For example, the query assignee:@me label:support new-project translated to “give me all issues that are assigned to me AND have the label support AND contain the text new-project.”
But the developer community has been asking for more flexibility in issue search, repeatedly, for nearly a decade now. They wanted to be able to find all issues that had either the label support or the label question, using the query label:support OR label:question. So, we shipped an enhancement towards this request in 2021, when we enabled an OR style search using a comma-separated list of values.
However, they still wanted the flexibility to search this way across all issue fields, and not just the labels field. So we got to work.
Technical architecture and implementation
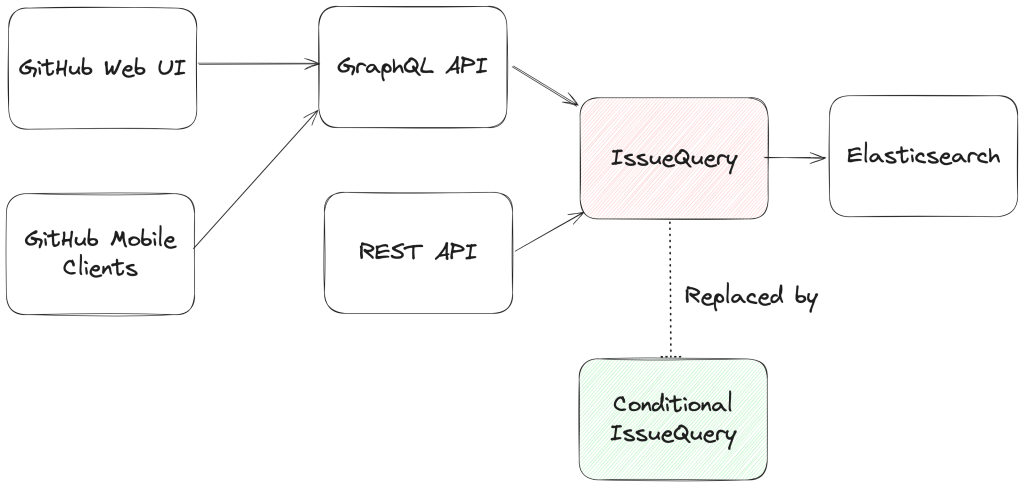
From an architectural perspective, we swapped out the existing search module for Issues (IssuesQuery), with a new search module (ConditionalIssuesQuery), that was capable of handling nested queries while continuing to support existing query formats.
This involved rewriting IssueQuery, the search module that parsed query strings and mapped them into Elasticsearch queries.
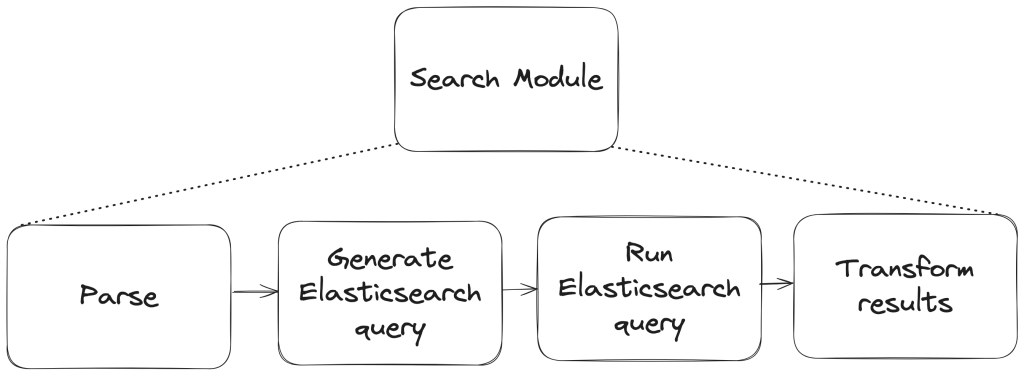
To build a new search module, we first needed to understand the existing search module, and how a single search query flowed through the system. At a high level, when a user performs a search, there are three stages in its execution:
- Parse: Breaking the user input string into a structure that is easier to process (like a list or a tree)
- Query: Transforming the parsed structure into an Elasticsearch query document, and making a query against Elasticsearch.
- Normalize: Mapping the results obtained from Elasticsearch (JSON) into Ruby objects for easy access and pruning the results to remove records that had since been removed from the database.
Each stage presented its own challenges, which we’ll explore in more detail below. The Normalize step remained unchanged during the re-write, so we won’t dive into that one.
Parse stage
The user input string (the search phrase) is first parsed into an intermediate structure. The search phrase could include:
- Query terms: The relevant words the user is trying to find more information about (ex: “models”)
- Search filters: These restrict the set of returned search documents based on some criteria (ex: “assignee:Deborah-Digges”)
Example search phrase:
- Find all issues assigned to me that contain the word “codespaces”:
is:issue assignee:@me codespaces
- Find all issues with the label documentation that are assigned to me:
assignee:@me label:documentation
The old parsing method: flat list
When only flat, simple queries were supported, it was sufficient to parse the user’s search string into a list of search terms and filters, which would then be passed along to the next stage of the search process.
The new parsing method: abstract syntax tree
As nested queries may be recursive, parsing the search string into a list was no longer sufficient. We changed this component to parse the user’s search string into an Abstract Syntax Tree (AST) using the parsing library parslet.
We defined a grammar (a PEG or Parsing Expression Grammar) to represent the structure of a search string. The grammar supports both the existing query syntax and the new nested query syntax, to allow for backward compatibility.
A simplified grammar for a boolean expression described by a PEG grammar for the parslet parser is shown below:
class Parser < Parslet::Parser
  rule(:space)  { match[" "].repeat(1) }
  rule(:space?) { space.maybe }

  rule(:lparen) { str("(") >> space? }
  rule(:rparen) { str(")") >> space? }

  rule(:and_operator) { str("and") >> space? }
  rule(:or_operator)  { str("or")  >> space? }

  rule(:var) { str("var") >> match["0-9"].repeat(1).as(:var) >> space? }

  # The primary rule deals with parentheses.
  rule(:primary) { lparen >> or_operation >> rparen | var }

  # Note that following rules are both right-recursive.
  rule(:and_operation) {
    (primary.as(:left) >> and_operator >>
      and_operation.as(:right)).as(:and) |
    primary }

  rule(:or_operation)  {
    (and_operation.as(:left) >> or_operator >>
      or_operation.as(:right)).as(:or) |
    and_operation }

  # We start at the lowest precedence rule.
  root(:or_operation)
end
For example, this user search string:is:issue AND (author:deborah-digges OR author:monalisa )
would be parsed into the following AST:
{
  "root": {
    "and": {
      "left": {
        "filter_term": {
          "attribute": "is",
          "value": [
            {
              "filter_value": "issue"
            }
          ]
        }
      },
      "right": {
        "or": {
          "left": {
            "filter_term": {
              "attribute": "author",
              "value": [
                {
                  "filter_value": "deborah-digges"
                }
              ]
            }
          },
          "right": {
            "filter_term": {
              "attribute": "author",
              "value": [
                {
                  "filter_value": "monalisa"
                }
              ]
            }
          }
        }
      }
    }
  }
}
Query
Once the query is parsed into an intermediate structure, the next steps are to:
- Transform this intermediate structure into a query document that Elasticsearch understands
- Execute the query against Elasticsearch to obtain results
Executing the query in step 2 remained the same between the old and new systems, so let’s only go over the differences in building the query document below.
The old query generation: linear mapping of filter terms using filter classes
Each filter term (Ex: label:documentation) has a class that knows how to convert it into a snippet of an Elasticsearch query document. During query document generation, the correct class for each filter term is invoked to construct the overall query document.
The new query generation: recursive AST traversal to generate Elasticsearch bool query
We recursively traversed the AST generated during parsing to build an equivalent Elasticsearch query document. The nested structure and boolean operators map nicely to Elasticsearch’s boolean query with the AND, OR, and NOT operators mapping to the must, should, and should_not clauses.
We re-used the building blocks for the smaller pieces of query generation to recursively construct a nested query document during the tree traversal.
Continuing from the example in the parsing stage, the AST would be transformed into a query document that looked like this:
{
  "query": {
    "bool": {
      "must": [
        {
          "bool": {
            "must": [
              {
                "bool": {
                  "must": {
                    "prefix": {
                      "_index": "issues"
                    }
                  }
                }
              },
              {
                "bool": {
                  "should": {
                    "terms": {
                      "author_id": [
                        "<DEBORAH_DIGGES_AUTHOR_ID>",
                        "<MONALISA_AUTHOR_ID>"
                      ]
                    }
                  }
                }
              }
            ]
          }
        }
      ]
    }
    // SOME TERMS OMITTED FOR BREVITY
  }
}
With this new query document, we execute a search against Elasticsearch. This search now supports logical AND/OR operators and parentheses to search for issues in a more fine-grained manner.
Considerations
Issues is one of the oldest and most heavily -used features on GitHub. Changing core functionality like Issues search, a feature with an average of nearly 2000 queries per second (QPS)—that’s almost 160M queries a day!—presented a number of challenges to overcome.
Ensuring backward compatibility
Issue searches are often bookmarked, shared among users, and linked in documents, making them important artifacts for developers and teams. Therefore, we wanted to introduce this new capability for nested search queries without breaking existing queries for users.
We validated the new search system before it even reached users by:
- Testing extensively: We ran our new search module against all unit and integration tests for the existing search module. To ensure that the GraphQL and REST API contracts remained unchanged, we ran the tests for the search endpoint both with the feature flag for the new search system enabled and disabled.
- Validating correctness in production with dark-shipping: For 1% of issue searches, we ran the user’s search against both the existing and new search systems in a background job, and logged differences in responses. By analyzing these differences we were able to fix bugs and missed edge cases before they reached our users.
- We weren’t sure at the outset how to define “differences,” but we settled on “number of results” for the first iteration. In general, it seemed that we could determine whether a user would be surprised by the results of their search against the new search capability if a search returned a different number of results when they were run within a second or less of each other.
Preventing performance degradation
We expected more complex nested queries to use more resources on the backend than simpler queries, so we needed to establish a realistic baseline for nested queries, while ensuring no regression in the performance of existing, simpler ones.
For 1% of Issue searches, we ran equivalent queries against both the existing and the new search systems. We used scientist, GitHub’s open source Ruby library, for carefully refactoring critical paths, to compare the performance of equivalent queries to ensure that there was no regression.
Preserving user experience
We didn’t want users to have a worse experience than before just because more complex searches were possible.
We collaborated closely with product and design teams to ensure usability didn’t decrease as we added this feature by:
- Limiting the number of nested levels in a query to five. From customer interviews, we found this to be a sweet spot for both utility and usability.
- Providing helpful UI/UX cues: We highlight the AND/OR keywords in search queries, and provide users with the same auto-complete feature for filter terms in the UI that they were accustomed to for simple flat queries.
Minimizing risk to existing users
For a feature that is used by millions of users a day, we needed to be intentional about rolling it out in a way that minimized risk to users.
We built confidence in our system by:
- Limiting blast radius: To gradually build confidence, we only integrated the new system in the GraphQL API and the Issues tab for a repository in the UI to start. This gave us time to collect, respond to, and incorporate feedback without risking a degraded experience for all consumers. Once we were happy with its performance, we rolled it out to the Issues dashboard and the REST API.
- Testing internally and with trusted partners: As with every feature we build at GitHub, we tested this feature internally for the entire period of its development by shipping it to our own team during the early days, and then gradually rolling it out to all GitHub employees. We then shipped it to trusted partners to gather initial user feedback.
And there you have it, that’s how we built, validated, and shipped the new and improved Issues search!
Feedback
Want to try out this exciting new functionality? Head to our docs to learn about how to use boolean operators and parentheses to search for the issues you care about!
If you have any feedback for this feature, please drop us a note on our community discussions.
Acknowledgements
Special thanks to AJ Schuster, Riley Broughten, Stephanie Goldstein, Eric Jorgensen Mike Melanson and Laura Lindeman for the feedback on several iterations of this blog post!
The post GitHub Issues search now supports nested queries and boolean operators: Here’s how we (re)built it appeared first on The GitHub Blog.
]]>The post How GitHub engineers learn new codebases appeared first on The GitHub Blog.
]]>No matter where you are in your coding career, you will likely come across a new codebase or problem domain that is completely unfamiliar to you. Because codebases can be filled with many layers of design patterns, bugfixes, and temporary workarounds, learning a new one can be a time-consuming and frustrating process.
Last year, I moved to a new team at GitHub. During my transition, I collected insights from colleagues about how they approach learning new technical spaces. A fascinating collection of strategies emerged, and I’m excited to share them!
Below are the most effective methods I gathered, organized by approach. Whether you’re a seasoned engineer switching teams or a newcomer to the field, these strategies can help make your next codebase onboarding a little bit easier.
Hands-on code exploration
One of the best ways to get started is working directly with the code itself:
- Start with “Good First Issues”: Begin your journey by tackling smaller, well-defined tasks. These issues are often carefully selected by the team that owns the codebase to help newcomers understand key components without becoming overwhelmed. They provide natural entry points into the system, while delivering immediate value to the team.
- Learn with GitHub Copilot: Open up your Copilot Chat window next to the codebase as you’re exploring it. You can ask Copilot Chat your questions, and then use the
/explainfunctionality for things that are difficult to understand. Learn more about using Copilot Chat in your development environment here. Here are some example queries that I have used with GitHub Copilot to enhance my understanding of a codebase:- What will this function return if I give it X?
- Summarize what this method is made to do
- What are some potential gaps in the existing tests for this method?
- Analyze telemetry and metrics: Modern applications generate vast amounts of performance and usage data. Study these metrics to understand how the system behaves in production, what patterns emerge during peak usage, and which components require the most attention. This data-driven approach provides invaluable context about the application’s real-world behavior.
- Explore through testing: Make deliberate modifications to the code and observe their effects. Write new tests to verify your understanding, and intentionally break things (in development) to see how the system fails. This helps build an intuitive understanding of the application’s boundaries and failure modes.
Collaborative learning
Knowledge sharing is often the fastest path to understanding:
- Pair program: Don’t just observe—actively participate in pairing sessions with experienced team members. Ask questions about their workflow, note which files they frequently access, and get to know their debugging strategies. Even if you’re mainly watching, you’ll absorb valuable context about how different pieces fit together.
- Understand the “why”: When assigned tasks, dig deep into the motivation behind them. Understanding the business context and technical rationale helps you make better architectural decisions and aids in future problem solving. Don’t be afraid to ask seemingly basic questions. They often lead to important insights.
- Monitor team communications: Stay active in team chat channels and incident response discussions. Pay special attention to production alerts and how the team responds to them. This exposure helps you understand common failure patterns and builds muscle memory for handling incidents.
Documentation and knowledge management
Writing and organizing information helps solidify understanding:
- Create personal documentation: Maintain a living document of your discoveries, questions, and insights. Document important code paths, architectural decisions, and system interfaces as you encounter them. This will become an invaluable reference and help identify gaps in your understanding.
- Build technical maps: Create diagrams of system architecture, data flows, and entity relationships. Start with high-level “black boxes” and gradually fill in the details as your understanding grows. Visual representations often reveal patterns and relationships that aren’t obvious in the code. One tool that I use for this is Figma. I start with adding the basic blocks that I understand about a system and how they interact, and then continuously zoom in and out on different parts of the system to add to the map as I learn.
- Maintain a command cheat sheet: Keep track of useful commands, scripts, and workflows you discover. Include context about when and why to use them. This becomes especially valuable when working with complex build systems or deployment pipelines. Here’s an example of a command cheat sheet that I often refer to for markdown syntax.
- Gather information on the domain: One key to managing your knowledge of a codebase is to have a deep understanding of the domain. This can be gained from product owners, customer insights, or from industry best practices if the domain is generalizable enough. Deeply understanding the domain and what customers in that space find the most critical are key to learning a new codebase.
Learn by teaching
One great way to verify your understanding of a topic is the ability to accurately explain it to others. If you created personal documentation, as recommended in the previous section, you can formalize it into guides and official documentation for future new members of your team:
- Write internal guides: Once you learn something new, document it for the next person. This forces you to organize what you’ve learned and often reveals areas where your understanding isn’t as complete as you thought.
- Contribute to official documentation: When you find gaps in the existing documentation, take the initiative to improve it. This not only helps future team members but also validates your understanding with current experts. Learn more about writing documentation for your GitHub repository from our GitHub-flavored markdown guide.
- Regularly reflect on your learning by answering these key questions:
- Can you describe the system in a few concise sentences?
- How does it interact with adjacent systems?
- What surprised you most during the learning process?
- What aspects remain unclear?
After all of these recommendations, I’ve found that my favorite way to learn a new codebase is through documenting it, and turning that documentation into something that others can use in the future. Writing things down forces me to structure my thoughts and identify gaps in my understanding.
Here is a markdown template I developed for learning new codebases, which I use in conjunction with these methods to systematically build my knowledge.
No matter how you learn, getting familiar with a new codebase can take some time. If you find that you need to brush up on your GitHub skills for any of these areas, check out this GitHub for Beginners video.
Happy learning!
The post How GitHub engineers learn new codebases appeared first on The GitHub Blog.
]]>The post How we built the GitHub Skyline CLI extension using GitHub appeared first on The GitHub Blog.
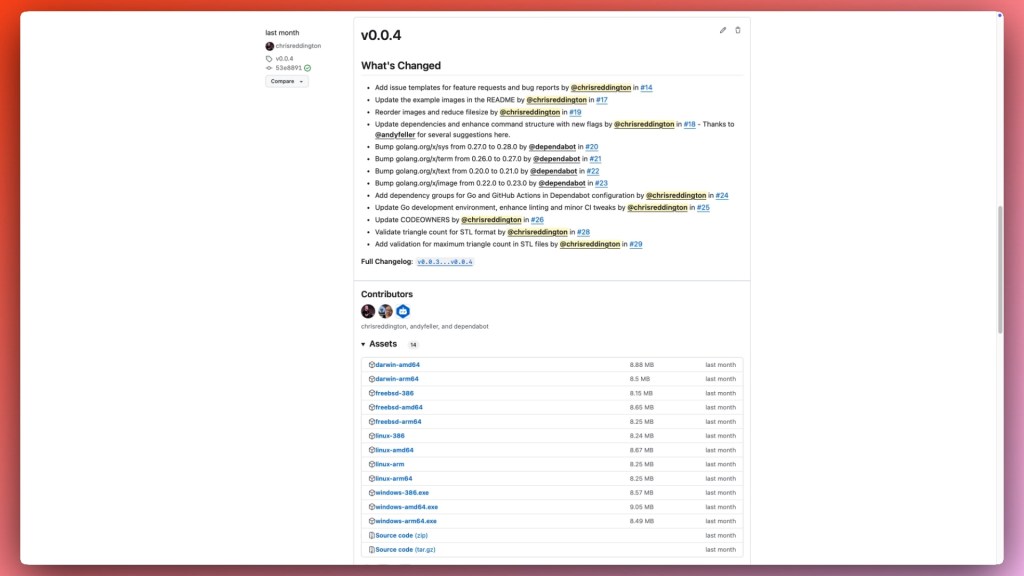
]]>In December 2024, we announced gh-skyline, a GitHub CLI extension that allows our developer community to generate a 3D version of their GitHub Contribution Graph into an STL file ready for printing on a 3D printer, just in time to capture all of those contributions!
Before we explain any more about Skyline or how we built it, let’s make sure you’re familiar with the GitHub CLI. Through a command line interface (CLI), you can interact with applications or the operating system in a text-based interface via your terminal. In other words, the GitHub CLI brings GitHub to your terminal and other locations where you can run command line scripts, like automated processes such as GitHub Actions. Once you’ve authenticated, the CLI can interact with a number of the core parts of GitHub, like Issues, Pull Requests, Codespaces and Actions workflows. But you’re not just limited to the commands available directly from the GitHub CLI. It’s designed to be extensible so that you can create your own GitHub CLI extensions.
GitHub has built many GitHub CLI extensions including gh-copilot, gh-gei, and gh-models, but we’re not the only ones building them. There’s a whole community of GitHub CLI extension authors, so why not take a peek at their work? gh-skyline is just one of many extensions that you can use in the GitHub CLI.
Getting started with gh-skyline
You’ll first need to have the GitHub CLI installed to get started with the GitHub Skyline CLI. You can find out more about that here.
Once you have authenticated into the GitHub CLI, you can then install gh-skyline. To do this, run the following command in your terminal:
gh extension install github/gh-skyline
Once complete, you should receive a message that the github/gh-skyline extension installed successfully. Now you can execute gh skyline in your terminal to generate the 3D version of your contribution graph, as well as an ASCII art representation while you wait! By default, it will render the current year. (I don’t know about you, but I’m still putting 2024 at the end of my dates.) You can also pass the year parameter to look back at a specific year, like gh skyline --year 2024. There are several more flags available, and you can review the README to explore further.
| 💡 Thought: While you’re there, why not star the repository so you can keep track of the project? Or even better, contribute an idea through a feature request, bug report, or make some code contributions! We’ve already had several excellent community contributions. 🙏 |
How we used GitHub to build gh-skyline
We’ve published many posts about how we use GitHub to build GitHub, including How GitHub uses merge queue to ship hundreds of changes every day, How GitHub uses GitHub Actions and Actions larger runners to build and test GitHub.com and How we build containerized services at GitHub using GitHub.
| 💡 Tip: Like these types of posts? Check out more by browsing the “How GitHub builds GitHub” tag on our blog! |
We know that many developers take pride in their contribution history and like to have something to show for that. So we also knew from the outset that we wanted to open source the codebase so the community can learn from it and contribute. That goal shaped several of the decisions we made when setting up the repository. Let’s walk through the development lifecycle to learn how and why we used various GitHub services.
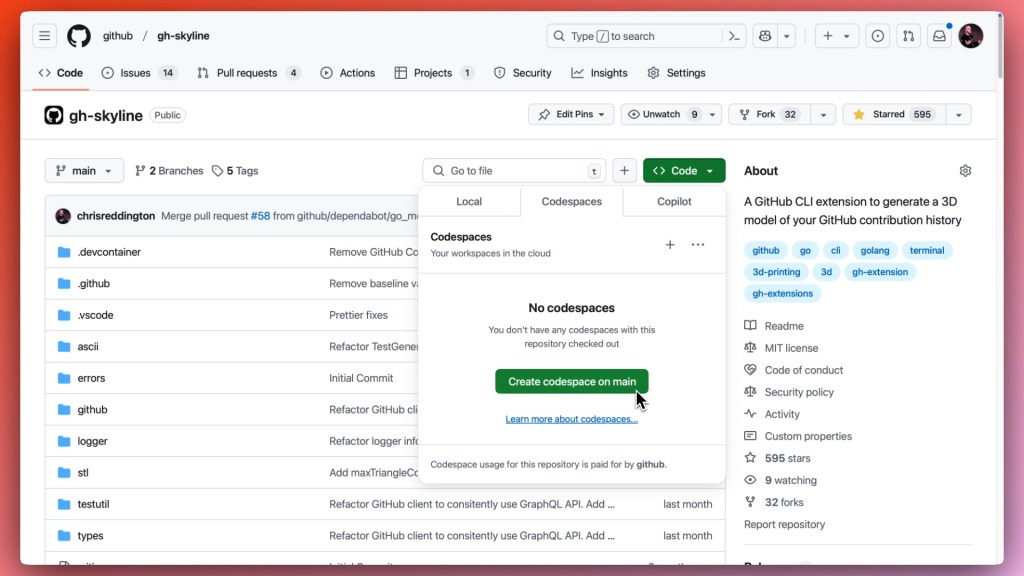
Making contributing easy with GitHub Codespaces
GitHub Codespaces simplifies development by enabling you to provision an environment configured with the tools you need to complete your task. Codespaces are configured using a devcontainer, so you can specify the underlying container image in use, Visual Studio Code extensions, or post-creation steps that you may need as part of the creation process.
The gh-skyline devcontainer was configured with:
- A container image: We’re using a go devcontainer image as the base image of our GitHub Codespace, so that it has several of the tools we need for Go development.
- Extensions: Several GitHub extensions make it easier to work between Visual Studio Code and GitHub. Additionally, the Go for Visual Studio Code extension further improves the developer experience as the project is written in Go (statement completion, code navigation, and other features).
- Features: Installing the GitHub CLI so that we can test the GitHub CLI extension directly within the Codespace. To do that, we’ll need the GitHub CLI!
- postCreateCommand: We’re also specifying some additional go tools to be installed which are required as part of our linting process. The base image doesn’t include those, so we’re able to add that in as a final preparation step for the environment.
Remember that making gh-skyline open source was a key goal that we set off with. GitHub Codespaces are incredibly helpful with this because they lower the contribution barrier by providing a consistent development environment that is easy to set up and use, all with a click of a button.
Contributors can get started quickly and focus on a new code contribution rather than spending time configuring tools and dependencies for their environment. (As an aside, you may be interested in learning how GitHub used GitHub Codespaces to bootstrap a GitHub.com development environment and reduce the timeframe from 45 minutes to 5 minutes, and then from 5 minutes to 10 seconds.)
Rubber ducking with Copilot Chat
Copilot Chat has been my preferred way of working with GitHub Copilot since the feature was introduced. Acting as a rubber duck, it allows me to explore ideas, and I use it as a thought partner.
For example, when exploring different approaches to structuring types and packages or tackling core programming decisions like whether to use a pointer or pass an object directly. Instead of reviewing documentation, community discussions, or Q&A threads, Copilot provides contextual guidance within the project, offering suggestions for me to consider and iterate on.
| 💡 Tip: In December 2024, we announced a free tier of GitHub Copilot. Check out the blog for more details and how you can get started! |
From conversation to action with Copilot Edits
While Copilot Chat enables me to explore ideas, Copilot Edits helps “execute” those ideas by making changes on my behalf. Many times, I’ve pointed it in the general direction of the changes I wanted to make, provided the appropriate context, and it made the changes for me.
Fixing linter suggestions with Copilot Edits and #terminalSelection
Setting coding standards with tools such as linters is important because it ensures code consistency, readability, and helps catch potential errors early in the development process. gh-skyline has several linters configured, but that occasionally meant needing to iterate on code changes to align to those standards.
Some of those suggestions could be fixed by passing in a --fix or --write parameter, depending on the tools and errors, but some of them had to be resolved manually.
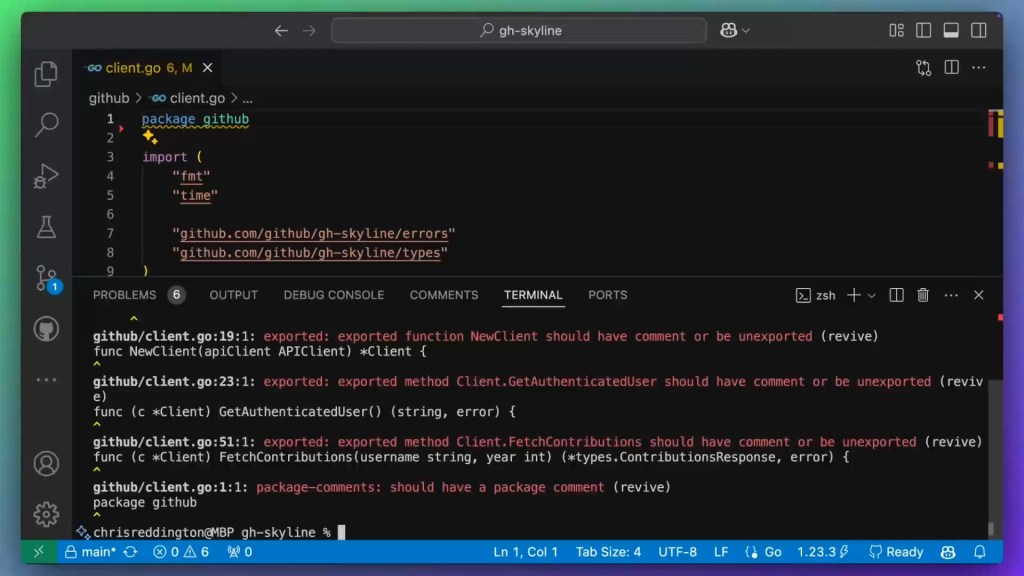
Copilot Edits proved especially helpful in this scenario. After running the linting command in the terminal, we could select the outputs and use #terminalSelection in the Copilot Edits prompt and ask Copilot to fix the issues for us. This streamlined my workflow, allowing me to efficiently resolve linter issues without manually searching for each instance in the codebase.
Refactoring with Copilot Edits
Refactoring is an essential part of software development, where you focus on improving code maintainability without altering its overall behavior. By using Copilot Edits, I was able to specify the general direction of the refactoring I wanted to make, and Copilot proceeded to make the edits to the files directly. I remained in control, able to accept or discard the changes,or even undo and redo changes to experiment with different ideas.
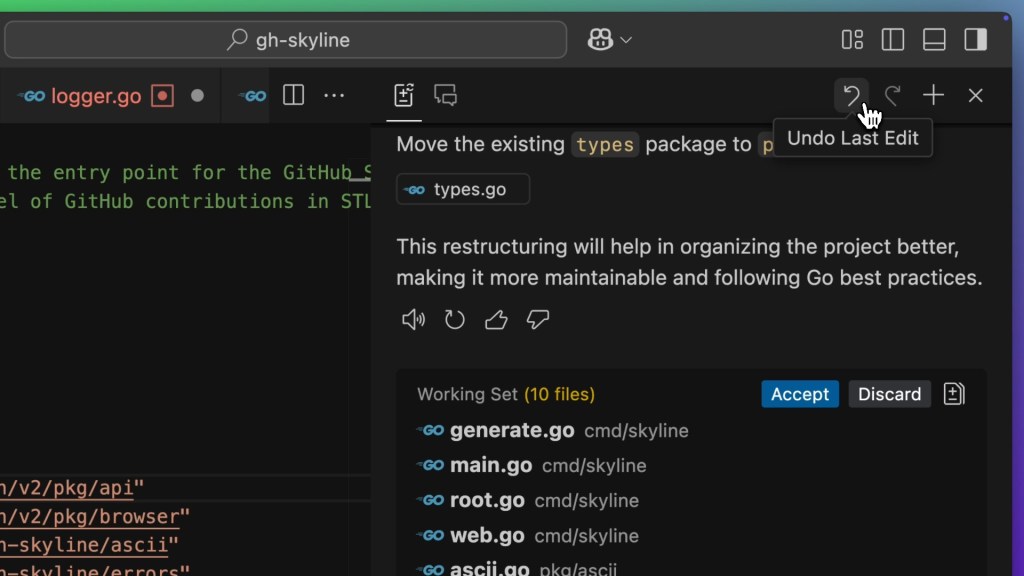
This collaboration between my intent as the developer and the automated edits introduced a new approach to refactoring, where I could iterate on the changes with Copilot, step back and forth, and make incremental tweaks as needed. This kept me in the flow and focused on the task at hand rather than on the low-level details of the refactoring process.
Checking for quality with Actions
Software development is a team sport, and maintaining code quality is essential for a successful collaboration and to ensure the reliability of the software you’re building. Given that we planned for the project to be open source, we wanted to ensure that the codebase was well-tested, linted, and had a consistent style. Additionally, it was important to have a process to streamline the contribution review process, catch errors early, and ensure that the codebase was maintainable.
To achieve this, we set up several GitHub Actions workflows as part of our development process.
Continuous Integration
Continuous Integration (CI) ensures that every code change is automatically tested and integrated, maintaining code quality and accelerating development. So it was important to have a CI workflow that would run tests, linting, and other quality checks on every pull request. With GitHub Actions, each separate file in the .github/workflows directory represents a different workflow.
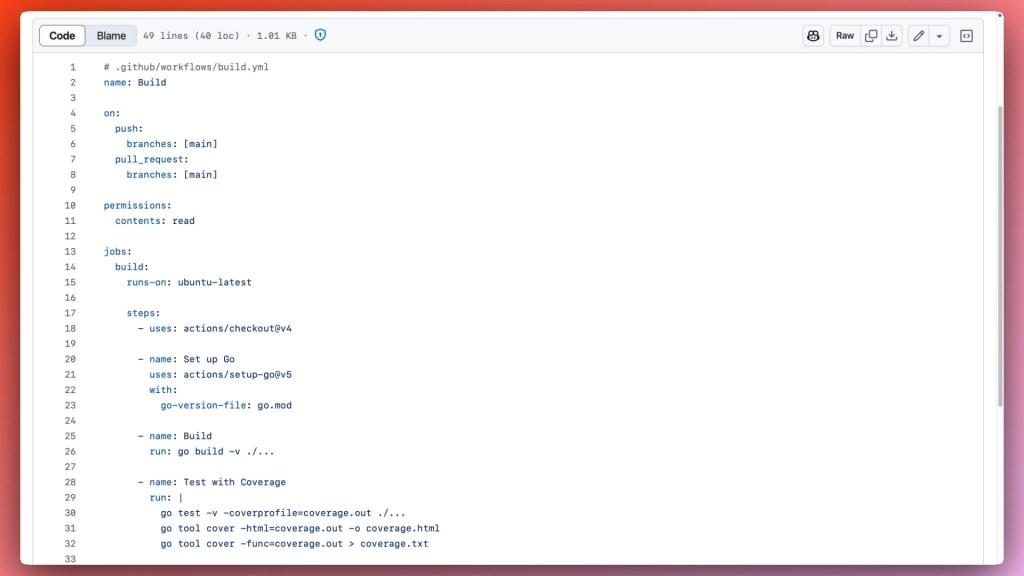
For example, we’ve configured build.yml to build the code and run tests, while linter.yml checks the code for linting errors. In fact, the linter step uses super-linter, another open source project published by GitHub. Both of those workflows are triggered on every pull request or push to the main branch.
In addition, repository branch rulesets were configured so that the main branch could only be updated through a pull request, and that the build and linter checks must pass before merging. This combination of automated checks and branch protection rules helped maintain code quality and ensure that the codebase was reliable and stable.
Release process
GitHub Actions are not just limited to CI. They can be triggered by a number of GitHub events like when an issue comment is added, a release is published, or by a manual workflow dispatch.
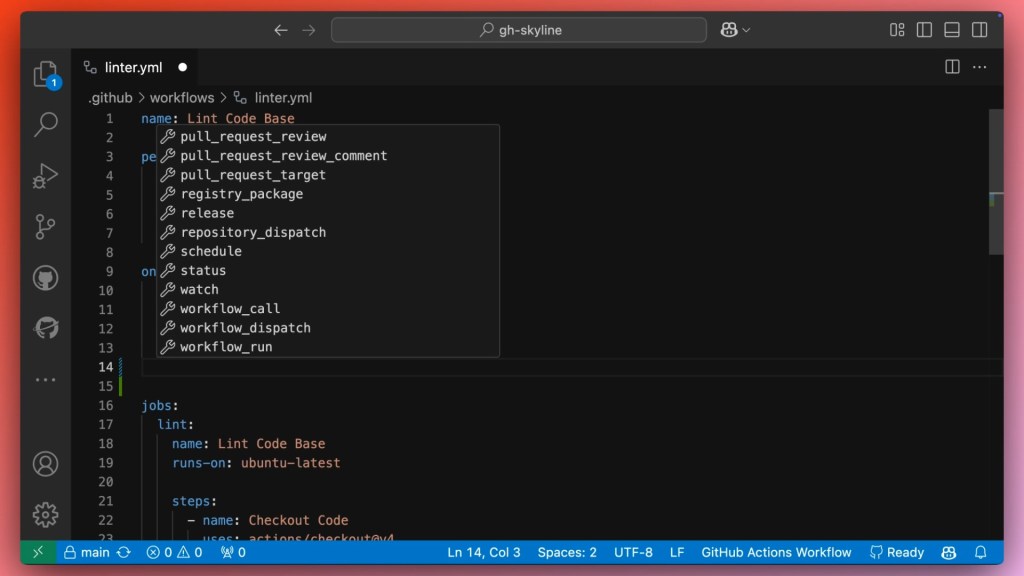
| 💡 Tip: If you use Visual Studio Code and want additional tools to help with Workflow authoring like in the above screenshot, check out the GitHub Actions extension. |
When releasing a GitHub CLI extension, we need to consider the various platforms that the extension will be available on, like Windows, macOS, and Linux. In other words, we need to make sure there is a binary available for each of those platforms. Fortunately, the GitHub CLI team had us covered. As we created a precompiled extension in go, we could use the gh extension create command to initialize the extension scaffolding, download the Go dependencies, and set up a GitHub Actions workflow to build the extension for each platform.
gh extension create --precompiled=go skyline
✓ Created directory gh-skyline
✓ Initialized git repository
✓ Made initial commit
✓ Set up extension scaffolding
✓ Downloaded Go dependencies
✓ Built gh-skyline binary

gh-skyline is ready for development!
The GitHub Actions workflow is set up in the release.yml file and is triggered when a new release is published. The workflow uses the cli/gh-extension-precompile GitHub Action, which builds the extension for each platform and uploads the binaries as assets to the release.
Security
Security is a core requirement and table stakes for many software developers, serving as the foundation for trustworthy applications. GitHub has several tools that span supply chain security, code security, and secret scanning. When releasing an open source project like gh-skyline, or any piece of software, maintaining robust security practices is essential to ensure reliability and trustworthiness.
Supply chain security (dependencies)
Managing dependencies is crucial to protect against supply chain attacks and vulnerabilities. By regularly updating and auditing third-party libraries, we minimize the risk of introducing insecure components into our project.
As gh-skyline is built as a Go Module, we used go.mod to manage the dependencies, and go.sum, which contains the hashes of the direct and indirect dependencies and ensures that the dependencies are locked to specific versions.
Staying on top of dependencies can feel like a chore, but it’s important to ensure that your project remains secure and benefits from any improvements in your upstream dependencies, contributing to the overall health of the codebase.
Dependabot can help manage dependencies, both from a vulnerability perspective (Dependabot security updates) and to ensure that you’re using the latest versions of your dependencies (Dependabot version updates). It can automatically create pull requests to update dependencies, and you can configure it to automatically merge those pull requests if the tests pass.
| 💡 Tip: As Dependabot raises these version bumps as pull requests, GitHub Actions workflows will be triggered, running the tests and linters to ensure that the updated dependencies don’t introduce any issues. It’s always worth a review, but these automated checks can help catch issues and accelerate your review process. |
Dependabot version updates are enabled in the dependabot.yml configuration file, which specifies the update schedule and the package ecosystems to check for updates.
Dependabot is configured in the gh-skyline repository:
- With two package ecosystems,
gomodandgithub-actions - So that each package ecosystem is checked for updates weekly
- Where the
gomoddependencies check for direct and indirect dependency updates - With dependency updates for the
gomodandgithub-actionsecosystems are each grouped into a pull request per ecosystem
Dependabot helps us keep on top of the latest updates by automatically raising pull requests, after which GitHub Actions runs the necessary automated checks, simplifying and accelerating our process to improve our supply chain security.
| 💡 Tip: While Dependabot helps you manage your existing dependencies, you should also review any new dependencies being introduced (via a pull request). Dependency Review complements Dependabot by providing detailed insights into the dependencies you’re adding, such as whether they’re insecure, or specifying the types of allowed licenses. By adding this as a check to your pull request, you can add extra gates to make sure your software remains healthy. |
Code security
Writing secure code involves adhering to best practices and conducting thorough code reviews. This ensures that potential security flaws are identified and addressed early to maintain the integrity of the codebase.
Manual code reviews are a key part of the development process, but they can be time-consuming and error-prone. Automated code analysis tools can help streamline the review process, catch common issues, and ensure that the code adheres to a set of standards.
Along with the linters we have configured in the GitHub Actions workflows (such as gosec), we also use GitHub’s code scanning default setup. This makes it easy to get started with code scanning, as it automatically detects the languages in your repository and scans any supported languages.
Code scanning allows us to identify potential vulnerabilities in our codebase and Copilot Autofix suggests fixes to resolve those issues for you. Or, if you depend on other security tools, you may be able to integrate them into code scanning.
Secrets
I’m sure many of us have been there—the moment you accidentally commit a secret to your repository. It’s a common mistake, but one that can have serious consequences, particularly if you’re pushing changes to a public repository. Properly managing secrets, such as API keys and credentials, is vital to prevent unauthorized access to services.
Secret scanning detects a number of known patterns across your repository and provides an alert if it finds a match. We had this enabled before we made the repository public, as a safety check to ensure that we hadn’t inadvertently committed any secrets.
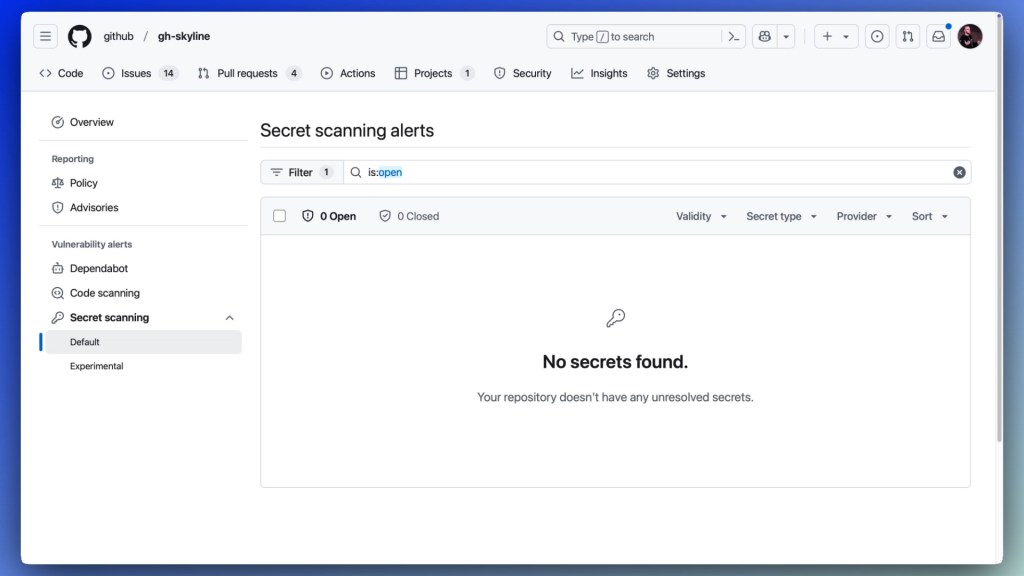
But how do you reduce the risk of secrets from making their way to GitHub once you’ve enabled secret scanning? Secret scanning push protection can help, by scanning your code when you push it to GitHub and proactively blocking the push if a secret is detected. Then, you can review the alert, review whether it’s a false positive, or whether you need to clean up the secret (and associated history) and push the changes again.
Getting ready for the public release
Open source release process
GitHub’s Open Source Program Office (OSPO) supports GitHub’s teams in open sourcing projects, responsible adoption of open source and more by sharing recommended practices, patterns and processes. At GitHub, we have an open source release process that we follow when open sourcing projects. This process ensures that we have the necessary reviews, acts as a check for any potential issues (e.g. reviewing whether there may be sensitive IP, secrets, or other information that shouldn’t be public), and ensures that the project is set up for success in the open source community.
The OSPO team have open sourced the release process and a repository release template to help share our recommended practices externally.
Community engagement
Flipping the project to be publicly visible is just the beginning. Engaging with the community is essential to build a healthy and sustainable open source project. This can take many forms, such as responding to issues and pull requests, providing documentation and guidance, and fostering a welcoming and inclusive environment for contributors.
- Documentation: Clear and concise documentation makes onboarding new contributors easier. It helps them understand the project, the standards, how to contribute and how to use the project. This includes a code of conduct, contributor guidelines, LICENSE, and README. These are a key part of our open source release process.
- Issues: Issues are a way for users to report bugs, request features, and ask questions. Having a clear process around these is important, so the community knows the project is actively maintained and that they’re a key part of its evolution:
- Issue templates help contributors provide the necessary information for creating an issue. This helps us streamline the issue triage process as we’ve guided the user to provide the minimum amount of information up front (such as operating system, CLI, and
gh-skylineversion). - Labels help us categorize issues. For example, we use the good first issue and help wanted labels to easily identify issues that could use support from the open source community. You can even filter and search by those labels, reducing the entry hurdle for community contributions.
- GitHub Projects helps us organize and prioritize the issues and pull requests through a visual representation. For example, the community can use this view to glance through the backlog and active items in development while the maintainers use the “Needs Review” view as part of their regular triage process.
- Issue templates help contributors provide the necessary information for creating an issue. This helps us streamline the issue triage process as we’ve guided the user to provide the minimum amount of information up front (such as operating system, CLI, and
- Pull requests: Pull requests are how contributors can submit code changes to the project. It’s important to approach this as a learning process, where you can provide feedback, guidance, and help ensure contributions are maintainable in the long term.
- Community: Building a community and supporting them is essential for the long-term success of any open source project. For example, celebrating contributions, recognizing contributors (tagging them in your releases), and fostering a welcoming and inclusive environment can help build a strong community around your project.
Summary
This snapshot into how we built gh-skyline, a GitHub CLI extension that generates a 3D version of your GitHub Contribution Graph, covered how we used GitHub Codespaces to make contributing easy, how GitHub Copilot supported the development process, and how GitHub Actions helped ensure code quality and security. We also touched on the open source release process and community engagement, which are essential for building a healthy and sustainable open source project.
You can try out gh-skyline by installing the GitHub CLI and running gh extension install github/gh-skyline. We hope you enjoy visualizing your contributions in 3D and wish you the best as you build up your 2025 Skyline! Who knows, maybe one of those could be a contribution to gh-skyline itself?
The post How we built the GitHub Skyline CLI extension using GitHub appeared first on The GitHub Blog.
]]>The post Insider newsletter digest: Cook up a controller with GitHub Copilot appeared first on The GitHub Blog.
]]>| This is abridged content from September 2023’s Insider newsletter. Like what you see? Sign up for the newsletter to receive complete, unabridged content in your inbox twice a month Sign up now > |
Whether you’re a software architect, QA engineer, technical lead, or any other type of developer, you’ll most likely benefit from building a controller function in Node.js. A controller function is a specific piece of code within an application’s architecture—often found in the Model-View-Controller (MVC) pattern—that facilitates communication between the user and the underlying application logic.
Think of the controller function as the master chef in your code kitchen 
 . It takes in your ingredients (user input), works its culinary magic behind the scenes by interacting with the data model, and serves up a deliciously updated UI
  . So, whether you’re coding up a storm or cooking up code, the controller function is your secret sauce to a flavorful application.
And here’s a little extra food for thought: did you know that you can build a controller on the fly with GitHub Copilot?
Follow this recipe to cook up your own controller function in Node.js with our new AI-pair programming tool:
- Install the GitHub Copilot extension
- Set up a new Node.js project and add instructions for GitHub Copilot.
- Define your controller function specifications.
- Leverage GitHub Copilot’s suggestions.
- Accept and implement the code recommendations by pressing TAB and ENTER.
- Add the required function details.
- Optimize error handling.
- Return API response.
- Review and validate the code.
- Update code to match your specific requirements.
One of our very own developer advocates, @LadyKerr, used this exact recipe to help concoct a GPT-3 application with GitHub Copilot that finds the nutritional content of any recipe with AI  . You can find the source code and build it yourself here.
Or, if you’re a more visual learner, you can click through to follow the steps in this video:

Ready to whip up a controller function of your own? Let’s get cookin’  ! Sign up for GitHub Copilot.
The post Insider newsletter digest: Cook up a controller with GitHub Copilot appeared first on The GitHub Blog.
]]>The post Build code security skills with the GitHub Secure Code Game appeared first on The GitHub Blog.
]]>In March 2023, we launched the Secure Code Game, an in-repo learning experience where players fix intentionally vulnerable code, so developers can build a secure coding mindset while having fun! Since then, more than 3,500 developers have played, and we love seeing how it has helped enterprise, open source, and education communities achieve their objectives. Today, we are excited to release the second season with five community-contributed challenges in JavaScript, Python, Go, and GitHub Actions!
How the game works
The game is still as simple as it can be: review the code, fix the bugs, and run the tests to progress to the next level! The best part? It takes less than two minutes to spin it up as a fully configured environment in the cloud via GitHub Codespaces, with up to 60 hours a month free. It’s designed for developers and students who want to improve their code security skills, learn how to build security into workflows, and how to use GitHub Advanced Security (GHAS).
Why a game?
Our initial motivation was to tackle the pain points that the developer community was struggling with in secure coding training. In our interactions with the community, we collected the following feedback:
- “Boring courses that follow a purely theoretical approach, often video-based.”
- “Learning outside of a dev environment.”
- “Assessments through multiple-choice questions while in the real world there are not guarantees of fixing a security issue without introducing new ones.”
- “Lack of personalization based on the programming languages and frameworks in use, including frequent security issues occurring from one’s coding style.”
We chose a gamified approach that excited our learners and the in-repo experience, either inside Codespaces or locally, made it developer-first, keeping developers where they excel: their code editor. We then gave players a threefold challenge: spot the security issue(s), fix them, and keep the code as functional as initially to proceed to the next level. This made players recognize the real-world challenge of fixing an issue effectively, without introducing any regression of the existing functionality. Finally, by open sourcing our game, we also gave the community a chance to contribute. They seized the opportunity and contributed to four out of five challenges of the new season!
Contributing to the Secure Code Game means having an impact in the wider security world through open source. I added challenges to the second season inspired by real-life scenarios, to help others learn in an engaging, fun, and hands-on way.
Over the past year, hearing from our community about how they’ve been using the game has been incredibly rewarding. For example, a PropTech startup gathered its developers for the first of its kind hackathon based on the Secure Code Game. After trying other trainings unsuccessfully and seeing vulnerabilities in code continue piling up, they decided to take some common security issues they were facing and transform them into Secure Code Game challenges for their engineers to compete in teams of two. As a result, they noted a 96% reduction in security issues when combining GHAS and the Secure Code Game, and nearly 97% reduction in the weekly time required from the security team to help developers with security remediation.
Our engineers had fun! We noticed an increased sense of ownership among developers and willingness to learn directly from our security engineers.
Additionally, the Secure Code Game was used in the classroom at the University of Novi Sad for delivering interactive lectures with the active participation of students.
I observed that this is a more efficient way to share knowledge compared to the classic delivery with a passive audience. Students immediately got a chance to practice concepts and learn by doing. They also realized that security shouldn’t be an afterthought because they experienced in practice when it’s bolted on top of a feature-rich application, it’s just too late and risky.
Your chance to level up!
We can’t wait to find out how you will perform on the challenges of this second season. And for the creative readers, don’t miss your opportunity to contribute! We welcome your ideas to shape the game’s future. Just take a look at our contribution guideline for more details.
So, what are you waiting for? Start playing now!
The post Build code security skills with the GitHub Secure Code Game appeared first on The GitHub Blog.
]]>The post Insider newsletter digest: Build from anywhere appeared first on The GitHub Blog.
]]>| This is abridged content from August’s Insider newsletter. Like what you see? Sign up for the newsletter to receive complete, unabridged content in your inbox twice a month Sign up now > |
In this newsletter, we’ll explore a few insider tips and tricks you can use to make the most of GitHub Mobile, such as:
- Creating and managing issues with Issue Composer
- Customizing your mobile experience with shortcuts
Let’s dive in.
Create and manage issues on the fly with Issue Composer 
Have you ever gone for a midday coffee run and then all of a sudden remembered,“Oh, I should’ve updated those issues before I left!” No worries, Issue Composer has your back. With Issue Composer, you can create issues, document bugs, propose features, and engage in discussions directly from your mobile device. And now, with our new Property Bar feature, you can effortlessly add metadata to your issues, like assignees, labels, milestones, and projects. Plus, you can do all of this while you’re in line to place that coffee order. 
Check this out:

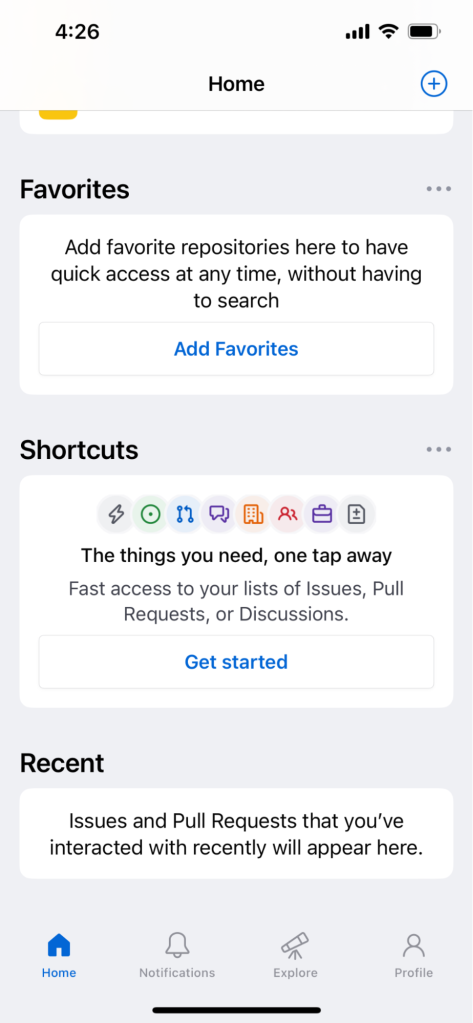
Customize the app by creating shortcuts 
There are times when taking the scenic route makes sense, but maybe not necessarily when you’re working under a deadline. And that’s the beauty of shortcuts, right? With GitHub Mobile’s Shortcuts, you can access all of the important things, like issues, discussion, or pull requests, right on the home page of your mobile app.
To start customizing your shortcuts, simply open the app and click the “Get started” button.
From there, you can either choose from the “suggested shortcuts” selection or create your own. When creating your shortcuts, the scope for customization is pretty vast. You can select:
- Open or closed issues
- Created, mentioned, or assigned issues
- All, private, or public repositories
- Filter by org
- Filter by repository
- Even sort from various categories and emojis

Once you save the shortcut, all the things you need are simply a tap away.
Increase productivity with GitHub Mobile 
GitHub Mobile empowers developers to make meaningful contributions and stay productive no matter where they are. Whether you’re reviewing code, managing issues, or participating in discussions, you can stay connected and engaged with your projects at all times, even during downtime. And now that you’re armed with these tidbits, you’re on your way to becoming a mobile power user. 
Ready to try out these tips and features for yourself? Download GitHub Mobile.
Want to receive content like this twice a month, right in your inbox? Sign up for the newsletter now >
The post Insider newsletter digest: Build from anywhere appeared first on The GitHub Blog.
]]>The post Getting started with edge computing appeared first on The GitHub Blog.
]]>There’s quite a bit to unpack there. How does building edge computing software differ from writing other cloud applications, what do you need to know to get started, and does Microsoft’s definition hold up in the first place? The ReadME Project Senior Editor Klint Finley gathered three experts to answer these and other questions.
Let’s meet our experts:
 Jerome Hardaway is a senior software engineer at Microsoft, where he works in Industry Solutions Engineering. He’s also a U.S. Air Force veteran and the executive developer of Vets Who Code, a tuition-free, open source, coding-immersive non-profit that specializes in training veterans.
 Kate Goldenring is co-chair of the Cloud Native Computing Foundation IoT Edge Working Group and a senior software engineer at Fermyon Technologies.
 Alex Ellis is the founder of OpenFaaS, a former CNCF ambassador, and creator of the Linux Foundation’s Introduction to Kubernetes on Edge with K3s course.
Klint: Let’s start by getting on the same page about what we’re talking about. I shared the Microsoft Azure cloud computing dictionary definition of edge computing. Does that definition work? Would you change anything about it?
Jerome: I would make the definition more human-centric. It’s not just about devices, it’s about the person. You want data processed and updated at the edge of the network as close to the person using it as possible, because, without a person to answer it, a cell phone is just a block of electricity.
Kate: I think it’s a good definition, given that it’s 12 words long. I would add more to it. When the CNCF IoT Edge Working Group was working to define edge computing, we found that definitions tend to fall into three main categories. The most common, and the one that Microsoft seems to be using, is geography-based—the distance between devices and servers, for example. The second is a resource-based definition, which prioritizes the resource constraints faced in edge computing. The third was connectivity-based.
Alex: Likewise, I’d change the definition to reflect how broad a topic edge computing can be. Just like with cloud computing, you can have two industry experts with a wealth of experience talking about two very different things when you ask them about edge computing.
Klint: I could see there being some confusion between edge computing and private or hybrid cloud, since all three typically involve some on-premises computing power. What are the main differences between edge computing architectures and more traditional architectures?
Jerome: A big part of the difference is about the intent, and that will affect how you architect your solution. Private and hybrid cloud computing is usually more about controlling where your data can go. For example, a healthcare company might need to make sure that patient data never leaves their premises. Edge computing is more about specific requirements, like the need to have an extremely responsive application, for example. Edge computing is about ensuring you have the right resources in the right places.
Kate: One way to think about it is that edge computing is a continuum that includes the downstream devices; upstream cloud resources, whether those are part of a public or private cloud; and whatever nodes you might have in between. You have to think about what sort of storage and computing resources you will have available at each point in the continuum. Network connectivity is a big constraint for much of what we talk about when we talk about edge computing.
Alex: You’re not always necessarily working around resource constraints in edge computing. Sometimes you might be working with rather capable devices and servers. But resources and environment are certainly something you have to consider when designing an edge computing solution in a way you might not have to for a more traditional scenario. For example, in a hybrid cloud scenario, you might be able to assume that devices will maintain a traditional TCP/IP network connection at all times. But what if you have a remote sensor powered by a battery that has to be changed manually? You might want to plan to have that sensor only intermittently connect to a network, rather than maintaining a constant connection, to conserve power and reduce the number of trips someone has to make to change the batteries. The device might only support a low-power wireless protocol to communicate with the intermediary device, so you’ll need to accommodate that as well.
Klint: What applications are NOT a good fit for edge computing?
Jerome: Adding more intermediaries between a device and a data store creates a bigger attack surface that you have to secure, so some industries, healthcare for example, will need to pay extra attention to the possible trade-offs. You have to think about the requirements and the benefits versus the challenges for your specific use case. You need to make sure you understand the business problems you’re trying to solve for your organization.
Alex: I don’t want to pigeonhole edge computing by saying it’s good for certain things and not others. It’s more about building an appropriate solution, which can differ greatly depending on the requirements. To continue with the healthcare example, building an edge computing system for medical devices will be quite different from building one for restaurant point-of-sale systems, which will be different from a solution for airlines. A POS device might run a full installation of Android and you might need to reboot it periodically to install updates. For medical devices, you’re probably going to want something like a real-time operating system that can run continuously without the need to take it offline to install updates.
Kate: It comes down to the characteristics of the application. If you have a highly stateful application that needs constant connectivity and lots of storage, then maybe you’d be better off running that application in the cloud. But you still might want to have some intermediaries near the edge to handle some lighter processing.
Klint: How portable between platforms do edge computing applications tend to be? Any tips on making them more portable?
Kate: It depends on what you mean by platform. Edge computing software tends not to be very portable between scenarios because of how customized it is to its circumstances. There are many different ways to connect to different devices, so there often needs to be a lot of custom logic to facilitate that. But one thing you can make consistent is what you do after ingesting data from your devices. You can focus on these elements to make things more portable.
Jerome: The more features of a platform you use, the less portable it is. To use an analogy, the more you use the built-in functionality of a framework from Ruby on Rails as opposed to implementing your own solutions, the harder it will be to move. But it’s also more work on your end. The tradeoff is that the more you leverage the technology, the more dependent you are on it. That’s not always bad but you need to be aware of it.
Alex: Again, it depends on what you’re running at the edge and what resources and capabilities are available. Embedded software for bespoke devices might not be very portable, but if your hardware can run a container or a virtual machine, your solution can be very portable.
Klint: What sorts of skills should developers learn to prepare to work in edge computing development?
Alex: I have a free course on Kubernetes and K3s at the edge. It has a list of associated skills that are useful in this space, such as MQTT, shell scripting, and Linux. Of course, what you need to learn depends on what sort of edge computing you will be doing. In some cases you might be making an otherwise traditional web or mobile application more responsive by putting resources closer to the user, but in others you might be working with industrial equipment or automobiles. Either way, Kubernetes isn’t a bad skill to have.
Jerome: Language-wise, I recommend Python, because you’ll be working with many different platforms and environments, and Python plays well with just about everything. It’s one of the most transferable technical skills you can learn. Edge computing is also one of the few areas where I recommend getting professional certifications for the technologies you use, because it showcases that you’re really taking the time to learn them. And as always, work on your communication skills, because you’re going to FUBAR a thing or two.
Kate: Edge computing is a really broad field. It’s also fairly new, so you’re not alone in figuring out what you need to learn. Learning about networking technologies and all the various protocols that devices use to communicate might be a good starting point. And you can always just get a Raspberry Pi and build something. Connect it to an edge computing platform and start learning the terminology. Have some fun, that’s the best way to learn.
Want to get The ReadME Project right in your inbox? Sign up for our newsletter to receive new stories, best practices and opinions developed for The ReadME Project, as well as great listens and reads from around the community.
The post Getting started with edge computing appeared first on The GitHub Blog.
]]>The post Implementing a robust digital identity appeared first on The GitHub Blog.
]]>One of the toughest problems is figuring out who’s who online.

Identity management is tricky, and improperly verifying identity can have massive security implications.
We’re here to help offer some guidance about how to securely implement authentication (that is, how to verify digital identity) into your app. In the blog post below, we’ll discuss ways that will help you securely implement these features into your application.
OWASP breaks down the three main approaches to managing digital identity into the following criteria:
- Passwords
- Multi-factor authentication (MFA)
- Cryptographic-based authentication
Given the current authentication landscape, we’re adding another category:
- Single sign-on (SSO)
We’ll discuss single sign-on first, as it can be the simplest form of authentication to implement into your application.
Using single sign-on (SSO)
The simplest way to assert whether a user is who they say they are is to have a trusted third party confirm their identity. Technically speaking, this means having your users sign into a platform with a robust authentication platform (like, GitHub, Google, or Apple), then having that platform tell your application “this user is <some user>.”
By using SSO, neither you nor your users need to deal with having an additional password. You also don’t need to deal with any of the infrastructure needed to verify a user’s digital identity. Instead, this is the responsibility of a service provider.
The main tradeoff with using SSO is that you need to trust the identity provider. However, generally speaking, identity providers tend to have robust security resources dedicated to protecting user authentication. As such, in most cases we’d advise you to consider using an authentication provider as opposed to writing your own authentication.
There’s a couple of ways to implement this into your application. The most common way for a web application is to use OAuth or SAML. Check out our documentation for more information about how to use GitHub for OAuth!
Next, let’s discuss the oldest and most common way of handling authentication—passwords.
Handling passwords
When handling user accounts and identities, the first thing that usually comes to mind is passwords. Passwords are the way most users are accustomed to creating a new account, and rely on a user generating a secret string, which they present to the application each time they want to be authenticated.
There’s a couple of key issues to look out for when using passwords in your application as follows:
1. Creating (and facilitating the creation of) secure passwords

Easily guessable passwords can lead to account compromises, so you need to ensure that your users are setting strong credentials.
Provide guardrails to ensure users set strong passwords, without requirements that upset or confuse them.
It’s important to strike a proper balance between a positive user experience and good security! Studies have shown that complexity requirements on passwords have mixed effectiveness, so you’re better off removing abstract character requirements in favor of longer passwords.
OWASP’s guidance for good password guardrails are the following:
- Ensure all passwords are at least 10 characters in length.
- Allow all printable ASCII characters.
- Block commonly-used and compromised passwords.
Allowing user-friendly, longer passwords means that your users will be happier, more likely to remember them, and less vulnerable to a brute force attack.
This is a good place to mention that you should not prevent paste in password fields. This is extremely user unfriendly, and makes it harder for users to use tooling, like password managers, incentivizing bad passwords.
Remember, user friendly comes first!
2. Recovering passwords
We’ve all forgotten our passwords at some point. Without them, how can we securely assert our identity? We can do this by using an alternate method, like multi-factor authentication!
Verify your user’s identity using multi-factor authentication (MFA)
We’ll discuss MFA in more depth later, but in a nutshell, in a secure MFA implementation, you should have a user prove their identity by using a combination of the following:
- Have them use something they know.
- For example, have them answer a security question.
- For further guidance, specifically about security questions, check out the OWASP forgotten password cheat sheets.
- Have them use something they own.
- For example, send a reset token to a device or other account that they own (email).
Make sure to provide a user friendly flow to reset their password using some combination of the above methods.
Another good idea is to provide some instructions in your password recovery flow if the user did not expect to receive a password recovery email (for example, please change your password immediately).
3. Storing passwords securely
Passwords are the most critical part of a user asserting their identity. As such, we need to treat them carefully in our infrastructure. Especially with password dumps seemingly becoming more common every day, it’s extremely important to keep in mind the following.
Never store passwords in plain text
Storing passwords in plain text means that any user that gets access to your password database will be able to login as any other user. In the event of a breach, this would be catastrophic.
On the other hand, only handling properly-hashed passwords ensures that a malicious user that does get access to the password database will need to spend an enormous amount of time trying to brute force each password.
In order to properly implement this, keep in mind two things:
- Choose the right hashing algorithm.
- Cryptography is tough! So, it’s important to use an algorithm/library that has been vetted by security experts and is well used.
- A good hashing algorithm should be slow from both a CPU and GPU perspective (to prevent brute forcing a password).
- We’d recommend using Argon2 or Bcrypt.
- Salt your passwords.
- Attackers have access to rainbow tables, which are massive databases of precomputed hash to string pairs. This can be used to map hashed versions of passwords back to their strings (for commonly-used strings). In order to add entropy to the hashes and thus make it less likely that the rainbow table contains the mapping, you should add a random string, known as a salt, to user passwords when hashing. See the following blog post for more information.
4. Handling brute force attacks
Given an infinite number of guesses, any password can technically be guessed. To reduce the probability of a successful password being tried, implement rate limiting or lockout protections for a certain number of failed attempts. Dial this according to existing policies and sensitivity of the data you are protecting.
For example, you could set up a counter to only allow five failed login attempts in an hour. Then, lock the account, and let the user know of the failed attempts via email.
To implement this, it’s important to track the number of failed logins for any given resource. You can use Redis, or another similar tool, to implement rate limiting.
This also helps prevent credential stuffing attacks, where leaked credentials from another site are tried against several other websites.
Also consider adding monitoring services to reactively inform you when a resource is being attacked! Time is everything in security, so having automated monitoring can be the difference between a successful attack and one that is thwarted.
Even the best password can sometimes be compromised. Next, we’ll talk about ways to protect your users beyond the use of passwords.
Multi-factor authentication (MFA)
What happens if your users have their passwords compromised? Not all is lost, as long as they have MFA enabled!
MFA means that users have to produce multiple pieces of information (factors) in order to be granted access to your app. This also means that an attacker would need more than just a password to take control of a user’s account.
As mentioned previously, MFA consists of either something a user knows, or something that a user owns. As such, there’s a variety of methods that you can use to implement this.
It’s important to only support secure methods. These include TOTP, WebAuthn or push-based notifications.
Make sure not to support insecure methods, such as texting a user with a token. Texting a user is vulnerable to several kinds of attacks, such as spoofing, phishing, and SIM swapping. As such, keep things safe and easy for your user by only allowing one of the above options.
As an example of how important this is to protecting your users, GitHub recently announced that we will require all users that contribute code on GitHub.com to enable one or more methods of two-factor authentication (2FA) on their accounts.
Finally, let’s take a look at how to securely handle your user’s identity using cryptographic-based authentication.
Cryptographic-based authentication
Now that you’ve created the proper guardrails, and your users are behaving securely, the last pillar of securing your user’s identity is to ensure that your application is properly handling your user’s identity with cryptographic-based authentication. This can happen in two main ways:
Session authentication
A “session” is a server side object that stores information about who the current user is, when they logged in, and other aspects of their identity. Then, in order to identify the user, we typically put a cookie on the user’s browser that contains a session identifier, which maps back to the server side identity object.
Some things to ensure when implementing session authentication are:
- Make sure to use secure configuration settings for the session cookie.
- In most cases, you should set the `http-only`, `secure`, and `samesite=lax` flags.
- Ensure that the session identifier is long, unique, and random.
- Generate a new session each time the user re-authenticates.
Token authentication
Tokens are an alternative form of authentication, where instead of storing anything on the server side, we cryptographically sign a piece of data and give it to the client. Then, the client can give us this signed piece of data, and we can thus ensure that we successfully authenticated them.
Token authentication can be tricky to implement safely, so we’d recommend doing more research before implementing this yourself. However, some pointers to start, include:
- Use a long, random secret key.
- The entire security posture of your application relies on your tokens being generated from a secure key.
- Having a weak secret key will leave you vulnerable to a brute force attack, where an attacker can try to guess your secret key, and thus hack all users at once.
- Use a secure cryptographic algorithm, like ES256.
- Set an appropriate expiration date with your tokens, based on your application’s usage patterns.
- Store your tokens in a secure place.
- For a mobile app, you can use KeyStore (for Android) or KeyChain (for iOS).
- For a web app, there are several places where you can store the token, each with different security considerations. For general guidance, we would recommend storing tokens in a cookie, with the `http-only`, `Secure` and `SameSite=Lax` being set.
As mentioned previously, using token authentication in a web app can be tricky, and best practices differ from framework to framework, so please do further research before implementing this yourself.
Securely verifying your user’s identity can be tricky, but following the guidance above can help prevent common issues to keep your application and your users secure. Until next time, stay secure!
The post Implementing a robust digital identity appeared first on The GitHub Blog.
]]>The post Adding support for cross-cluster associations to Rails 7 appeared first on The GitHub Blog.
]]>Most recently, we extracted internal functionality to disable joining queries when an association crossed multiple databases. Prior to our work in this area, Rails had no support for handling associations that spanned across clusters; teams had to write SQL to achieve this.
Background
At GitHub, we have 30 databases configured in our Rails monolith—15 primaries and 15 replicas. We use “functional partitioning” to split up our data, which means that each of those 15 primaries has a different schema. In contrast, a “horizontal sharding” approach would have 15 shards with the same schema.
While there are some workarounds for joining across clusters in MySQL, they are usually not performant or else they require additional setup. Without these workarounds, attempting to join from a table in cluster A to a table in cluster B would result in an error. To work around this limitation, teams had to write SQL, selecting IDs from the first table to then use in the second query to find the appropriate records. This was extra work and could be error-prone. We had an opportunity to make this process smoother by implementing non-join queries in Rails.
Let’s look at some code to see how this works:
Let’s say we have three models: Dog, Human, and Treat.
# table dogs in database animals
class Dog < AnimalsRecord
  has_many: treats, through: :humans
  has_many :humans
end

# table humans in database people
class Human < PeopleRecord
  has_many :treats
  has_many :dogs
end

# table treats in database default
class Treat < ApplicationRecord
  has_many :dogs, through: :humans
  has_many :humans
end
If our Rails application code loaded the dog.treats association, usually that would automatically perform a join query:
SELECT treats.* FROM treats INNER JOIN humans ON treats.human_id = humans.id WHERE humans.dog_id = 2
Looking at the inheritance chain, we can see that Dog, Treat, and Human all inherit from different base classes. Each of these base classes belongs to a different database connection, which means that records for all three models are stored in different databases.
Since the data is stored across multiple primaries, when the join on dog.treats is run we’ll see an application error:
ActiveRecord::StatementInvalid (Table 'people_db_cluster.humans' doesn't exist)
One of the best features Rails provides out of the box is generating SQL for you. But since GitHub’s data lives in different databases, we could no longer take advantage of this. We had an opportunity to improve Rails in a way that benefited our engineers and everyone else in the Rails community who uses multiple databases.
Implementation
Prior to our work in this area, engineers working on any associations that crossed database boundaries would be forced to manually query IDs rather than using Active Record’s association APIs. Writing SQL can be error prone and defeats the purpose of Active Record’s convenience methods like dog.treats.
A little over two years ago, we started experimenting with an internal gem to disable joins for cross-database associations. We chose to implement this outside of Rails first so that we could work out the majority of bugs before merging to Rails. We wanted to be sure that we could use it successfully in production and that it didn’t cause any significant friction in development or any performance concerns in production. This is how many of Rails’ popular features get developed. We often extract implementations from large production applications – if it’s something we need and something a lot of applications can benefit from, we make it stable first, then upstream it to Rails.
The overall implementation is relatively small. To accomplish disabling joins, we added an option to has_many :through associations called disable_joins. When set to true for an association, Rails will generate separate queries for each database rather than a join query.
This needed to be an option on the association rather than performed at runtime because Rails associations are lazily loaded – the SQL is generated when the association objects are created, which means that by the time Rails runs the SQL to load dog.treats the join will already be generated. After adding the option in Rails, we implemented a new scoping class that would handle the order, limit, scopes, and other options.
Now applications can add the following to their associations to make sure Rails generates two or more queries instead of joins:
class Dog < AnimalsRecord
  has_many: treats, through: :humans, disable_joins: true
  has_many :humans
end
And that’s all that’s needed to disable generating joins for associations that cross database servers!
Now, calls to dog.treats will generate the following SQL:
SELECT "humans"."id" FROM "humans" WHERE "humans"."dog_id" = ?  [["dog_id", 1]]
SELECT "treats".* FROM "treats" WHERE "treats"."human_id" IN (?, ?, ?)  [["human_id", 1], ["human_id", 2], ["human_id", 3]]
Caveats
There are a couple of important caveats to keep in mind when using this new feature. Applications that need to disable joins may see that those associations have slower database performance. This would be true whether you wrote the SQL manually or use Rails’ new disable_joins feature. Fundamentally, if you’re performing multiple queries across multiple databases, that can be slower than performing a single join query on one database. It’s really important to make sure that your queries are efficient and that proper indexes are in place before using this feature. And as always, when making major changes to your database queries, it’s important to benchmark and understand how those changes will affect your application.
Additionally, if your queries rely on an order and limit from the join database you may see a performance impact on requests. When two queries are joined, MySQL can perform the order based on the table that’s joined (i.e., order by humans.human_id which would order the returned treats by the human ID). However, when you’re splitting queries the order can’t be applied by the database. To solve this, Rails orders the records in-memory based on the order they would have been returned if there was a join. This preserves the expected behavior but since the order and limit are performed in-memory, you’ll usually want to avoid performing these actions on hundreds of thousands of records.
Conclusion
Four years ago, contributing to Rails at this level was just something we’d hoped to be able to do one day. We were so far behind in our upgrades that it was difficult to contribute changes to the framework. This might look like a small change but it’s a clear demonstration of the hard work we’ve done to improve the technical debt in our application and ensure that we’re giving back to the community whenever we can.
By adding support for handling associations across databases, we help empower other applications to scale as their traffic and data grow. Additionally, by pushing this code into Rails and out of our private internal gem we’ll find even more improvements and edge cases in applications that aren’t GitHub. As we continue to grow and improve Rails for us at GitHub, we’ll continue to improve it for the entire community. This pull request is just one example of how we intend to do that for years to come.
The post Adding support for cross-cluster associations to Rails 7 appeared first on The GitHub Blog.
]]>The post Presenting CodeNaija: A hackathon hosted by Andela and GitHub’s Blacktocats appeared first on The GitHub Blog.
]]>
The Blacktocats’ mission is to attract and empower Black lives in tech. According to our recent Octoverse Report, Nigeria is one of the fastest-growing open source communities (by projects) in the world. We wanted to highlight this community of developers by promoting their fantastic talent and showcasing their work.
Understanding the community ecosystem
Ahead of the hackathon, we hosted a developer roundtable that focused on developers and social impact organizations. We partnered with market entry firm Ingressive to bring over 20 developers and social good “techprenuers” to help with the discussion. Ultimately, we wanted to connect with the developer community in Lagos to understand the ecosystem and answer questions about our work at GitHub. During the discussion, we were excited to have attendees that included the organizers of GitGirl and GirlsCoding, who work to bring adult women and young girls, respectively, into the tech industry.
The CodeNaija Hackathon was highly anticipated, with more than 800 developers applying for one of only 100 spots to attend. In the end, 80 participants across 19 teams devoted over 30 hacking hours to deliver the best technological solution to a social issue in Nigeria.
Take a look behind the scenes of the Code Naija Hackathon
https://www.youtube.com/watch?v=uMID_SxzIKw&feature=youtu.b
Thank you
We partnered with talent accelerator Andela to recruit attendees and help make the hackathon a reality. We also received support from our sponsors Flutterwave, Microsoft, and M12 who provided input, funding, and prizes.
We’re incredibly thankful for our partners and participants. We couldn’t have done this without you.

Learn more about the CodeNaija Hackathon
The post Presenting CodeNaija: A hackathon hosted by Andela and GitHub’s Blacktocats appeared first on The GitHub Blog.
]]>