What legacy system will you modernize next? Start building now with GitHub Copilot now >
The post How GitHub Copilot and AI agents are saving legacy systems appeared first on The GitHub Blog.
]]>Picture this: you’re a developer in 2025, and your company just told you they need to modernize a mainframe system that processes millions of ATM transactions daily. We’re talking about COBOL, a programming language that’s been around for 65 years. That’s older than the internet.
Now, your first instinct might be to laugh or maybe cry a little. But here’s the thing—COBOL isn’t going anywhere. In fact, it’s powering some of the largest and most critical systems on the planet right now.
The problem? Finding developers who understand COBOL is like finding unicorns. The original developers are retiring, and yet 200 billion lines of COBOL code are still running our banks, insurance companies, and government systems.
But here’s the plot twist: we now have the opportunity to support the unicorns. We have GitHub Copilot and autonomous AI agents.
Meet the developer who’s modernizing COBOL (without learning COBOL)
I recently spoke with Julia Kordick, Microsoft Global Black Belt, who’s modernizing COBOL systems using AI. What’s remarkable? She never learned COBOL.
Julia brought her AI expertise and worked directly with the people who had decades of domain knowledge. That partnership is the key insight here. She didn’t need to become a COBOL expert. Instead, she focused on what she does best: designing intelligent solutions. The COBOL experts provided the legacy system knowledge.
When this whole idea of Gen AI appeared, we were thinking about how we can actually use AI to solve this problem that has not been really solved yet.
Julia Kordick, Microsoft Global Black Belt
The three-step framework for AI-powered legacy modernization
Julia and her team at Microsoft have cracked the code (pun intended) with a systematic approach that works for any legacy modernization project, not just COBOL. Here’s their GitHub Copilot powered, battle-tested framework.
Step 1: Code preparation (reverse engineering)
The biggest problem with legacy systems? Organizations have no idea what their code actually does anymore. They use it, they depend on it, but understanding it? That’s another story.
This is where GitHub Copilot becomes your archaeological tool. Instead of hiring consultants to spend months analyzing code, you can use AI to:
- Extract business logic from legacy files.
- Document everything in markdown for human review.
- Automatically identify call chains and dependencies.
- Clean up irrelevant comments and historical logs.
- Add additional information as comments where needed.
| 💡Pro tip: Always have human experts review AI-generated analysis. AI is incredible at pattern recognition, but domain knowledge still matters for business context. |
Here’s what GitHub Copilot generates for you:
# Business Logic Analysis Generated by GitHub Copilot
## File Inventory
- listings.cobol: List management functionality (~100 lines)
- mainframe-example.cobol: Full mainframe program (~10K lines, high complexity)

## Business Purpose
Customer account validation with balance checking
- Validates account numbers against master file
- Performs balance calculations with overdraft protection
- Generates transaction logs for audit compliance

## Dependencies Discovered
- DB2 database connections via SQLCA
- External validation service calls
- Legacy print queue system
Step 2: Enrichment (making code AI-digestible)
You usually need to add context to help AI understand your code better. Here’s what that looks like:
Translation: If your code has Danish, German, or other non-English comments, translate them. Models work better with English context.
Structural analysis: COBOL has deterministic patterns. Even if you’ve never written COBOL, you can leverage these patterns because they’re predictable. Here’s how:
COBOL programs always follow the same four-division structure:
- IDENTIFICATION DIVISION (metadata about the program)
- ENVIRONMENT DIVISION (file and system configurations)
- DATA DIVISION (variable declarations and data structures)
- PROCEDURE DIVISION (the actual business logic)
Ask GitHub Copilot to map these divisions for you. Use prompts like:
"Identify all the divisions in this COBOL file and summarize what each one does"

"List all data structures defined in the DATA DIVISION and their purpose"

"Extract the main business logic flow from the PROCEDURE DIVISION"
The AI can parse these structured sections and explain them in plain English. You don’t need to understand COBOL syntax. You just need to know that COBOL’s rigid structure makes it easier for AI to analyze than more flexible languages.
Documentation as source of truth: Save everything AI generates as markdown files that become the primary reference. Julia explained it this way: “Everything that you let Copilot generate as a preparation, write it down as a markdown file so that it can actually reference these markdown files as source of truth.”
💡Pro tip: COBOL’s verbosity is actually an advantage here. Statements like ADD TOTAL-SALES TO ANNUAL-REVENUE are almost self-documenting. Ask Copilot to extract these business rules into natural language descriptions. |
Step 3: Automation Aids (Scaling the Process)
Once you’ve analyzed and enriched individual files, you need to understand how they all fit together. This is where you move from using Copilot interactively to building automated workflows with AI agents.
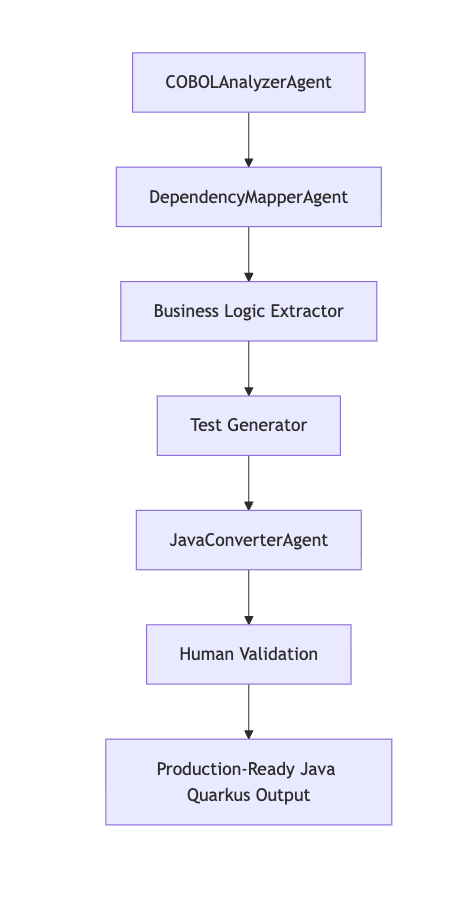
Julia’s team built a framework using Microsoft Semantic Kernel, which orchestrates multiple specialized agents. Each agent has a specific job, and they work together to handle the complexity that would overwhelm a single AI call.
Here’s what this orchestration looks like in practice:
- Call chain mapping: Generate Mermaid diagrams showing how files interact. One agent reads your COBOL files, another traces the CALL statements between programs, and a third generates a visual diagram. You end up with a map of your entire system without manually tracing dependencies.
- Test-driven modernization: Extract business logic (agent 1), generate test cases that validate that logic (agent 2), then generate modern code that passes those tests (agent 3). The tests become your safety net during migration.
- Dependency optimization: Identify utility classes and libraries that you can replace with modern equivalents. An agent analyzes what third-party COBOL libraries you’re using, checks if modern alternatives exist, and flags opportunities to simplify your migration.
Think of it like this: Copilot in your IDE is a conversation. This framework is a production line. Each agent does one thing well, and the orchestration layer manages the workflow between them.
| 💡Pro tip: Use Mermaid diagrams to visualize complex dependencies before making any changes. It helps you catch edge cases early. You can generate these diagrams by asking Copilot to trace all CALL statements in your codebase and output them in Mermaid syntax. Mermaid chart example: |
The reality check: It’s not a silver bullet
Julia’s brutally honest about limitations:
Everyone who’s currently promising you, ‘hey, I can solve all your mainframe problems with just one click’ is lying to you.
The reality is:
- Humans must stay in the loop for validation.
- Each COBOL codebase is unique and complex.
- We’re early in the agentic AI journey.
- Full automation is probably at least five years away.
But that doesn’t mean we can’t make massive progress today.
See it in action: the Azure samples framework
Julia and her team have open-sourced their entire framework. It’s built with Microsoft Semantic Kernel for agentic orchestration and includes:
- Multiple specialized agents: DependencyMapperAgent, COBOLAnalyzerAgent, JavaConverterAgent
- Cost tracking: See exactly how much each AI operation costs (usually $2-5 per 1000 lines analyzed)
- Human validation points: Built-in checkpoints for expert review
doctor.sh: A configuration and testing script that gets you started quickly
Try running the COBOL modernization framework:
- Fork the repository: aka.ms/cobol
- Set up your environment: Configure Azure OpenAI endpoint (or use local models for sensitive data)
- Run the doctor script:
./doctor.sh doctorvalidates your setup and dependencies - Start modernization:
./doctor.sh runbegins the automated process
# Quick setup for the impatient developer

git clone https://github.com/Azure-Samples/Legacy-Modernization-Agents

cd Legacy-Modernization-Agents

./doctor.sh setup

./doctor.sh run
The business case that changes everything
This isn’t just about technical debt. It’s about business survival. Organizations are facing a critical shortage of COBOL expertise right when they need it most.
The traditional approach has been to hire expensive consultants, spend 5+ years on manual conversion, and end up with auto-generated code that’s unmaintainable. I’ve seen this play out at multiple organizations. The consultants come in, run automated conversion tools, hand over thousands of lines of generated code, and leave. Then the internal team is stuck maintaining code they don’t understand in a language they’re still learning.
The AI-powered approach changes this. You use AI to understand business logic, generate human-readable modern code, and maintain control of your intellectual property. Your team stays involved throughout the process. They learn the business logic as they go. The code that comes out the other end is something your developers can actually work with.
Julia explained the shift:
What a lot of customers do not want to actually give all their intellectual property like a hundred percent to a partner anymore, right? They want to keep it in check.
Start here: your path to becoming the modernization hero
Whether you’re dealing with COBOL, ancient Java, or any legacy system, here’s how you can start today:
Start small
- Identify one problematic legacy system (start with fewer than 5,000 lines)
- Use GitHub Copilot to analyze a single file
- Document what you discover in markdown
- Share findings with your team
Build your AI toolkit
- Experiment with the Azure Samples framework
- Learn prompt engineering for code analysis (try: “Analyze this COBOL program and explain its business purpose in simple terms”)
- Practice iterative modernization techniques
Think beyond code
- Consider nonfunctional requirements for cloud-native design
- Plan for distributed systems architecture
- Remember: most COBOL programs are doing simple CRUD operations. They don’t need the complexity of a mainframe. They need the simplicity of modern architecture.
Here’s a challenge: Find a legacy system in your organization. Six-month-old code counts as legacy in our industry. Try using GitHub Copilot to:
- Generate business logic documentation
- Identify potential modernization opportunities
- Create a migration plan with human validation checkpoints
Share your results on LinkedIn and tag me. I’d love to see what you discover.
The best time to start is now
The most powerful insight from my conversation with Julia is this: AI doesn’t replace developer expertise. It amplifies it.
COBOL experts bring irreplaceable domain knowledge. Modern developers bring fresh perspectives on architecture and best practices. AI brings pattern recognition and translation capabilities at scale.
When these three forces work together, legacy modernization transforms from an impossible challenge into an achievable project.
The best time to modernize legacy code was 10 years ago. The second-best time is now.
Special thanks to Julia Kordick, Microsoft Global Black Belt, who shared her insights and experiences that made this blog post possible.
Ready to dive deeper? Check out the full blog post about this project at aka.ms/cobol-blog and connect with Julia on LinkedIn for the latest updates.
The age of legacy code doesn’t have to be a barrier anymore. With the right AI tools and framework, even 65-year-old COBOL can become approachable, maintainable, and modern.
The post How GitHub Copilot and AI agents are saving legacy systems appeared first on The GitHub Blog.
]]>The post GitHub Copilot CLI: How to get started appeared first on The GitHub Blog.
]]>You already live in the terminal. You clone repositories there, install dependencies, debug issues, and run builds. But until now, when you needed AI help, you had to leave the CLI and open your editor or browser. Not anymore.
GitHub Copilot CLI brings that same assistance straight to your shell. No switching contexts, no breaking flow. Just you, your terminal, and an AI that can actually help you get things done.
Install once, authenticate, and start working
With Copilot CLI, you don’t have to juggle your API keys. Just install the assistant, sign in with your existing GitHub Copilot Pro, Pro+, Business, or Enterprise plan, and go.
# 1. Install via npm
npm install -g @github/copilot

# 2. Launch Copilot CLI
copilot

# Authenticate with your GitHub account
/login
Requirements:
- Node v22+
- npm version 10 or later
- Launch Copilot CLI
- Log in with your GitHub account
From here, you can get hands-on immediately—debugging tests, spinning up preview deploys, or writing one-off scripts—without leaving your terminal.
Use case: From clone to pull request in the terminal
Imagine this: You’ve just cloned a repository you want to contribute to. Normally, you’d spend time reading through the README, manually checking dependencies, and combing through open issues to find a place to start. But with Copilot CLI, you can offload all of that.
1. Clone and launch Copilot
First things first. Grab the repository you want to work on and run Copilot CLI in your terminal.
gh repo clone github/spec-kit
cd spec-kit
copilot
Copilot greets you in the terminal. Type / at any time to see available commands, or use Ctrl+R to see logs of the commands Copilot has run on your behalf.
2. Get oriented in a new codebase
Once you’re inside the project, the first step is understanding how everything fits together. Instead of scrolling through files manually or piecing it together from the README, ask Copilot to explain it for you.
You say: Explain the layout of this project.
Copilot inspects the repository using find, tree, and the README, then returns a clean Markdown summary. No more hunting through nested directories trying to figure out where things live.
3. Check your environment
After you know the lay of the land, the next question is: can you actually build it? Normally, you’d spend time hunting for dependencies and making sure you’ve installed the right versions. Copilot now handles that.
You say: Make sure my environment is ready to build this project.
Copilot verifies dependencies, installs missing tools (like Go for the GitHub CLI), and confirms you can build locally. All without you having to comb through setup docs or run trial-and-error commands.
4. Find a good first issue
Now that you’re set up, you’ll want to start contributing. Instead of browsing through dozens of open issues, let Copilot surface the ones that make sense for you.
You say: Find good first issues in this repository and rank them by difficulty.
Copilot queries GitHub Issues with its built-in GitHub MCP server and suggests a curated list, complete with difficulty levels. Instead of scanning dozens of issues, you can dive straight into a task that matches your comfort zone.
5. Start implementing
Now comes the real work. Normally, after finding an issue to work on, you’d create a branch, open the right files, make edits, and double-check your changes before committing. With Copilot CLI, you can let it draft the fix for you while you stay in control at every step.
You say: Start implementing issue #1234. Show me the diff before applying.
Copilot drafts a plan, makes the edits, and presents the diff. You stay in control, review, and approve before changes are applied.
👀 Pro tip: You can @-mention files in your prompt if you want Copilot to focus on specific parts of the code.
6. Commit and open a draft pull request
Once the changes look good, the next step is packaging them up and sharing your work. Normally, that means staging files, writing a commit message, pushing a branch, and opening a pull request, which is all a bit of a dance in Git. Copilot CLI streamlines the whole flow so you can stay focused on the code.
You say: Stage changes, write a commit referencing #1234, and open a draft PR.
Copilot will then stage files, write the commit message, and open a draft pull request for you to review.
7. Bonus: Kill that process hogging your port
Let’s say you’ve hit another common headache: a process hogging a port. You know, that moment when you try to start your dev server and it tells you a port (let’s say 8080 for this example) is already in use, and you have to go hunting for the right lsof command and flags.
You say: What process is using port 8080? Kill it and verify the port is free.
Copilot runs the right lsof command, shows the PID, kills the process, and verifies it’s gone. No more Googling arcane flags or trying to remember if it’s lsof -i :8080 or lsof -t -i:8080 or something else entirely.
I’m horrible at remembering commands, especially ones I use infrequently. With Copilot CLI, I just defer these tasks straight to it. Maybe I’ll remember the command next time, or maybe (probably) not. But I’ll definitely ask Copilot again.
Stay in control
Copilot always asks before running commands or accessing directories. This is critical when you’re giving an AI access to run things on your machine.
Before Copilot can execute anything, it will prompt you to:
- Allow once
- Allow always for this command
- Deny
You can also:
- Use
/sessionto view what’s currently allowed - Reset permissions at any time with
/reset - Add directories to your allowed list with
/add-directory
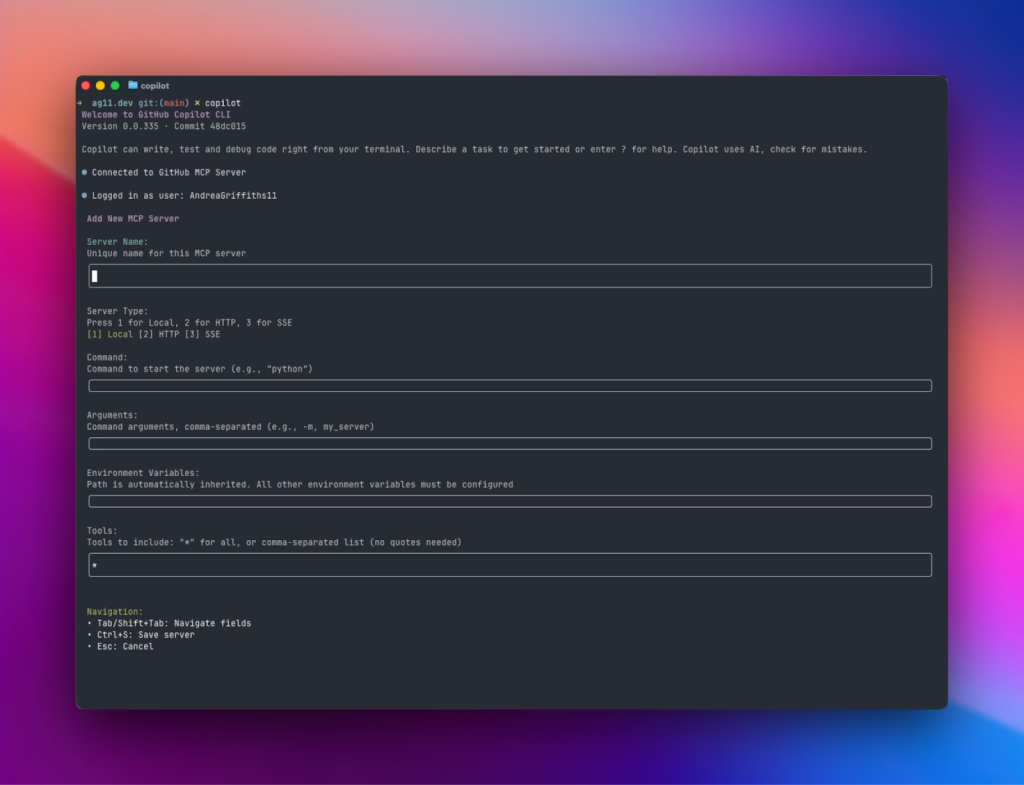
Extend with MCP servers
Copilot CLI ships with the GitHub MCP server already installed and running. This is what powers the issue search and repository interactions. But you can add any MCP server you want from the registry using /mcp.
Want to add Playwright for browser testing? Or integrate with your company’s internal tools? You can customize and extend Copilot CLI to match your workflow.
Why this matters
Here’s what I appreciate most about Copilot CLI: It meets me where I already work. I spend a lot of time in the terminal anyway, jumping between repositories, checking logs, running builds. Having Copilot right there means I’m not constantly switching contexts between my IDE, browser, and command line just to get AI help.
When I’m onboarding contributors to our projects or exploring a new codebase myself, I can stay in that flow. I can ask about the project structure, verify dependencies, find issues to work on, and start implementing without bouncing around between tools. That consistency matters when you’re trying to maintain momentum.
This isn’t about replacing your IDE. It’s about having the right tool in the right place.
What’s next
Copilot CLI is in public preview, and your feedback will shape our roadmap. We have ideas for what’s coming next, but we want to know what matters most to you.
👉 Install it today with:
npm install -g copilotThen share your experience using /feedback.
Start using GitHub Copilot CLI >
The post GitHub Copilot CLI: How to get started appeared first on The GitHub Blog.
]]>The post A step-by-step guide to modernizing Java projects with GitHub Copilot agent mode appeared first on The GitHub Blog.
]]>Whether you’re migrating your app to the cloud or updating Java runtime, modernizing legacy applications is rarely simple. Conflicting or deprecated dependencies, antiquated deployment targets, and lingering security vulnerabilities often block smooth progress.
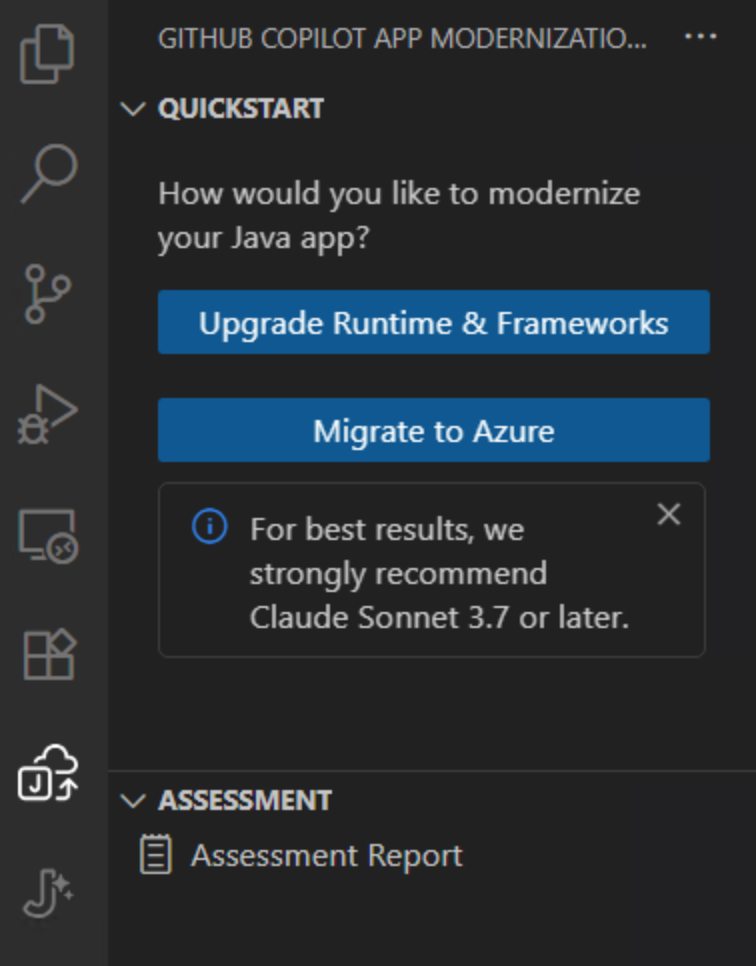
That’s when GitHub Copilot agent mode, paired with the GitHub Copilot app modernization VS Code extension, comes in. This toolset delivers an interactive, step-by-step experience to help you upgrade and migrate your Java projects faster, with fewer errors and more confidence.
While this guide highlights Java modernization, we also support end-to-end .NET app modernization within Visual Studio through GitHub Copilot Agent Mode. This includes AI-assisted .NET upgrades, cloud-ready migration paths, and seamless deployment to Azure — delivering a consistent, guided experience across the entire modernization journey that reduces manual effort and accelerates time to value. Learn more in the docs.
In this article, you’ll learn how to use these tools together in Visual Studio Code to:
- Analyze your Java project and generate an upgrade plan
- Apply changes automatically using GitHub Copilot
- Fix build issues and validate tests in-loop
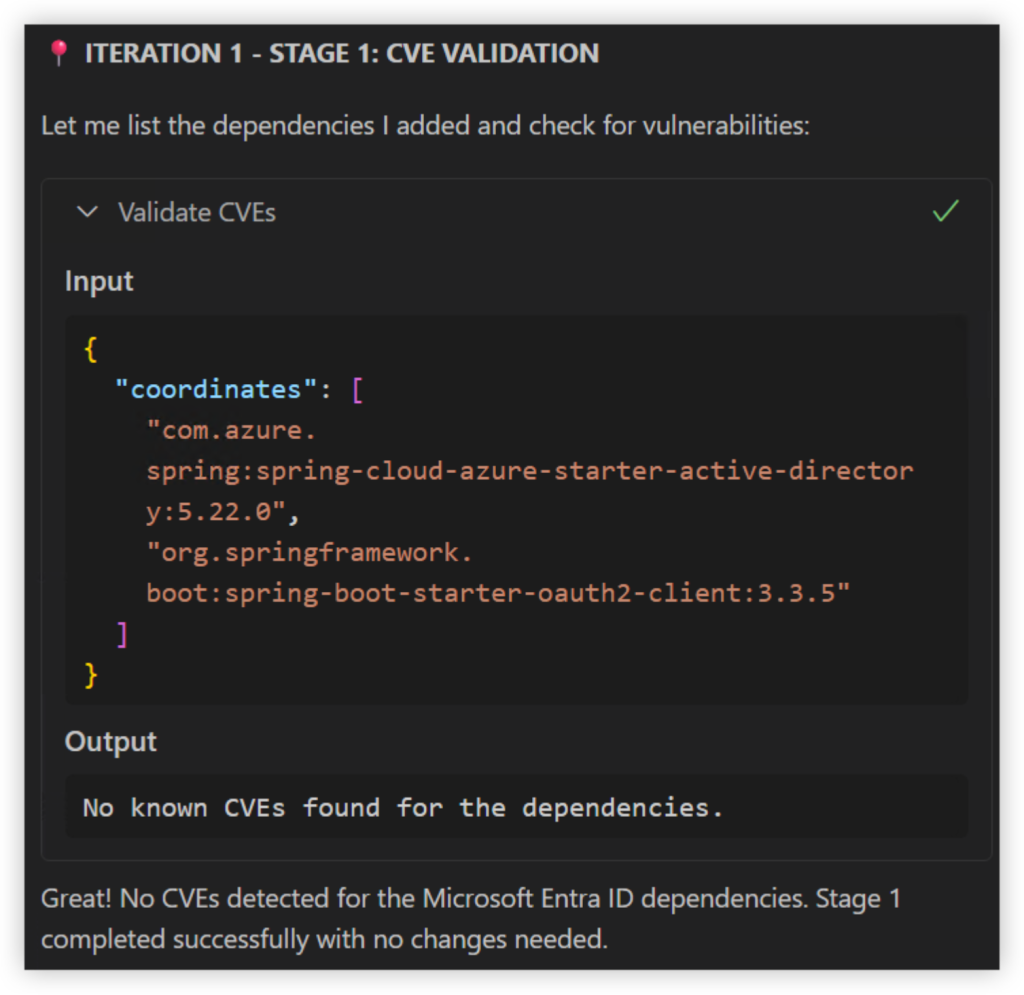
- Detect and fix CVEs post-upgrade
But first, there are a few things you’ll need
To follow along, make sure you have:
- Visual Studio Code
- GitHub Copilot license (Pro, Pro +, Business and Enterprise subscribers also get access to Copilot coding agent)
- GitHub Copilot app modernization – upgrade for Java extension
- A Git based, legacy Java project built with Maven or Gradle (anything using JDK 8 or later will work)
Got it? Now let’s dive into the good stuff.
Overview
When you start an agent session using the Java upgrade extension, Copilot performs the following:
- Analyzes your Java codebase
- Generates a customizable upgrade plan
- Executes code transformations using tools like OpenRewrite
- Fixes build errors iteratively
- Validates changes through test execution
- Scans for CVEs, provides code validation behavior and proposes secure replacements
- Provides a full summary report
Getting started, Step 1: Open your Java project in VS Code
Use a sample legacy Java project (or your own), with source control initialized using Git and a working test suite (ideally with unit tests).
git clone https://github.com/your-org/your-legacy-java-app.git
cd your-legacy-java-app
code
Step 2: Start an agent session in VS Code
Launch the GitHub Copilot chat sidebar and start a new agent session. Choose GitHub Copilot app modernization – upgrade for Java from the available tools.
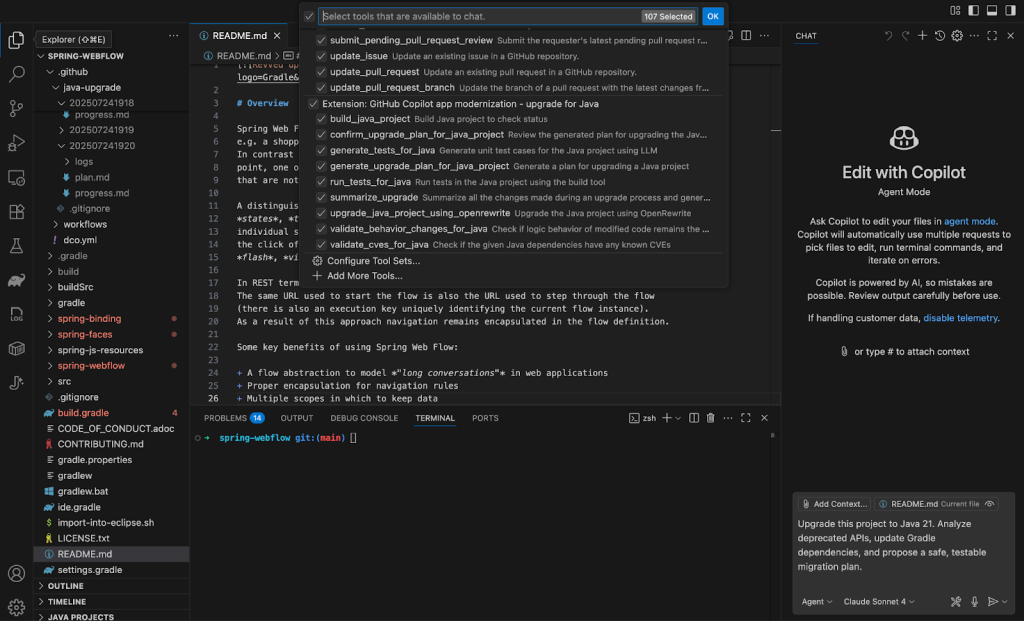
Copy and paste this inside your agent session to begin:
Using Java upgrade tools,upgrade this project to Java 21. Analyze deprecated APIs, update Gradle dependencies, and propose a safe, testable migration plan.Step 3: Let Copilot scan and plan
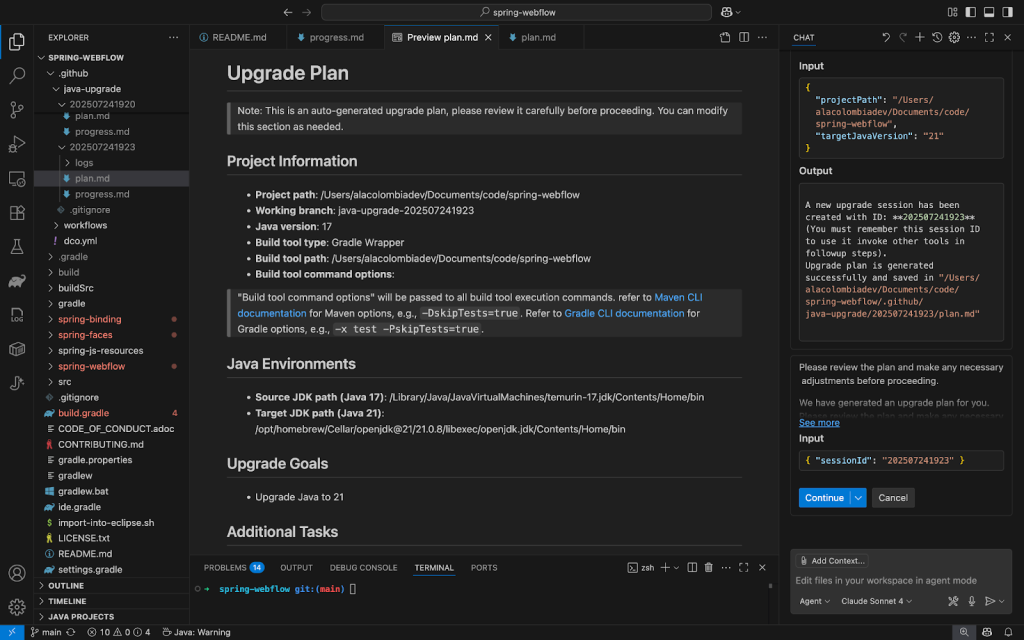
Copilot will analyze your project and propose an upgrade plan. The tool begins with a scan of your:
- JDK version usage
- Build tool configurations (build.gradle for Gradle or pom.xml for Maven)
- Outdated or insecure dependencies
- Deprecated APIs and language features
It then creates a structured upgrade plan, editable in the Copilot chat. You can prompt Copilot to exclude modules from this upgrade or make any necessary adjustments to the plan.
Step 4: Apply changes and resolve errors
Once you approve the plan, Copilot begins upgrading files, adjusting imports, and fixing syntax errors. If build errors pop up, Copilot enters a fix-and-test loop until the project compiles cleanly.
Copilot produces a detailed upgrade report, including:
- Changed files and commit history
- API and dependency updates
- Remaining to-dos and next steps

Example code changes before and after the upgrade:
// Before (deprecated constructor)
View view = this.resolver.resolveViewName("intro", new Locale("EN"));
// After Java 21 upgrade
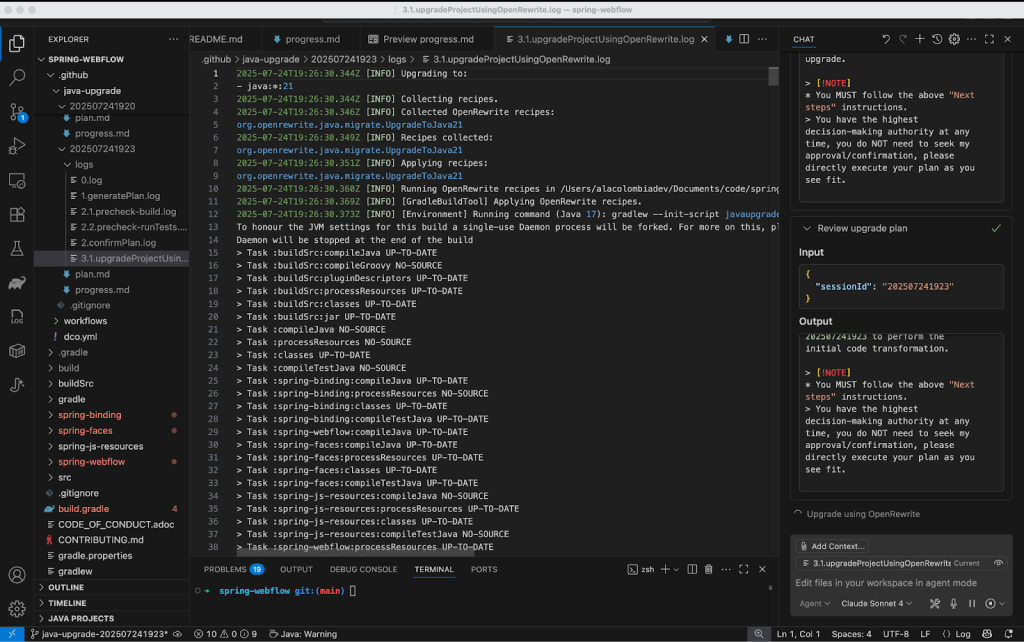
View view = this.resolver.resolveViewName("intro", Locale.of("EN"));Step 5: Migrate to Azure
To make the app Azure-ready, you can run an app assessment to identify cloud readiness issues. From the GitHub Copilot app modernization extension UI, click on Migrate to Azure.
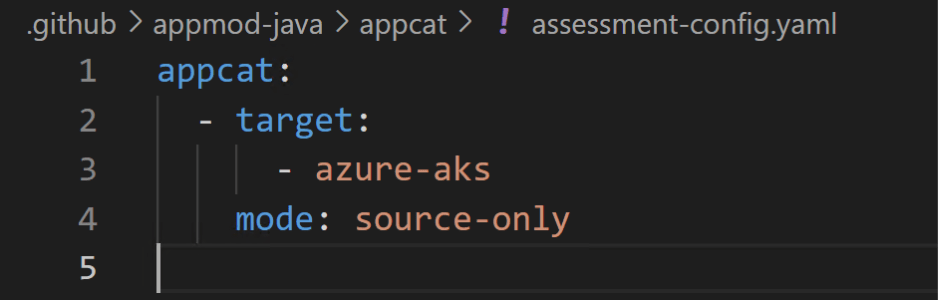
Depending on the deployment target, GitHub Copilot app modernization will identify cloud migration issues with recommended actions. To set the deployment target, modify the assessment-config.yaml file under the appmod-java/appcat folder. In this example, we will choose Azure Kubernetes Service (AKS) as the target. (Other deployment targets include Azure App Service, Azure App Service Managed Instance, Azure Container Apps, Azure Kubernetes Service, and AKS Automatic, etc.)
An assessment report is generated, detailing cloud readiness issues. Click on the migrate button associated with the Auth Migration issue category to move from on-premise user authentication to Microsoft Entra ID.

Similar to the upgrade process, Copilot first makes a plan highlighting the dependency updates and configuration changes. Once you approve the plan, Copilot will go ahead and execute the migration steps.
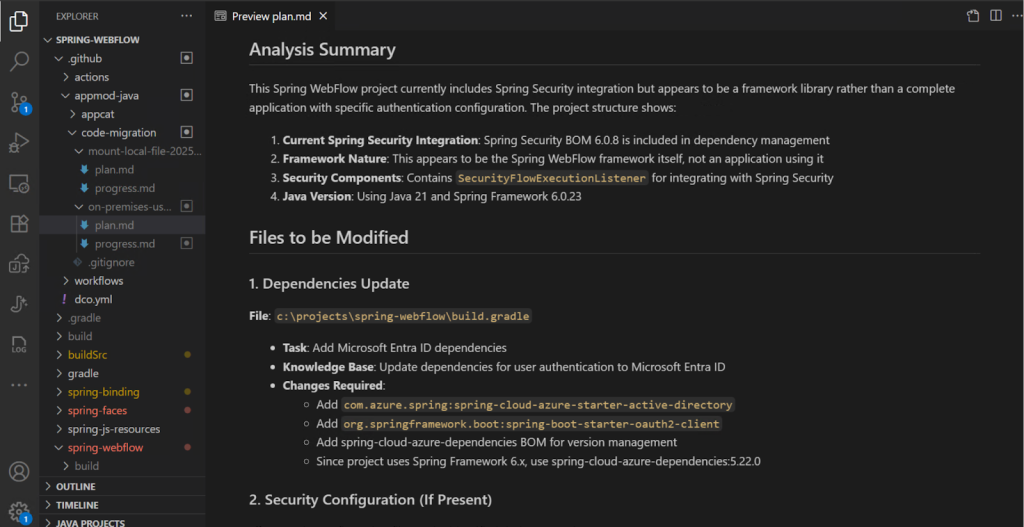
Copilot summarizes a list of changes made for this migration scenario. These changes include:
- Added Microsoft Entra ID dependency in the build configuration
- Added configuration for Microsoft Entra ID in Application.properties
- Added configuration adapter for Spring security to enable Microsoft Entra ID
- Added documentation to explain how to implement Microsoft Entra ID authentication with the Spring WebFlow app

Step 6: Validate changes and review the report
With your code updated, it’s time to confirm everything works as expected. Copilot will guide you through running your test suite using your project’s build system.
For Maven projects, you can also run tests manually with:
bash
./mvnw testFor Gradle projects:
bash
./gradlew testIf there are failures, Copilot will help debug or even write missing tests based on your recent changes. All with the human-in-the-loop principle, who has to confirm all proposed steps.
Automated CVE scanner
GitHub Copilot app modernization automatically performs comprehensive CVE scanning across all changed dependencies, a critical security feature consistently requested by development teams. When vulnerabilities are detected, the agent intelligently proposes safe version replacements or recommends alternative libraries to maintain security compliance.
Deploy to Azure
Deploying the app to Azure can be a long, painstaking process, and requires a specific set of skills to craft infrastructure as code. We’ve simplified this step and automated deployment to Azure, so you can go from code to cloud faster.

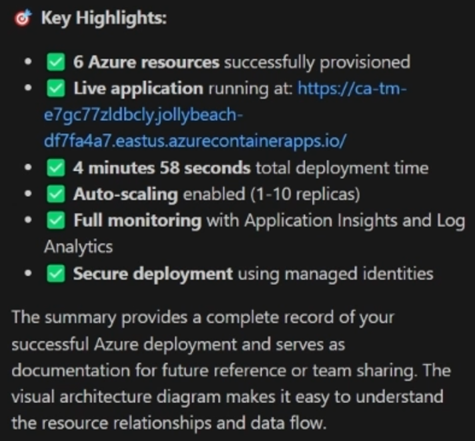
Java modernization complete
And that’s it. With GitHub Copilot app modernization, you can take a legacy Java project and make it cloud ready. It remediates code for Java upgrades and migrations scenarios, resolves build issues, validates changes, and even helps strengthen test coverage — all within a single, guided workflow.
Try Copilot agent mode today
Whether you’re modernizing Java, upgrading .NET, or planning your next migration, these extensions that enhance Copilot agent mode are ready to help you analyze large codebases, plan upgrades or migrations, fix issues automatically, and save hours of manual debugging.
To get started, modernize your Java and .NET apps, or learn more about the latest AI-assisted modernization enhancements from Azure.
The post A step-by-step guide to modernizing Java projects with GitHub Copilot agent mode appeared first on The GitHub Blog.
]]>The post 5 ways to integrate GitHub Copilot coding agent into your workflow appeared first on The GitHub Blog.
]]>If you’ve already tried GitHub Copilot coding agent, you know the basics: assign a task, let it work in the background, and review the pull request when it’s done.
But what if you’re ready to move beyond the basics?
We got you. In this tutorial, we’ll explore five powerful strategies to integrate the coding agent deeper into your development workflow. From tackling tech debt to validating UI changes and experimenting with branch strategies, let’s unlock Copilot’s full potential.
Let’s go!
1. Offload tech debt with the Agents panel
Tech debt is like weeds in your garden: ignore it, and it spreads everywhere.
You know that pile of “we should really fix this someday” tasks sitting in your backlog? The dependency upgrades, lingering feature flags, small refactors that everyone avoids because they’re boring but necessary?
I used to let those pile up until they became weekend projects. Not anymore.
The new Agents panel lets me batch these tedious-but-important tasks and hand them off to Copilot while I focus on actual feature development.
Steps:
- Open your repository on GitHub.com and click the Agents panel button.
- Describe your task:
- “Update the extension manifest to support VS Code 1.104”
- “Add TypeScript strict mode and fix all resulting type errors”
- Hit Start task and let Copilot do the rest.
👉 Pro tip: Batch small cleanup tasks into separate requests. Each task only costs one premium request, and you’ll get neatly scoped pull requests you can merge independently.
2. Validate UI changes with Playwright MCP
Front-end changes usually come with a side quest: Spin up the app locally, poke around the UI, and hope nothing’s broken. Copilot’s Playwright MCP server integration changes this completely. It can spin up your application, interact with it, and capture screenshots automatically.
Steps:
- From the Agents panel, describe the task:
“Add internationalization support for English, French, and Spanish.” - Copilot generates the code, uses the Playwright MCP server to run your app in a browser, and captures screenshots for the pull request.
- Review the screenshots directly in the pull request before checking out the branch locally.
👉 Pro tip: This is great for validating responsive designs, dark mode toggles, or any UI change where a screenshot is worth a thousand code reviews.
3. Experiment safely with branch strategies
Not every idea is ready for prime time. Sometimes you need a safe space to let Copilot experiment without touching your main branch. And here’s what makes Copilot’s branch handling really powerful: You can pick any branch as your starting point, not just the default.
Steps:
- From the Agents panel, describe the task:
“Add real time flight tracking with live delay notifications” - Choose your base branch from the dropdown: Maybe you want to build on
feature/booking-systeminstead of main. - Copilot creates a
copilot/branch from your selected base branch and opens a draft pull request for your review.
- Review the pull request and give Copilot feedback through pull request comments, as seen in the gif below:
👉 Pro tip: Use dedicated branches to showcase prototypes in demos — clean, isolated, and easy to discard if needed.
4. Choose the right entry point for your task
You wouldn’t use a screwdriver when you need a hammer, and the same goes for assigning tasks to Copilot. With multiple entry points (Agents panel, GitHub Issues, Your favorite IDE, GitHub Mobile), the trick is knowing which one fits the moment.
My best fits:
- Agents panel: Perfect for ad hoc tasks while browsing GitHub — ideal when you’re reviewing issues or planning work.
- GitHub Issues: Great if your team already tracks work in Issues. Just assign directly to Copilot and it becomes part of your existing workflow.
- VS Code: Use for quick refactors spotted while coding — no context switching required.
- Mobile app: Surprisingly useful for small tasks or follow-ups when you’re away from your desk.
👉 Pro tip: Don’t overthink it. The best entry point is the one closest to where inspiration strikes.
5. Extend Copilot Coding Agent with MCP servers
Here’s where things get interesting. Copilot gets smarter when it has more context to work with. Out of the box, it ships with two powerful Model Context Protocol (MCP) servers:
Default MCP servers:
- Playwright MCP: Enables browser automation and screenshot capabilities for testing web applications
- GitHub MCP: Provides awareness of GitHub repositories, issues, pull requests, and other GitHub-specific context.
But it can become ever more powerful when you extend this ecosystem with custom MCP servers, for example:
- Notion MCP: Pull in project specs or notes.
- Hugging Face MCP: Access AI models and datasets for machine learning features.
The recently launched open source MCP Registry provides a centralized place to discover, publish, and manage MCP server integrations. Check it out to see what others have built or to contribute your own.
👉 Pro tip: For implementation examples, visit the VS Code Insider page, which offers a curated list of MCP servers across categories like Developer Tools, Productivity, Data & Analytics, Business Services, and Cloud & Infrastructure — all installable with a click.
TL;DR
These five workflows demonstrate how Copilot evolves from a suggestion tool into an essential development partner with the coding agent. By integrating it into your daily routine, you’re not just saving time, you’re fundamentally changing how you approach development challenges.
Think about it: Those tech debt items that used to languish for months? Now automated. The UI validations that demanded context-switching? Handled with screenshots. The experimental features you were hesitant to build? Safely prototyped in isolated branches.
The big wins: When teams stop seeing Copilot as just another coding tool and start treating it as a collaborator that unlocks new possibilities in your dev workflow.
Your next steps
Don’t just read about these workflows, experience them. Choose one task from your backlog right now (we all have them), open the Agents panel in your repository, and hand it off to Copilot. Then use those reclaimed hours to tackle the creative challenges only us humans can solve.
As AI-assisted development continues to evolve, the developers who thrive won’t be those who code the fastest, they’ll be the ones who masterfully orchestrate their AI tools to amplify their impact.
What will you build with your new teammate?
Read the Docs to learn more about GitHub Copilot coding agent >
The post 5 ways to integrate GitHub Copilot coding agent into your workflow appeared first on The GitHub Blog.
]]>The post How to use GitHub Copilot on github.com: A power user’s guide appeared first on The GitHub Blog.
]]>You’ve been using GitHub Copilot in your IDE for autocomplete and code suggestions. But here’s what I discovered recently: there’s a whole other side of Copilot that lives on github.com, and it’s designed for different problems entirely.
While your IDE handles the day-to-day coding, GitHub Copilot on github.com helps you tackle project management, team coordination, and rapid prototyping. I can file issues from screenshots, assign AI agents to fix bugs, and spin up working demos without opening VS Code. Check it out in the video below 👇
No extensions to install, no setup required. Just go to github.com/copilot and start working. This becomes your AI-powered command center, and here’s how you can use it strategically:
File issues from screenshots
Got a bug report with a screenshot? Don’t write it manually, let Copilot do it. Here’s how:
- Take a screenshot of the bug (e.g., a misaligned icon or layout problem)
- Drag it into the Copilot chat on github.com/copilot.
- Add a prompt like:
Create a new issue using the 'bug' label. Use this screenshot and describe the overlapping arrow icon. Apply the UI issue template from this repo.Copilot reads the image, generates a clear title and description, applies the right labels, and uses your repository’s issue templates. It’s faster than manual transcription and often catches details I might miss.
| 💡 Pro tip: Copilot can infer issue context from your screenshot and your prompt, no need to spell everything out. |
Let agents handle routine work
Once your issue is created, you can assign it to the Copilot coding agent to start working on a solution.
To assign an agent:
In the chat thread, tell Copilot: Assign yourself to this issue and draft a fix.
The agent will analyze your codebase, identify the root cause, and submit a draft pull request with the fix. You can monitor progress in the task pane and review the pull request when ready.
This works well for routine bugs, documentation updates, and dependency upgrades. For more complex features, I still prefer hands-on development in the IDE.
| 💡 Pro tip: Agents can work across issues, run workflows, and follow up, just like a teammate. |
Use Spark to prototype live
When I need to test how a component behaves or validate a design idea, I use GitHub Spark to:
- Rapidly scaffold working code
- Preview and interact with the output
- Share the work via a link with collaborators
Example prompt:
Create a feature comparison table for an API pricing page. Show Free, Pro, and Enterprise tiers with checkmarks for features.Within minutes, I get working code with a live preview. I can edit directly in Spark, GitHub Codespaces, or VS Code, see changes immediately, and publish and share the prototype with teammates.
| 💡 Pro tip: Use Spark to quickly practice with unfamiliar syntax by running and editing snippets in real time. |
Choose the best model for the task
You can get access to multiple AI models and switch between models on github.com. In my experience:
| Model | Best for |
| GPT-4.1 | General coding and reasoning |
| Claude Sonnet 4 | Structured writing, refactors, context-heavy tasks |
| Opus 4 | Creativity, edge cases, alternative perspectives |
To switch models:
- In a thread, click the model name.
- Select a different model and reload the response.
- Compare answers and choose the best one for your use case.
| 💡 Pro tip: Use model comparison to reduce hallucinations and sharpen your output. In my experience, GPT-4.1 works well for general coding, Claude 4 for complex refactoring, and Opus 4 when I need creative approaches. But your mileage may vary; the real value is having options when one model’s response doesn’t quite fit. |
Navigate conversation branches
GitHub Copilot groups multiple responses under each message you send, especially when you switch models. It’s not threading in the Slack sense, but it acts like it — each group works like a separate “branch” of your conversation, completely isolated from the others.
Here are a few use practical use cases:
- Compare different refactoring approaches by switching models for the same question.
- Test multiple architectural patterns by reviewing several AI-generated answers.
- Explore alternative explanations side-by-side without mixing contexts.
| 💡 Pro tip: Think of each message as a base commit in Git. Model switching creates alternative responses grouped under that message, letting you review different approaches without starting over. |
Combine web and IDE strategically
Copilot is most powerful when you use both github.com and your IDE together, leveraging each for what they do best.
| Task | Use github.com when you need… | Use IDE when you need… |
| Project coordination | Cross-repository visibility | Single codebase focus |
| Issue management | Creating and assigning issues | Implementing solution |
| Agent work | Async automation via coding agent | Real-time collaboration via agent mode |
| Prototyping | Quick demos and sharing | In-depth debugging |
Example workflow: I’ll start a project discussion on github.com, prototype the solution in Spark, create issues for the team, then switch to VS Code for implementation.
Build your AI-native dev workflow
Here’s what a full day might look like:
- Land at github.com/copilot.
- Check assigned pull requests and issues.
- Use chat to summarize project status and recent team activity.
- Assign an agent to a newly created issue.
- Prototype a new idea in Spark.
- Use thread conversations and switch models mid-thread.
- Push final changes via pull request.
The key insight is that github.com Copilot handles the coordination and exploration work, while your IDE handles the detailed implementation. Used together, they can cover the full development workflow.
Ready to try it?
Copilot on github.com turns your browser into your personal development mission control. It’s time to stop thinking of Copilot as just autocomplete and start using it as your workflow orchestrator.
Head to github.com/copilot and start building now >
The post How to use GitHub Copilot on github.com: A power user’s guide appeared first on The GitHub Blog.
]]>The post Rediscovering joy in learning: Jason Lengstorf on the state of development appeared first on The GitHub Blog.
]]>I’ve been there. Staring at my screen at 11 p.m., panicked, trying to learn the latest framework because I’m convinced it’ll make or break my career. Jason Lengstorf thinks we’ve got this all wrong.
It feels like we’re scrambling to learn whatever thing we’re worried is gonna cost us our job if we don’t learn it really fast. A huge motivation for me is to try to remind everybody that this stuff can be fun. And having fun isn’t not working.
Jason Lengstorf, creator of CodeTV
We had the pleasure of hosting Jason Lengstorf, creator of “Learn with Jason” and the mastermind behind Code TV, where he makes what he calls “reality television for developers,” on a recent episode of The GitHub Podcast. With over 20 years in the industry, Jason’s perspective on learning, AI, and open source got me thinking about where we’ve been and where we’re headed.
Listen to the full podcast episode👇
Jason’s take resonates with me because I see (and feel) this anxiety everywhere. Every Slack channel I’m in, every conference hallway conversation. Some of us are running a bit scared instead of running curious. But Jason’s perspective, combined with his predictions about AI integration and the critical role of open source maintainers, paints a picture of an industry on the cusp of significant change.
Why I stopped panic-learning (and you should too)
Here’s Jason’s thesis: “Having fun isn’t not working. Having fun actually makes you more likely to retain stuff and more likely to stick through a project and finish it.”
When I first started building with AI tools, I treated every new model release like a pop quiz I hadn’t studied for. Sound familiar? But Jason’s approach with “Learn with Jason” flips this completely. Instead of cramming knowledge into developers’ heads, he creates space for exploration and discovery.
The difference shows up everywhere. When developers approach learning with curiosity rather than desperation, they absorb concepts more thoroughly. They contribute more meaningfully to projects. They actually finish what they start. And they share their knowledge instead of hoarding it.
Having fun actually makes you more likely to retain stuff and more likely to stick through a project and finish it and share it.
I’m guilty of this too. How many times have you bookmarked a tutorial “for later” because you were too stressed about keeping up to actually enjoy learning it? When we give ourselves permission to enjoy the process, we model healthy behaviors for the next generation of developers.
AI as a force multiplier (not a replacement)
Jason nailed it with this analogy: “A can of caulk and a plunger can get you part of the way there, but at some point, you need to hire a plumber.” That’s AI and developers in a nutshell.
All the YouTube videos in the world aren’t going to teach me how this stuff really works in 25 minutes. What we’re seeing in practice is that the tooling is acting similarly to the way that something like TypeScript suddenly enabled developers to intuit things about a code base.
Here’s what happened when Jason and Jack Harrington built an MCP (Model Context Protocol) server live on stream. The AI churned out code automatically. Everything looked perfect until they hit a bug: One missing component name in a config file.
Jack fixed it in seconds because he knew the system. Jason, despite 20 years of experience, would’ve needed to reverse-engineer the entire AI-generated codebase to debug it.
If you’re a skilled developer, this is gonna make you unbelievably fast. If you are not a skilled developer, it’s gonna give you a lot of tools to learn very quickly. If you have no interest in learning, it is going to get you into a big bad mess really, really fast.
That’s the difference AI makes: It amplifies what you already know, but can’t replace domain knowledge.
For skilled developers, it creates incredible leverage. For those learning, it accelerates the process. But for those hoping to bypass learning entirely? Jason’s right — it creates bigger problems faster.
The fact that MCP emerged as a shared standard gives me hope. Instead of every company launching their own incompatible AI integration system, we’re seeing convergence around shared protocols. This suggests the AI tooling ecosystem is maturing beyond the “new framework every week” phase.
The developers keeping our world running (and why they need our help)
Zod is the TypeScript schema validation library that’s become foundational to so much of our ecosystem. Yet, very few people know who builds Zod and how much of the AI stuff it’s powering, Jason says.
This brings to mind the XKCD comic about critical infrastructure maintained by “some random person in Nebraska who’s thanklessly maintaining it.” The reality is even more stark than the comic suggests:
- SQLite, which runs most local databases globally, is maintained by four people
- The global timezone database is managed by two people
- Colin McDonald maintains Zod, which powers countless AI applications and framework integrations
During Jason’s live coding challenges on CodeTV, participants consistently reach for the same open source tools: Tailwind, ShadCN/UI, Vue, Nuxt, React. We deploy to proprietary services and use proprietary AI models, but the building blocks, the things that actually create value, are largely gifts from individual maintainers and small teams.
This creates both opportunity and responsibility. As Jason notes, Zod is one of the few projects he sponsors on GitHub because he considers it “load bearing” for his work. Check your package.json right now. I bet you’ll find at least three dependencies maintained by people you’ve never heard of. More of us need to identify our own load-bearing dependencies and if able to, support them financially through GitHub Sponsors or other means.
The sustainability of open source isn’t just about individual kindness. It’s about the health of our entire industry. When critical infrastructure depends on unpaid volunteers, we’re building on unstable foundations.
The next wave of web innovation
I have a hunch that we are in a bit of a temporary lull that’s gonna lead to something really interesting.
The JavaScript ecosystem is in a curious state. We’ve hit what Jason calls “a weird spot” where instead of innovating, “we’re just arguing about whether or not the innovation we had was horrific.” Meanwhile, CSS is experiencing a boom with new browser capabilities arriving regularly.
But this apparent stagnation might be the calm before a significant storm. Jason looks at how AI will change UX fundamentals: “You don’t necessarily need as many navigation buttons and nested dropdowns and all this really complex information architecture stuff anymore. It’s gonna be more conversational.”
This doesn’t mean everything becomes a chat interface. People want varied interaction methods. Instead, we’ll need new approaches to component-based architecture that integrate with autonomous agents operating different parts of websites.
The convergence of local AI models running in browsers, standardized protocols like MCP, and the web’s necessity to adapt while maintaining core technologies creates a unique moment. We’re seeing early patterns emerge around bringing AI capabilities directly into web applications as first-class features.
For indie developers, this moment offers opportunities similar to the early JavaScript framework days. The same way edge functions made enterprise-level capabilities accessible to individual developers, AI tools are democratizing capabilities that were previously available only to large organizations.
Looking forward
Here’s what I’m taking from Jason: Stop learning out of fear. Start building with curiosity. Support the maintainers who power your apps. And when the next wave of web innovation hits (and it will), you’ll be ready because you’ve been having fun the whole time.
The developers who embrace learning for joy rather than fear will be best positioned to use AI tools effectively. Those who understand and support the open source infrastructure enabling their work will build on more stable foundations. And those who stay curious about emerging patterns will help shape what comes next.
The question isn’t whether you can keep up. It’s whether you’re enjoying the ride.
Listen to our full conversation with Jason Lengstorf on The GitHub Podcast. And don’t miss the next episode by subscribing today!
The post Rediscovering joy in learning: Jason Lengstorf on the state of development appeared first on The GitHub Blog.
]]>The post A practical guide on how to use the GitHub MCP server appeared first on The GitHub Blog.
]]>Running the Model Context Protocol (MCP) server locally works, but managing Docker, rotating access tokens, and pulling updates is a hassle. GitHub’s managed MCP endpoint eliminates these infrastructure headaches, letting you focus on what you love — shipping code.
In this 201-level tutorial, we’ll walk through upgrading from the local MCP setup to GitHub’s managed endpoint. You’ll get OAuth authentication, automatic updates, and access to toolsets that open the door to richer AI workflows you simply can’t pull off with a bare‑bones local runtime.
You’ll also learn how to customize tool access with read-only modes, streamline your AI workflows with dynamic toolsets, and get ready for agent-to-agent collaboration using GitHub Copilot.
But first, why switch to our hosted server?
Running the open source MCP server locally works, but it carries hidden costs. Here’s what changes when you go remote:
| Local Docker server | Hosted MCP endpoint |
|---|---|
| Maintain a Docker image, upgrade manually | GitHub patches and upgrades automatically |
| Manage personal‑access tokens (PATs) | Sign in once with OAuth; scopes handled for you |
| Expose the server on localhost only | Reachable from any IDE or remote‑dev box |
| Full write access unless you customise the binary | Built-in read‑only switch and per‑toolset flags |
If you need an air‑gapped environment, stick with local. For most teams, the hosted server eliminates infrastructure work and lets you focus on automation. With that, let’s dive in.
A few things you need before you get started:
- GitHub Copilot or Copilot Enterprise seat
- VS Code 1.92+ (or another MCP‑capable client)
- Network access to
https://api.githubcopilot.com - A test repository to experiment with
Step 1: Install the remote MCP server
Setting up GitHub’s remote MCP server server is a breeze compared to local Docker-based installations. Hosted by GitHub, it eliminates the need for managing Docker containers or manually handling updates, offering a streamlined, cloud-native experience.
How to install the remote server on VS Code or VS Code Insiders:
- Open the command palette and run:
> GitHub MCP: Install Remote Server - Complete the OAuth flow to connect your GitHub account.
- Restart the server to finish setup.
For any other client
Set the server URL to: https://api.githubcopilot.com/mcp/
Then authenticate when prompted.
Validate your connection with a quick check
curl -I https://api.githubcopilot.com/mcp/_ping
# HTTP/1.1 200 OK
If you see 200 OK, you’re good to go.
Once installed, the remote server replaces the local one, and you’re ready to roll. That means no more Docker or tokens, just a simple integration.
Step 2: Configure access controls
Use read-only mode for safe exploration.
Working in a sensitive environment? Testing in production? Demoing to stakeholders? Flip the server to read-only mode:
{
  "servers": {
    "github": {
      "type": "http",
      "url": "https://api.githubcopilot.com/mcp/",
      "headers": {
        "X-MCP-Readonly": "true"
      }
    }
  }
}
The agent can read issues, pull requests, and code but can’t push changes. Perfect for code reviews where you want context without risk.
Use case: Pull request viewer
Need to review pull requests without modifying anything? This setup gives you safe, read-only access — perfect for browsing changes, leaving comments, or gathering context without risk of altering code.
- Go to the GitHub MCP server repo.
- Navigate to the “Remote Server” section.
- Choose the pull request read-only variant.
- Click Install Read Only.
You’ll now see tools like listPullRequests, getPullRequest, and searchPullRequests, but no write access. And since these tools don’t make changes, VS Code skips the permission prompts for a seamless experience.
Step 3: Try it out with these three hands-on examples
Want to see how Copilot agent mode works in practice? These real-world examples show how the agent can handle everyday developer tasks — like managing pull requests, debugging workflows, and triaging security alerts — without needing local setup or manual digging. Just prompt and go.
Example 1: Add a CODEOWNERS file and open a pull request
- Open your repo ➜ Ask Copilot Agent.
- Prompt your agent:
"Add a CODEOWNERS file for /api/** assigning @backend-team, then open a draft pull request." - The agent will:
- Use
repos.create_fileto add the CODEOWNERS file. - Call
pull_requests.opento create the pull request. - Execute
pull_requests.request_reviewersto assign reviewers.
No local cloning, no manual file creation. Just prompt and ship.
Example 2: Debug a failed workflow
Prompt: “Why did the release.yml job fail last night?”
The agent pulls logs with actions.get_workflow_run_logs, analyzes the stack trace, and suggests fixes. It’s like having a senior engineer review your CI/CD failures.
Example 3: Triage security alerts
Prompt: “List critical Dependabot alerts across all my repos and create issues for each.”
The server returns alerts via dependabot.list_dependabot_alerts, then the agent creates focused issues only where needed.
Step 4: Troubleshooting tips with the GitHub remote MCP server
| Symptom | Likely cause | Fix |
|---|---|---|
| 401 Unauthorized on install | Left‑over GITHUB_TOKEN env var | Unset the var and rerun OAuth flow |
| Tools don’t appear | Corporate proxy blocks api.githubcopilot.com | Add proxy settings or allowlist the domain |
| Model times out | Large toolset enabled | Restrict to needed toolsets only |
Step 5: What’s next with security and agentic workflows
The GitHub MCP server is actively evolving. Here’s what’s coming next:
Secret scanning in MCP
Soon, the MCP server will detect and block AI-generated secrets, just like GitHub prevents you from pushing secrets in pull requests. You can override if needed, but the default protects your data, whether from a prompt injection or by accident.
Assign issues to Copilot
Direct integration with Copilot’s coding agent means you’ll be able to:
- Assign issues directly to Copilot.
- Trigger completions from VS Code.
- Watch as agent-to-agent workflows unfold across tools.
The future is agents collaborating with agents, and GitHub MCP is the foundation.
Want to contribute?
The GitHub MCP project is fully open source and growing fast.
📌 Explore the repo: See how tools are built and contribute your own.
📌 File issues: Help shape the protocol and tooling.
📌 Join discussions: Connect with other builders on GitHub and Discord.
Whether you’re building tools, providing feedback, or exploring AI-powered development, there’s a place for you in the MCP ecosystem.
Ready to Ship?
The GitHub remote MCP server removes infrastructure overhead so you can focus on building better automations. No more Docker babysitting, no more token rotation, just OAuth once and start shipping.
Remember: the best infrastructure is the infrastructure you don’t have to manage.
Read the full documentation to get started, or dive into the examples above and start experimenting today.
Read our guide to building secure and scalable remote MCP servers >
The post A practical guide on how to use the GitHub MCP server appeared first on The GitHub Blog.
]]>The post Understand your software’s supply chain with GitHub’s dependency graph appeared first on The GitHub Blog.
]]>What if you could spot the weakest link in your software supply chain before it breaks?
With GitHub’s dependency graph, you can. By providing a clear, complete view of the external packages your code depends on, both directly and indirectly, it allows you to understand, secure, and manage your project’s true footprint.
If you’re like me and sometimes lose track of what’s actually powering your applications (we’ve all been there!), GitHub’s dependency graph is about to become your new best friend.
What is the dependency graph?
Here’s the thing: Every modern software project is basically an iceberg. That small manifest file with your direct dependencies seems quite harmless at first glance. But underneath? There’s this massive, hidden world of transitive dependencies that most of us never think about. The GitHub dependency graph maps this entire underwater world. Think of it like a family tree, but for your code. Each package is a family member, and each dependency relationship shows who’s related to whom (and trust me, some of these family trees get really complicated).
Each package is a node. Each dependency relationship is an edge. The result? A full visual and structured representation of your software’s external codebase.
In some cases, 95–97% of your code is actually someone else’s. The dependency graph helps you make sense of that reality.
GitHub engineer Eric Sorenson
Let that sink in for a moment. We’re basically curators of other people’s work, and the dependency graph finally helps us make sense of that reality.
Why it matters
When vulnerabilities are discovered in open source packages, the consequences ripple downstream. If you don’t know a vulnerable dependency is part of your project, it’s hard to take action.
The dependency graph isn’t just a cool visualization (though it is pretty neat to look at). It’s the foundation that makes Dependabot alerts possible. When a security issue is found in any of your dependencies (even a transitive one), GitHub notifies you. You get the full picture of what’s in your supply chain, how it got there, and what you can actually do about it.
See it in action: From 21 to 1,000 dependencies
Eric showed us a project that looked innocent enough:
- 21 direct dependencies (the ones actually listed in package.json)
- 1,000 total dependencies (including everything that got pulled in along the way)
With the dependency graph, you can finally:
- Understand which dependencies are direct vs. transitive
- Trace how a package like Log4j ended up in your codebase. (Spoiler: it probably came along for the ride with something else.)
- Know what’s yours to fix and what depends on an upstream maintainer
Tighten your supply chain with Dependabot
Dependabot runs on top of the dependency graph—so enabling the graph is what makes Dependabot’s vulnerability alerts and automatic fix suggestions possible.
Pro tip: Filter for direct dependencies first. These are the ones you can actually control, so focus your energy there instead of pulling your hair out over transitive dependencies that are someone else’s responsibility.
How to enable the dependency graph
You can enable the dependency graph in your repository settings under Security > Dependency Graph. If you turn on Dependabot, the graph will be enabled automatically.
Using GitHub Actions? Community-maintained actions can generate a Software Bill of Materials (SBOM) and submit it to GitHub’s Dependency submission API, even if your language ecosystem doesn’t support auto-discovery.
✅ The best part? Dependency graph and Dependabot alerts are free for all repositories.
TL;DR
You can’t secure what you can’t see. GitHub’s dependency graph gives you visibility into the 90%+ of your codebase that comes from open source libraries and helps you take action when it counts.
- Enable it today (seriously, do it now)
- Use it with Dependabot for automated alerts and fixes
- Finally discover what’s actually in your software supply chain
Your future self (and your security team) will thank you.
Want to learn more about the GitHub dependency graph? Explore the documentation >
The post Understand your software’s supply chain with GitHub’s dependency graph appeared first on The GitHub Blog.
]]>The post GitHub Copilot Spaces: Bring the right context to every suggestion appeared first on The GitHub Blog.
]]>When generative AI tools guess what you need, the magic only lasts as long as the guesses are right. Add an unfamiliar codebase, a security checklist your team keeps in a wiki, or a one‑off Slack thread that explains why something matters, and even the most and even the most powerful model may fill in gaps with assumptions rather than having access to your specific context and knowledge.
GitHub Copilot Spaces fixes that problem by letting you bundle the exact context Copilot should read—code, docs, transcripts, sample queries, you name it—into a reusable “space.” Once a space is created on github.com, Copilot chat and command interactions on the GitHub platform are grounded in that curated knowledge, producing answers that feel like they came from your organization’s resident expert. In the future, IDE integration for Spaces is planned.
In this article, we’ll walk through:
- A 5‑minute quick‑start guide to creating your first space
- Tips for personalizing Copilot’s tone, style, and conventions with custom instructions
- Real‑world recipes for accessibility, data queries, and onboarding
- Collaboration, security, and what’s next on the roadmap (spoiler: IDE integration and Issues/PR support)
Why context is the new bottleneck for AI‑assisted development
Large language models (LLMs) thrive on patterns, but day‑to‑day engineering work is full of unpatterned edge cases, including:
- A monorepo that mixes modern React with legacy jQuery
- Organizational wisdom buried in Slack threads or internal wikis
- Organization‑specific security guidelines that differ from upstream OSS docs
Without that context, an AI assistant can only guess. But with Copilot Spaces, you choose which files, documents, or free‑text snippets matter, drop them into a space, and let Copilot use that context to answer questions or write code. As Kelly Henckel, PM for GitHub Spaces, said in our GitHub Checkout episode, “Spaces make it easy to organize and share context, so Copilot acts like a subject matter expert.” The result? Fewer wrong guesses, less copy-pasting, and code that’s commit-ready.
What exactly is a Copilot Space?
Think of a space as a secure, shareable container of knowledge plus behavioral instructions:
| What it holds | Why it matters | |
|---|---|---|
| Attachments | Code files, entire folders, Markdown docs, transcripts, or any plain text you add | Gives Copilot the ground truth for answers |
| Custom instructions | Short system prompts to set tone, coding style, or reviewer expectations | Lets Copilot match your house rules |
| Sharing & permissions | Follows the same role/visibility model you already use on GitHub | No new access control lists to manage |
| Live updates | Files stay in sync with the branch you referenced | Your space stays up to date with your codebase |
Spaces are available to anyone with a Copilot license (Free, Individual, Business, or Enterprise) while the feature is in public preview. Admins can enable it under Settings > Copilot > Preview features.
TL;DR: A space is like pinning your team’s collective brain to the Copilot sidebar and letting everyone query it in plain language.
Quick-start guide: How to build your first space in 5 minutes
- Navigate to github.com/copilot/spaces and click Create space.
- Name it clearly. For example,
frontend‑styleguide. - Add a description so teammates know when—and when not—to use it.
- Attach context:
- From repos: Pull in folders like
src/componentsor individual files such aseslint.config.js. - Free‑text hack: Paste a Slack thread, video transcript, onboarding checklist, or even a JSON schema into the Text tab. Copilot treats it like any other attachment.
- Write custom instructions. A sentence or two is enough:
- “Respond as a senior React reviewer. Enforce our ESLint rules and tailwind class naming conventions.”
- Save and test it. You’re done. Ask Copilot a question in the Space chat—e.g., “Refactor this
<Button>component to match our accessibility checklist”—and watch it cite files you just attached.
Personalize Copilot’s coding style (and voice, too)
Custom instructions are the “personality layer” of a space and where spaces shine because they live alongside the attachments. This allows you to do powerful things with a single sentence, including:
- Enforce conventions
- “Always prefer Vue 3
script setupsyntax and Composition API for examples.”
- “Always prefer Vue 3
- Adopt a team tone
- “Answer concisely. Include a one‑line summary before code blocks.”
- Teach Copilot project‑specific vocabulary
- “Call it ‘scenario ID’ (SCID), not test case ID.”
During the GitHub Checkout interview, Kelly shared how she built a personal space for a nonprofit side project: She attached only the Vue front‑end folder plus instructions on her preferred conventions, and Copilot delivered commit‑ready code snippets that matched her style guide on the first try.
Automate your workflow: three real‑world recipes
1. Accessibility compliance assistant
Space ingredients
- Markdown docs on WCAG criteria and GitHub’s internal “Definition of Done”
- Custom instruction: “When answering, cite the doc section and provide a code diff if changes are required.”
How it helps: Instead of pinging the accessibility lead on Slack, you can use Spaces to ask questions like “What steps are needed for MAS‑C compliance on this new modal?” Copilot summarizes the relevant checkpoints, references the doc anchor, and even suggests ARIA attributes or color‑contrast fixes. GitHub’s own accessibility SME, Katherine, pinned this space in Slack so anyone filing a review gets instant, self‑service guidance.
2. Data‑query helper for complex schemas
Space ingredients
- YAML schema files for 40+ event tables
- Example KQL snippets saved as
.sqlfiles - Instruction: “Generate KQL only, no prose explanations unless asked.”
How it helps: Product managers and support engineers who don’t know your database structures can ask, “Average PR review time last 7 days?” Copilot autocompletes a valid KQL query with correct joins and lets them iterate. Result: lets PMs and support self-serve without bugging data science teams.
3. Onboarding Hub and knowledge base in one link
Space ingredients
- Key architecture diagrams exported as SVG text
- ADRs and design docs from multiple repos
- Custom instruction: “Answer like a mentor during onboarding; link to deeper docs.”
How it helps: New hires type “How does our auth flow handle SAML?” and get a structured answer with links and diagrams, all without leaving GitHub. Because spaces stay in sync with main, updates to ADRs propagate automatically—no stale wikis.
Collaboration that feels native to GitHub
Spaces respect the same permission model you already use:
- Personal spaces: visible only to you unless shared
- Organization‑owned spaces: use repo or team permissions to gate access
- Read‑only vs. edit‑capable: let SMEs maintain the canon while everyone else consumes
Sharing is as simple as sending the space URL or pinning it to a repo README. Anyone with access and a Copilot license can start chatting instantly.
What’s next for Copilot Spaces?
We’re working to bring Copilot Spaces to more of your workflows, and are currently developing:
- Issues and PR attachments to bring inline discussions and review notes into the same context bundle.
- IDE Integration: Query Spaces in VS Code for tasks like writing tests to match your team’s patterns.
- Org‑wide discoverability to help you browse spaces like you browse repos today, so new engineers can search “Payments SME” and start chatting.
Your feedback will shape those priorities. Drop your ideas or pain points in the public discussion or, if you’re an enterprise customer, through your account team.
Get started today
Head to github.com/copilot/spaces, spin up your first space, and let us know how it streamlines your workflow. Here’s how to get it fully set up on your end:
- Flip the preview toggle: Settings > Copilot > Preview features > Enable Copilot Spaces.
- Create one small, high‑impact space—maybe your team’s code‑review checklist or a set of common data queries.
- Share the link in Slack or a README and watch the pings to subject‑matter experts drop.
- Iterate: prune unused attachments, refine instructions, or split a giant space into smaller ones.
Copilot Spaces is free during the public preview and doesn’t count against your Copilot seat entitlements when you use the base model. We can’t wait to see what you build when Copilot has the right context at its fingertips.
The post GitHub Copilot Spaces: Bring the right context to every suggestion appeared first on The GitHub Blog.
]]>The post The difference between coding agent and agent mode in GitHub Copilot appeared first on The GitHub Blog.
]]>“Give a dev a code completion and they’ll merge once. Teach a dev to wield an AI agent and they’ll empty the backlog before the coffee cools.“
GitHub Copilot started life in 2021 as the autocomplete sidekick that kept you in flow. Fast forward to 2025 and it now has two new and very different superpowers:
- Agent mode: a real‑time collaborator that sits in your editor, works with you, and edits files based on your needs.
- Coding agent: an asynchronous teammate that lives in the cloud, takes on issues, and sends you fully tested pull requests while you do other things.
While they’re both AI agents, they’re tuned for different parts in your day-to-day workflows. Since we’ve been getting a few questions, we’re breaking down what they are, when to reach for each, and—because we’re developers—offering some hands‑on tips.
TL;DR: The difference between agent mode and coding agent
- Agent mode = synchronous: Works inside VS Code (and now JetBrains/Eclipse/Xcode previews) as an autonomous collaborator that iterates on code, runs tests, and fixes its own mistakes in real time.
- Coding agent = asynchronous: Runs inside GitHub Actions (in public preview), picks up issues you assign (
assignee: Copilot), explores the repo, writes code, passes tests, and opens a pull request for your review. - Think of agent mode as the senior dev pair programming with you, and coding agent as the diligent teammate grinding through well‑scoped tickets.
- You can (and should) use both together: Prototype interactively in agent mode, then give follow‑up tasks to the coding agent.
Note: Both consume Copilot premium requests, but coding agent also uses Actions minutes.
Meet agent mode: Your real‑time collaborator
Agent mode transforms Copilot Chat into an orchestrator of tools (read_file, edit_file, run_in_terminal, etc.). Give it a natural‑language goal—“add OAuth to our Flask app and write tests”—and it plans, edits files, runs the test suite, reads failures, fixes them, and loops until green. You watch the steps, intervene when you like, and keep all changes local.
How to turn agent mode on
- Open Copilot Chat in VS Code.
- Select Agent from the mode dropdown.
- (Optional but smart) Click Tools → Manage to enable or disable capabilities and add MCP extensions.
Pro tips for using agent mode to the fullest extent
- Scope the outcome: “Generate a REST endpoint” beats “help?” Vagueness breeds hallucination, so be as clear as possible about what you want.
- Seed with context: Point it at the spec file or paste the schema so it doesn’t reinvent shapes.
- Iterate interactively: Let it run, but nudge when it veers—like pair programming with a skilled teammate who’s fast but needs occasional direction.
- Extend with MCP servers: If you need custom tools (database migrations, cloud deploys, etc.).
- Choose your model: OpenAI GPT‑4o for raw power, Anthropic Claude for longer context—swap via the model picker.
TLDR: Agent mode is like pair programming with a pro who writes code, runs tests, and fixes errors instantly, all within your editor.
Meet your coding agent: Your asynchronous teammate
Where agent mode lives in the IDE, coding agent lives in your repos. Assign an issue to Copilot, and it spins up a secure cloud workspace (via GitHub Actions), figures out a plan, edits code on its own branch, runs your tests/linters, and opens a pull request tagging you for review.
How to enable it
- Plan eligibility: Requires Copilot Pro+ or Copilot Enterprise.
- Flip the switch: Enterprise admins must enable “Copilot coding agent” in organization policies.
- Assign issues: Prompt coding agent with natural language by pointing it at an issue to get started.
### Feature: add dark‑mode toggle
assignees: Copilot- Watch the pull requests roll in—quick turnarounds for small tasks, thorough work on the complex ones.
Sweet‑spot tasks
- Low‑to‑medium complexity changes in well‑tested repositories.
- Adding or extending unit tests.
- Small refactors (rename a service, extract helpers).
- Documentation or typo fixes.
Not yet ideal for: massive rewrites, cross‑repo changes, codebases with 0% test coverage.
Pro tips for using coding agent in GitHub Copilot
- Write crisp acceptance criteria in the issue. The agent reads them like a spec.
- Link to files or functions the change touches; saves exploration time.
- Keep it atomic: one logical task per issue. Multiple smaller issues scale better than one behemoth.
- Leverage PR comments: Ask the agent for tweaks, then you can extract the logic into a separate function and add error handling.
- Mind your minutes: Heavy tasks consume Actions minutes and premium requests, so queue strategically.
And remember: GitHub Copilot coding agent follows your existing code style without complaints… yet.
Side by side: Picking the right tool
| Decision lens | Agent mode | Coding agent |
| Workflow pacing | Real‑time collaboration, conversational, and iterative | Fire and forget, background tasks |
| Interface | VS Code / JetBrains / Eclipse / Xcode chat | GitHub Issues or Copilot Chat → Monitored via pull requests |
| Typical tasks | Refactor, prototype, debug, migrate | Feature add, bug fix, extending tests, boring tasks and repetitive engineering chores |
| Human oversight | Continuous (you watch edits) | At pull request review checkpoint |
| Resource cost | Premium requests | Premium requests + Actions minutes |
| Best for | Exploring unknown code, tight feedback loops | Clearing backlog, parallelizing chores |
Get more done by using both
Before we dive into the tactical playbook, remember that Copilot’s superpowers aren’t either/or—they’re peanut butter and jelly. The magic really shows up when the real‑time, in‑editor agent mode meets the steady, background hustle of the coding agent.
With that, here are three proven pairings that let you wring every drop of productivity (and fun) out of both:
- Prototype in agent mode. Ship with coding agent.
- Use agent mode to spike a working feature branch.
- Open an issue describing polish tasks; assign to Copilot.
- Agent mode for spec generation. Coding agent for implementation.
- Ask agent mode to draft a design doc from code context.
- Fine‑tune it, then hand the ticket to coding agent to execute.
- Coding agent regression fix. Agent mode hot patch.
- If coding agent’s pull request introduces a build failure, open the branch locally and summon agent mode to diagnose and patch instantly.
These aren’t the only areas where you can use agent mode and coding agent to greater effect. But they do offer some examples to help you get started.
Safety and quality checklist
Excited to watch Copilot code circles around your backlog? Same—but let’s make sure the wheels don’t fall off at 120 mph. Before you hit merge, run through this quick pre‑flight to keep quality, security, and version‑control hygiene firmly on‑track.
- Tests green? Both agents rely on tests—invest in coverage or they’ll fly blind.
- Secrets safe? Coding agent runs in a secure ephemeral env; still, guard
.envfiles. - Review everything: Agents accelerate work; they don’t eliminate your responsibility as reviewer-of-record.
- Version control FTW: Agent mode edits locally in a branch, so commit early and often.
Common questions, quick answers
Still scratching your head about edge cases, quirky workflows, or editor allegiance? Below are the questions we hear most often when we demo these agents—served up in a lightning round so you can get back to shipping.
Q: Can coding agent fix that legacy Perl CGI script from 2002?
A: It can try—but without tests it’s like teaching a golden retriever calculus. Use agent mode to refactor first.
Q: Does agent mode support vim?
A: Not yet. But you can always :wq VS Code if you miss modal editing (ducks).
Q: How many issues can I throw at coding agent at once?
A: Multiple, but remember each consumes compute and your pull request queue tolerance. Treat it like coffee—great in moderation, disaster when the pot overflows.
Q: Can GitHub Copilot coding agent work with images?
A: Yes! Thanks to vision models, it can see screenshots of bugs or mockups included in GitHub issues, making visual bug reports much more effective.
Q: What about accessing external data sources?
A: With Model Context Protocol (MCP) support, GitHub Copilot coding agent can connect to external data and capabilities beyond GitHub.
Take this with you
- Agent mode = synchronous mastery inside your editor; coding agent = asynchronous work in issues and PRs on GitHub.
- Clear prompts, good tests, and small scopes remain the secret sauce.
- Use both agents in tandem to cover the full dev‑cycle—from “Hmm, what if…?” to “LGTM, ship it.”
- Keep humans in the loop for architecture choices, security reviews, and celebratory high‑fives.
AI agents won’t replace engineers; they’ll replace the boring parts of engineering. That means more time for inventive features, better code quality, and building what’s next. And isn’t that why we all love being developers? (Ok, maybe that’s just me.)
Happy building, and may your Actions minutes be plentiful and your pull request diff stats impressively tiny.
Want to learn more?
Try exploring our Docs on everything Copilot >
The post The difference between coding agent and agent mode in GitHub Copilot appeared first on The GitHub Blog.
]]>