The post Spec-driven development: Using Markdown as a programming language when building with AI appeared first on The GitHub Blog.
]]>The usual workflow with AI coding agents like GitHub Copilot is simple: “Write app A that does X.“ You start with that seed, then iterate: “Add feature Y,” “Fix bug Z.“ This works, at least until the agent loses track of your app’s purpose or past decisions.
If you’re new to AI coding agents, the change is subtle. Suddenly, the agent asks you to repeat things you’ve already explained, or suggests changes that ignore your previous instructions. Sometimes, it forgets why a feature exists, or proposes solutions that contradict earlier choices.
Some AI coding agents try to address this by supporting custom instructions files. For example, GitHub Copilot supports copilot-instructions.md. You can put your app’s purpose and design decisions in this Markdown file, and GitHub Copilot will read it every time it generates code.
When I’m in a coding rush, I often forget to update copilot-instructions.md after asking GitHub Copilot to do things. It feels redundant to put the same information into both the chat prompt and the instructions file.
Which made me wonder: What if I “wrote” the entire app in the Markdown instructions file?
For my latest pet project—GitHub Brain MCP Server—I tried exactly that by writing the app code in Markdown and letting GitHub Copilot compile it into actual Go code. As a result, I rarely edit or view the app’s Go code directly.
This process should work with any AI coding agent and programming language, though I’ll use VS Code, GitHub Copilot, and Go as examples. GitHub Brain MCP Server will be my example app throughout this post.
Let’s jump in.
Setup: What I used to get started
There are four key files:
.
├── .github/
│   └── prompts/
│       └── compile.prompt.md
├── main.go
├── main.md
└── README.md
At a high level, I edit README.md or main.md to develop the app, invoke compile.prompt.md to let the AI coding agent generate main.go, then build and run main.go like any other Go app. Next, I’ll break down each file and the workflow.
README.md: User-facing documentation
The example app, GitHub Brain MCP Server, is a command-line tool. Its README.md provides clear, user-facing instructions for installation and usage. If you write libraries, this file should contain API documentation. Below is a condensed excerpt from the example app’s README.md:
# GitHub Brain MCP Server

**GitHub Brain** is an experimental MCP server for summarizing GitHub discussions, issues, and pull requests.

## Usage

```sh
go run main.go <command> [<args>]
```

**Workflow:**

1. Populate the local database with the `pull` command.
2. Start the MCP server with the `mcp` command.

### `pull`

Populate the local database with GitHub data.

Example:

```sh
go run main.go pull -o my-org
```

Arguments:

- `-t`: Your GitHub personal access token. **Required.**
- `-o`: The GitHub organization to pull data from. **Required.**
- `-db`: Path to the SQLite database directory. Default: `db` folder in the current directory.

### `mcp`

Start the MCP server using the local database.

...README.md continues...
Nothing special here , just regular documentation. But it gets interesting when this file is included in main.md.
main.md: AI coding agent specification
main.md is the actual source code of the app: the Markdown instructions file. Whenever I need to add features or fix bugs, I edit this file. Here’s the opening of the example app’s main.md:
# GitHub Brain MCP Server

AI coding agent specification. User-facing documentation in [README.md](README.md).

## CLI

Implement CLI from [Usage](README.md#usage) section. Follow exact argument/variable names. Support only `pull` and `mcp` commands.

## pull

- Resolve CLI arguments and environment variables into `Config` struct:
  - `Organization`: Organization name (required)
  - `GithubToken`: GitHub API token (required)
  - `DBDir`: SQLite database path (default: `./db`)
- Use `Config` struct consistently, avoid multiple environment variable reads
- Pull items: Repositories, Discussions, Issues, Pull Requests, Teams
- Use `log/slog` custom logger for last 5 log messages with timestamps in console output

...main.md continues...
Notice how the user-facing documentation from README.md is embedded in the specification. This keeps documentation and implementation in sync. If I want to add an alias for the -o argument, I just update README.md with no extra steps required.
Here’s another snippet from the example app’s main.md:
### Discussions

- Query discussions for each repository with `has_discussions_enabled: true`
- Record most recent repository discussion `updated_at` timestamp from database before pulling first page

```graphql
{
  repository(owner: "<organization>", name: "<repository>") {
    discussions(first: 100, orderBy: { field: UPDATED_AT, direction: DESC }) {
      nodes {
        url
        title
        body
        createdAt
        updatedAt
        author {
          login
        }
      }
    }
  }
}
```

- If repository doesn't exist, remove the repository, and all associated items from the database and continue
- Query discussions ordered by most recent `updatedAt`
- Stop pulling when hitting discussions with `updatedAt` older than recorded timestamp
- Save or update by primary key `url`
- Preserve the discussion markdown body

...main.md continues...
This is effectively programming in Markdown and plain English: storing variables, loops, and logical conditions. You get all the usual keywords—if, foreach, or continue. It’s a blend of structural and declarative styles, with Markdown links []() for imports.
The database schema is also coded in Markdown:
## Database

SQLite database in `{Config.DbDir}/{Config.Organization}.db` (create folder if needed). Avoid transactions. Save each GraphQL item immediately.

### Tables

#### table:repositories

- Primary key: `name`
- Index: `updated_at`

- `name`: Repository name (e.g., `repo`), without organization prefix
- `has_discussions_enabled`: Boolean indicating if the repository has discussions feature enabled
- `has_issues_enabled`: Boolean indicating if the repository has issues feature enabled
- `updated_at`: Last update timestamp

...main.md continues...
compile.prompt.md: AI coding agent prompt
compile.prompt.md uses GitHub Copilot’s prompt file format. This repeatable prompt tells the agent to compile main.md into main.go. Here’s compile.prompt.md from the example app:
---
mode: agent
---

- Update the app to follow [the specification](../../main.md)
- Build the code with the VS Code tasks. Avoid asking me to run `go build` or `go test` commands manually.
- Fetch the GitHub home page for each used library to get a documentation and examples.
I keep this prompt simple . The real information is in main.md, after all. This example uses GitHub Copilot’s format, but keeping it simple makes it portable to other AI coding agents.
The workflow to bring this all together
The development loop is straightforward:
- Edit the specification in
main.mdorREADME.md. - Ask the AI coding agent to compile it into Go code.
- Run and test the app. Update the spec if something doesn’t work as expected.
- Repeat.
In GitHub Copilot for VS Code, use the / command to invoke the prompt.
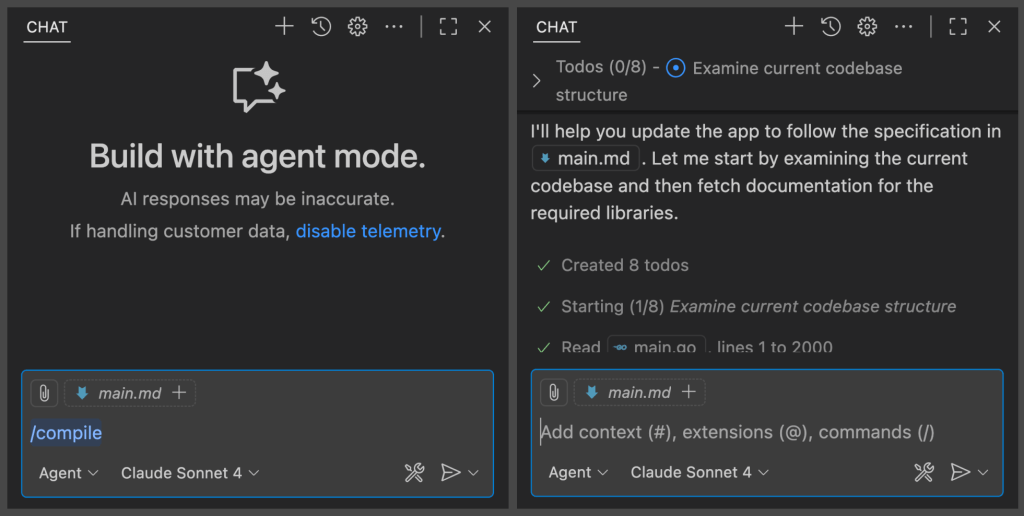
For smaller specs, GitHub Copilot usually catches changes automatically. As the spec grows, I nudge it in the right direction by appending ”focus on <the-change>”.

Coding
Coding in main.md is sometimes harder than writing Go directly . You have to clearly describe what you want, which might be the hardest part of software development 😅. Fortunately, you can use GitHub Copilot to help with this, just like you probably do with your Go code daily.
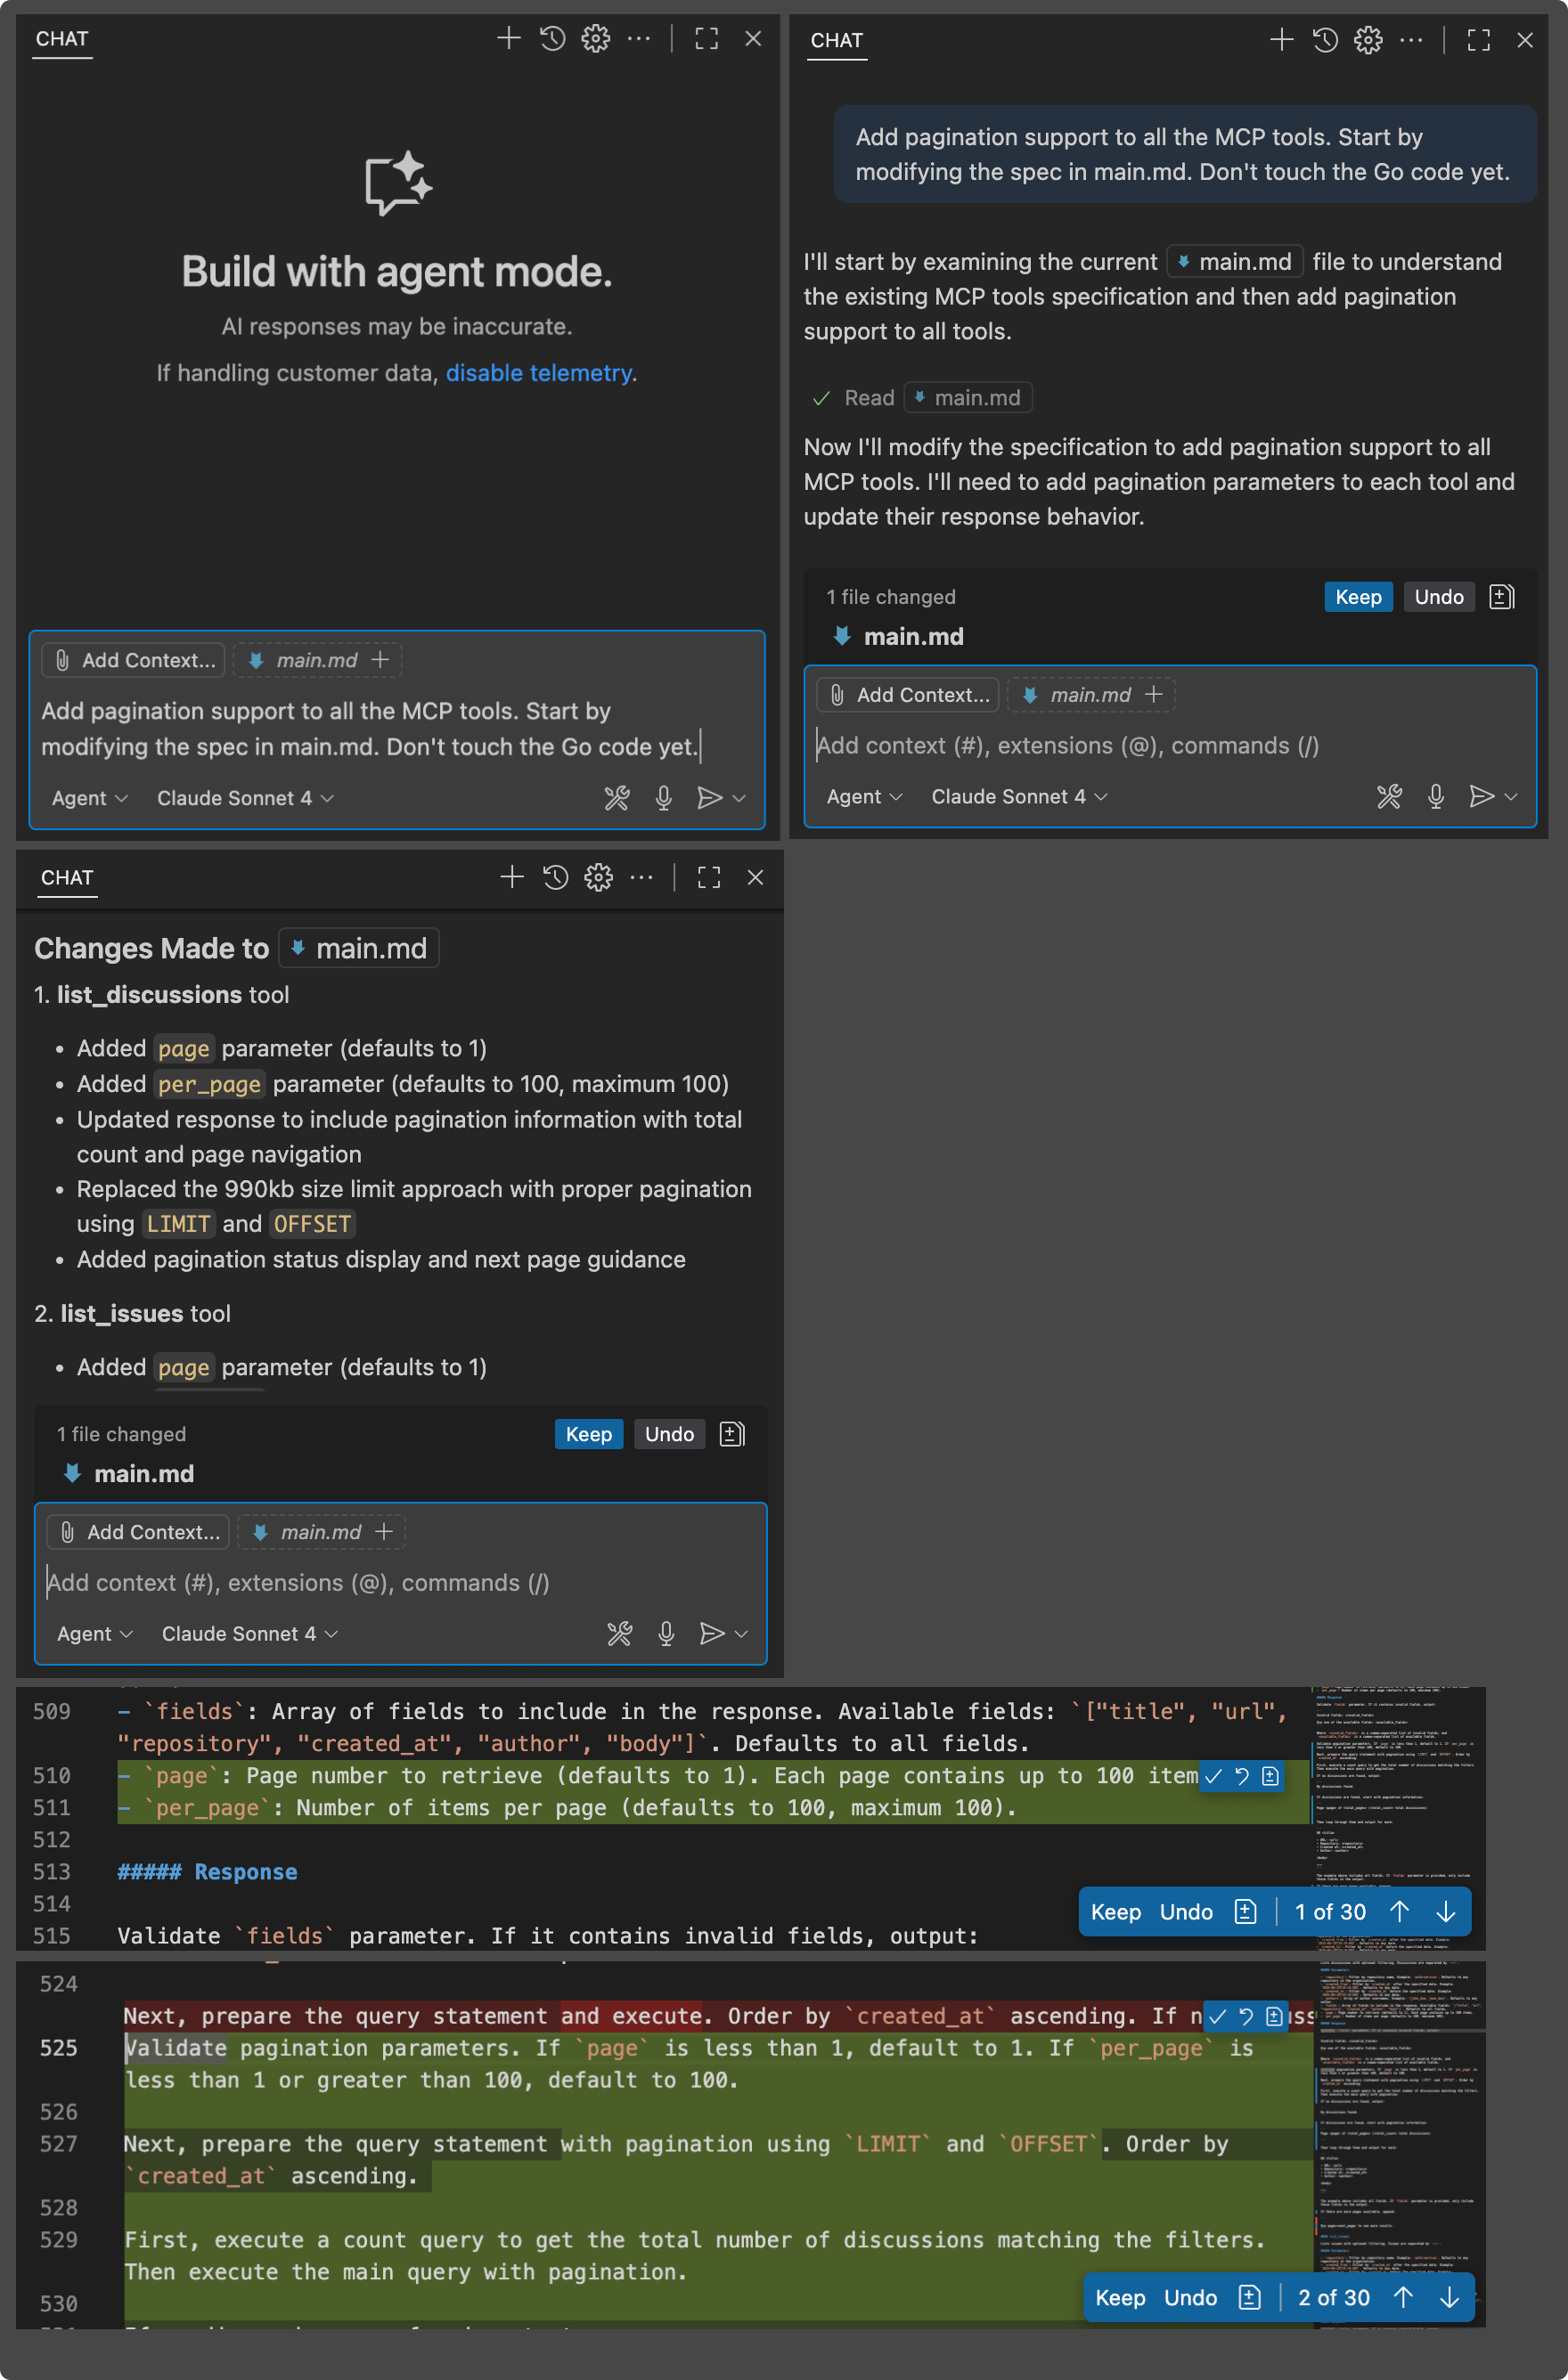
Here we ask it to add pagination to all MCP tools in main.md. Copilot not only saves us from doing repetitive work, but it also recommends proper pagination style and parameter names.
Linting
main.md can get messy like any code. To help with this, you can ask Copilot to clean it up. Here’s lint.prompt.md from the example app:
---
mode: agent
---

- Optimize [the app specification](../../main.md) for clarity and conciseness
- Treat the english language as a programming language
- Minimize the number of synonyms - i.e. pull/get/fetch. Stick to one term.
- Remove duplicate content
- Preserve all important details
- Do not modify the Go code with this. Only optimize the Markdown file.
- Do not modify this prompt itself.
Like with compile.prompt.md, I use the / command to invoke this prompt. The AI coding agent lints main.md, and if the result looks good, I can compile it to Go with compile.prompt.md.

Closing thoughts
After a few months using this workflow, here are my observations:
- It works! And it gets better with each agentic update to Copilot.
- Compilation slows down as
main.gogrows. Something I want to work on next is modifying the spec to break compiled code into multiple modules—by adding “Break each ## section into its own code module.” - Testing? I haven’t tried adding tests yet. But even with spec-driven workflows, testing remains essential. The spec may describe intended behavior, but tests verify it.
Something else I want to try next? Discarding all Go code and regenerating the app from scratch in another language. Will the new code work right away?
The rapid advances in this field are really encouraging, and I hope my experimental workflows give you some practical ideas to try.
The post Spec-driven development: Using Markdown as a programming language when building with AI appeared first on The GitHub Blog.
]]>The post Spec-driven development with AI: Get started with a new open source toolkit appeared first on The GitHub Blog.
]]>As coding agents have grown more powerful, a pattern has emerged: you describe your goal, get a block of code back, and often… it looks right, but doesn’t quite work. This “vibe-coding” approach can be great for quick prototypes, but less reliable when building serious, mission-critical applications or working with existing codebases.
Sometimes the code doesn’t compile. Sometimes it solves part of the problem but misses the actual intent. The stack or architecture may not be what you’d choose.
The issue isn’t the coding agent’s coding ability, but our approach. We treat coding agents like search engines when we should be treating them more like literal-minded pair programmers. They excel at pattern recognition but still need unambiguous instructions.
That’s why we’re rethinking specifications — not as static documents, but as living, executable artifacts that evolve with the project. Specs become the shared source of truth. When something doesn’t make sense, you go back to the spec; when a project grows complex, you refine it; when tasks feel too large, you break them down.
Spec Kit, our new open sourced toolkit for spec-driven development, provides a structured process to bring spec-driven development to your coding agent workflows with tools including GitHub Copilot, Claude Code, and Gemini CLI.
What is the spec-driven process with Spec Kit?
Spec Kit makes your specification the center of your engineering process. Instead of writing a spec and setting it aside, the spec drives the implementation, checklists, and task breakdowns. Your primary role is to steer; the coding agent does the bulk of the writing.
It works in four phases with clear checkpoints. But here’s the key insight: each phase has a specific job, and you don’t move to the next one until the current task is fully validated.
Here’s how the process breaks down:
- Specify: You provide a high-level description of what you’re building and why, and the coding agent generates a detailed specification. This isn’t about technical stacks or app design. It’s about user journeys, experiences, and what success looks like. Who will use this? What problem does it solve for them? How will they interact with it? What outcomes matter? Think of it as mapping the user experience you want to create, and letting the coding agent flesh out the details. Crucially, this becomes a living artifact that evolves as you learn more about your users and their needs.
- Plan: Now you get technical. In this phase, you provide the coding agent with your desired stack, architecture, and constraints, and the coding agent generates a comprehensive technical plan. If your company standardizes on certain technologies, this is where you say so. If you’re integrating with legacy systems, have compliance requirements, or have performance targets you need to hit … all of that goes here. You can also ask for multiple plan variations to compare and contrast different approaches. If you make your internal docs available to the coding agent, it can integrate your architectural patterns and standards directly into the plan. After all, a coding agent needs to understand the rules of the game before it starts playing.
- Tasks: The coding agent takes the spec and the plan and breaks them down into actual work. It generates small, reviewable chunks that each solve a specific piece of the puzzle. Each task should be something you can implement and test in isolation; this is crucial because it gives the coding agent a way to validate its work and stay on track, almost like a test-driven development process for your AI agent. Instead of “build authentication,” you get concrete tasks like “create a user registration endpoint that validates email format.”
- Implement: Your coding agent tackles the tasks one by one (or in parallel, where applicable). But here’s what’s different: instead of reviewing thousand-line code dumps, you, the developer, review focused changes that solve specific problems. The coding agent knows what it’s supposed to build because the specification told it. It knows how to build it because the plan told it. And it knows exactly what to work on because the task told it.
Crucially, your role isn’t just to steer. It’s to verify. At each phase, you reflect and refine. Does the spec capture what you actually want to build? Does the plan account for real-world constraints? Are there omissions or edge cases the AI missed? The process builds in explicit checkpoints for you to critique what’s been generated, spot gaps, and course correct before moving forward. The AI generates the artifacts; you ensure they’re right.
How to use Spec Kit in your agentic workflows
Spec Kit works with coding agents like GitHub Copilot, Claude Code, and Gemini CLI. The key is to use a series of simple commands to steer the coding agent, which then does the hard work of generating the artifacts for you.
Setting it up is straightforward. First, install the specify command-line tool. This tool initializes your project and sets up the necessary structure.
uvx --from git+https://github.com/github/spec-kit.git specify init <PROJECT_NAME>Once your project is initialized, use the /specify command to provide a high-level prompt, and the coding agent generates the full spec. Focus on the “what” and “why” of your project, not the technical details.
Next, use the /plan command to steer the coding agent to create a technical implementation plan. Here, you provide the high-level technical direction, and the coding agent will generate a detailed plan that respects your architecture and constraints.
Finally, use the /tasks command to make the coding agent break down the specification and plan into a list of actionable tasks. Your coding agent will then use this list to implement the project requirements.
This structured workflow turns vague prompts into clear intent that coding agents can reliably execute.
But why does this approach succeed where vague prompting fails?
Why this works
This approach succeeds where “just prompting the AI” fails due to a basic truth about how language models work: they’re exceptional at pattern completion, but not at mind reading. A vague prompt like “add photo sharing to my app” forces the model to guess at potentially thousands of unstated requirements. The AI will make reasonable assumptions, and some will be wrong (and you often won’t discover which aren’t quite right until deep into your implementation).
By contrast, providing a clear specification up front, along with a technical plan and focused tasks, gives the coding agent more clarity, improving its overall efficacy. Instead of guessing at your needs, it knows what to build, how to build it, and in what sequence.
This is why the approach works across different technology stacks. Whether you’re building in Python, JavaScript, or Go, the fundamental challenge is the same: translating your intent into working code. The specification captures the intent clearly, the plan translates it into technical decisions, the tasks break it into implementable pieces, and your AI coding agent handles the actual coding.
For larger organizations, this solves another critical problem: Where do you put all your requirements around security policies, compliance rules, design system constraints, and integration needs? Often, these things either live in someone’s head, are buried in a wiki that nobody reads, or are scattered across Slack conversations that are impossible to find later.
With Spec Kit, all of that stuff goes in the specification and the plan, where the AI can actually use it. Your security requirements aren’t afterthoughts; they’re baked into the spec from day one. And your design system isn’t something you bolt on later. It’s part of the technical plan that guides implementation.
The iterative nature of this approach is what gives it power. Where traditional development locks you into early decisions, spec-driven makes changing course simple: just update the spec, regenerate the plan, and let the coding agent handle the rest.
3 places this approach works really well
Spec-driven development is especially useful in three scenarios:
- Greenfield (zero-to-one): When you’re starting a new project, it’s tempting to just start coding. But a small amount of upfront work to create a spec and a plan ensures the AI builds what you actually intend, not just a generic solution based on common patterns.
- Feature work in existing systems (N-to-N+1): This is where spec-driven development is most powerful. Adding features to a complex, existing codebase is hard. By creating a spec for the new feature, you force clarity on how it should interact with the existing system. The plan then encodes the architectural constraints, ensuring the new code feels native to the project instead of a bolted-on addition. This makes ongoing development faster and safer. To make this work, advanced context engineering practices might be needed — we’ll cover those separately.
- Legacy modernization: When you need to rebuild a legacy system, the original intent is often lost to time. With the spec-driven development process offered in Spec Kit, you can capture the essential business logic in a modern spec, design a fresh architecture in the plan, and then let the AI rebuild the system from the ground up, without carrying forward inherited technical debt.
The core benefit is separating the stable “what” from the flexible “how,” enabling iterative development without expensive rewrites. This allows you to build multiple versions and experiment quickly.
Where we’re headed
We’re moving from “code is the source of truth” to “intent is the source of truth.” With AI the specification becomes the source of truth and determines what gets built.
This isn’t because documentation became more important. It’s because AI makes specifications executable. When your spec turns into working code automatically, it determines what gets built.
Spec Kit is our experiment in making that transition real. We open sourced it because this approach is bigger than any one tool or company. The real innovation is the process. There is more here that we’ll cover soon, specifically around how you can combine spec-driven development practices with context engineering to build more advanced capabilities in your AI toolkit.
And we’d love to hear how it works for you and what we can improve! If you’re building with spec-driven patterns, share your experience with us. We’re particularly curious about:
- Making the workflow more engaging and usable: Reading walls of text can be tedious. How do we make this process genuinely enjoyable?
- Possible VS Code integrations: We’re exploring ways to bring this workflow directly into VS Code. What would feel most natural to you?
- Comparing and diffing multiple implementations: Iterating and diffing between implementations opens up creative possibilities. What would be most valuable here?
- Managing specs and tasks at scale in your organization: Managing lots of Markdown files can get overwhelming. What would help you stay organized and focused?
We’re excited to see you leverage AI to figure out better ways to translate human creativity into working software.
The post Spec-driven development with AI: Get started with a new open source toolkit appeared first on The GitHub Blog.
]]>The post GPT-5 in GitHub Copilot: How I built a game in 60 seconds appeared first on The GitHub Blog.
]]>What an exciting time to be a developer! GPT-5 just dropped and it’s already available in GitHub Copilot. I was literally watching OpenAI’s livestream when they announced it, and I couldn’t contain my excitement — especially knowing we could start building with it immediately with our favorite AI peer programmer.
If you’ve been following our Rubber Duck Thursday streams, you know I love exploring new AI models and tools. This stream was all about two game-changing releases: GPT-5 and the GitHub Model Context Protocol (MCP) server. And wow, did we cover some ground!
Let me walk you through what we built, what we learned, and how you can start using these powerful tools in your own development workflow today.
GPT-5: Bringing increased reasoning capabilities to your workflows
GPT-5 is OpenAI’s most advanced model yet, and the best part? It’s now available to use in your favorite IDE. You can access it in ask, edit, and agent modes in VS Code — which is incredible because not all models are available across all modes.
What really impressed me was the speed. This is a reasoning model, and the response time was genuinely faster than I expected. When I was building with it, suggestions came back almost instantly, and the quality was noticeably different.
How to enable GPT-5 in GitHub Copilot:
- Open the model picker in your Copilot interface
- Select GPT-5 from the available options
- Start building!
| Enterprise note: If you’re using GitHub Copilot through your company, enterprise and business administrators need to opt in to enable GPT-5 access. Chat with your IT team if you don’t see it available yet. |
Live test: Building a Magic Tiles game in under 60 seconds
I wanted to put GPT-5 to the test immediately, so I asked my stream audience what I should build. The overwhelming response? A game! Someone suggested Magic Tiles (which, I’ll be honest, I had no idea how to play). But that’s where GPT-5 really shined.
Here’s my approach when building with AI (what I call spec-driven development):
Step 1: Let AI create the product requirements
Instead of jumping straight into code, I asked GPT-5:
Do you know the game Magic Tiles? If you do, can you describe the game in simple MVP terms? No auth, just core functionality.GPT-5 delivered an incredibly detailed response with:
- Task breakdown and core gameplay loop
- Minimal feature set requirements
- Data model structure
- Clear checklist for building the game
This is exactly why context is king with LLMs. By asking for a spec first, I gave GPT-5 enough context to build something cohesive and functional.
Step 2: Build with a simple prompt
With the MVP spec ready, I simply said:
Build this.That’s it. No framework specifications, no technology stack requirements — just “build this.” And you know what? GPT-5 made smart choices:
- Using HTML, CSS, and JavaScript for a simple MVP
- Creating a canvas-based game with proper input handling
- Adding scoring, combo tracking, and speed progression
- Implementing game over functionality
The entire build took less than a minute. I’m not exaggerating; GPT-5 delivered a working prototype that quickly.
Step 3: Iterate with natural language
When I realized the game needed better user instructions, I asked:
Can you provide user instructions on how to play the game before the user clicks start?GPT-5 immediately updated the HTML with clear instructions and even gave me suggestions for next features. This iterative approach felt incredibly natural, like having a conversation with a very smart coding partner.
Next, let’s take a look at the GitHub MCP Server!
GitHub MCP server: Automating GitHub with natural language
Now, let’s talk about something that’s going to change how you interact with GitHub: the Model Context Protocol (MCP) server.
What is MCP and why should you care?
MCP is a standard for connecting AI assistants to external tools and applications. Think of it as a bridge that lets your large language model (LLM) talk to:
- GitHub repositories and issues
- Gmail accounts
- SQL servers
- Figma projects
- And so much more
Without MCP, your LLMs live in isolation. With MCP, they become powerful automation engines that can interact with your entire development ecosystem.
MCP follows a client-server architecture, similar to REST APIs. In VS Code, for example, VS Code acts as both the host (providing the environment) and the client (connecting to MCP servers).
Setting up GitHub MCP server (surprisingly simple!)
Getting started with GitHub’s MCP server takes less than 5 minutes:
1. Create the configuration file
Create a .vscode/mcp.json file in your workspace root:
{
  "servers": {
    "github": {
      "command": "npx",
      "args": ["-y", "@github/mcp-server-github"]
    }
  }
}
2. Authenticate with GitHub
Click the “Start” button in your MCP configuration. You’ll go through a standard GitHub OAuth flow (with passkey support!).
3. Access your tools
Once authenticated, you’ll see GitHub MCP server tools available in your Copilot interface.
That’s it! No complex setup, no API keys to manage, just simple configuration and authentication.
Real-world MCP automation that will blow your mind
During the stream, I demonstrated some genuinely useful MCP workflows that you can start using today.
Creating a repository with natural language
I previously built a project called “Teenyhost” (a clone of Tiinyhost for temporarily deploying documents to the web), and I want to create a repository for it. Instead of manually creating a GitHub repo, I simply asked Copilot:
Can you create a repository for this project called teenyhost?GPT-5 asked for the required details:
- Repository name: teenyhost
- Owner: my GitHub username
- Visibility: public
- Optional description
I provided these details, and within seconds, Copilot used the MCP server to:
- Create the repository on GitHub
- Push my local code to the new repo
- Set up the proper Git remotes
This might seem simple, but think about the workflow implications. How many times have you been deep in a coding session and wanted to quickly push a project to GitHub? Instead of context-switching to the browser, you can now handle it with natural language right in your editor.
Bulk issue creation from natural language
Here’s where things get really interesting. I asked Copilot:
What additional features and improvements can I implement in this app?It came back with categorized suggestions:
- Low effort quick wins
- Core robustness improvements
- Enhanced user experience features
- Advanced functionality
Then I said:
Can you create issues for all the low effort improvements in this repo?And just like that, Copilot created five properly formatted GitHub issues with:
- Descriptive titles
- Detailed descriptions
- Implementation suggestions
- Appropriate labels
Think about how powerful this is for capturing project ideas. Instead of losing great suggestions in Slack threads or meeting notes, you can immediately convert conversations into actionable GitHub issues.
What makes this workflow revolutionary
After using both GPT-5 and the GitHub MCP server extensively, here’s what stood out:
Speed and context retention
GPT-5’s processing speed is genuinely impressive. This isn’t just about faster responses — it’s about maintaining flow state while building. When your AI assistant can keep up with your thought process, the entire development experience becomes more fluid.
Natural language as a development interface
The GitHub MCP server eliminates the friction between having an idea and taking action. No more:
- Switching between VS Code and github.com
- Manually formatting issue descriptions
- Context-switching between coding and project management
Human-in-the-loop automation
What I love about this setup is that you maintain control. When Copilot wanted to push directly to the main branch, I could cancel that action. The AI handles the tedious parts while you make the important decisions.
Your action plan: Start building today
Want to dive in? Here’s exactly what to do:
Try GPT-5 immediately
- Open GitHub Copilot in your IDE
- Switch to the GPT-5 model in your model picker
- Start with agent mode for complex builds
- Try the spec-driven approach: ask for requirements first, then build
Set up GitHub MCP server
- Create
.vscode/mcp.jsonin your workspace - Add the GitHub MCP server configuration
- Authenticate with GitHub
- Start automating your GitHub workflows with natural language
- Experiment with automation workflows:
- Create repositories for side projects
- Generate issues from brainstorming sessions
- Automate branch creation and pull request workflows
- Explore the full range of MCP tools available
On the horizon
The combination of GPT-5 and GitHub MCP server represents a significant shift in how we interact with our development tools. We’re moving from manual, interface-driven workflows to conversational, intent-driven automation.
On our next Rubber Duck Thursday, I’m planning to build our first custom MCP server from scratch. I’ve never built one before, so we’ll learn together — which is always the most fun way to explore new technology.
In the meantime, I encourage you to:
- Install the GitHub MCP server and experiment with it.
- Try building something with GPT-5 using the spec-driven approach.
- Share your experiments and results with the community.
The tools are here, they’re accessible, and they’re ready to supercharge your development workflow. What are you going to build first?
Get started with GitHub Copilot >
The post GPT-5 in GitHub Copilot: How I built a game in 60 seconds appeared first on The GitHub Blog.
]]>The post Junior developers aren’t obsolete: Here’s how to thrive in the age of AI appeared first on The GitHub Blog.
]]>| Editor’s note: This piece was originally published in our LinkedIn newsletter, Branching Out_. Sign up now for more career-focused content > |
Everyone’s talking about it: AI is changing how we work. And nowhere is that more true than in the field of software engineering.
If you’re just getting started as a developer, you might be wondering: is AI ruining my chances of getting a junior-level role? After all, a 2023 study by ServiceNow and Pearson projects that nearly 26% of tasks performed by [current] junior application developers will be augmented or fully automated by 2027.
In a word: No. Quite the contrary. New learners are well positioned to thrive as junior developers because they’re coming into the workforce already savvy with AI tools, which is just what companies need to adapt to the changing ways software is being developed.
Our CEO Thomas Domke says:
We’re entering an era where interns and junior developers are showing up already fluent in the best tools for AI code-gen on the market. Why? They vibe with AI. They build with it. Fresh talent
— Thomas Dohmke (@ashtom) May 27, 2025➡ better ideas➡ the best tools. :robot_face:
Thanks @GergelyOrosz for the story on how we’re… https://t.co/Sj6KAbq7dz
Hear more from Thomas on The Pragmatic Engineer podcast >
So what does that mean for you? According to Miles Berry, professor of computing education at the University of Roehampton, today’s learners must develop the skills to work with AI rather than worry about being replaced by it. As a junior developer, you need to think critically about the code your AI tool gives you, stay curious when things feel unfamiliar, and collaborate with AI itself in addition to senior team members.
As Berry puts it:
“Creativity and curiosity are at the heart of what sets us apart from machines.”
With that in mind, here are five ways to stand out as a junior developer in the AI era:
1. Use AI to learn faster, not just code faster
Most developers use GitHub Copilot for autocomplete. But if you’re just starting out, you can turn it into something more powerful: a coding coach.
Get Copilot to tutor you
You can set personal instructions so Copilot guides you through concepts instead of handing you full solutions. Here’s how:
In VS Code, open the Command Palette and run:
> Chat: New Instructions FileThen paste this into the new file:
---
applyTo: "**"
---
I am learning to code. You are to act as a tutor; assume I am a beginning coder. Teach me concepts and best practices, but don’t provide full solutions. Help me understand the approach, and always add: "Always check the correctness of AI-generated responses."
This will apply your tutoring instructions to any file you work on. You can manage or update your instructions anytime from the Chat > Instructions view.
Ask Copilot questions
Open Copilot Chat in VS Code and treat it like your personal coach. Ask it to explain unfamiliar concepts, walk through debugging steps, or break down tricky syntax. You can also prompt it to compare different approaches (“Should I use a for loop or map here?”), explain error messages, or help you write test cases to validate your logic. Every prompt is a learning opportunity and the more specific your question, the better Copilot can guide you.
Practice problem solving without autocomplete
When you’re learning to code, it can be tempting to rely on autocomplete suggestions. But turning off inline completions — at least temporarily — can help strengthen your problem-solving and critical thinking skills. You’ll still have access to Copilot Chat, so you can ask questions and get help without seeing full solutions too early.
Just keep in mind: This approach slows things down by design. It’s ideal when you’re learning new concepts, not when you’re under time pressure to build or ship something.
To disable Copilot code completion for a project (while keeping chat on), create a folder called .vscode in the root of your project, and add a file named settings.json with this content:
{
  "github.copilot.enable": {
    "*": false
  }
}
This setting disables completions in your current workspace, giving you space to think through solutions before asking Copilot for help.
Read our full guide on how to use Copilot as a tutor >
2. Build public projects that showcase your skills (and your AI savvy)
In today’s AI-powered world, highlighting your AI skills can help you stand out to employers. Your side projects are your portfolio and GitHub gives you the tools to sharpen your skills, collaborate, and showcase your work. Here’s how to get started: In VS Code, open Copilot Chat and type:
/newCopilot can scaffold a new project inside your editor to help you get started. Once it’s scaffolded, ask Copilot:
“Add the MIT license to this project and publish it as a public project on GitHub.”
Open a command line in VS Code and send the following prompt to manually push:
git init && git add . && git commit -m "Initial commit" && git pushOr create a new repo using the GitHub web interface and upload your files.
From there, you can:
- Track progress with issues, commits, and project boards.
- Document your journey and milestones in the README.
- Iterate and improve with feedback and AI assistance.
Read our full guide on prompting Copilot to create and publish new projects and start building your public portfolio >
3. Level up your developer toolkit with core GitHub workflows
Yes, AI is changing the game, but strong fundamentals still win it. If you’re aiming to level up from student to junior dev, these core workflows are your launchpad:
- Automate with GitHub Actions. Automating builds and deployments is a best practice for all developers. Use GitHub Actions to build, test, and deploy your projects automatically.
- Contribute to open source. Join the global developer community by contributing to open source. It’s one of the best ways to learn new skills, grow your resume, and build real-world experience.
- Collaborate through pull requests. Coding is a team sport. Practice the same pull request workflows used by professional teams: Review others’ code, discuss feedback, and merge with confidence.
Read our full guide on understanding GitHub workflows >
4. Sharpen your expertise by reviewing code
One of the fastest ways to grow as a developer is to learn from the reviews given by your peers. Every pull request is a chance to get feedback — not just on your code, but on how you think, communicate, and collaborate.
GitHub staff engineer Sarah Vessels has reviewed over 7,000 pull requests. She advises not to be afraid to ask questions during code reviews. If you’re unsure why a suggestion was made, speak up. If something isn’t obvious, clarify. Code review is a conversation, not a test.
Here’s how to make the most of it:
- Ask questions. Use comments to understand decisions or explore alternate approaches. It shows curiosity and builds shared knowledge.
- Look for patterns. Repeated suggestions often point to best practices you can internalize and reuse.
- Take notes. Keep track of feedback you’ve received and how you’ve addressed it, which is great for personal growth and future reference.
- Be gracious. Say thank you, follow up when you make changes, and acknowledge when a comment helped you see something differently.
Read our full guide on code review best practices and learn how to grow from every review >
5. Debug smarter and faster with AI
Debugging is one of the most time-consuming parts of software development. But with GitHub Copilot, you don’t have to do it alone.
Use Copilot Chat to:
- Ask “Why is this function throwing an error?” and get real-time explanations.
- Use
/fixto highlight code and generate a potential fix. - Run
/teststo create test cases and verify your logic. - Try
/explainon cryptic errors to understand the root cause.
You can even combine commands for deeper debugging — for example, use /explain to understand the problem, then /fix to generate a solution, and /doc to document it for your team.
Read our full guide on how to debug code with Copilot >
The bottom line
Whether you’re writing your first pull request or building your fifth side project, GitHub is the place to sharpen your skills, collaborate in the open, and build a portfolio that gets you hired.
AI may be reshaping the software world, but, with the right tools and mindset, junior developers can thrive.

The post Junior developers aren’t obsolete: Here’s how to thrive in the age of AI appeared first on The GitHub Blog.
]]>The post Automate your project with GitHub Models in Actions appeared first on The GitHub Blog.
]]>GitHub Models brings AI into your GitHub Actions workflows, helping you automate triage, summarize, and more — right where your project lives.
Let’s explore three ways to integrate and automate the use of GitHub Models in GitHub Actions workflows, from the most straightforward to the most powerful.
But first: Add the right permissions
Before you can use GitHub Models in your Actions workflows, you need to grant your workflow access to AI models. Without the correct permissions, any step that tries to call an AI model will fail.
Giving permissions to use GitHub Models is one line in your permissions block:
permissions:
  contents: read
  issues: write
  models: read
These permissions will give your workflow the ability to read repository content; to read, create, or update issues and comments; and, most importantly for this tutorial, to enable access to GitHub Models.
Example one: Request more information in bug reports
This example will show you how to use the AI inference action and how to use AI to create branching logic. You can find the full workflow in this repo.
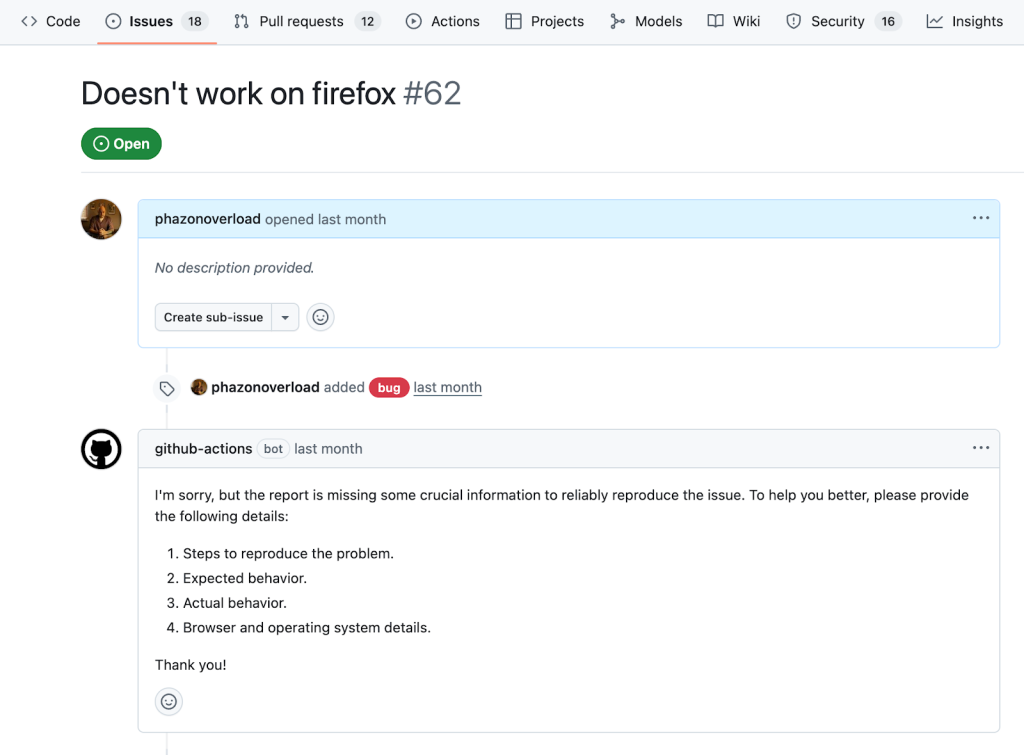
One of the most time-consuming and menial parts of our work as developers is triaging new issues that often contain too little information to reproduce.
Instead of having to spend time assessing and responding to these issues, you can use the AI inference action lets you call leading AI models to analyze or generate text as part of your workflow. The workflow below, for example, will automatically check if new bug reports have enough information to be actionable, and respond if they’re not.
To set up the workflow, create a new file in your repository’s .github/workflows directory called bug-reproduction-instructions.yml (create the directory if it doesn’t exist). It will trigger whenever a new issue is opened and then fetch the issue’s title and body for future steps.
name: Bug Report Reproduction Check

on:
  issues:
    types: [opened]

permissions:
  contents: read
  issues: write
  models: read

jobs:
  reproduction-steps-check:
    runs-on: ubuntu-latest
    steps:
      - name: Fetch Issue
        id: issue
        uses: actions/github-script@v7
        with:
          script: |
            const issue = await github.rest.issues.get({
              owner: context.repo.owner,
              repo: context.repo.repo,
              issue_number: context.issue.number
            })
            core.setOutput('title', issue.data.title)
            core.setOutput('body', issue.data.body)
Now that your workflow has the necessary context, create a new step. This step should only execute if the issue is tagged with a bug label. This step will use the AI inference action, configured with a system prompt that outlines the characteristics of effective reproduction instructions, and provide the value from the issue.
- name: Analyze Issue For Reproduction
  if: contains(join(github.event.issue.labels.*.name, ','), 'bug')
  id: analyze-issue
  uses: actions/ai-inference@v1
  with:
  model: mistral-ai/ministral-3b
  system-prompt: |
    Given a bug report title and text for an application, return 'pass' if there is enough information to reliably reproduce the issue, meaning the report clearly describes the steps to reproduce the problem, specifies the expected and actual behavior, and includes environment details such as browser and operating system; if any of these elements are missing or unclear, return a brief description of what is missing in a friendly response to the author instead of 'pass'. Consider the following title and body:
  prompt: |
    Title: ${{ steps.issue.outputs.title }}
    Body: ${{ steps.issue.outputs.body }}
This step will either return a pass if there is enough information provided (more on why we’re doing this in a moment), or return a response detailing what is missing.
You can use over 40 AI models available in the GitHub Models catalog. Just swap out the model value with the identifier on each model’s page.
Next, add one final step, which will post the comment only if the value returned was not pass.
- name: Comment On Issue
  if: contains(join(github.event.issue.labels.*.name, ','), 'bug') && steps.analyze-issue.outputs.response != 'pass'
  uses: actions/github-script@v7
  env:
    AI_RESPONSE: steps.analyze-issue.outputs.response
    with:
      script: |
        await github.rest.issues.createComment({
          owner: context.repo.owner,
          repo: context.repo.repo,
          issue_number: context.issue.number,
          body: process.env.AI_RESPONSE
        })
By prompting the AI model to return a fixed string if certain criteria are met (in this case, a good bug report was filed with enough reproduction information), we can create AI-powered conditional logic in our workflows.
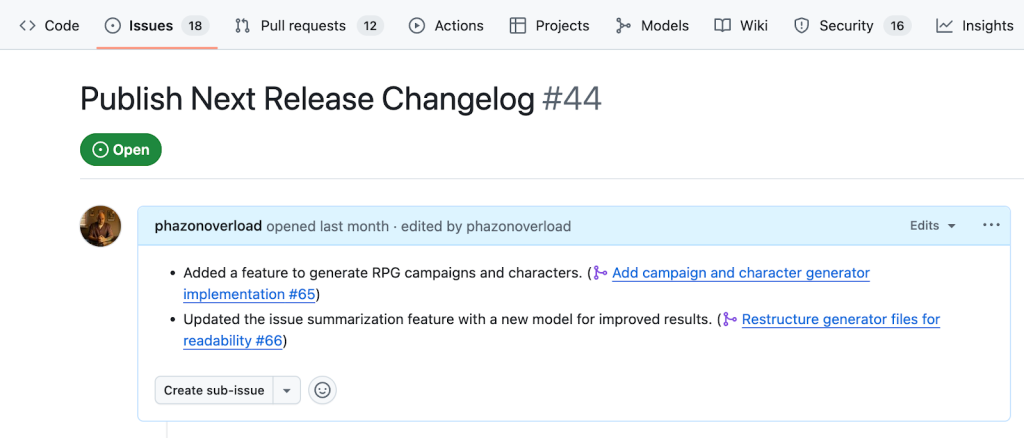
Example two: Creating release notes from merged pull requests
This example will show you how to use the gh CLI with the gh-models extension. You can find the full workflow in this repo.
Generating thorough release notes with new versions of a project can take time, between collating what’s changed and finding a succinct way to explain it to users.
But you can actually trigger GitHub Actions workflow steps when pull requests are merged and use the GitHub CLI to gather information and take action, including calling models. The workflow below, for example, will summarize merged pull requests and add them to a release notes issue — showing how you can save time and energy with each pull request.
To set up this workflow, create a new label called release, and create one issue with this label called Publish next release changelog. Then, create a new file in your repository’s .github/workflows directory called release-notes.yml. It will trigger whenever a new pull request is closed, and its single job conditionally will run only if its merged status is true.
name: Add to Changelog

on:
  pull_request:
    types:
      - closed

permissions:
  pull-requests: read
  issues: write
  contents: read
  models: read

jobs:
  add_to_changelog:
    if: github.event.pull_request.merged == true
    runs-on: ubuntu-latest
    steps:
      - name: Checkout repository
        uses: actions/checkout@v4
Install the gh-models extension with a new step, providing your workflow’s token which now has permissions to use GitHub Models:
- name: Install gh-models extension
  run: gh extension install https://github.com/github/gh-models
  env:
    GH_TOKEN: ${{ secrets.GITHUB_TOKEN }}
The rest of the steps will take place in one step:
- name: Summarize pull request and append to release issue
  env:
    GH_TOKEN: ${{ secrets.GITHUB_TOKEN }}
  run: |-
    PR_NUMBER="${{ github.event.pull_request.number }}"

    # Fetch PR and save to a file
    gh pr view "$PR_NUMBER" --json title,body,comments,reviews > pr.json

    # Generate a summary using the model by reading from file
    cat pr.json | gh models run xai/grok-3-mini \
      "Given the following pull request information, generate a single, clear, and concise one-line changelog entry that summarizes the main change (feature, fix, or bug) introduced by this PR. Use neutral, user-facing language and avoid technical jargon or internal references. Only write the line, with no additional introduction or explanation text." > summary.md

    # Fetch release issue number
    RELEASE_ISSUE=$(gh issue list --label release --limit 1 --json number --jq '.[0].number')

    # Fetch current release issue body
    RELEASE_ISSUE_BODY=$(gh issue view "$RELEASE_ISSUE" --json body --jq '.body')

    # Append summary to release issue body
    FORMATTED_LINE="- $(cat summary.md) (#$PR_NUMBER)"
    NEW_BODY="${RELEASE_ISSUE_BODY}"$'\n'"$FORMATTED_LINE"

    # Update the release issue with the new body
    gh issue edit "$RELEASE_ISSUE" --body "$NEW_BODY"
The pull request’s title, body, comments, and reviews are grabbed and passed to a model using the gh models run command. The release issue is fetched and updated with the summarized line.
Example three: Summarizing and prioritizing issues
This example demonstrates how to use the GitHub CLI with the gh-models extension and a prompt file to automate a more complex, scheduled workflow. Review the full workflow file and prompt file.
It’s easy to lose track of new activity, especially as your project grows. And even then, actually keeping track of repeated issues and themes requires a surprising amount of time. To open a weekly issue to summarize, thematize, and prioritize newly opened issues, you can trigger GitHub Actions on a schedule.
To set up the workflow, create a new file in your repository’s .github/workflows directory called weekly-issue-summary.yml. It will trigger every Monday at 9 a.m.
name: Weekly Issue Summary

on:
  workflow_dispatch:
  schedule:
    - cron: '0 9 * * 1'

permissions:
  issues: write
  contents: read
  models: read

jobs:
  create_weekly_summary:
    runs-on: ubuntu-latest
    steps:
      - name: Checkout repository
        uses: actions/checkout@v4

      - name: Install gh-models extension
        run: gh extension install https://github.com/github/gh-models
        env:
          GH_TOKEN: ${{ github.token }}
Create a new step to get open issues from the last week and save them to a file:
 - name: Get issues from the past week and summarize
  id: get_issues
    run: |-
      LAST_WEEK=$(date -d "7 days ago" +"%Y-%m-%d")
      gh search issues "created:>$LAST_WEEK" --state=open --json title,body,url --repo ${{ github.repository }} > issues.json

      # further code will go here
    env:
      GH_TOKEN: ${{ github.token }}
Pass in the week’s worth of issues to a gh models run call:
cat issues.json | gh models run --file prompts/issue-summary.prompt.yml > summary.mdUnlike the previous example, a separate prompt file is being used by this command. Create a prompts directory in your repository and, within it, a issue-summary.prompt.yml file:
name: Issue summarizer
description: Summarizes weekly issues
model: openai/gpt-4.1
messages:
  - role: system
    content: You are a helpful issue summarizer. When given issue content, respond in markdown format.
  - role: user
    content: "Please summarize the following issues into a few short bullet points. Include links if provided. If possible, pull out general themes and help the team prioritize based on impact. Issues begin here:\n {{input}}"
This file contains all of the required information: the model, the system and user prompts, and, optionally, parameters used to tune your response. By using a .prompt.yml file, you can also leverage the GitHub Models’ repository integration to iterate on the prompt with a rich UI.
Back in the workflow file, straight under the gh models run command, create the issue with the summary:
ISSUE_TITLE="Issue Summary - $(date -d '7 days ago' '+%B %d') to $(date '+%B %d')"
gh issue create --title "$ISSUE_TITLE" --label summary --body-file summary.md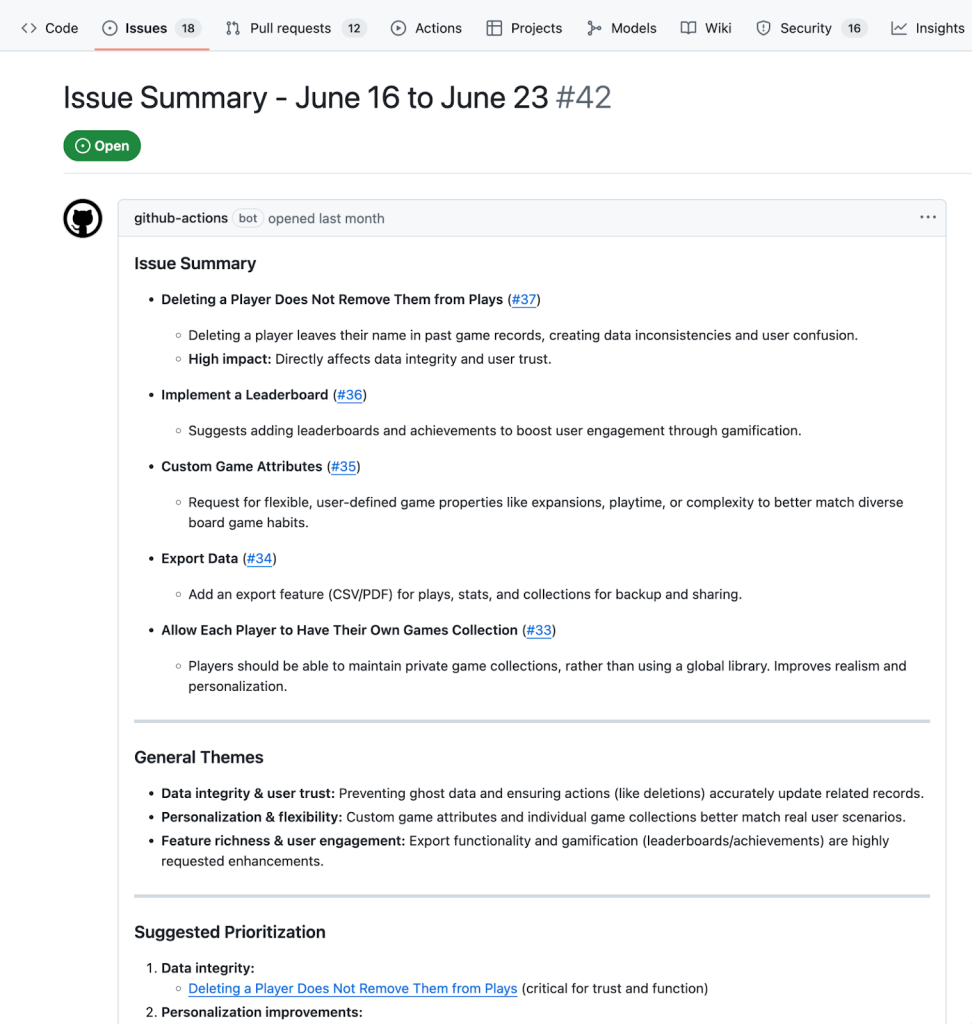
Whether you start simple with the AI inference action, use the gh-models CLI with inline prompts, or create full-featured, prompt-driven workflows, GitHub Models makes it easy to scale your processes with AI.
Just add the right permissions, pick an example above, and try out GitHub Models in your next workflow.
The post Automate your project with GitHub Models in Actions appeared first on The GitHub Blog.
]]>The post A practical guide on how to use the GitHub MCP server appeared first on The GitHub Blog.
]]>Running the Model Context Protocol (MCP) server locally works, but managing Docker, rotating access tokens, and pulling updates is a hassle. GitHub’s managed MCP endpoint eliminates these infrastructure headaches, letting you focus on what you love — shipping code.
In this 201-level tutorial, we’ll walk through upgrading from the local MCP setup to GitHub’s managed endpoint. You’ll get OAuth authentication, automatic updates, and access to toolsets that open the door to richer AI workflows you simply can’t pull off with a bare‑bones local runtime.
You’ll also learn how to customize tool access with read-only modes, streamline your AI workflows with dynamic toolsets, and get ready for agent-to-agent collaboration using GitHub Copilot.
But first, why switch to our hosted server?
Running the open source MCP server locally works, but it carries hidden costs. Here’s what changes when you go remote:
| Local Docker server | Hosted MCP endpoint |
|---|---|
| Maintain a Docker image, upgrade manually | GitHub patches and upgrades automatically |
| Manage personal‑access tokens (PATs) | Sign in once with OAuth; scopes handled for you |
| Expose the server on localhost only | Reachable from any IDE or remote‑dev box |
| Full write access unless you customise the binary | Built-in read‑only switch and per‑toolset flags |
If you need an air‑gapped environment, stick with local. For most teams, the hosted server eliminates infrastructure work and lets you focus on automation. With that, let’s dive in.
A few things you need before you get started:
- GitHub Copilot or Copilot Enterprise seat
- VS Code 1.92+ (or another MCP‑capable client)
- Network access to
https://api.githubcopilot.com - A test repository to experiment with
Step 1: Install the remote MCP server
Setting up GitHub’s remote MCP server server is a breeze compared to local Docker-based installations. Hosted by GitHub, it eliminates the need for managing Docker containers or manually handling updates, offering a streamlined, cloud-native experience.
How to install the remote server on VS Code or VS Code Insiders:
- Open the command palette and run:
> GitHub MCP: Install Remote Server - Complete the OAuth flow to connect your GitHub account.
- Restart the server to finish setup.
For any other client
Set the server URL to: https://api.githubcopilot.com/mcp/
Then authenticate when prompted.
Validate your connection with a quick check
curl -I https://api.githubcopilot.com/mcp/_ping
# HTTP/1.1 200 OK
If you see 200 OK, you’re good to go.
Once installed, the remote server replaces the local one, and you’re ready to roll. That means no more Docker or tokens, just a simple integration.
Step 2: Configure access controls
Use read-only mode for safe exploration.
Working in a sensitive environment? Testing in production? Demoing to stakeholders? Flip the server to read-only mode:
{
  "servers": {
    "github": {
      "type": "http",
      "url": "https://api.githubcopilot.com/mcp/",
      "headers": {
        "X-MCP-Readonly": "true"
      }
    }
  }
}
The agent can read issues, pull requests, and code but can’t push changes. Perfect for code reviews where you want context without risk.
Use case: Pull request viewer
Need to review pull requests without modifying anything? This setup gives you safe, read-only access — perfect for browsing changes, leaving comments, or gathering context without risk of altering code.
- Go to the GitHub MCP server repo.
- Navigate to the “Remote Server” section.
- Choose the pull request read-only variant.
- Click Install Read Only.
You’ll now see tools like listPullRequests, getPullRequest, and searchPullRequests, but no write access. And since these tools don’t make changes, VS Code skips the permission prompts for a seamless experience.
Step 3: Try it out with these three hands-on examples
Want to see how Copilot agent mode works in practice? These real-world examples show how the agent can handle everyday developer tasks — like managing pull requests, debugging workflows, and triaging security alerts — without needing local setup or manual digging. Just prompt and go.
Example 1: Add a CODEOWNERS file and open a pull request
- Open your repo ➜ Ask Copilot Agent.
- Prompt your agent:
"Add a CODEOWNERS file for /api/** assigning @backend-team, then open a draft pull request." - The agent will:
- Use
repos.create_fileto add the CODEOWNERS file. - Call
pull_requests.opento create the pull request. - Execute
pull_requests.request_reviewersto assign reviewers.
No local cloning, no manual file creation. Just prompt and ship.
Example 2: Debug a failed workflow
Prompt: “Why did the release.yml job fail last night?”
The agent pulls logs with actions.get_workflow_run_logs, analyzes the stack trace, and suggests fixes. It’s like having a senior engineer review your CI/CD failures.
Example 3: Triage security alerts
Prompt: “List critical Dependabot alerts across all my repos and create issues for each.”
The server returns alerts via dependabot.list_dependabot_alerts, then the agent creates focused issues only where needed.
Step 4: Troubleshooting tips with the GitHub remote MCP server
| Symptom | Likely cause | Fix |
|---|---|---|
| 401 Unauthorized on install | Left‑over GITHUB_TOKEN env var | Unset the var and rerun OAuth flow |
| Tools don’t appear | Corporate proxy blocks api.githubcopilot.com | Add proxy settings or allowlist the domain |
| Model times out | Large toolset enabled | Restrict to needed toolsets only |
Step 5: What’s next with security and agentic workflows
The GitHub MCP server is actively evolving. Here’s what’s coming next:
Secret scanning in MCP
Soon, the MCP server will detect and block AI-generated secrets, just like GitHub prevents you from pushing secrets in pull requests. You can override if needed, but the default protects your data, whether from a prompt injection or by accident.
Assign issues to Copilot
Direct integration with Copilot’s coding agent means you’ll be able to:
- Assign issues directly to Copilot.
- Trigger completions from VS Code.
- Watch as agent-to-agent workflows unfold across tools.
The future is agents collaborating with agents, and GitHub MCP is the foundation.
Want to contribute?
The GitHub MCP project is fully open source and growing fast.
📌 Explore the repo: See how tools are built and contribute your own.
📌 File issues: Help shape the protocol and tooling.
📌 Join discussions: Connect with other builders on GitHub and Discord.
Whether you’re building tools, providing feedback, or exploring AI-powered development, there’s a place for you in the MCP ecosystem.
Ready to Ship?
The GitHub remote MCP server removes infrastructure overhead so you can focus on building better automations. No more Docker babysitting, no more token rotation, just OAuth once and start shipping.
Remember: the best infrastructure is the infrastructure you don’t have to manage.
Read the full documentation to get started, or dive into the examples above and start experimenting today.
Read our guide to building secure and scalable remote MCP servers >
The post A practical guide on how to use the GitHub MCP server appeared first on The GitHub Blog.
]]>The post How to build secure and scalable remote MCP servers appeared first on The GitHub Blog.
]]>Model Context Protocol (MCP) enables AI agents to connect to external tools and data sources without having to implement API-specific connectors. Whether you’re extracting key data from invoices, summarizing support tickets, or searching for code snippets across a large codebase, MCP provides a standardized way to connect LLMs with the context they need.
Below we’ll dig into why security is such a crucial component to MCP usage, especially with a recent specification release, as well as how developers of both MCP clients and MCP servers can build secure integrations from the get-go.
Why security matters for MCP
Unlike traditional APIs that serve known clients in somewhat controlled environments, MCP servers act as bridges between AI agents and an unlimited number of data sources that can include sensitive enterprise resources. So, a security breach won’t just compromise data — it can give malicious actors the ability to manipulate AI behavior and access connected systems.
To help prevent common pitfalls, the MCP specification now includes security guidelines and best practices that address common attack vectors, like confused deputy problems, token passthrough vulnerabilities, and session hijacking. Following these patterns from the start can help you build systems that can handle sensitive tools and data.
Understanding the MCP authorization
The MCP specification uses OAuth 2.1 for secure authorization. This allows MCP, at the protocol level, to take advantage of many modern security capabilities, including:
- Authorization server discovery: MCP servers implement OAuth 2.0 Protected Resource Metadata (PRM) (RFC 9728) to advertise the authorization servers that they support. When a client attempts to access a protected MCP server, the server will respond with a
HTTP 401 Unauthorizedand include aWWW-Authenticateheader pointing to the metadata endpoint. - Dynamic client registration: This is automatic client registration using OAuth 2.0 Dynamic Client Registration Protocol (RFC 7591). This removes the need for manual client setup when AI agents connect to MCP servers dynamically.
- Resource indicators: The specification also mandates RFC 8707 Resource Indicators, ensuring that tokens are bound to specific MCP servers. This prevents token reuse attacks and helps maintain clear security boundaries.
Even with the latest changes to authorization specs, like the clean split between the responsibilities of the authorization server and the resource server, developers don’t need to worry about implementing security infrastructure from scratch. (Because the requirement to follow the OAuth2.1 conventions didn’t change.) So developers can just use off-the-shelf authorization servers and identity providers.
Because MCP requires implementers to snap to OAuth 2.1 as the default approach to authorization, this also means that developers can use existing OAuth libraries to build the authorization capabilities into their MCP servers without anything super-custom. This is a massive time and effort saver.
The complete authorization flow
When it comes to connecting to protected MCP servers, a MCP client will need to somehow find out what credentials the server needs. Luckily, because of the aforementioned discovery mechanism, this is a relatively straightforward flow:
- Discovery phase. MCP client attempts to access MCP server without credentials (that is a token).
- Server response. MCP server returns a
HTTP 401 Unauthorizedresponse with a metadata URL in theWWW-Authenticateheader. - Metadata retrieval. MCP client fetches Protected Resource Metadata, parses it, and then gets the authorization server endpoints.
- Client registration. MCP client automatically registers with authorization server (if supported). Some clients may be pre-registered.
- Authorization request. MCP client initiates OAuth flow with Proof Key for Code Exchange (PKCE) and the
resourceparameter. - User consent. The user authorizes access through the authorization server.
- Token exchange. MCP client exchanges authorization code for access token.
- Authenticated requests. All subsequent requests from MCP client to MCP server include
Bearertoken.
Nothing in the flow here is MCP-specific, and that’s the beauty of MCP snapping to a common industry standard. There’s no need to reinvent the wheel because a robust solution already exists.
Implementing authorization in MCP
Most OAuth providers work well for MCP server authorization without any additional configuration, though one of the more challenging gaps today is the availability of Dynamic Client Registration. However, support for that feature is slowly rolling out across the identity ecosystem, and we expect it to be more common as MCP gains traction.
Aside from the authorization server, when implementing authorization for your MCP server, you will need to consider several key components and behaviors:
- PRM endpoint. The MCP server must implement the
/.well-known/oauth-protected-resourceendpoint to advertise supported authorization server scopes. The MCP TypeScript SDK already integrates this capability natively, with other MCP SDK support coming very soon. - Token validation middleware. You need to make sure that your MCP server is only accepting tokens meant for it. Many open source solutions, like PyJWT, can help you here by:
- Extracting Bearer tokens from Authorization headers
- Validating token signatures using your OAuth provider’s JSON Web Key Sets (JWKS) endpoint
- Checking token expiration and audience claims
- Ensuring tokens were issued specifically for your MCP server (this part is critical for the security of your infrastructure)
- Error handling. Your MCP server will need to return proper HTTP status codes (
HTTP 401 Unauthorizedfor missing/invalid tokens,HTTP 403 Forbiddenfor insufficient permissions) with appropriateWWW-Authenticateheaders.
Anthropic, together with the broader MCP community, is working on integrating a lot of these capabilities directly into the MCP SDKs, removing the need to implement many of the requirements from scratch. For MCP server developers, this will be the recommended path when it comes to building implementations that conform to the MCP specification and will be able to work with any MCP client out there.
Handling multi-user scenarios
Multi-tenancy in MCP servers introduces unique security challenges that go beyond simple authorization and token validation. When your MCP server handles requests from multiple users — each with their own identities, permissions, and data — you must enforce strict boundaries to prevent unauthorized access and data leakage. This is a classic “confused deputy” problem, where a legitimate user could inadvertently trick the MCP server into accessing resources they shouldn’t.
OAuth tokens are the foundation for securely identifying users. They often contain the necessary user information embedded within their claims (like the sub claim for user ID), but this data must be rigorously validated, and not blindly trusted.
As mentioned earlier in the blog post, your MCP server is responsible for:
- Extracting and validating user identity. After validating the token’s signature and expiration, it can extract the user identifier from the claims.
- Enforcing authorization policies. Map the user identifier to an internal user profile to determine their specific permissions. Just because a user is authenticated doesn’t mean they are authorized to perform every action or access every piece of data that the MCP server makes available.
- Ensure correct token audience: Double-check that the token was issued specifically for your MCP server by validating the audience (e.g., in a JSON Web Token this can be the
audclaim). This prevents a token obtained for one MCP server from being used to access another.
With the user’s identity and permissions established, data isolation becomes the next critical layer of defense. Every database query, downstream API request, cache lookup, and log entry must be scoped to the current user. Failure to do so can lead to one user’s data being accidentally exposed to another. Adhering to the principle of least privilege — where a user can only access the data and perform the actions strictly necessary for their tasks — is paramount.
As with other security-sensitive operations, we strongly recommend you use existing, well-tested libraries and frameworks for handling user sessions and data scoping rather than implementing your own from scratch.
Scaling with AI gateways
As your MCP server gains visibility and adoption, raw performance and basic authorization capabilities won’t be enough. You’ll face challenges like traffic spikes from AI agents making rapid-fire requests, the need to transform between different protocol versions as clients evolve at different speeds, and the complexity of managing security policies consistently across multiple server instances.
An AI gateway, similar to what you might’ve seen with API gateways before, sits between your MCP client and MCP server, acting as both a shield and a traffic director. It handles the mundane but critical tasks that would otherwise clutter your business logic, such as rate limiting aggressive clients, validating JWT tokens before they reach your servers, and adding security headers that protect against common web vulnerabilities.
AI gateway configuration for MCP servers
The great thing about using an AI gateway lies in centralizing cross-cutting concerns. Rather than implementing rate limiting in every MCP server instance, you configure it once at the gateway level. The same applies to JWT validation. Let the gateway handle token verification against your OAuth provider’s requirements, then forward only validated requests with clean user context to your MCP server. This separation of concerns makes maintainability and diagnostics much easier, as you don’t need to worry about spaghetti code mixing responsibilities in one MCP server implementation.
Consider implementing these essential policies:
- Rate limiting to prevent resource exhaustion from runaway AI agents
- Request/response transformation to handle protocol evolution gracefully
- Caching for expensive operations that don’t change frequently
- Circuit breakers that fail fast when downstream services are struggling
The AI gateway also becomes your first line of defense for CORS handling and automatic security header injections.
Production-ready patterns
With the basics out of the way, you’re probably wondering what special considerations you need to keep in mind when deploying MCP servers to production. This section is all about best practices that we recommend you adopt to build secure and scalable MCP infrastructure.
Better secrets management
We cannot not talk about secrets. Chances are that your MCP server needs to handle its own collection of secrets to talk to many different services, databases, or APIs that are out of direct reach of the MCP server consumers. You wouldn’t want someone to be able to have direct access to the credentials stored on the MCP server to talk to your internal APIs, for example.
Knowing this, secrets in MCP servers present a unique challenge: They’re needed frequently for things like OAuth validation, external API calls, and database connections, which makes them prime targets for attackers. Compromising a MCP server often means gaining access to a wide array of downstream systems. Robust secrets management is a non-negotiable requirement for anything with Internet access.
What we often see is that developers default to very basic implementations that are just enough to get things working, usually based on environment variables. While these are convenient for local development, they are a security anti-pattern in production. Environment variables are difficult to rotate, often leak into logs or build artifacts, and provide a static target for attackers.
The modern approach is to move secrets out of your application’s configuration and into a dedicated secrets management service like Azure Key Vault, AWS Secrets Manager, or HashiCorp Vault. These services provide encrypted storage, fine-grained access control, detailed audit trails, and centralized management.
But the most secure way to access these vaults is by eliminating the “bootstrap secret” problem altogether using workload identities (you might’ve heard the term “secretless” or “keyless”). Different providers might have a different term or implementation of it, but the gist is that instead of storing a credential to access the vault, your application is assigned a secure identity by the cloud platform itself. This identity can then be granted specific, limited permissions (e.g., “read-only access to the database credential“) in the secrets vault. Your MCP server authenticates using this identity, retrieves the secrets it needs at runtime, and never has to handle long-lived credentials in its own configuration.
This architecture enables you to treat secrets as dynamic, short-lived resources rather than static configuration. You can implement startup validation to fail fast when required secrets are missing and builtin runtime secret rotation capabilities. All your static secrets, such as API keys, can be easily and quickly refreshed without server downtime, dramatically reducing the window of opportunity for an attacker.
Finally, the principle of least privilege is critical at scale. Each instance of your MCP server should only have access to the secrets it absolutely needs for its specific tasks. This compartmentalization limits the blast radius of any single compromised instance, containing the potential damage.
Observability and monitoring
Building scalable and secure MCP servers implies that you have full visibility into their operations. That means that you need effective observability, having full access to a combination of logs, metrics, and traces.
Structured logging forms the foundation. The key is consistency across request boundaries. When an AI agent makes a complex request that triggers multiple tool calls or external API interactions, a unique correlation ID should be attached to every log entry. This lets you trace the entire journey through your logs, from the initial request to the final response.
Beyond basic logs, distributed tracing provides a detailed, hop-by-hop view of a request’s lifecycle. Using standards like OpenTelemetry, you can visualize how a request flows through your MCP server and any downstream services it calls. This is invaluable for pinpointing performance bottlenecks, like if a specific tool invocation is taking too long.
Security event logging deserves special attention in MCP servers because they’re high-value targets. Every authentication attempt, authorization failure, and unusual access pattern should be captured with enough context for future forensic analysis. This isn’t just compliance theater; it’s your early warning system for attacks in progress.
In turn, metrics collection should focus on the signals that matter: request latency (because AI agents have short attention spans), error rates (especially for authentication and authorization), and resource utilization. You should also implement a dedicated health endpoint that provides a simple up/down status, allowing load balancers and orchestration systems to automatically manage server instances.
Finally, all this data is useless without alerting and visualization. Set up automated alerts to notify you when key metrics cross critical thresholds (e.g., a sudden spike in HTTP 500 errors). Create dashboards that provide an at-a-glance view of your MCP server’s health, performance, and security posture. The goal is to gain end-to-end visibility that helps you detect and diagnose emerging issues before they impact users at scale.
Take this with you
Building secure and scalable MCP servers requires attention to authentication, authorization, and deployment architecture. The patterns in this guide will give you a head start in creating reliable MCP servers that can handle sensitive tools and data.
When building on top of a fast-paced technology like MCP, it’s key that you start with security as a foundation, not an afterthought. The MCP specification provides basic security primitives, and modern cloud platforms provide the infrastructure to scale them.
Want to dive deeper? Check out the MCP authorization specification and recommended security best practices for complete technical details.
Want to dive deeper? Check out the MCP authorization specification and recommended security best practices for complete technical details.
The post How to build secure and scalable remote MCP servers appeared first on The GitHub Blog.
]]>The post Code review in the age of AI: Why developers will always own the merge button appeared first on The GitHub Blog.
]]>When GitHub first shipped the pull request (PR) back in 2008, it wrapped a plain-text diff in a social workflow: comments, approvals, and a merge button that crucially refused to light up without at least one thumbs up from another developer. That design decision hard-wired accountability into modern software and let maintainers scale far beyond hallway conversations or e-mail patches.
Seventeen years later, just about every “agentic” coding tool, from research demos to enterprise platforms, still funnels its work through that same merge gate. The PR remains the audit log, the governance layer, and the social contract that says nothing ships until a person is willing to own it.
Now that large language models (LLM) can scaffold projects, file PRs, and even reply to review comments they wrote themselves, the obvious next question is, who is accountable for code that ships when part of it comes from a model?
At GitHub, we think the answer hasn’t fundamentally changed: it’s the developer who hits “Merge.” But what has changed is everything that happens before that click.
In this article, we’ll explore how we’re re-thinking code reviews for a world where developers increasingly work with AI (and how your team can, too).
What we learned from GitHub Copilot’s code review capabilities
Earlier this year, the GitHub Copilot code review team conducted in-depth interviews with developers about their code review process. They also walked us through their code review workflow. These interviews revealed three consistent patterns:
- No special treatment for AI: Reviewers grilled model-generated diffs as hard as those from other developers.
- Self reviews raised the floor: Developers who ran a Copilot review before opening a PR often wiped out an entire class of trivial nit-picks (i.e., trimmed imports, missing tests), cutting out back-and-forth by roughly a third.
- AI was no replacement for human judgement: Programming often involves trade-offs. LLMs can inform you about those trade-offs, but someone has to make the call about what path to take based on your organization’s goals and standards.
An overarching principle quickly became clear: AI augments developer judgment; it can’t replace it. And our findings, from confidence scores to red-flag explanations, are informing how we’re building Copilot’s code review features.
What AI can (and can’t) handle today
LLMs are already great at the “grind” layer of a review:
- Mechanical scanning. “Is there a typo?” “Are all arguments used?”
- Pattern matching. “This looks like SQL injection” or “You forgot to await that promise.”
- Pedantic consistency. “Variable names snake_case here, camelCase there.”
Soon they’ll be able to do even more, such as understand product and domain context. But they still fall short on:
- Architecture and trade-offs. Should we split this service? Cache locally?
- Mentorship. Explaining why a pattern matters and when to break it.
- Values. Should we build this feature at all?
Those gaps keep developers in the loop and in the pilot’s seat. That principle is foundational for us as we continue to develop GitHub Copilot.
A playbook for modern code reviews
The most effective approach to AI-assisted code reviews starts before you even submit your pull request. Think of it as the golden rule of development: Treat code reviewers the way you’d like them to treat you.
Use AI to self review your code in your IDE
Before pushing your code, run GitHub Copilot code review in your IDE to catch the obvious stuff so your teammates can focus on the nuanced issues that require developer insight. Copilot code review can comb your staged diff, suggest docstrings, and flag null dereferences. From there, you can fix everything it finds before you submit your PR so teammates never see the noise.
Take ownership of your code
Just because you used AI to generate code doesn’t mean it’s not your code. Once you commit code, you’re responsible for it. That means understanding what it does, ensuring it follows your team’s standards, and making sure it integrates well with the rest of your codebase.
If an AI agent writes code, it’s on me to clean it up before my name shows up in git blame.
Jon Wiggins, Machine Learning Engineer at Respondology
Run your code through automated CI gates
Your pipeline should already be running unit tests, secret scanning, CodeQL, dependency checks, style linters. Keep doing that. Fail fast, fail loudly.
Practical tips for personal code hygiene:
- Review your own code in your IDE.
- Ensure variable names, comments, and structure to match your team’s conventions.
- Test AI-generated code thoroughly before including it in pull requests.
Use AI to focus on the areas where your judgement is critical
The real power of AI in code reviews isn’t in replacing developers as the reviewers. It’s in handling the routine work that can bog down the review process, freeing developers to focus where their judgment is most valuable.
AI doesn’t replace your existing automated checks.
Make sure tests pass, coverage metrics are met, and static analysis tools have done their work before developer reviews begin. This creates a solid foundation for more meaningful discussion.
You can use an LLM to catch not just syntax issues, but also patterns, potential bugs, and style inconsistencies. Ironically, LLMs are particularly good at catching the sorts of mistakes that LLMs make, which is increasingly relevant as more AI-generated code enters our codebases.
Clearly define roles
Set clear expectations about when AI feedback should be considered versus when human judgment takes precedence. For example, you should rely on other developers for code architecture and consistency with business goals and organizational values. It’s especially useful to use AI to review long repetitive PRs where it can be easy to miss little things.
Implementation tips for building a sustainable AI-assisted review process
- Document clear guidelines that specify when to use AI in code reviews, what types of feedback to trust, and how to escalate when developers disagree with an AI code review. With GitHub Copilot, for instance, you can use custom instructions to set clear rules for how Copilot engages with your code.
- Update guidelines regularly based on team feedback and evolving AI capabilities. Remember that as your codebase and AI tools evolve, what works today might not work tomorrow.
- Encourage open team discussions about the strengths and limitations of AI-assisted reviews. Share both positive and negative experiences to help everyone learn and improve their approach.
- Refine automation continuously by using feedback from reviewers to improve your automated testing strategy. Identify patterns where solutions to recurring issues could be automated.
Developer judgement remains crucial
While AI can handle much of the routine work in code reviews, developer judgment remains irreplaceable for architectural decisions, mentoring and knowledge transfer, and context-specific decisions that require understanding of your product and users.
And even as LLMs get smarter, three review tasks remain stubbornly human:
- Architecture trade-offs: Should we split this service? Cache locally? Pay tech debt now or later?
- Mentorship and culture: PR threads are team classrooms. A bot can’t tell a junior engineer the war story behind that odd regex.
- Ethics and product values: “Should we even build this?” is a question AI can’t answer.
The goal is to make developers more effective by letting them focus on what they do best.
Learn more about code reviews with GitHub Copilot >
The post Code review in the age of AI: Why developers will always own the merge button appeared first on The GitHub Blog.
]]>The post A guide to deciding what AI model to use in GitHub Copilot appeared first on The GitHub Blog.
]]>To ensure that you have access to the best technology available, we’re continuously adding support for new models to GitHub Copilot. That being said, we know it can be hard to keep up with so many new models being released all the time.
All of this raises an obvious question: Which model should you use?
You can read our recent blog post for an overview of the models currently available in Copilot and their strengths, or check out our documentation for a deep dive comparing different models and tasks. But the AI landscape moves quickly. In this article we’ll explore a framework—including a few strategies—for evaluating whether any given AI model is a good fit for your use, even as new models continue to appear at a rapid pace.
It’s hard to go wrong with our base model, which has been fine-tuned specifically for programming-related tasks. But depending on what you’re working on, you likely have varying needs and preferences. There’s no single “best” model. Some may favor a more verbose model for chat, while others prefer a terse one, for example.
We spoke with several developers about their model selection process. Keep reading to discover how to apply their strategies to your own needs.
💡 Watch the video below for tips on prompt engineering to get the best results.
Why use multiple models?
There’s no reason you have to pick one model and stick with it. Since you can easily switch between models for both chat and code completion with GitHub Copilot, you can use different models for different use cases.
It's kind of like dogfooding your own stack: You won’t know if it really fits your workflow until you've shipped some real code with it.
Chat vs. code completion
Using one model for chat and another for autocomplete is one of the most common patterns we see among developers. Generally, developers prefer autocompletion models because they’re fast and responsive, which they need if they’re looking for suggestions as they think and type. Developers are more tolerant of latency in chat, when they’re in more of an exploratory state of mind (like considering a complex refactoring job, for instance).
Reasoning models for certain programming tasks
Reasoning models like OpenAI o1 often respond slower than traditional LLMs such as GPT-4o or Claude Sonnet 3.5. That’s in large part because these models break a prompt down into parts and consider multiple approaches to a problem. That introduces latency in their response times, but makes them more effective at completing complex tasks. Many developers prefer these more deliberative models for particular tasks.
For instance, Fatih Kadir Akın, a developer relations manager, uses o1 when starting new projects from scratch. “Reasoning models better ‘understand’ my vision and create more structured projects than non-reasoning models,” he explains.
FirstQuadrant CTO and co-founder Anand Chowdhary favors reasoning models for large-scale code refactoring jobs. “A model that rewrites complex backend code without careful reasoning is rarely accurate the first time,” he says. “Seeing the thought process also helps me understand the changes.”
When creating technical interview questions for her newsletter, GitHub Senior Director of Developer Advocacy, Cassidy Williams mixes models for certain tasks. When she writes a question, she uses GPT-4o to refine the prose, and then Claude 3.7 Sonnet Thinking to verify code accuracy. “Reasoning models help ensure technical correctness because of their multi-step process,” she says. “If they initially get something wrong, they often correct themselves in later steps so the final answer is more accurate.”
There’s some subjectivity, but I compare model output based on the code structure, patterns, comments, and adherence to best practices.
What to look for in a new AI model
Let’s say a new model just dropped and you’re ready to try it out. Here are a few things to consider before making it your new go-to.
Recentness
Different models use different training data. That means one model might have more recent data than another, and therefore might be trained on new versions of the programming languages, frameworks, and libraries you use.
“When I’m trying out a new model, one of the first things I do is check how up to date it is,” says Xavier Portilla Edo, a cloud infrastructure engineering lead. He typically does this by creating a project manifest file for the project to see what version numbers Copilot autocomplete suggests. “If the versions are quite old, I’ll move on,” he says.
Speed and responsiveness
As mentioned, developers tend to tolerate more latency in a chat than in autocomplete. But responsiveness is still important in chat. “I enjoy bouncing ideas off a model and getting feedback,” says Rishab Kumar, a staff developer evangelist at Twilio. “For that type of interaction, I need fast responses so I can stay in the flow.”
Accuracy
Naturally, you need to evaluate which models produce the best code. “There’s some subjectivity, but I compare model output based on the code structure, patterns, comments, and adherence to best practices,” Portilla Edo says. “I also look at how readable and maintainable the code is—does it follow naming conventions? Is it modular? Are the comments helpful or just restating what the code does? These are all signals of quality that go beyond whether the code simply runs.”
How to test an AI model in your workflow
OK, so now you know what to look for in a model. But how do you actually evaluate it for responsiveness and correctness? You use it, of course.
Start with a simple app
Akın will generally start with a simple todo app written in vanilla JavaScript. “I just check the code, and how well it’s structured,” he says. Similarly, Kumar will start with a websocket server in Python. The idea is to start with something that you understand well enough to evaluate, and then layer on more complexity. “Eventually I’ll see if it can build something in 3D using 3js,” Akın says.
Portilla Edo starts by prompting a new model he wants to evaluate in Copilot Chat. “I usually ask it for simple things, like a function in Go, or a simple HTML file,” he says. Then he moves on to autocompletion to see how the model performs there.
Use it as a “daily driver” for a while
Chowdhary prefers to just jump in and start using a model. “When a new model drops, I swap it into my workflow as my daily driver and just live with it for a bit,” he says. “Available benchmarks and tests only tell you part of the story. I think the real test is seeing if it actually improves your day to day.”
For example, he checks to see if it actually speeds up his debugging jobs or produces cleaner refactors. “It’s kind of like dogfooding your own stack: You won’t know if it really fits your workflow until you’ve shipped some real code with it,” he says. “After evaluating it for a bit, I decide whether to stick with the new model or revert to my previous choice.”
Take this with you
What just about everyone agrees on is that the best way to evaluate a model is to use it.
The important thing is to keep learning. “You don’t need to be switching models all the time, but it’s important to know what’s going on,” Chowdhary says. “The state of the art is moving quickly. It’s easy to get left behind.”
Additional resources
- Choosing the right AI model for your task
- Examples for AI model comparison
- Which AI models should I use with GitHub Copilot?
The post A guide to deciding what AI model to use in GitHub Copilot appeared first on The GitHub Blog.
]]>The post From prompt to production: Building a landing page with Copilot agent mode appeared first on The GitHub Blog.
]]>GitHub Copilot has quickly become an integral part of how I build. Whether I’m exploring new ideas or scaffolding full pages, using Copilot’s agent mode in my IDE helps me move faster—and more confidently—through each step of the development process.
GitHub Copilot agent mode is an interactive chat experience built right into your IDE that turns Copilot into an active participant in your development workflow. After you give it a prompt, agent mode streamlines complex coding tasks by autonomously iterating on its own code, identifying and fixing errors, suggesting and executing terminal commands, and resolving runtime issues with self-healing capabilities.
And here’s the best part: You can attach images, reference files, and give natural language instructions, and Copilot will generate and modify code directly in your project!
In this post, I’ll walk you through how I built a developer-focused landing page—from product requirements to code—using GitHub Copilot agent mode and the Claude 3.5 Sonnet model. This kind of build could easily take a few hours if I did it all by myself. But with Copilot, I had a working prototype in under 30 minutes! You’ll see how I used design artifacts, inline chat, and Copilot’s awareness of context to go from idea → design → code, with minimal friction.
You can also watch the full build in the video above!
Designing with AI: From PRD to UI
Before I wrote a single line of code, I needed a basic product vision. I started by using GitHub Copilot on GitHub.com to generate a lightweight product requirements document (PRD) using GPT-4o. Here was my prompt:
> “Describe a landing page for developers in simple terms.”
Copilot returned a structured but simple outline of a PRD for a developer-focused landing page. I then passed this PRD into Claude 3.5 Sonnet and asked it to generate a design based on that prompt.
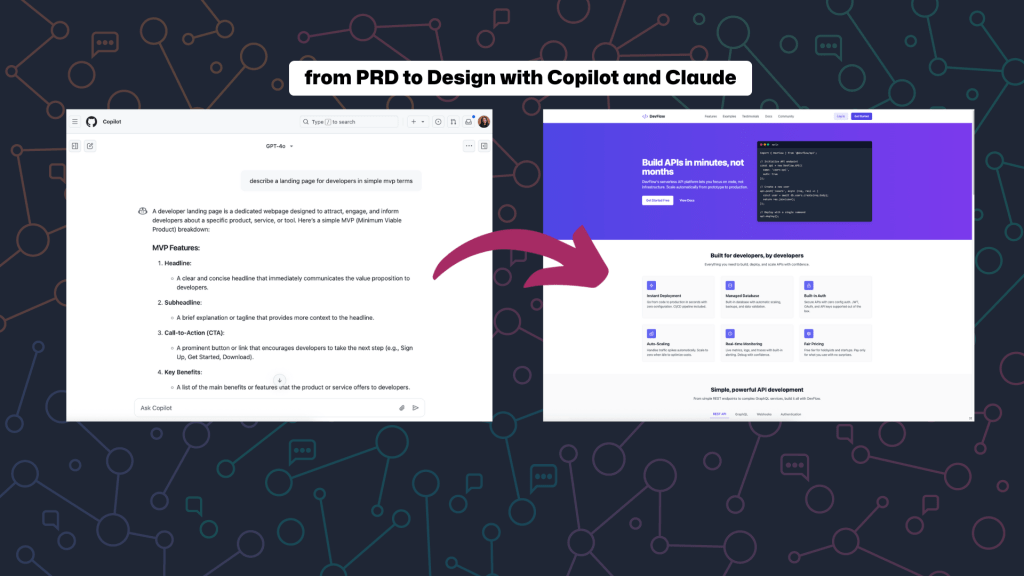
Claude gave me a clean, organized layout with common landing page sections: a hero, feature list, API examples, a dashboard preview, and more. This was more than enough for me to get started.
You can explore the full design that Claude built here; it’s pretty cool.
Setting up the project
For the tech stack, I chose Astro because of its performance and flexibility. I paired it with Tailwind CSS and React for styling and component architecture. I started in a blank directory and ran the following commands:
npm create astro@latest
npx astro add react
npx astro add tailwind
I initialized the project, configured Tailwind, and opened it in VS Code with GitHub Copilot agent mode enabled (learn how to enable it with our docs!). Once the server was running, I was ready to start building.
Building section by section with Copilot agent mode
Copilot agent mode really shines when translating visual designs into production-ready code because it understands both image and code context in your project. By attaching a screenshot and specifying which file to edit, I could prompt it to scaffold new components, update layout structure, and even apply Tailwind styles—all without switching tabs or writing boilerplate manually.
For our project here, this meant I could take screenshots of each section from Claude’s design and drop them directly into Copilot’s context window.
| 💡 Pro tip: When building from a visual design like this, I recommend working on one section at a time. This not only keeps the context manageable for the model, but also makes it easier to debug if something goes off track. You’ll know exactly where to look! |
Creating the hero and navigation section
I opened index.astro, attached the design screenshot, and typed the following prompt:
> “Update index.astro to reflect the attached design. Add a new navbar and hero section to start the landing page.”
Copilot agent mode then returned the following:
- Created
Navbar.astroandHero.astro - Updated
index.astroto render them - Applied Tailwind styling based on the visual layout
And here’s what I got:
Now, this is beautiful! Though it doesn’t have the image on the right per the design, it did a very good job of getting the initial design down. We’ll go back in later to update the section to be exactly what we want.
Commit early and often
| 💡 Pro tip: When building with AI tools, commit early and often. I’ve seen too many folks lose progress when a prompt goes sideways. |
And in case you didn’t know, GitHub Copilot can help here too. After staging your changes in the Source Control panel, click the ✨ sparkles icon to automatically generate a commit message. It’s a small step that can save you a lot of time (and heartache).
Improve accuracy with Copilot custom instructions
One of the best ways to improve the quality of GitHub Copilot’s suggestions—especially in multi-file projects—is by providing it with custom instructions. These are short, structured notes that describe your tech stack, project structure, and any conventions or tools you’re using.
Instead of repeatedly adding this contextual detail to your chat questions, you can create a file in your repository that automatically adds this information for you. The additional information won’t be displayed in the chat, but is available to Copilot—allowing it to generate higher-quality responses.
To give Copilot better context, I created a CopilotInstructions.md file describing my tech stack:
- Astro v5
- Tailwind CSS v4
- React
- TypeScript
When Copilot agent mode referenced this file when making suggestions, I noticed the results became more accurate and aligned with my setup.
Here’s what some of the file looked like:
# GitHub Copilot Project Instructions

## Project Overview
This is an Astro project that uses React components and Tailwind CSS for styling. When making suggestions, please consider the following framework-specific details and conventions.

## Tech Stack
- Astro v5.x
- React as UI library
- Tailwind CSS for styling (v4.x)
- TypeScript for type safety

## Project Structure
```
├── src/
│   ├── components/     # React and Astro components
│   ├── layouts/        # Astro layout components
│   ├── pages/          # Astro pages and routes
│   ├── styles/         # Global styles
│   └── utils/          # Utility functions
├── public/             # Static assets
└── astro.config.mjs    # Astro configuration
```

## Component Conventions

### Astro Components
- Use `.astro` extension
- Follow kebab-case for filenames
- Example structure:

```astro
---
// Imports and props
interface Props {
  title: string;
}

const { title } = Astro.props;
---

<div class="component-wrapper">
  <h1>{title}</h1>
  <slot />
</div>

<style>
  /* Scoped styles if needed */
</style>
```
You can explore the full instructions file in my repo, along with the full code, setup instructions, and a link to the deployed landing page.
Iterating on your designs by prompting Copilot
I then repeated the same process to build each new section. Here’s what this looked like in practice:
“Built by Developers” section
> “Add a new section to the landing page called ‘By Developers’ and follow the attached design.”
Copilot generated a reusable component with feature cards structured in a Tailwind-styled grid.
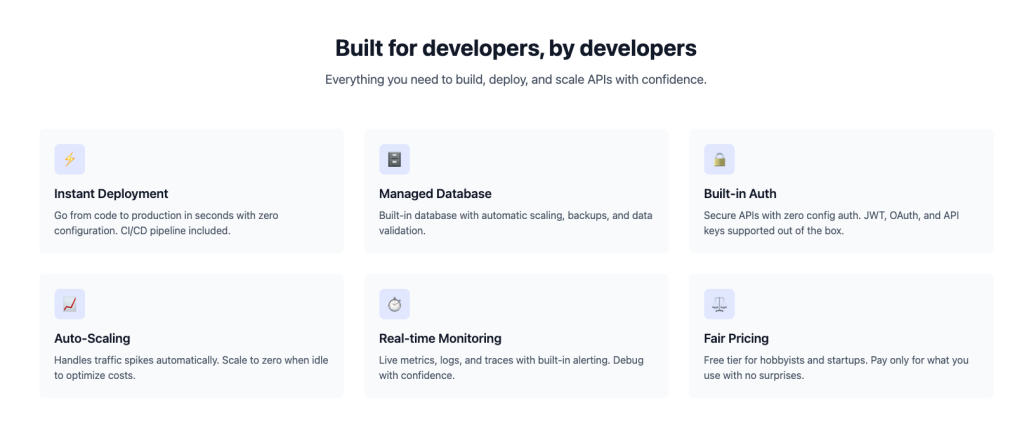
“API development” section
> “Add the API development section based on the design.”
This section featured interactive code samples in tabs. Copilot interpreted that from the screenshot and added UI logic to switch between examples—without me asking.
“Dashboard preview” section
> “Now add the dashboard management section on the landing page based on the design.”
I uploaded a screenshot of my editor as a placeholder image, and Copilot added it seamlessly to the new component.
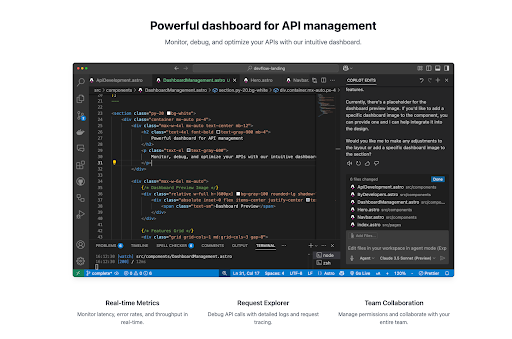
It’s so amazing how fast we’re building this landing page. Look at the progress we’ve already made!
Smart suggestions, fast results
Even with sections like “Trusted by Developers” and “Try it Yourself,” Copilot created placeholder images, added semantic HTML, and applied Tailwind styling—all based on a single image and prompt. 🤯

When I updated the final hero section to match the layout more closely, Copilot flagged and fixed TypeScript issues without being prompted.
That might sound small, but it’s a big deal. It means Copilot agent mode wasn’t just taking instructions—it was actively understanding my codebase, looking at my terminal, identifying problems, and resolving them in real time. This reduced my need to context switch, so I could focus on shipping!
This wasn’t just a series of generated components. It was a fully structured, landing page built with modern best practices baked in. And I didn’t have to build it alone!
Wrapping up:
With GitHub Copilot agent mode and Claude working together, I was able to:
- Generate a usable PRD and design mockup with a single prompt
- Build a responsive Astro-based landing page in less than thirty minutes
- Scaffold, test, and iterate on each section with minimal manual coding
- Use natural language to stay in the flow as I developed
What’s next?
To complete this project, I updated the README with a clear project structure, added instructions for getting started, and staged it for deployment. From here, you can:
- Deploy it with GitHub Pages, Netlify, or your host of choice
- Set up GitHub Actions for CI/CD
- Add unit tests or accessibility checks
- Replace placeholder content with real data (like logos, dashboard, and profile images)
- Add new pages based on the Navbar
Want to explore it yourself?
Take this with you
AI tools like GitHub Copilot agent mode are transforming how we build, but like any tool, their power depends on how well we use them. Adding context, being explicit, and committing often made building this web page smooth and successful.
If you’re thinking about building with GitHub Copilot, give this workflow a try:
- Start with a PRD using Copilot on GitHub.com
- Generate a design from your PRD with Claude
- Use Copilot Agent in your IDE to code it, step by step.
Until next time, happy coding!
The post From prompt to production: Building a landing page with Copilot agent mode appeared first on The GitHub Blog.
]]>