Users have the flexibility to choose Claude Haiku 4.5 alongside other leading models, enhancing their GitLab Duo experience with near-frontier performance at remarkable speed. With strong performance on SWE-bench Verified (73.3%) and more than 2x the speed of Claude Sonnet 4.5, GitLab users can apply Claude Haiku 4.5 to accelerate their development workflows with rapid, intelligent responses.
GitLab Duo Agent Platform + Claude Haiku 4.5
GitLab Duo Agent Platform extends the value of Claude Haiku 4.5 by enabling multi-agent orchestration, where Claude Haiku 4.5 can serve as a fast sub-agent executing parallel tasks while more powerful models handle high-level planning. This combination creates efficient agentic workflows, where speed meets intelligence across the software development lifecycle. The result is faster iterations, cost-effective AI assistance, and responsive experiences, all delivered inside the GitLab workflow developers already use every day.
Where you can use Claude Haiku 4.5
Claude Haiku 4.5 is now available as a model option in GitLab Duo Agent Platform Agentic Chat on GitLab.com. You can choose Claude Haiku 4.5 from the model selection dropdown to leverage its speed and coding capabilities for your development tasks.
Note: Ability to select Claude Haiku 4.5 in supported IDEs will be available soon.
Key capabilities:
- Superior coding performance: Achieves 73% on SWE-bench Verified, matching the intelligence level of models that were cutting-edge just months ago.
- Lightning-fast responses: More than 2x faster than Sonnet 4.5, perfect for real-time pair programming.
- Enhanced computer use: Outperforms Claude Sonnet 4 at autonomous task execution.
- Context awareness: First Haiku model with native context window tracking for better task persistence.
- Extended thinking: Pause and reason through complex problems before generating responses.
Get started today
GitLab Duo Pro and Enterprise customers can access Claude Haiku 4.5 today. Visit our documentation to learn more about GitLab Duo capabilities and models.
Questions or feedback? Share your experience with us through the GitLab community.
Want to try GitLab Ultimate with Duo Enterprise? Sign up for a free trial today.
Read more
]]>CI/CD pipelines can help with the challenge of building and validating software projects consistently, but, much like the software itself, these pipelines can become complex with many dependencies. This is where ideas like parent-child pipelines and data exchange in CI/CD setups become incredibly important.
In this article, we will cover common CI/CD data exchange challenges users may encounter with parent-child pipelines in GitLab — and how to solve them. You'll learn how to turn complex CI/CD processes into more manageable setups.
Using parent-child pipelines
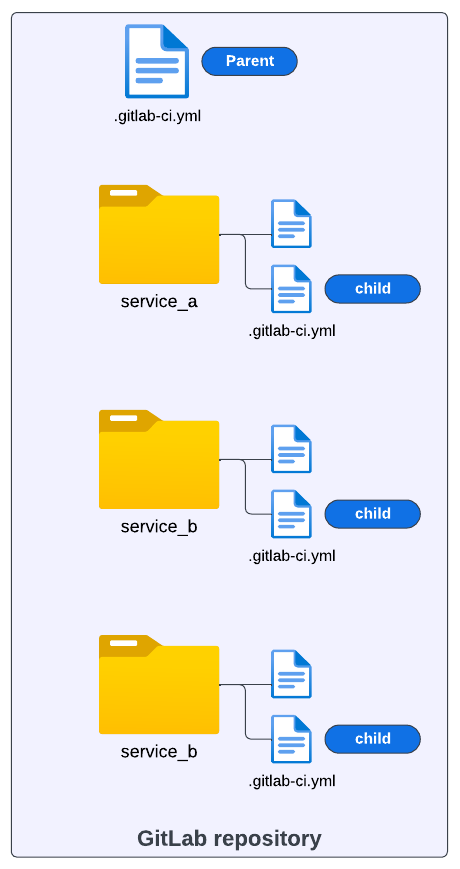
The pipeline setup in the image below illustrates a scenario where a project could require a large, complex pipeline. The whole project resides in one repository and contains different modules. Each module requires its own set of build and test automation steps.
One approach to address the CI/CD configuration in a scenario like this is to break down the larger pipeline into smaller ones (i.e., child pipelines) and keep a common CI/CD process that is shared across all modules in charge of the whole orchestration (i.e., parent pipeline).
The parent-child pipeline pattern allows a single pipeline to orchestrate one or many downstream pipelines. Similar to how a single pipeline coordinates the execution of multiple jobs, the parent pipeline coordinates the running of full pipelines with one or more jobs.
This pattern has been shown to be helpful in a variety of use cases:
-
Breaking down large, complex pipelines into smaller, manageable pieces
-
Conditionally executing certain pipelines as part of a larger CI/CD process
-
Executing pipelines in parallel
-
Helping manage user permissions to access and run certain pipelines
GitLab’s current CI/CD structure supports this pattern and makes it simple to implement parent-child pipelines. While there are many benefits when using the parent-child pipeline pattern with GitLab, one question we often get is how to share data between the parent and child pipelines. In the next sections, we’ll go over how to make use of GitLab variables and artifacts to address this concern.
Sharing variables
There are cases where it is necessary to pass the output from a parent pipeline job to a child pipeline. These outputs can be shared as variables, artifacts, and inputs.
Consider a case where we create a custom variable var_1 during the runtime of a job:
stages:
  - build
  - triggers

# This job only creates a variable

create_var_job:
  stage: build
  script:
    - var_1="Hi, I'm a Parent pipeline variable"
    - echo "var_1=$var_1" >> var.env
  artifacts:
    reports:
      dotenv: var.env
Notice that the variable is created as part of the script steps in the job (during runtime). In this example, we are using a simple string "Hi, I'm a Parent pipeline variable" to illustrate the main syntax required to later share this variable with a child pipeline. Let's break down the create_var_job and analyze the main steps from this GitLab job
First, we need to save var_1 as dotenv:
  script:
    - var_1="Hi, I'm a pipeline variable"
    - echo "var_1=$var_1" >> var.env
After saving var_1 as var.env, the next important step is to make this variable available as an artifact produced by the create_var_job. To do that, we use the following syntax:
artifacts:
    reports:
      dotenv: var.env
Up to this point, we have created a variable during runtime and saved it as a dotenv report. Now let's add the job that should trigger the child pipeline:
telco_service_a:
  stage: triggers
  trigger:
    include: service_a/.gitlab-ci.yml
  rules:
    - changes:
        - service_a/*
The goal of telco_service_a job is to find the .gitlab-ci.yml configuration of the child pipeline, which is defined in this case as service_a, and trigger its execution. Let's examine this job:
telco_service_a:
  stage: triggers
  trigger:
    include: service_a/.gitlab-ci.yml
We see it belongs to another stage of the pipeline named triggers.This job will run only after create_var_job from the first stage successfully finishes and where the variable var_1 we want to pass is created.
After defining the stage, we use the reserved words trigger and include to tell GitLab where to search for the child pipeline configuration, as illustrated in the YAML below:
  trigger:
    include: service_a/.gitlab-ci.yml
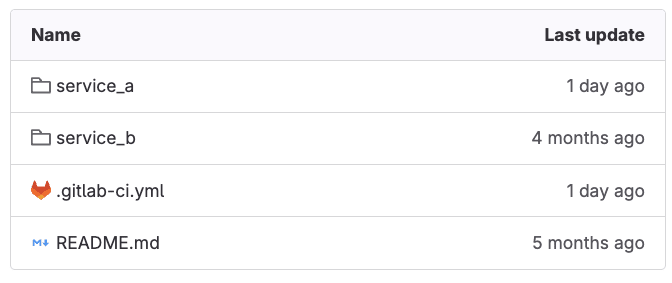
Our child-pipeline YAML configuration is under service_a/.gitlab-ci.yml folder in the GitLab repository, for this example.
<p></p>
<center><i>Child pipelines folders with configurations</i></center>
<p></p>
Take into consideration that the repository structure depicted above can vary. What matters is properly pointing the triggers: include properties at the location of your child-pipeline configuration in your repository.
Finally, we use rules: changes to indicate to GitLab that this child pipeline should be triggered only if there is any change in any file in the service_a/.gitlab-ci.yml directory, as illustrated in the following code snippet:
rules:
    - changes:
        - service_a/*
Using this rule helps to optimize cost by triggering the child pipeline job only when necessary. This approach is particularly valuable in a monorepo architecture where specific modules contain numerous components, allowing us to avoid running their dedicated pipelines when no changes have been made to their respective codebases.
Configuring the parent pipeline
Up to this point, we have put together our parent pipeline. Here's the full code snippet for this segment:
# Parent Pipeline Configuration

# This pipeline creates a custom variable and triggers a child pipeline


stages:
  - build
  - trigger

create_var_job:
  stage: build
  script:
    - var_1="Hi, I'm a Parent pipeline variable"
    - echo "var_1=$var_1" >> var.env
  artifacts:
    reports:
      dotenv: var.env

telco_service_a:
  stage: triggers
  trigger:
    include: service_a/.gitlab-ci.yml
  rules:
    - changes:
        - service_a/*
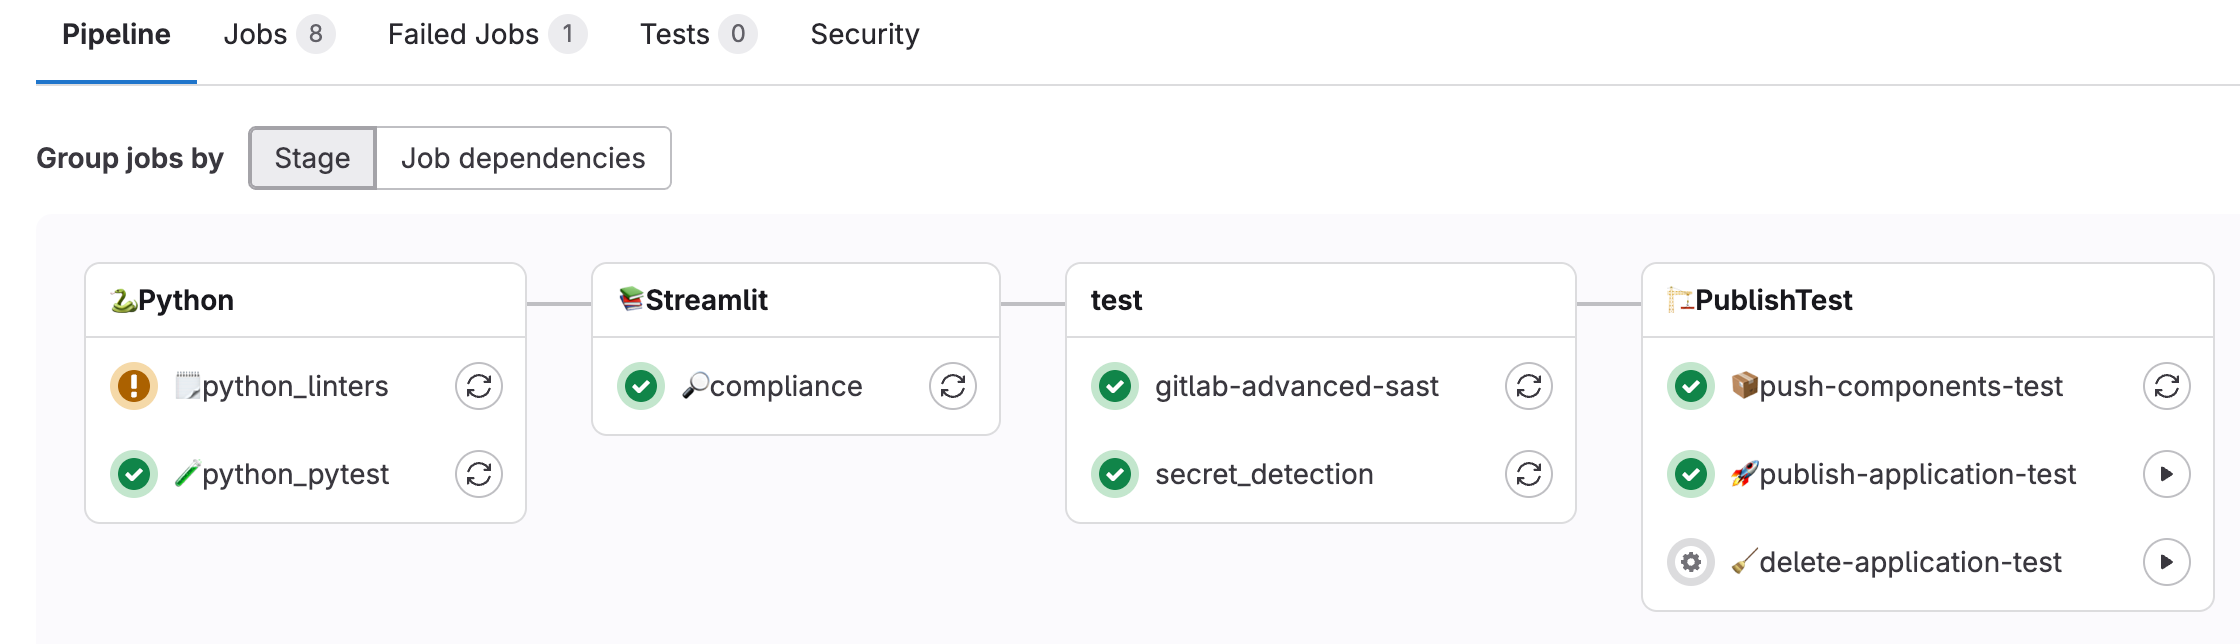
When GitLab executes the YAML configuration in the GitLab UI, the parent pipeline gets rendered as follows:
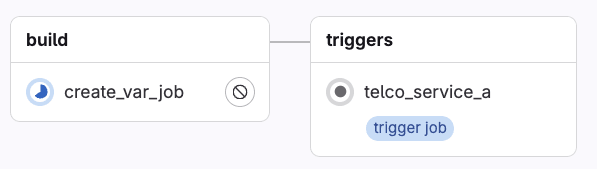
Notice the label "trigger job," which indicates this job will start the execution of another pipeline configuration.
Configuring the child pipeline
Moving forward, let's now focus on the child pipeline configuration, where we expect to inherit and print the value of the var_1 created in the parent pipeline.
The pipeline configuration in service_a/.gitlab_ci.yml has the following definition:
stages:
  - build

build_a:
  stage: build
  script:
    - echo "this job inherits the variable from the Parent pipeline:"
    - echo $var_1
  needs:
    - project: gitlab-da/use-cases/7-4-parent-child-pipeline
      job: create_var_job
      ref: main
      artifacts: true
Like before, let's break down this pipeline and highlight the main parts to achieve our goal. This pipeline only contains one stage (i.e., build) and one job (i.e., build_a). The script in the job contains two steps:
build_a:
  stage: build
  script:
    - echo "this job inherits the variable from the Parent pipeline:"
    - echo $var_1
These two steps print output during the execution. The most interesting one is the second step, echo $var_1, where we expect to print the variable value inherited from the parent pipeline. Remember, this was a simple string with value: "Hi, I'm a Parent pipeline variable."
Inheriting variables using needs
To set and link this job to inherit variables from the parent pipeline, we use the reserved GitLab CI properties needs as depicted in the following snippet:
needs:
    - project: gitlab-da/use-cases/7-4-parent-child-pipeline
      job: create_var_job
      ref: main
      artifacts: true
Using the "needs" keyword, we define dependencies that must be completed before running this job. In this case, we pass four different values. Let's walk through each one of them:
-
Project: The complete namespace of the project where the main
gitlab-ci.ymlcontaining the parent pipeline YAML is located. Make sure to include the absolute path. -
Job: The specific job name in the parent pipeline from where we want to inherit the variable.
-
Ref: The name of the branch where the main
gitlab-ci.ymlcontaining the parent pipeline YAML is located. -
Artifacts: Where we set a boolean value, indicating that artifacts from the parent pipeline job should be downloaded and made available to this child pipeline job.
Note: This specific approach using the needs property is only available to GitLab Premium and Ultimate users. We will cover another example for GitLab community users later on.
Putting it all together
Now let's assume we make a change to any of the files under service_a folder and commit the changes to the repository. When GitLab detects the change, the rule we set up will trigger the child job pipeline execution. This gets displayed in the GitLab UI as follows:
Clicking on the telco_service_a will take us to the jobs in the child pipeline:
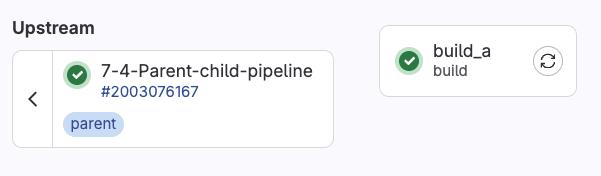
We can see the parent-child relationship, and finally, by clicking on the build_a job, we can visually verify the variable inheritance in the job execution log:
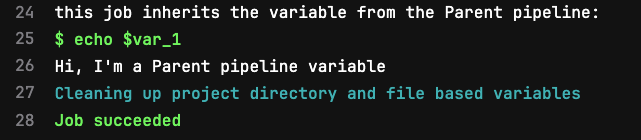
This output confirms the behavior we expected. The custom runtime variable var_1 created in the parent job is inherited in the child job, unpacked from the dotenv report, and its value accessible as can be confirmed in Line 26 above.
This use case illustrates how to share custom variables that can contain any value between pipelines. This example is intentionally simple and can be extrapolated to more realistic scenarios. Take, for instance, the following CI/CD configuration, where the custom variable we need to share is the tag of a Docker image:
# Pipeline


build-prod-image:
  tags: [ saas-linux-large-amd64 ]
  image: docker:20.10.16
  stage: build
  services:
    - docker:20.10.16-dind

  script:
    - docker login -u $CI_REGISTRY_USER -p $CI_REGISTRY_PASSWORD $CI_REGISTRY
    - docker build -t $PRODUCTION_IMAGE .
    - docker push $PRODUCTION_IMAGE
    - echo "UPSTREAM_CONTAINER_IMAGE=$PRODUCTION_IMAGE" >> prodimage.env

  artifacts:
    reports:
      dotenv: prodimage.env

  rules:
     - if: '$CI_COMMIT_BRANCH == "main"'
       when: always
     - when: never
And use the variable with the Docker image tag, in another job that updates a Helm manifest file:
update-helm-values:
    stage: update-manifests
    image:
        name: alpine:3.16
        entrypoint: [""]

    before_script:
         - apk add --no-cache git curl bash yq
         - git remote set-url origin https://${CI_USERNAME}:${GITOPS_USER}@${SERVER_PATH}/${PROJECT_PATH}
         - git config --global user.email "gitlab@gitlab.com"
         - git config --global user.name "GitLab GitOps"
         - git pull origin main
    script:
          - cd src
          - echo $UPSTREAM_CONTAINER_IMAGE
          - yq eval -i ".spec.template.spec.containers[0].image |= \"$UPSTREAM_CONTAINER_IMAGE\"" store-deployment.yaml
          - cat store-deployment.yaml
          - git pull origin main
          - git checkout -B main
          - git commit -am '[skip ci] prod image update'
          - git push origin main
    needs:
      - project: gitlab-da/use-cases/devsecops-platform/simply-find/simply-find-front-end
        job: build-prod-image
        ref: main
        artifacts: true
Mastering how to share variables between pipelines while maintaining the relationship between them enables us to create more sophisticated workflow orchestration that can meet our software building needs.
Using GitLab Package Registry to share artifacts
While the needs feature mentioned above works great for Premium and Ultimate users, GitLab also has features to help achieve similar results for Community Edition users. One suggested approach is to store artifacts in the GitLab Package Registry.
Using a combination of the variables provided in GitLab CI/CD jobs and the GitLab API, you can upload artifacts to the GitLab Package Registry from a parent pipeline. In the child pipeline, you can then access the uploaded artifact from the package registry using the same variables and API to access the artifact. Let’s take a look at the example pipeline and some supplementary scripts that illustrate this:
gitlab-ci.yml (parent pipeline)
# Parent Pipeline Configuration

# This pipeline creates an artifact, uploads it to Package Registry, and triggers a child pipeline


stages:
  - create-upload
  - trigger

variables:
  PACKAGE_NAME: "pipeline-artifacts"
  PACKAGE_VERSION: "$CI_PIPELINE_ID"
  ARTIFACT_FILE: "artifact.txt"

# Job 1: Create and upload artifact to Package Registry

create-and-upload-artifact:
  stage: create-upload
  image: alpine:latest
  before_script:
    - apk add --no-cache curl bash
  script:
    - bash scripts/create-artifact.sh
    - bash scripts/upload-to-registry.sh
  rules:
    - if: $CI_PIPELINE_SOURCE == "push"

# Job 2: Trigger child pipeline

trigger-child:
  stage: trigger
  trigger:
    include: child-pipeline.yml
    strategy: depend
  variables:
    PARENT_PIPELINE_ID: $CI_PIPELINE_ID
    PACKAGE_NAME: $PACKAGE_NAME
    PACKAGE_VERSION: $PACKAGE_VERSION
    ARTIFACT_FILE: $ARTIFACT_FILE
  rules:
    - if: $CI_PIPELINE_SOURCE == "push"
child-pipeline.yml
# Child Pipeline Configuration

# This pipeline downloads the artifact from Package Registry and processes it


stages:
  - download-process

variables:
  # These variables are passed from the parent pipeline
  PACKAGE_NAME: "pipeline-artifacts"
  PACKAGE_VERSION: "$PARENT_PIPELINE_ID"
  ARTIFACT_FILE: "artifact.txt"

# Job 1: Download and process artifact from Package Registry

download-and-process-artifact:
  stage: download-process
  image: alpine:latest
  before_script:
    - apk add --no-cache curl bash
  script:
    - bash scripts/download-from-registry.sh
    - echo "Processing downloaded artifact..."
    - cat $ARTIFACT_FILE
    - echo "Artifact processed successfully!"
upload-to-registry.sh
#!/bin/bash


set -e


# Configuration

PACKAGE_NAME="${PACKAGE_NAME:-pipeline-artifacts}"

PACKAGE_VERSION="${PACKAGE_VERSION:-$CI_PIPELINE_ID}"

ARTIFACT_FILE="${ARTIFACT_FILE:-artifact.txt}"


# Validate required variables

if [ -z "$CI_PROJECT_ID" ]; then
    echo "Error: CI_PROJECT_ID is not set"
    exit 1
fi


if [ -z "$CI_JOB_TOKEN" ]; then
    echo "Error: CI_JOB_TOKEN is not set"
    exit 1
fi


if [ -z "$CI_API_V4_URL" ]; then
    echo "Error: CI_API_V4_URL is not set"
    exit 1
fi


if [ ! -f "$ARTIFACT_FILE" ]; then
    echo "Error: Artifact file '$ARTIFACT_FILE' not found"
    exit 1
fi


# Construct the upload URL

UPLOAD_URL="${CI_API_V4_URL}/projects/${CI_PROJECT_ID}/packages/generic/${PACKAGE_NAME}/${PACKAGE_VERSION}/${ARTIFACT_FILE}"


# Upload the file using curl

response=$(curl -w "%{http_code}" -o /tmp/upload_response.json \
    --header "JOB-TOKEN: $CI_JOB_TOKEN" \
    --upload-file "$ARTIFACT_FILE" \
    "$UPLOAD_URL")

if [ "$response" -eq 201 ]; then
    echo "Upload successful!"
else
    echo "Upload failed with HTTP code: $response"
    exit 1
fi
download-from-regsitry.sh
#!/bin/bash


set -e


# Configuration

PACKAGE_NAME="${PACKAGE_NAME:-pipeline-artifacts}"

PACKAGE_VERSION="${PACKAGE_VERSION:-$PARENT_PIPELINE_ID}"

ARTIFACT_FILE="${ARTIFACT_FILE:-artifact.txt}"


# Validate required variables

if [ -z "$CI_PROJECT_ID" ]; then
    echo "Error: CI_PROJECT_ID is not set"
    exit 1
fi


if [ -z "$CI_JOB_TOKEN" ]; then
    echo "Error: CI_JOB_TOKEN is not set"
    exit 1
fi


if [ -z "$CI_API_V4_URL" ]; then
    echo "Error: CI_API_V4_URL is not set"
    exit 1
fi


if [ -z "$PACKAGE_VERSION" ]; then
    echo "Error: PACKAGE_VERSION is not set"
    exit 1
fi


# Construct the download URL

DOWNLOAD_URL="${CI_API_V4_URL}/projects/${CI_PROJECT_ID}/packages/generic/${PACKAGE_NAME}/${PACKAGE_VERSION}/${ARTIFACT_FILE}"


# Download the file using curl

response=$(curl -w "%{http_code}" -o "$ARTIFACT_FILE" \
    --header "JOB-TOKEN: $CI_JOB_TOKEN" \
    --fail-with-body \
    "$DOWNLOAD_URL")

if [ "$response" -eq 200 ]; then
    echo "Download successful!"
else
    echo "Download failed with HTTP code: $response"
    exit 1
fi
In this example, the parent pipeline uploads a file to the GitLab Package Registry by calling a script named upload-to-registry.sh. The script gives the artifact a name and version and constructs the API call to upload the file to the package registry. The parent pipeline is able to authenticate using a $CI_JOB_TOKEN to push the artifact.txt file to the registry.
The child pipeline operates the same as the parent pipeline by using a script to construct the API call to download the artifact.txt file from the package registry. It also is able to authenticate to the registry using the $CI_JOB_TOKEN.
Since the GitLab Package Registry is available to all GitLab users, it helps to serve as a central location for storing and versioning artifacts. It is a great option for users working with many kinds of artifacts and needing to version artifacts for workflows even beyond CI/CD.
Using inputs to pass variables to a child pipeline
If you made it this far in this tutorial, and you have plans to start creating new pipeline configurations, you might want to start by evaluating if your use case can benefit from using inputs to pass variables to other pipelines.
Using inputs is a recommended way to pass variables when you need to define specific values in a CI/CD job and have those values remain fixed during the pipeline run. Inputs might offer certain advantages over the method we implemented before. For example, with inputs, you can include data validation through options (i.e., values must be one of these: [‘staging', ‘prod’]), variable descriptions, type checking, and assign default values before the pipeline run.
Configuring CI/CD inputs
Consider the following parent pipeline configuration:
# .gitlab-ci.yml (main file)

stages:
 - trigger

trigger-staging:
 stage: trigger
 trigger:
   include:
     - local: service_a/.gitlab-ci.yml
       inputs:
         environment: staging
         version: "1.0.0"
Let's zoom in at the main difference between the code snippet above and the previous parent pipeline examples in this tutorial:
trigger:
   include:
     - local: service_a/.gitlab-ci.yml
       inputs:
         environment: staging
         version: "1.0.0"
The main difference is using the reserved word "inputs". This part of the YAML configuration can be read in natural language as: “trigger the child pipeline defined in service_a.gitlab-ci.yml and make sure to pass ‘environment: staging’ and ‘version:1.0.0’ as input variables that the child pipeline will know how to use.
Reading CI/CD inputs in child pipelines
Moving to the child pipeline, it must contain in its declaration a spec that defines the inputs it can take. For each input, it is possible to add a little description, a set of predefined options the input value can take, and the type of value it will take. This is illustrated as follows:
# target pipeline or child-pipeline in this case


spec:
  inputs:
    environment:
      description: "Deployment environment"
      options: [staging, production]
    version:
      type: string
      description: "Application version"


---


stages:
  - deploy
# Jobs that will use the inputs

deploy:
  stage: deploy
  script:
     -  echo "Deploying version $[[ inputs.version ]] to $[[ inputs.environment ]]"
Notice from the code snippet that after defining the spec, there is a YAML document separator "---" followed by the actual child pipeline definition where we access the variables $[[ inputs.version ]] and $[[ inputs.environment ]]" from the defined inputs using input interpolation.
Get hands-on with parent-child pipelines, artifacts, and more
We hope this article has helped with navigating the challenge of sharing variables and artifacts in parent-child pipeline setups.
To try these examples for yourself, feel free to view or fork the Premium/Ultimate and the GitLab Package Registry examples of sharing artifacts.
You can also sign up for a 30-day free trial of GitLab Ultimate to experience all the features GitLab has to offer. Thanks for reading!
]]>The challenge
Imagine this scenario: Your organization has dozens of Streamlit applications across different environments, running various Python versions, connecting to sensitive data with inconsistent security practices. Some apps work, others break mysteriously, and nobody knows who built what or how to maintain them.
This was exactly the challenge our data team faced. Applications were being created in isolation, with no standardization, no security oversight, and no clear deployment process. The result? A compliance nightmare and a maintenance burden that was growing exponentially.
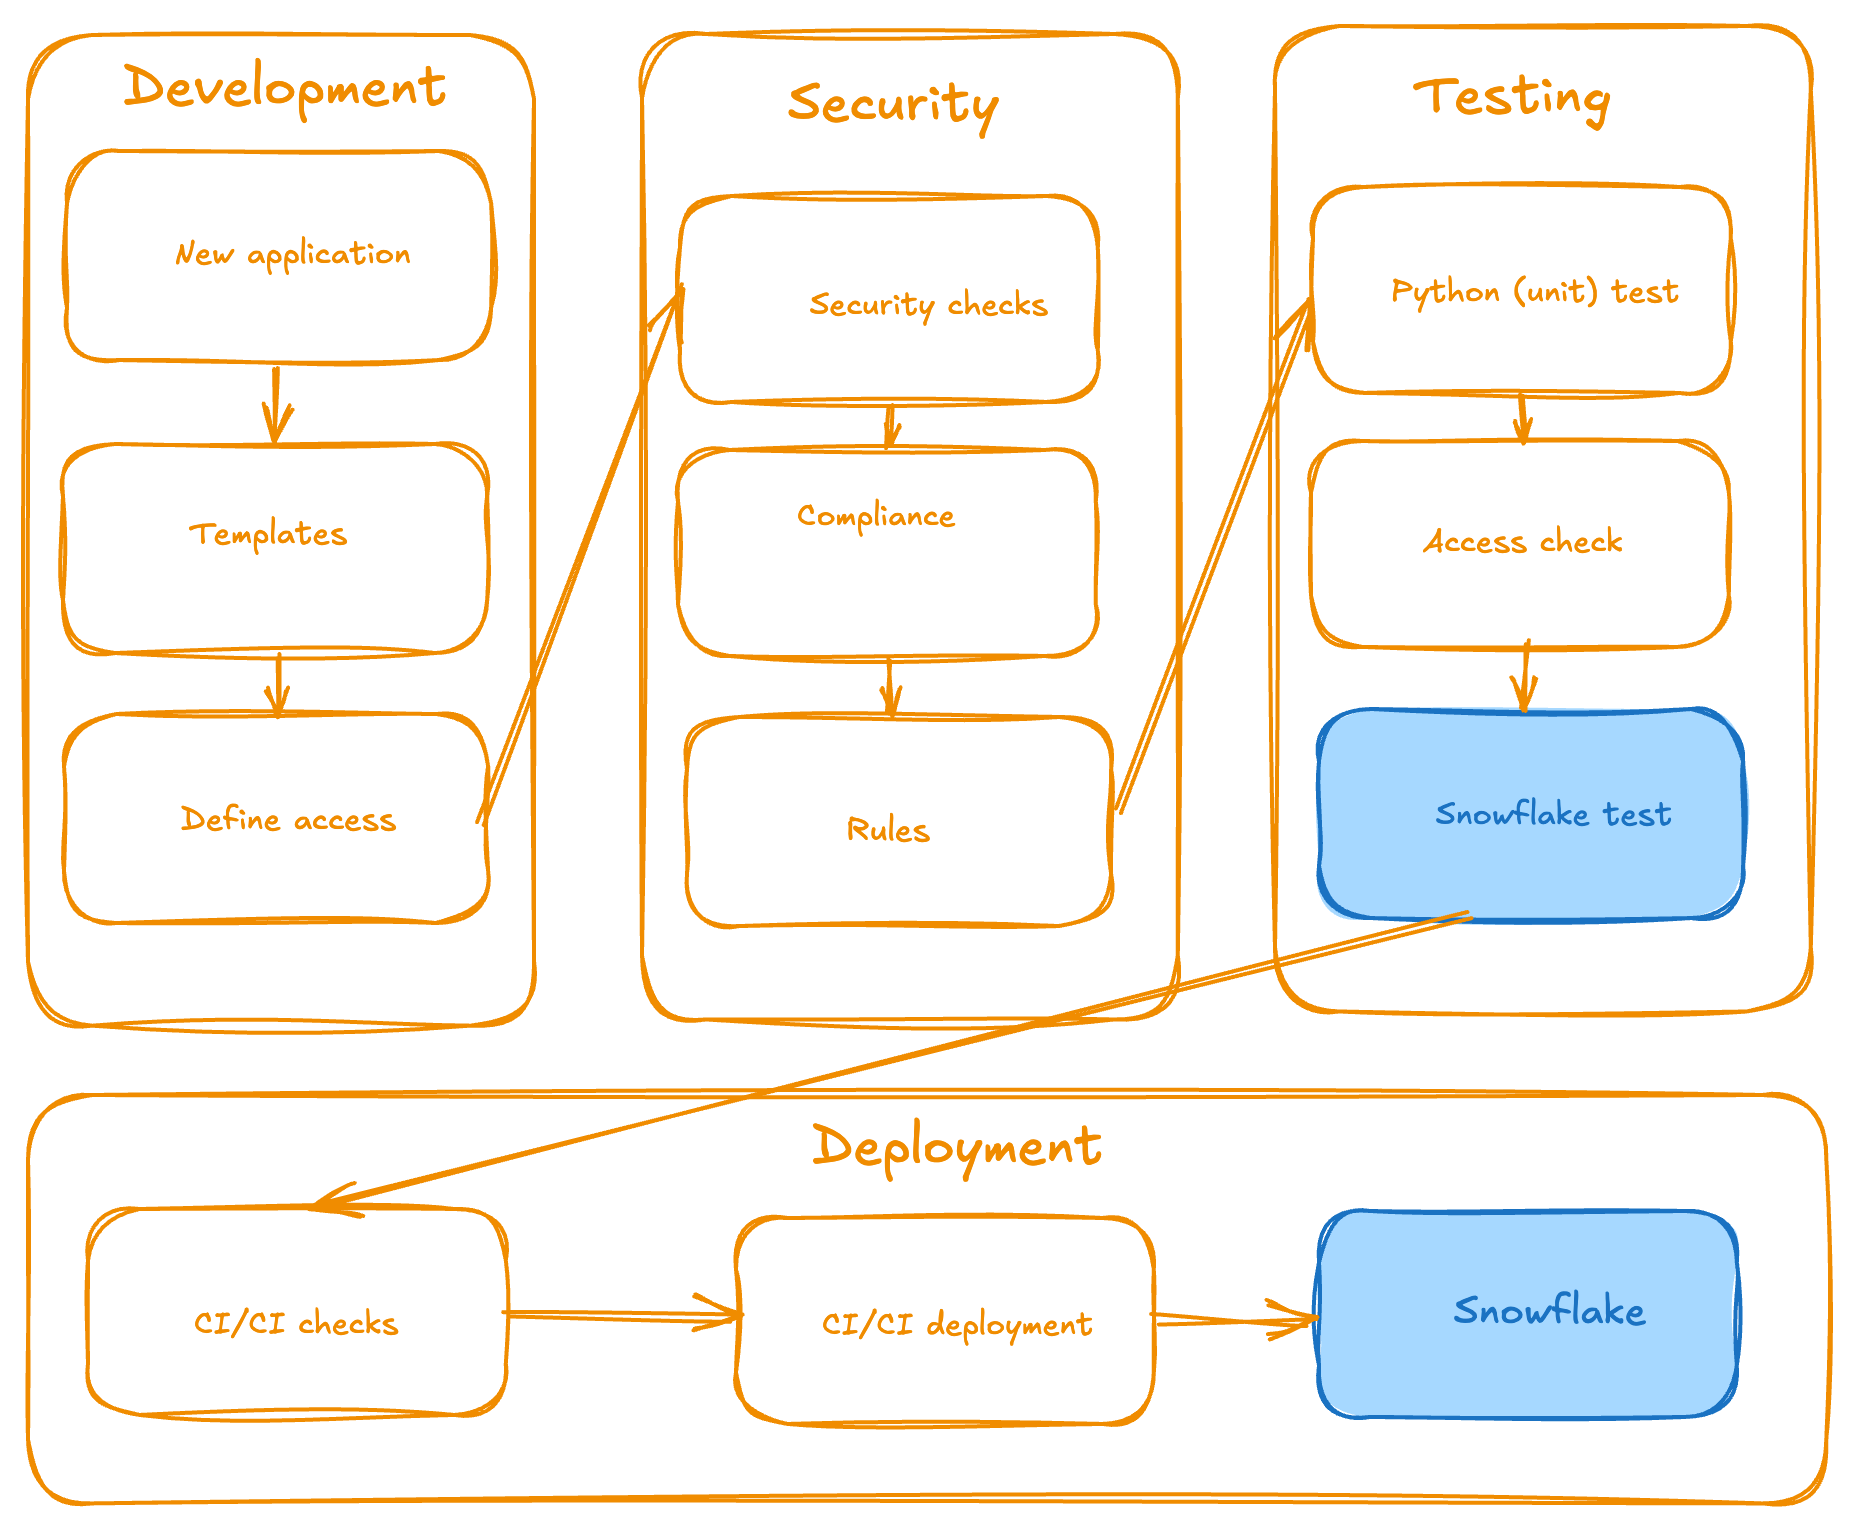
<p></p>
<center><i>Functional architectural design (high level)</i></center>
How we started
We leveraged our unique position as customer zero by building this entire framework on GitLab's own CI/CD infrastructure and project management tools. Here are the ingredients we started with:
-
GitLab (product)
-
Snowflake - our single source of truth (SSOT) for the data warehouse activities (and more than that)
-
Streamlit - an open-source tool for visual applications that has pure Python code under the hood
This provided us with immediate access to enterprise-grade DevSecOps capabilities, enabling us to implement automated testing, code review processes, and deployment pipelines from the outset. By utilizing GitLab's built-in features for issue tracking, merge requests, and automated deployments (CI/CD pipelines), we can iterate rapidly and validate the framework against real-world enterprise requirements. This internal-first approach ensured our solution was battle-tested on GitLab's own infrastructure before any external implementation.
The lessons we learned
The most critical lesson we learned from building the Streamlit Application Framework in Snowflake is that structure beats chaos every time — implement governance early rather than retrofitting it later when maintenance becomes exponential.
You also need to clearly define roles and responsibilities, separating infrastructure concerns from application development, so that each team can focus on its strengths.
Security and compliance cannot be afterthoughts; they must be built into templates and automated processes from day one, as it's far easier to enforce consistent standards upfront than to force them after the fact. Invest heavily in automation and CI/CD pipelines, as manual processes don't scale and introduce human error.
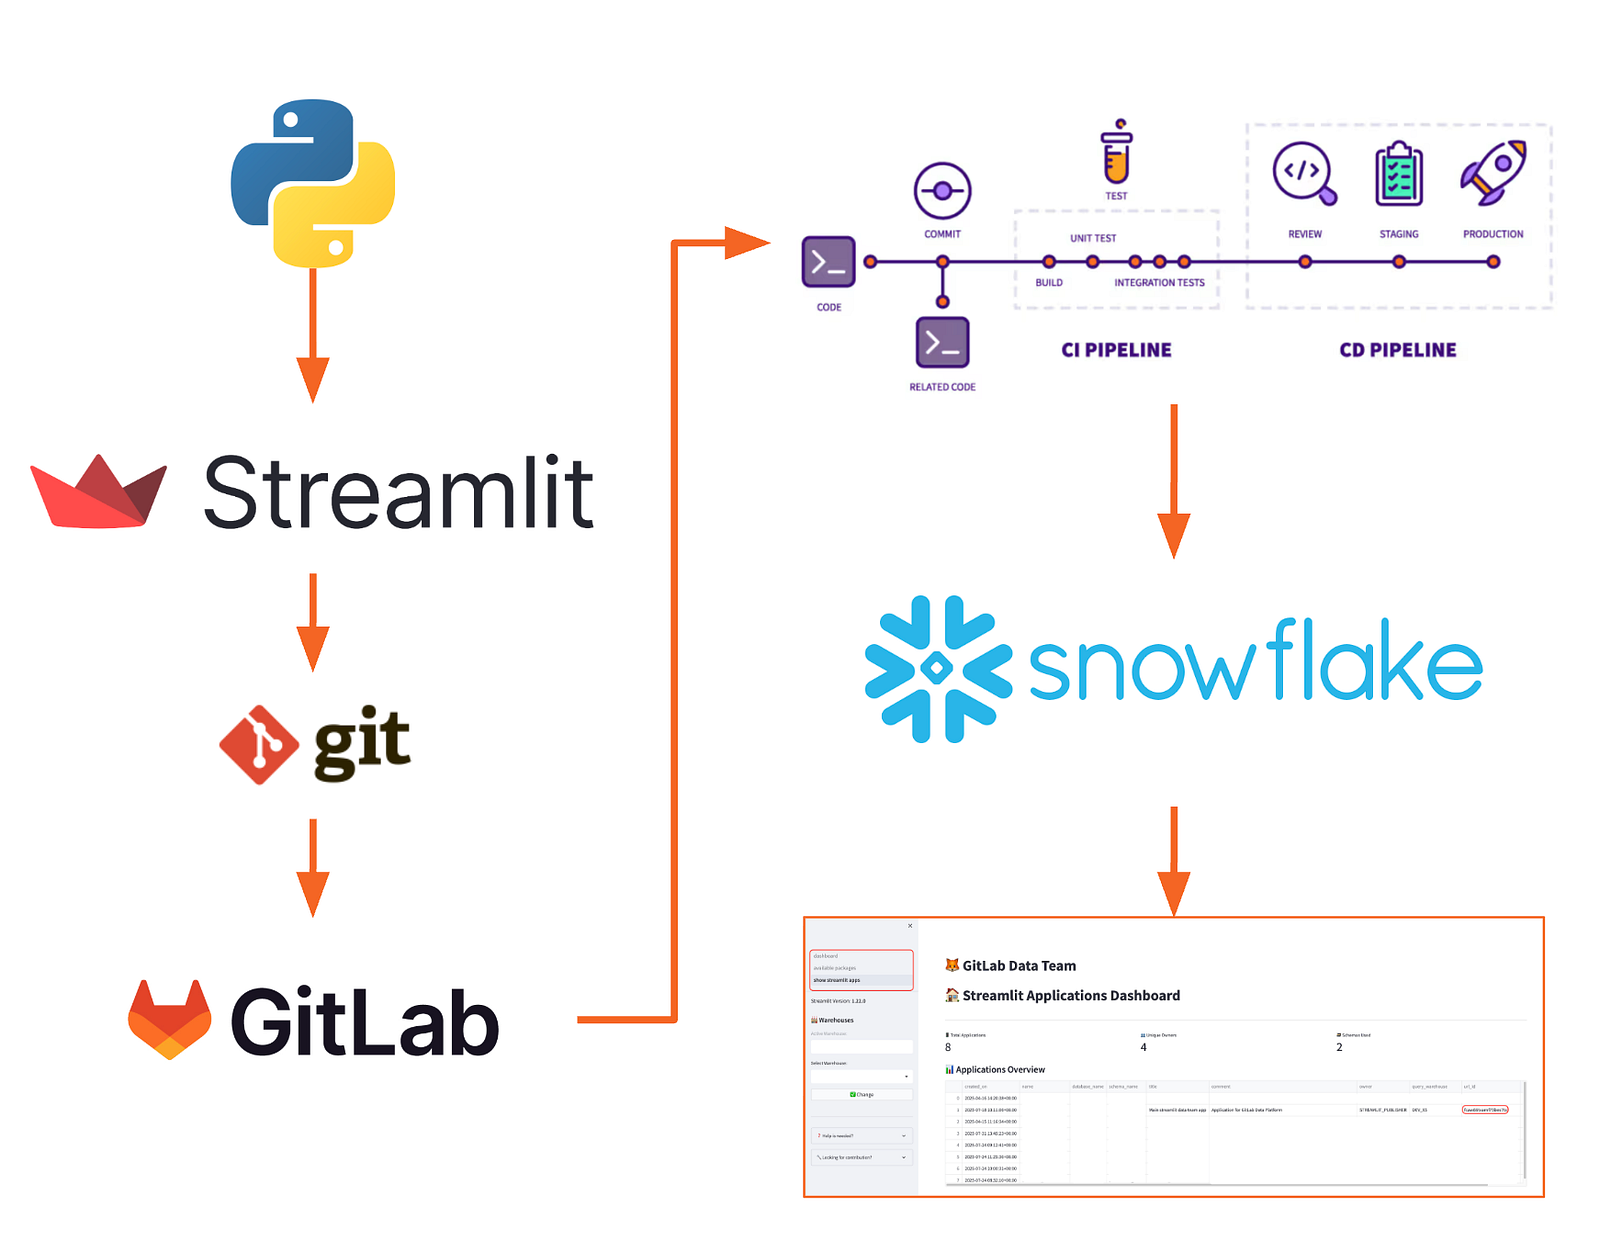
<p></p>
<center><i>Architecture of the framework (general overview)</i></center>
How the Streamlit Application Framework changes everything
The Streamlit Application Framework turns a scattered approach into a structure. It gives developers freedom within secure guardrails, while automating deployment and eliminating maintenance complexity.
Three clear roles, one unified process
The framework introduces a structured approach with three distinct roles:
-
Maintainers (Data team members and contributors) handle the infrastructure, including CI/CD pipelines, security templates, and compliance rules. They ensure the framework runs smoothly and stays secure.
-
Creators (those who need to build applications) can focus on what they do best: creating visualizations, connecting to Snowflake data, and building user experiences. They have full flexibility to create new applications from scratch, add new pages to existing apps, integrate additional Python libraries, and build complex data visualisations — all without worrying about deployment pipelines or security configurations.
-
Viewers (end users) access polished, secure applications without any technical overhead. All they need is Snowflake access.
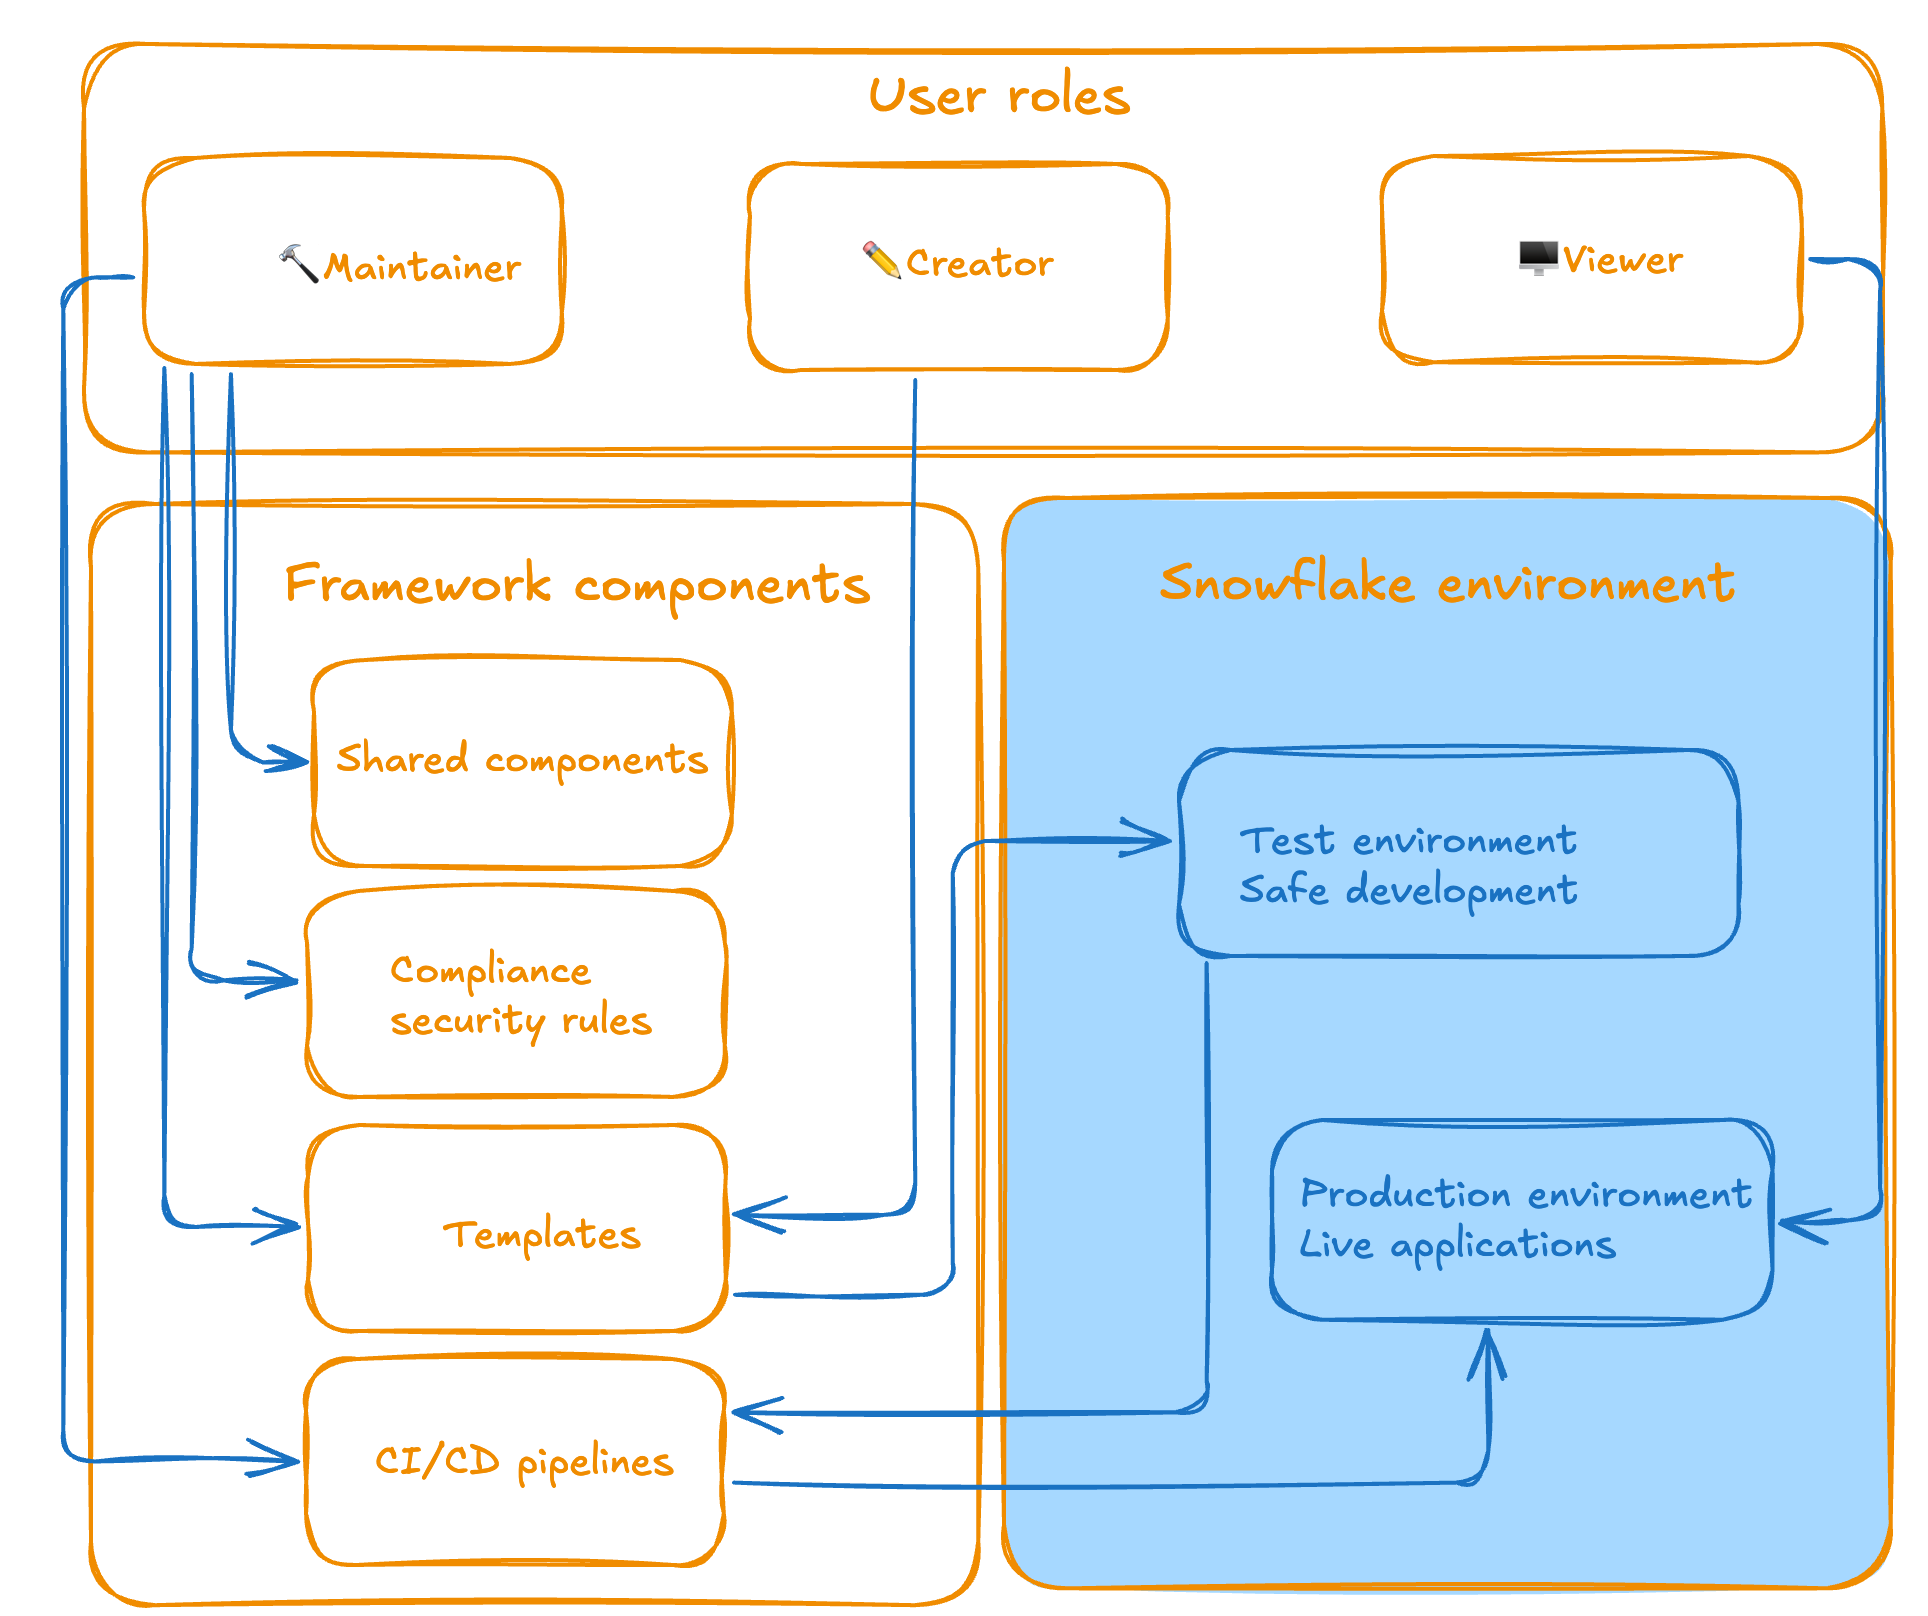
<p></p>
<center><i>Overview of roles and their functions</i></center>
Automate everything
By implementing CI/CD, days of manual deployments and configuration headaches are gone. The framework provides:
- One-click environment preparation: With a set of
makecommands, the environment is installed and ready in a few seconds.
================================================================================

✅ Snowflake CLI successfully installed and configured!

Connection: gitlab_streamlit

User: YOU@GITLAB.COM

Account: gitlab

================================================================================

Using virtualenv: /Users/YOU/repos/streamlit/.venv

📚 Installing project dependencies...

Installing dependencies from lock file

No dependencies to install or update

✅ Streamlit environment prepared!
-
Automated CI/CD pipelines: Handle testing, code review, and deployment from development to production.
-
Secure sandbox environments: Provide for safe development and testing before production deployment.
╰─$ make streamlit-rules

🔍 Running Streamlit compliance check...

================================================================================

CODE COMPLIANCE REPORT

================================================================================

Generated: 2025-07-09 14:01:16

Files checked: 1


SUMMARY:

✅ Passed: 1

❌ Failed: 0

Success Rate: 100.0%


APPLICATION COMPLIANCE SUMMARY:

📱 Total Applications Checked: 1

⚠️ Applications with Issues: 0

📊 File Compliance Rate: 100.0%


DETAILED RESULTS BY APPLICATION:

...
- Template-based application creation: Ensures consistency across all applications and pages.
╰─$ make streamlit-new-page STREAMLIT_APP=sales_dashboard STREAMLIT_PAGE_NAME=analytics

📝 Generating new Streamlit page: analytics for app: sales_dashboard

📃 Create new page from template:

Page name: analytics

App directory: sales_dashboard

Template path: page_template.py

✅ Successfully created 'analytics.py' in 'sales_dashboard' directory from template
-
Poetry-based dependency management: Prevents version conflicts and maintains clean environments.
-
Organized project structure: Has dedicated folders for applications, templates, compliance rules, and configuration management.
├── src/

│   ├── applications/     # Folder for Streamlit applications

│   │   ├── main_app/     # Main dashboard application

│   │   ├── components/   # Shared components

│   │   └── <your_apps>/  # Your custom application

│   │   └── <your_apps2>/ # Your 2nd custom application

│   ├── templates/        # Application and page templates

│   ├── compliance/       # Compliance rules and checks

│   └── setup/            # Setup and configuration utilities

├── tests/                # Test files

├── config.yml            # Environment configuration

├── Makefile              # Build and deployment automation

└── README.md             # Main README.md file
- Streamlined workflow: Takes local development through testing schema to production, all automated through GitLab CI/CD pipelines.
<p></p> <center><i>GitLab CI/CD pipelines for full automation of the process</i></center>
Security and compliance by design
Instead of bolting on security as an afterthought, the structured Streamlit Application Framework builds it in from the ground up. Every application adheres to the same security standards, and compliance requirements are automatically enforced. Audit trails are maintained throughout the development lifecycle.
We introduce our compliance rules and verify them with a single command. For instance, we can list which classes and methods are mandatory to use, which files you should have, and which roles are allowed and which are forbidden to share the application with. The rules are flexible and descriptive; all you need to do is define them in a YAML file:
class_rules:
  - name: "Inherit code for the page from GitLabDataStreamlitInit"
    description: "All Streamlit apps must inherit from GitLabDataStreamlitInit"
    severity: "error"
    required: true
    class_name: "*"
    required_base_classes:
      - "GitLabDataStreamlitInit"
    required_methods:
      - "__init__"
      - "set_page_layout"
      - "setup_ui"
      - "run"

function_rules:
  - name: "Main function required"
    description: "Must have a main() function"
    severity: "error"
    required: true
    function_name: "main"

import_rules:
  - name: "Import GitLabDataStreamlitInit"
    description: "Must import the mandatory base class"
    severity: "error"
    required: true
    module_name: "gitlab_data_streamlit_init"
    required_items:
      - "GitLabDataStreamlitInit"
  - name: "Import streamlit"
    description: "Must import streamlit library"
    severity: "error"
    required: true
    module_name: "streamlit"

file_rules:
  - name: "Snowflake configuration required (snowflake.yml)"
    description: "Each application must have a snowflake.yml configuration file"
    severity: "error"
    required: true
    file_pattern: "**/applications/**/snowflake.yml"
    base_path: ""
  - name: "Snowflake environment required (environment.yml)"
    description: "Each application must have a environment.yml configuration file"
    severity: "error"
    required: true
    file_pattern: "**/applications/**/environment.yml"
    base_path: ""
  - name: "Share specification required (share.yml)"
    description: "Each application must have a share.yml file"
    severity: "warning"
    required: true
    file_pattern: "**/applications/**/share.yml"
    base_path: ""
  - name: "README.md required (README.md)"
    description: "Each application should have a README.md file with a proper documentation"
    severity: "error"
    required: true
    file_pattern: "**/applications/**/README.md"
    base_path: ""
  - name: "Starting point recommended (dashboard.py)"
    description: "Each application must have a dashboard.py as a starting point"
    severity: "warning"
    required: true
    file_pattern: "**/applications/**/dashboard.py"
    base_path: ""

sql_rules:
  - name: "SQL files must contain only SELECT statements"
    description: "SQL files and SQL code in other files should only contain SELECT statements for data safety"
    severity: "error"
    required: true
    file_extensions: [".sql", ".py"]
    select_only: true
    forbidden_statements:
      - ....
    case_sensitive: false
  - name: "SQL queries should include proper SELECT statements"
    description: "When SQL is present, it should contain proper SELECT statements"
    severity: "warning"
    required: false
    file_extensions: [".sql", ".py"]
    required_statements:
      - "SELECT"
    case_sensitive: false

share_rules:
  - name: "Valid functional roles in share.yml"
    description: "Share.yml files must contain only valid functional roles from the approved list"
    severity: "error"
    required: true
    file_pattern: "**/applications/**/share.yml"
    valid_roles:
      - ...
    safe_data_roles:
      - ...
  - name: "Share.yml file format validation"
    description: "Share.yml files must follow the correct YAML format structure"
    severity: "error"
    required: true
    file_pattern: "**/applications/**/share.yml"
    required_keys:
      - "share"
    min_roles: 1
    max_roles: 10
With one command running:
╰─$ make streamlit-rules
We can verify all the rules we have created and validate that the developers (who are building a Streamlit application) are following the policy specified by the creators (who determine the policies and building blocks of the framework), and that all the building blocks are in the right place. This ensures consistent behavior across all Streamlit applications.
🔍 Running Streamlit compliance check...

================================================================================

CODE COMPLIANCE REPORT

================================================================================

Generated: 2025-08-18 17:05:12

Files checked: 4


SUMMARY:

✅ Passed: 4

❌ Failed: 0

Success Rate: 100.0%


APPLICATION COMPLIANCE SUMMARY:

📱 Total Applications Checked: 1

⚠️ Applications with Issues: 0

📊 File Compliance Rate: 100.0%


DETAILED RESULTS BY APPLICATION:

================================================================================

✅ PASS APPLICATION: main_app

------------------------------------------------------------

📁 FILES ANALYZED (4):

✅ dashboard.py

📦 Classes: SnowflakeConnectionTester

🔧 Functions: main

📥 Imports: os, pwd, gitlab_data_streamlit_init, snowflake.snowpark.exceptions, streamlit


✅ show_streamlit_apps.py

📦 Classes: ShowStreamlitApps

🔧 Functions: main

📥 Imports: pandas, gitlab_data_streamlit_init, snowflake_session, streamlit


✅ available_packages.py

📦 Classes: AvailablePackages

🔧 Functions: main

📥 Imports: pandas, gitlab_data_streamlit_init, streamlit


✅ share.yml

👥 Share Roles: snowflake_analyst_safe


📄 FILE COMPLIANCE FOR MAIN_APP:

✅ Required files found:

✓ snowflake.yml

✓ environment.yml

✓ share.yml

✓ README.md

✓ dashboard.py


RULES CHECKED:

----------------------------------------

Class Rules (1):

- Inherit code for the page from GitLabDataStreamlitInit (error)


Function Rules (1):

- Main function required (error)


Import Rules (2):

- Import GitLabDataStreamlitInit (error)

- Import streamlit (error)


File Rules (5):

- Snowflake configuration required (snowflake.yml) (error)

- Snowflake environment required (environment.yml) (error)

- Share specification required (share.yml) (warning)

- README.md required (README.md) (error)

- Starting point recommended (dashboard.py) (warning)


SQL Rules (2):

- SQL files must contain only SELECT statements (error)

🗄 SELECT-only mode enabled

🚨 Forbidden: INSERT, UPDATE, DELETE, DROP, ALTER...

- SQL queries should include proper SELECT statements (warning)


Share Rules (2):

- Valid functional roles in share.yml (error)

👥 Valid roles: 15 roles defined

🔒 Safe data roles: 11 roles

- Share.yml file format validation (error)

------------------------------------------------------------

✅ Compliance check passed

-----------------------------------------------------------
Developer experience that works
Whether you prefer your favorite IDE, a web-based development environment, or Snowflake Snowsight, the experience remains consistent. The framework provides:
- Template-driven development: New applications and pages are created through standardized templates, ensuring consistency and best practices from day one. No more scattered design and elements.
╰─$ make streamlit-new-app NAME=sales_dashboard

🔧 Configuration Environment: TEST

📝 Configuration File: config.yml

📜 Config Loader Script: ./setup/get_config.sh

🐍 Python Version: 3.12

📁 Applications Directory: ./src/applications

🗄 Database: ...

📊 Schema: ...

🏗 Stage: ...

🏭 Warehouse: ...

🆕 Creating new Streamlit app: sales_dashboard

Initialized the new project in ./src/applications/sales_dashboard
- Poetry package management: All dependencies are managed through Poetry, creating isolated environments that won't disrupt your existing Python setup.
[tool.poetry]

name = "GitLab Data Streamlit"

version = "0.1.1"

description = "GitLab Data Team Streamlit project"

authors = ["GitLab Data Team <*****@gitlab.com>"]

readme = "README.md"


[tool.poetry.dependencies]

python = "<3.13,>=3.12"

snowflake-snowpark-python = "==1.32.0"

snowflake-connector-python = {extras = ["development", "pandas", "secure-local-storage"], version = "^3.15.0"}

streamlit = "==1.22.0"

watchdog = "^6.0.0"

types-toml = "^0.10.8.20240310"

pytest = "==7.0.0"

black = "==25.1.0"

importlib-metadata = "==4.13.0"

pyyaml = "==6.0.2"

python-qualiter = "*"

ruff = "^0.1.0"

types-pyyaml = "^6.0.12.20250516"

jinja2 = "==3.1.6"


[build-system]

requires = ["poetry-core"]

build-backend = "poetry.core.masonry.api"
- Multi-page application support: Creators can easily build complex applications with multiple pages and add new libraries as needed. Multi-page applications are part of the framework and a developer is focusing on the logic, not the design and structuring.
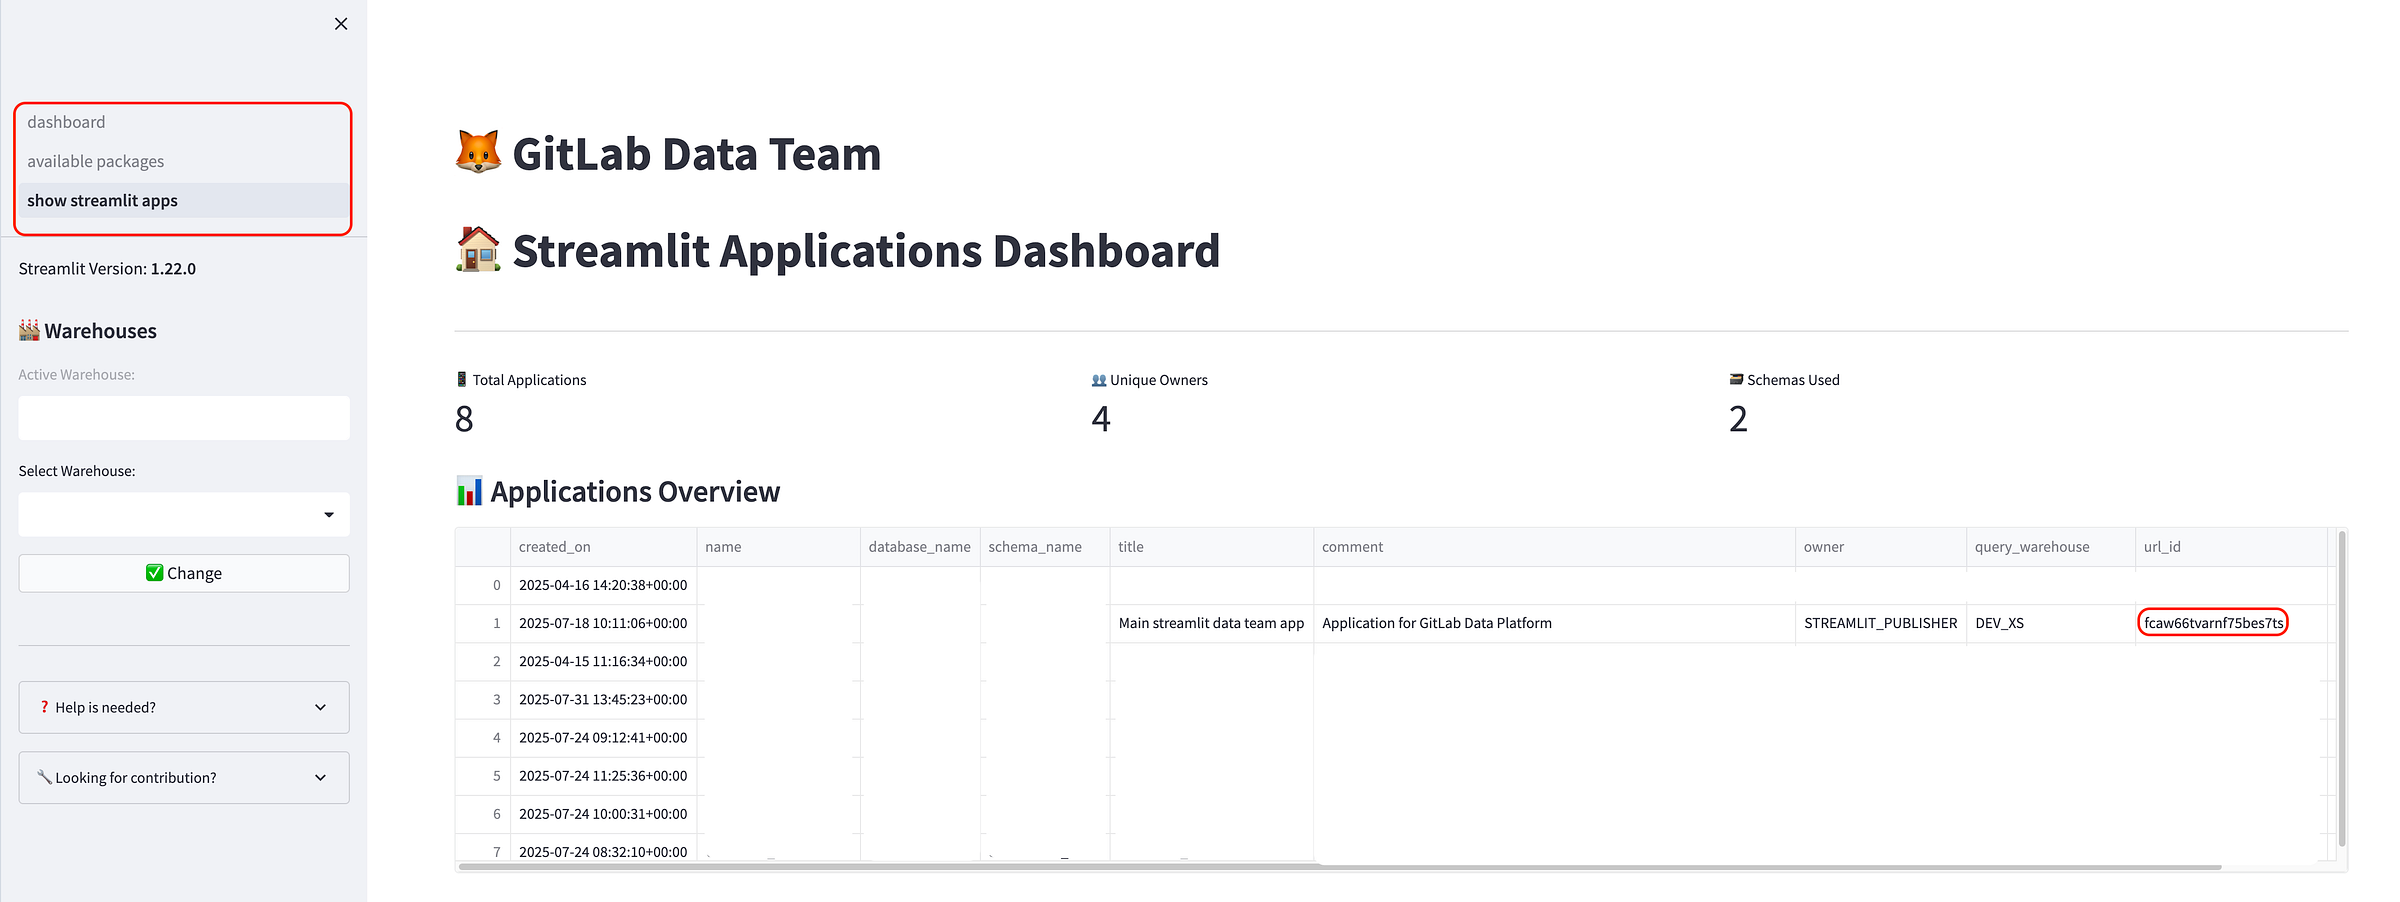
<p></p>
<center><i>Multipage application example (in Snowflake)</i></center>
<p></p>
- Seamless Snowflake integration: Built-in connectors and authentication handling for secure data access provide the same experience, whether in local development or directly in Snowflake.
make streamlit-push-test APPLICATION_NAME=sales_dashboard

📤 Deploying Streamlit app to test environment: sales_dashboard

...

------------------------------------------------------------------------------------------------------------

🔗 Running share command for application: sales_dashboard

Running commands to grant shares

🚀 Executing: snow streamlit share sales_dashboard with SOME_NICE_ROLE

✅ Command executed successfully

📊 Execution Summary: 1/1 commands succeeded
-
Comprehensive Makefile: All common commands are wrapped in simple Makefile commands, from local development to testing and deployment, including CI/CD pipelines.
-
Safe local development: Everything runs in isolated Poetry environments, protecting your system while providing production-like experiences.
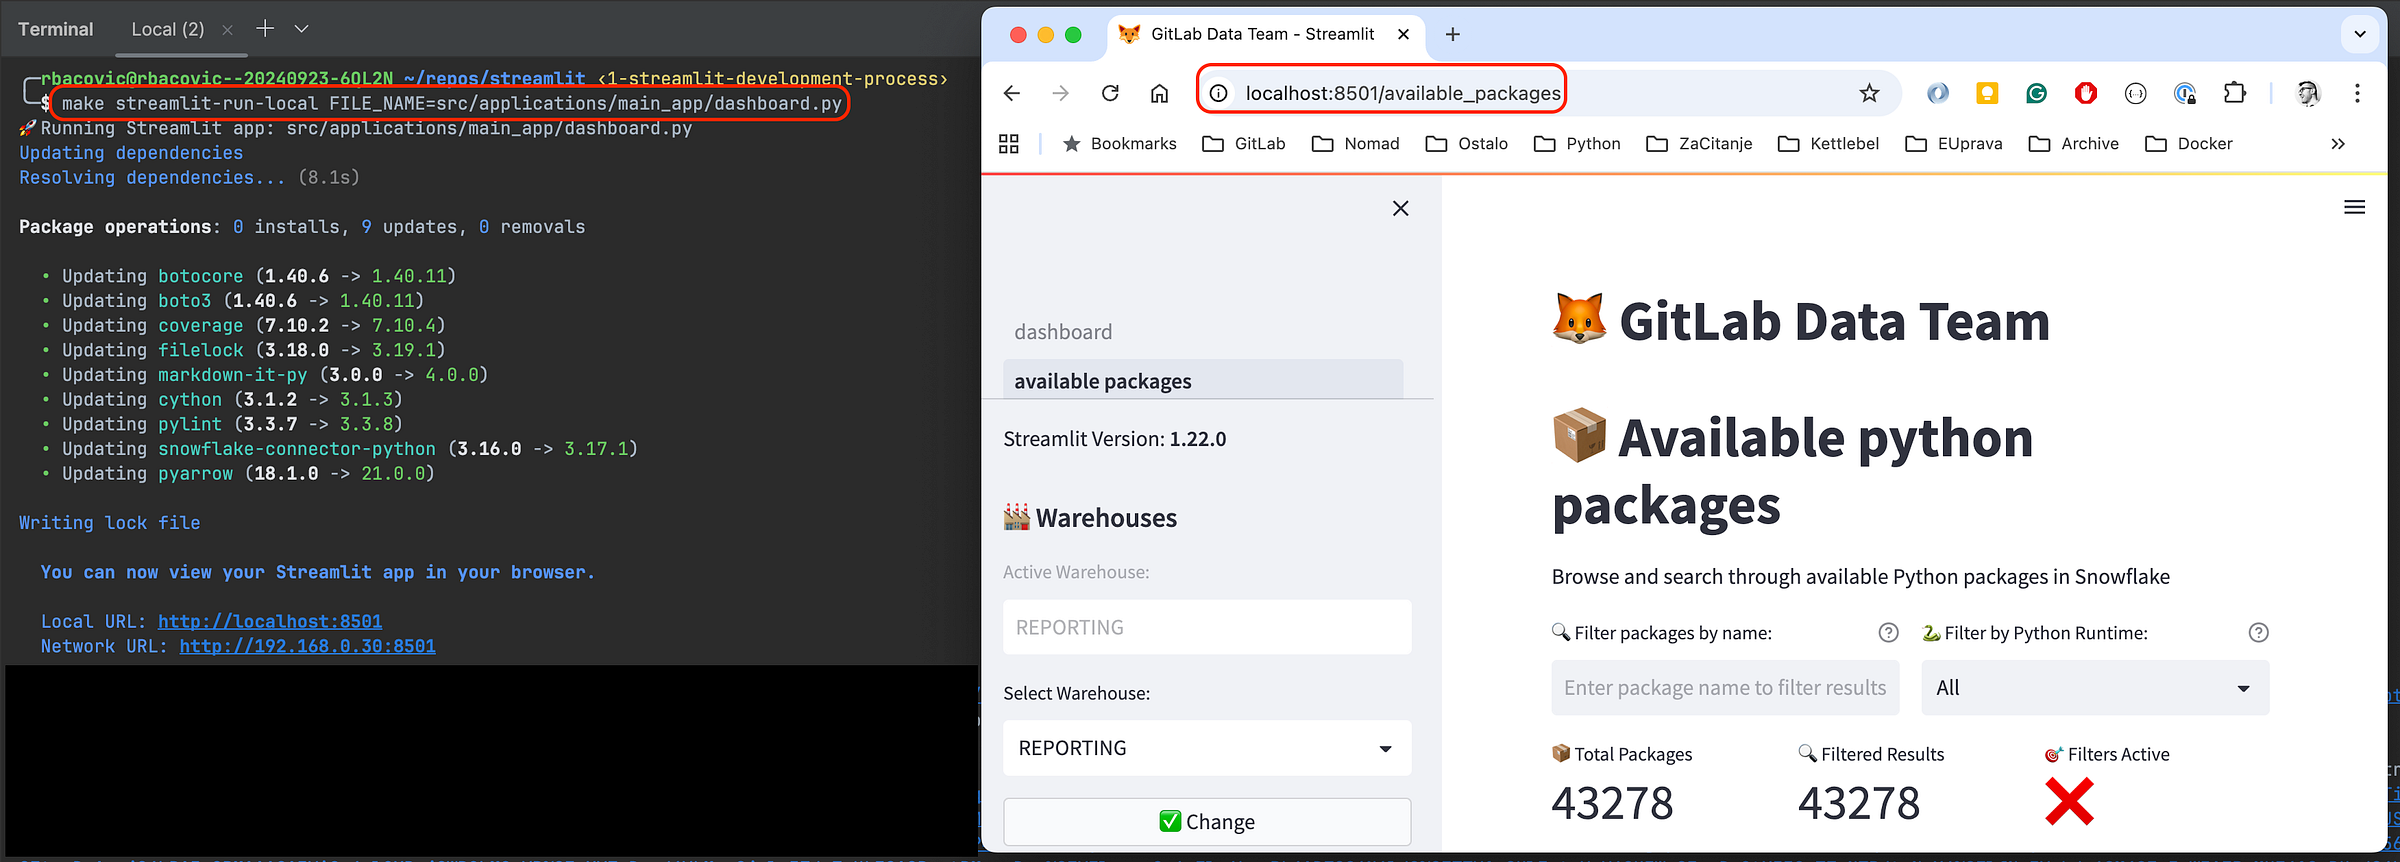
<p></p>
<center><i>Same experience despite the environment (example of the local development)</i></center>
<p></p>
- Collaboration via code: All applications and components are wrapped up in one repository, which allows the entire organization to collaborate on the same resources and avoid double work and redundant setup.
How you can get started
If you're facing similar challenges with scattered Streamlit applications, here's how to begin and move quickly:
-
Assess your current state: Inventory your existing applications and identify pain points.
-
Define your roles: Separate maintainer responsibilities from creator and end users' needs.
-
Start with templates: Create standardized application templates that enforce your security and compliance requirements.
-
Implement CI/CD: Automate your deployment pipeline to reduce manual errors and ensure consistency.
<p></p>
<center><i>The application deployed in Snowflake</i></center>
The bigger picture
This framework represents more than just a technical solution — it's a paradigm shift toward treating data applications as first-class citizens in your enterprise (data) architecture.
By providing structure without sacrificing flexibility, the GitLab Data team created an environment where anyone in the company with minimal technical knowledge can innovate rapidly while maintaining the highest standards of security and compliance.
What's next?
We're continuing to enhance the framework based on user feedback and emerging needs. Future improvements include expanded template libraries, enhanced monitoring capabilities, more flexibility, and a smoother user experience.
The goal isn't just to solve today's problems, but to create a foundation that scales with your organization's growing data application needs.
Summary
The GitLab Data Team transformed dozens of scattered, insecure Streamlit applications with no standardization into a unified, enterprise-grade framework that separates roles cleanly:
-
Maintainers handle infrastructure and security.
-
Creators focus on building applications without deployment headaches.
-
Viewers access polished, compliant apps.
And we used these building blocks:
-
Automated CI/CD pipelines
-
Fully collaborative and versioned code in git
-
Template-based development
-
Built-in security compliance, testing
-
Poetry-managed environments
We eliminated the maintenance nightmare while enabling rapid innovation — proving that you can have both structure and flexibility when you treat data applications as first-class enterprise assets rather than throwaway prototypes.
]]>Here's how to configure object storage for maximum performance, security,
and reliability across your GitLab components.
Use consolidated form for GitLab components
For artifacts, LFS, uploads, packages, and other GitLab data, eliminate credential duplication with the consolidated form:
gitlab_rails['object_store']['enabled'] = true

gitlab_rails['object_store']['connection'] = {
  'provider' => 'AWS',
  'region' => 'us-east-1',
  'use_iam_profile' => true
}

gitlab_rails['object_store']['objects']['artifacts']['bucket'] = 'gitlab-artifacts'

gitlab_rails['object_store']['objects']['lfs']['bucket'] = 'gitlab-lfs'

# ... additional buckets for each object type
This reduces complexity while enabling encrypted S3 buckets and proper Content-MD5 headers.
Configure container registry separately
The container registry requires its own configuration since it doesn't support the consolidated form:
registry['storage'] = {
  's3_v2' => {  # Use the new v2 driver
    'bucket' => 'gitlab-registry',
    'region' => 'us-east-1',
    # Omit access keys to use IAM roles
  }
}
Note: The s3_v1 driver is deprecated and will be removed in GitLab 19.0. Migrate to s3_v2 for better performance and reliability.
Disable proxy download for performance
Set proxy_download to false (default) for direct downloads:
# For GitLab objects - can be set globally

gitlab_rails['object_store']['proxy_download'] = false

# Or configure per bucket for granular control

gitlab_rails['object_store']['objects']['artifacts']['proxy_download'] = false

gitlab_rails['object_store']['objects']['lfs']['proxy_download'] = false

gitlab_rails['object_store']['objects']['uploads']['proxy_download'] = true  # Example: keep proxy for uploads

# Container registry defaults to redirect mode (direct downloads)

# Only disable if your environment requires it:

registry['storage']['redirect']['disable'] = false  # Keep as false
Important: The proxy_download option can be configured globally at the object-store level or individually per bucket. This gives you flexibility to optimize based on your specific use case — for example, you might want direct downloads for large artifacts and LFS files, but proxy smaller uploads through GitLab for additional security controls.
This dramatically reduces server load and egress costs by letting clients download directly from object storage.
Choose identity-based authentication
AWS: Use IAM roles instead of access keys:
# GitLab objects

gitlab_rails['object_store']['connection'] = {
  'provider' => 'AWS',
  'use_iam_profile' => true
}

# Container registry

registry['storage'] = {
  's3_v2' => {
    'bucket' => 'gitlab-registry',
    'region' => 'us-east-1'
    # No access keys = IAM role authentication
  }
}
Google Cloud Platform: Enable application default credentials:
gitlab_rails['object_store']['connection'] = {
  'provider' => 'Google',
  'google_application_default' => true
}
Azure: Use workload identities by omitting storage access keys.
Add encryption layers
Enable server-side encryption for additional security:
# GitLab objects

gitlab_rails['object_store']['storage_options'] = {
  'server_side_encryption' => 'AES256'
}

# Container registry

registry['storage'] = {
  's3_v2' => {
    'bucket' => 'gitlab-registry',
    'encrypt' => true
  }
}
For AWS KMS encryption, specify the key ARN in server_side_encryption_kms_key_id.
Use separate buckets for organization
Create dedicated buckets for each component:
-
gitlab-artifacts - CI/CD job artifacts
-
gitlab-lfs - Git LFS objects
-
gitlab-uploads - User uploads
-
gitlab-packages - Package registry
-
gitlab-registry - Container images
This isolation improves security, enables granular access controls, and simplifies cost tracking.
Key configuration differences
| Component | Consolidated Form | Identity Auth | Encryption | Direct Downloads |
|---|---|---|---|---|
| Artifacts, LFS, Packages | ✅ Supported | ✅ use_iam_profile | ✅ storage_options | ✅ proxy_download: false |
| Container Registry | ❌ Separate config | ✅ Omit access keys | ✅ encrypt: true | ✅ redirect enabled by default |
Migration path
-
Start with GitLab objects: Use the consolidated form for immediate complexity reduction.
-
Configure registry separately: Use s3_v2 driver with IAM authentication.
-
Enable encryption: Add server-side encryption for both components.
-
Optimize performance: Ensure direct downloads are enabled with appropriate
proxy_downloadsettings. -
Set up lifecycle policies: Configure S3 lifecycle rules to clean up incomplete multipart uploads.
Additional resources
For a complete AWS S3 configuration example, see the GitLab documentation on AWS S3 object storage setup.
For more details on configuring proxy_download parameters per bucket, refer to the GitLab object storage configuration documentation.
These configurations will scale with your growth while maintaining security and performance. The separation between GitLab object storage and container registry configurations reflects their different underlying architectures, but both benefit from the same optimization principles.
]]>I recently spoke with a platform engineer at a Fortune 500 company who told me, "I spend more time managing artifact repositories than I do on actual platform improvements." That conversation reminded me why we need an honest discussion about the real costs of fragmented artifact management — and what platform teams can realistically do about it. This article will help you better understand the problem and how GitLab can help you solve it through strategic consolidation.
Real-world impact: The numbers
Based on data from our customers and industry research, fragmented artifact management typically results in the following costs for a midsize organization (500+ developers):
- Licensing: $50,000-200,000 annually across multiple tools
- Operational overhead: 2-3 FTE's equivalent time spent on artifact management tasks
- Storage inefficiency: 20%-30% higher storage costs due to duplication and poor lifecycle management
- Developer productivity loss: 15-20 minutes daily per developer due to artifact-related friction
For large enterprises, these numbers multiply significantly. One customer calculated they were spending over $500,000 annually just on the operational overhead of managing seven different artifact storage systems.
The hidden costs compound daily:
Time multiplication: Every lifecycle policy, security rule, or access control change must be implemented across multiple systems. What should be a 15-minute configuration becomes hours of work.
Security gap risks: Managing security policies across disparate systems creates blind spots. Vulnerability scanning, access controls, and audit trails become fragmented.
Context switching tax: Developers lose productivity when they can't find artifacts or need to remember which system stores what.
The multiplication problem
The artifact management landscape has exploded. Where teams once managed a single Maven repository, today's platform engineers juggle:
- Container registries (Docker Hub, ECR, GCR, Azure ACR)
- Package repositories (JFrog Artifactory, Sonatype Nexus)
- Language-specific registries (npm, PyPI, NuGet, Conan)
- Infrastructure artifacts (Terraform modules, Helm charts)
- ML model registries (MLflow, Weights & Biases)
Each tool comes with its own authentication system, lifecycle policies, security scanning, and operational requirements. For organizations with hundreds or thousands of projects, this creates an exponential management burden.
GitLab's strategic approach: Depth over breadth
When we started building GitLab's artifact management capabilities six years ago, we faced a classic product decision: support every artifact format imaginable or go deep on the formats that matter most to enterprise teams. We chose depth, and that decision has shaped everything we've built since.
Our core focus areas
Instead of building shallow support for 20+ formats, we committed to delivering enterprise-grade capabilities for a strategic set:
- Maven (Java ecosystem)
- npm (JavaScript/Node.js)
- Docker/OCI (container images)
- PyPI (Python packages)
- NuGet (C#/.NET packages)
- Generic packages (any binary artifact)
- Terraform modules (infrastructure as code)
These seven formats account for approximately 80% of artifact usage in enterprise environments, based on our customer data.
What 'enterprise-grade' actually means
By focusing on fewer formats, we can deliver capabilities that work in production environments with hundreds of developers, terabytes of artifacts, and strict compliance requirements:
Virtual registries: Proxy and cache upstream dependencies for reliable builds and supply chain control. Currently production-ready for Maven, with npm and Docker coming in early 2026.
Lifecycle management: Automated cleanup policies that prevent storage costs from spiraling while preserving artifacts for compliance. Available at the project level today, organization-level policies planned for mid-2026.
Security integration: Built-in vulnerability scanning, dependency analysis, and policy enforcement. Our upcoming Dependency Firewall (planned for late 2026) will provide supply chain security control across all formats.
Deep CI/CD integration: Complete traceability from source commit to deployed artifact, with build provenance and security scan results embedded in artifact metadata.
Current capabilities: Battle-tested features
Maven virtual registries: Our flagship enterprise capability, proven with 15+ enterprise customers. Most complete Maven virtual registry setup within two months, with minimal GitLab support required.
Locally-hosted repositories: All seven supported formats offer complete upload, download, versioning, and access control capabilities supporting critical workloads at organizations with thousands of developers.
Protected artifacts: Comprehensive protection preventing unauthorized modifications, supporting fine-grained access controls across all formats.
Project-level lifecycle policies: Automated cleanup and retention policies for storage cost control and compliance.
Performance and scale characteristics
Based on current production deployments:
- Throughput: 10,000+ artifact downloads per minute/per instance
- Storage: Customers successfully managing 50+ TB of artifacts
- Concurrent users: 1,000+ developers accessing artifacts simultaneously
- Availability: 99.99% uptime for GitLab.com for more than 2 years
Strategic roadmap: Next 18 months
Q1 2026
- npm virtual registries: Enterprise proxy/cache for JavaScript packages
- Docker virtual registries: Container registry proxy capabilities
Q2 2026
- Organization-level lifecycle policies (Beta): Centralized cleanup policies with project overrides
- NuGet virtual registries (Beta): .NET package proxy support
- PyPI virtual registries (Beta): Completing virtual registry support for Python
Q3 2026
- Advanced Analytics Dashboard: Storage optimization and usage insights
Q4 2026
- Dependency Firewall (Beta): Supply chain security control for all artifact types
When to choose GitLab: Decision framework
GitLab is likely the right choice if:
- 80%+ of your artifacts are in our seven supported formats
- You're already using GitLab for source code or CI/CD
- You value integrated workflows over standalone feature richness
- You want to reduce the operational complexity of managing multiple systems
- You need complete traceability from source to deployment
Migration considerations
Typical timeline: 2-4 months for complete migration from Artifactory/Nexus
Common challenges: Virtual registry configuration, access control mapping, and developer workflow changes
Success factors: Phased approach, comprehensive testing, and developer training
Most successful migrations follow this pattern:
- Assessment (2-4 weeks): Catalog current artifacts and usage patterns
- Pilot (4-6 weeks): Migrate one team/project end-to-end
- Rollout (6-12 weeks): Gradual migration with parallel systems
- Optimization (ongoing): Implement advanced features and policies
Better artifact management can start today
GitLab's artifact management isn't trying to be everything to everyone. We've made strategic trade-offs: deep capabilities for core enterprise formats rather than shallow support for everything.
If your artifact needs align with our supported formats and you value integrated workflows, we can significantly reduce your operational overhead while improving developer experience.
Our goal is to help you make informed decisions about your artifact management strategy with a clear understanding of capabilities and our roadmap.
Please reach out to me at trizzi@gitlab.com to learn more about GitLab artifact management. I can discuss specific requirements and connect you with our technical team for a deeper evaluation.
This blog contains information related to upcoming products, features, and functionality. It is important to note that the information in this blog post is for informational purposes only. Please do not rely on this information for purchasing or planning purposes. As with all projects, the items mentioned in this blog and linked pages are subject to change or delay. The development, release, and timing of any products, features, or functionality remain at the sole discretion of GitLab.
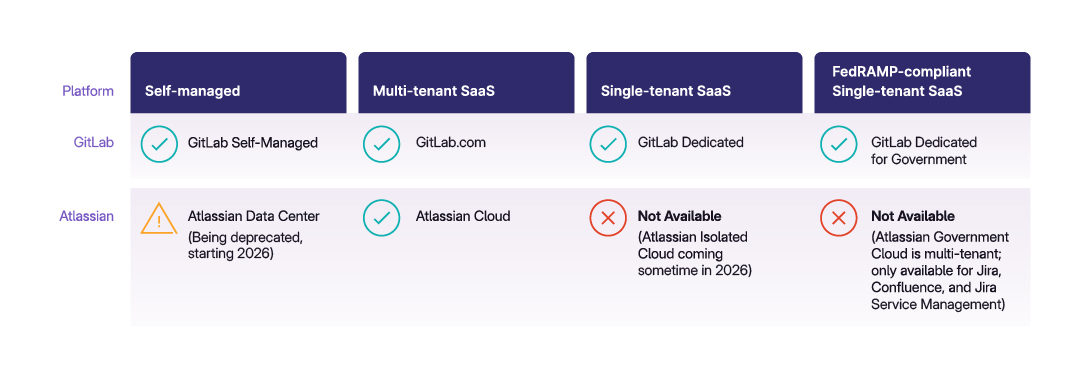
]]>While other vendors force migrations to cloud-only architectures, GitLab remains committed to supporting the deployment choices that match your business needs. Whether you're managing sensitive government data, operating in air-gapped environments, or simply prefer the control of self-managed deployments, we understand that one size doesn't fit all.
The cloud isn't the answer for everyone
For the many companies that invested millions of dollars in Data Center deployments, including those that migrated to Data Center after its Server products were discontinued, this announcement represents more than a product sunset. It signals a fundamental shift away from customer-centric architecture choices, forcing enterprises into difficult positions: accept a deployment model that doesn't fit their needs, or find a vendor that respects their requirements.
Many of the organizations requiring self-managed deployments represent some of the world's most important organizations: healthcare systems protecting patient data, financial institutions managing trillions in assets, government agencies safeguarding national security, and defense contractors operating in air-gapped environments.
These organizations don't choose self-managed deployments for convenience; they choose them for compliance, security, and sovereignty requirements that cloud-only architectures simply cannot meet. Organizations operating in closed environments with restricted or no internet access aren't exceptions — they represent a significant portion of enterprise customers across various industries.
The real cost of forced cloud migration goes beyond dollars
While cloud-only vendors frame mandatory migrations as "upgrades," organizations face substantial challenges beyond simple financial costs:
-
Lost integration capabilities: Years of custom integrations with legacy systems, carefully crafted workflows, and enterprise-specific automations become obsolete. Organizations with deep integrations to legacy systems often find cloud migration technically infeasible.
-
Regulatory constraints: For organizations in regulated industries, cloud migration isn't just complex — it's often not permitted. Data residency requirements, air-gapped environments, and strict regulatory frameworks don't bend to vendor preferences. The absence of single-tenant solutions in many cloud-only approaches creates insurmountable compliance barriers.
-
Productivity impacts: Cloud-only architectures often require juggling multiple products: separate tools for planning, code management, CI/CD, and documentation. Each tool means another context switch, another integration to maintain, another potential point of failure. GitLab research shows 30% of developers spend at least 50% of their job maintaining and/or integrating their DevSecOps toolchain. Fragmented architectures exacerbate this challenge rather than solving it.
GitLab offers choice, commitment, and consolidation
Enterprise customers deserve a trustworthy technology partner. That's why we've committed to supporting a range of deployment options — whether you need on-premises for compliance, hybrid for flexibility, or cloud for convenience, the choice remains yours. That commitment continues with GitLab Duo, our AI solution that supports developers at every stage of their workflow.
But we offer more than just deployment flexibility. While other vendors might force you to cobble together their products into a fragmented toolchain, GitLab provides everything in a comprehensive AI-native DevSecOps platform. Source code management, CI/CD, security scanning, Agile planning, and documentation are all managed within a single application and a single vendor relationship.
This isn't theoretical. When Airbus and Iron Mountain evaluated their existing fragmented toolchains, they consistently identified challenges: poor user experience, missing functionalities like built-in security scanning and review apps, and management complexity from plugin troubleshooting. These aren't minor challenges; they're major blockers for modern software delivery.
Your migration path: Simpler than you think
We've helped thousands of organizations migrate from other vendors, and we've built the tools and expertise to make your transition smooth:
-
Automated migration tools: Our Bitbucket Server importer brings over repositories, pull requests, comments, and even Large File Storage (LFS) objects. For Jira, our built-in importer handles issues, descriptions, and labels, with professional services available for complex migrations.
-
Proven at scale: A 500 GiB repository with 13,000 pull requests, 10,000 branches, and 7,000 tags is likely to take just 8 hours to migrate from Bitbucket to GitLab using parallel processing.
-
Immediate ROI: A Forrester Consulting Total Economic Impact™ study commissioned by GitLab found that investing in GitLab Ultimate confirms these benefits translate to real bottom-line impact, with a three-year 483% ROI, 5x time saved in security related activities, and 25% savings in software toolchain costs.
Start your journey to a unified DevSecOps platform
Forward-thinking organizations aren't waiting for vendor-mandated deadlines. They're evaluating alternatives now, while they have time to migrate thoughtfully to platforms that protect their investments and deliver on promises.
Organizations invest in self-managed deployments because they need control, compliance, and customization. When vendors deprecate these capabilities, they remove not just features but the fundamental ability to choose environments matching business requirements.
Modern DevSecOps platforms should offer complete functionality that respects deployment needs, consolidates toolchains, and accelerates software delivery, without forcing compromises on security or data sovereignty.
Talk to our sales team today about your migration options, or explore our comprehensive migration resources to see how thousands of organizations have already made the switch.
You also can try GitLab Ultimate with GitLab Duo Enterprise for free for 30 days to see what a unified DevSecOps platform can do for your organization.
]]>GitLab's managed lifecycle environments solve these virtual testing challenges. Through virtual environment automation, GitLab accelerates embedded development cycles without the configuration complexity and cost overruns.
Virtual testing challenges
Virtual testing environments — simulated hardware setups that replicate embedded system behavior and real-world conditions — offer the potential to reduce hardware bottlenecks. Teams can test firmware on simulated processors, run model-in-the-loop (MIL) tests in MATLAB/Simulink, or verify software on virtual embedded systems without waiting for physical hardware access.
However, teams often implement virtual environments using one of two common approaches, both of which create unsustainable challenges.
Flawed approach 1: Pipeline lifecycle environments
Pipeline lifecycle environments re-create the entire testing setup for every CI/CD run. When code changes trigger your CI/CD pipeline, the system provisions infrastructure, installs software simulations, and configures everything from scratch before running tests.
This approach works for simple scenarios but becomes inefficient as complexity rises. Consider software-in-the-loop (SIL) testing in a complex virtual environment, for example. Each pipeline run requires complete environment re-creation, including virtual processor provisioning, toolchain installations, and target configurations. These processes can eat up considerable time.
Moreover, as embedded systems require more sophisticated virtual hardware configurations, the provisioning costs quickly add up.
To avoid these rebuild costs and delays, many teams turn to long-lived environments that persist between test runs. But they come with downsides.
Flawed approach 2: Long-lived environments
Long-lived environments persist indefinitely to avoid constant rebuilding. Developers request these environments from IT or DevOps teams, wait for approval, then need someone to manually provision the infrastructure. These environments are then tied to individual developers/teams rather than specific code changes, and they support ongoing development work across multiple projects.
While this eliminates rebuild overhead, it creates environment sprawl. Environments accumulate without a clear termination date. Infrastructure costs climb as environments consume resources indefinitely.
Long-lived environments also suffer from "config rot" — environments retain settings, cached data, or software versions from previous tests that can affect subsequent results. A test that should fail ends up passing due to the residue of previous testing.
Ultimately, managing long-lived environments is a manual process that slows development velocity and increases operational overhead.
GitLab offers a third approach through “managed lifecycle environments.” This approach captures the benefits of both long-lived and pipeline lifecycle environments while avoiding the drawbacks.
Solution: Managed lifecycle environments
GitLab's managed lifecycle environments tie virtual testing setups to merge requests (MRs) rather than pipeline runs or individual developers. You can also think of them as “managed MR test environments.” When you create an MR for a new feature, GitLab automatically orchestrates the provisioning of necessary virtual testing environments. These environments persist throughout the entire feature development process.
Key benefits
-
Persistent environments without rebuilding: The same virtual environment handles multiple pipeline runs as you iterate on your feature. Whether you're running MIL tests in MATLAB/Simulink or SIL tests on specialized embedded processors, the environment remains configured and ready.
-
Automatic cleanup: When you merge your feature and delete the branch, GitLab automatically triggers environment cleanup, eliminating environment sprawl.
-
Single source of truth: The MR records all build results, test outcomes, and environment metadata in one location. Team members can track progress and collaborate without shuffling between different tools or spreadsheets.
Watch this overview video to see how managed lifecycle environments work in practice:
<!-- blank line --> <figure class="video_container"> <iframe src="https://www.youtube.com/embed/9tfyVPK5DuI?si=Kj_xXNo02bnFBDhy" frameborder="0" allowfullscreen="true"> </iframe> </figure> <!-- blank line -->
GitLab automates the entire testing workflow. Each time you run firmware tests, GitLab orchestrates testing in the appropriate virtual environment, records results, and provides full visibility into every pipeline run. This approach transforms complex virtual testing from a manual, error-prone process into automated, reliable workflows.
The result: Teams get reusable environments without runaway costs. And they increase efficiency while maintaining clean, isolated testing setups for each feature.
See a demonstration of managed lifecycle environments for testing firmware on virtual hardware:
<!-- blank line --> <figure class="video_container"> <iframe src="https://www.youtube.com/embed/iWdY-kTlpH4?si=D6rpoulr9sv6Sl6E" frameborder="0" allowfullscreen="true"> </iframe> </figure> <!-- blank line -->
Business impact
GitLab's managed lifecycle environments deliver measurable improvements across embedded development workflows. Teams running MIL testing in MATLAB/Simulink and SIL testing on specialized processors like Infineon AURIX or BlackBerry QNX systems no longer face the tradeoff between constant environment rebuilds or uncontrolled environment sprawl. Instead, these complex virtual testing setups persist throughout feature development while automatically cleaning up when complete, enabling:
- Faster product development cycles
- Shorter time-to-market
- Lower infrastructure costs
- Higher quality assurance
Start transforming virtual testing today
Download “Unlocking agility and avoiding runaway costs in embedded development” for a deeper exploration of managed lifecycle environments and learn how to accelerate embedded development workflows dramatically.
]]>Users now have the flexibility to choose Claude Sonnet 4.5 alongside other leading models, enhancing their GitLab Duo experience with upgrades in tool orchestration, context editing, and domain-specific capabilities. With top performance on SWE-bench Verified (77.2%) and strengths in cybersecurity, finance, and research-heavy workflows, GitLab users can apply Claude Sonnet 4.5 to bring sharper insights and deeper context to their development work.
"Having Claude Sonnet 4.5 in GitLab is a big win for developers. It’s a really capable coding model, and, when you use it with the GitLab Duo Agent Platform, you get smarter help right in your workflows. It’s the kind of step that makes development easier," said Taylor McCaslin, Principal, Strategy and Operations for AI Partnerships at GitLab.
GitLab Duo Agent Platform + Claude Sonnet 4.5
GitLab Duo Agent Platform extends the value of Claude Sonnet 4.5 by orchestrating agents, connecting them to internal systems, and integrating them throughout the software lifecycle. This combination creates a uniquely GitLab experience — where advanced reasoning and problem-solving meet platform-wide context and security. The result is faster development, more accurate outcomes, and stronger organizational coverage, all delivered inside the GitLab workflow developers already use every day.
Where you can use Claude Sonnet 4.5
Claude Sonnet 4.5 is now available as a model option in GitLab Duo Agent Platform Agentic Chat on GitLab.com. You can choose Claude Sonnet 4.5 from the model selection dropdown to leverage its advanced coding capabilities for your development tasks.
Note: Ability to select Claude Sonnet 4.5 in supported IDEs will be available soon.
Get started
GitLab Duo Pro and Enterprise customers can access Claude Sonnet 4.5 today. Visit our documentation to learn more about GitLab Duo capabilities and models.
Questions or feedback? Share your experience with us through the GitLab community.
]]>Want to try GitLab Ultimate with Duo Enterprise? Sign up for a free trial today.
Agentic AI is a type of artificial intelligence that leverages advanced language models and natural language processing to take independent action. Unlike traditional generative AI tools that require constant human direction, these systems can understand requests, make decisions, and execute multi-step plans to achieve goals. They tackle complex tasks by breaking them into manageable steps and employ adaptive learning to modify their approach when facing challenges.
Agentic AI insights
- Transform development with agentic AI: The enterprise guide
- GitLab 18.4: AI-native development with automation and insight With GitLab 18.4, teams create custom agents, unlock Knowledge Graph context, and auto-fix pipelines so developers stay focused and in flow.
- GitLab 18.3: Expanding AI orchestration in software engineering Learn how we're advancing human-AI collaboration with enhanced Flows, enterprise governance, and seamless tool integration.
- GitLab Duo Agent Platform Public Beta: Next-gen AI orchestration and more — Introducing the DevSecOps orchestration platform designed to unlock asynchronous collaboration between developers and AI agents.
- GitLab Duo Agent Platform: What's next for intelligent DevSecOps — GitLab Duo Agent Platform, a DevSecOps orchestration platform for humans and AI agents, leverages agentic AI for collaboration across the software development lifecycle.
- From vibe coding to agentic AI: A roadmap for technical leaders — Discover how to implement vibe coding and agentic AI in your development process to increase productivity while maintaining code quality and security.
- Emerging agentic AI trends reshaping software development — Discover how agentic AI transforms development from isolated coding to intelligent workflows that enhance productivity while maintaining security.
- Agentic AI: Unlocking developer potential at scale — Explore how agentic AI is transforming software development, moving beyond code completion to create AI partners that proactively tackle complex tasks.
- Agentic AI, self-hosted models, and more: AI trends for 2025 — Discover key trends in AI for software development, from on-premises model deployments to intelligent, adaptive AI agents.
- How agentic AI unlocks platform engineering potential — Explore how agentic AI elevates platform engineering by automating complex workflows and scaling standardization.
The agentic AI ecosystem
- AI-driven code analysis: The new frontier in code security
- DevOps automation & AI agents
- AI-augmented software development: Agentic AI for DevOps
Best practices for implementing agentic AI
- Implementing effective guardrails for AI agents — Discover essential security guardrails for AI agents in DevSecOps, from compliance controls and infrastructure protection to user access management.
GitLab's agentic AI offerings
GitLab Duo with Amazon Q
- GitLab Duo with Amazon Q: Agentic AI optimized for AWS generally available — The comprehensive AI-powered DevSecOps platform combined with the deepest set of cloud computing capabilities speeds dev cycles, increases automation, and improves code quality.
- DevSecOps + Agentic AI: Now on GitLab Self-Managed Ultimate on AWS — Start using AI-powered, DevSecOps-enhanced agents in your AWS GitLab Self-Managed Ultimate instance. Enjoy the benefits of GitLab Duo and Amazon Q in your organization.
- GitLab Duo with Amazon Q partner page
Watch GitLab Duo with Amazon Q in action:
<div style="padding:56.25% 0 0 0;position:relative;"><iframe src="https://player.vimeo.com/video/1075753390?badge=0&autopause=0&player_id=0&app_id=58479" frameborder="0" allow="autoplay; fullscreen; picture-in-picture; clipboard-write; encrypted-media" style="position:absolute;top:0;left:0;width:100%;height:100%;" title="Technical Demo: GitLab Duo with Amazon Q"></iframe></div><script src="https://player.vimeo.com/api/player.js"></script>
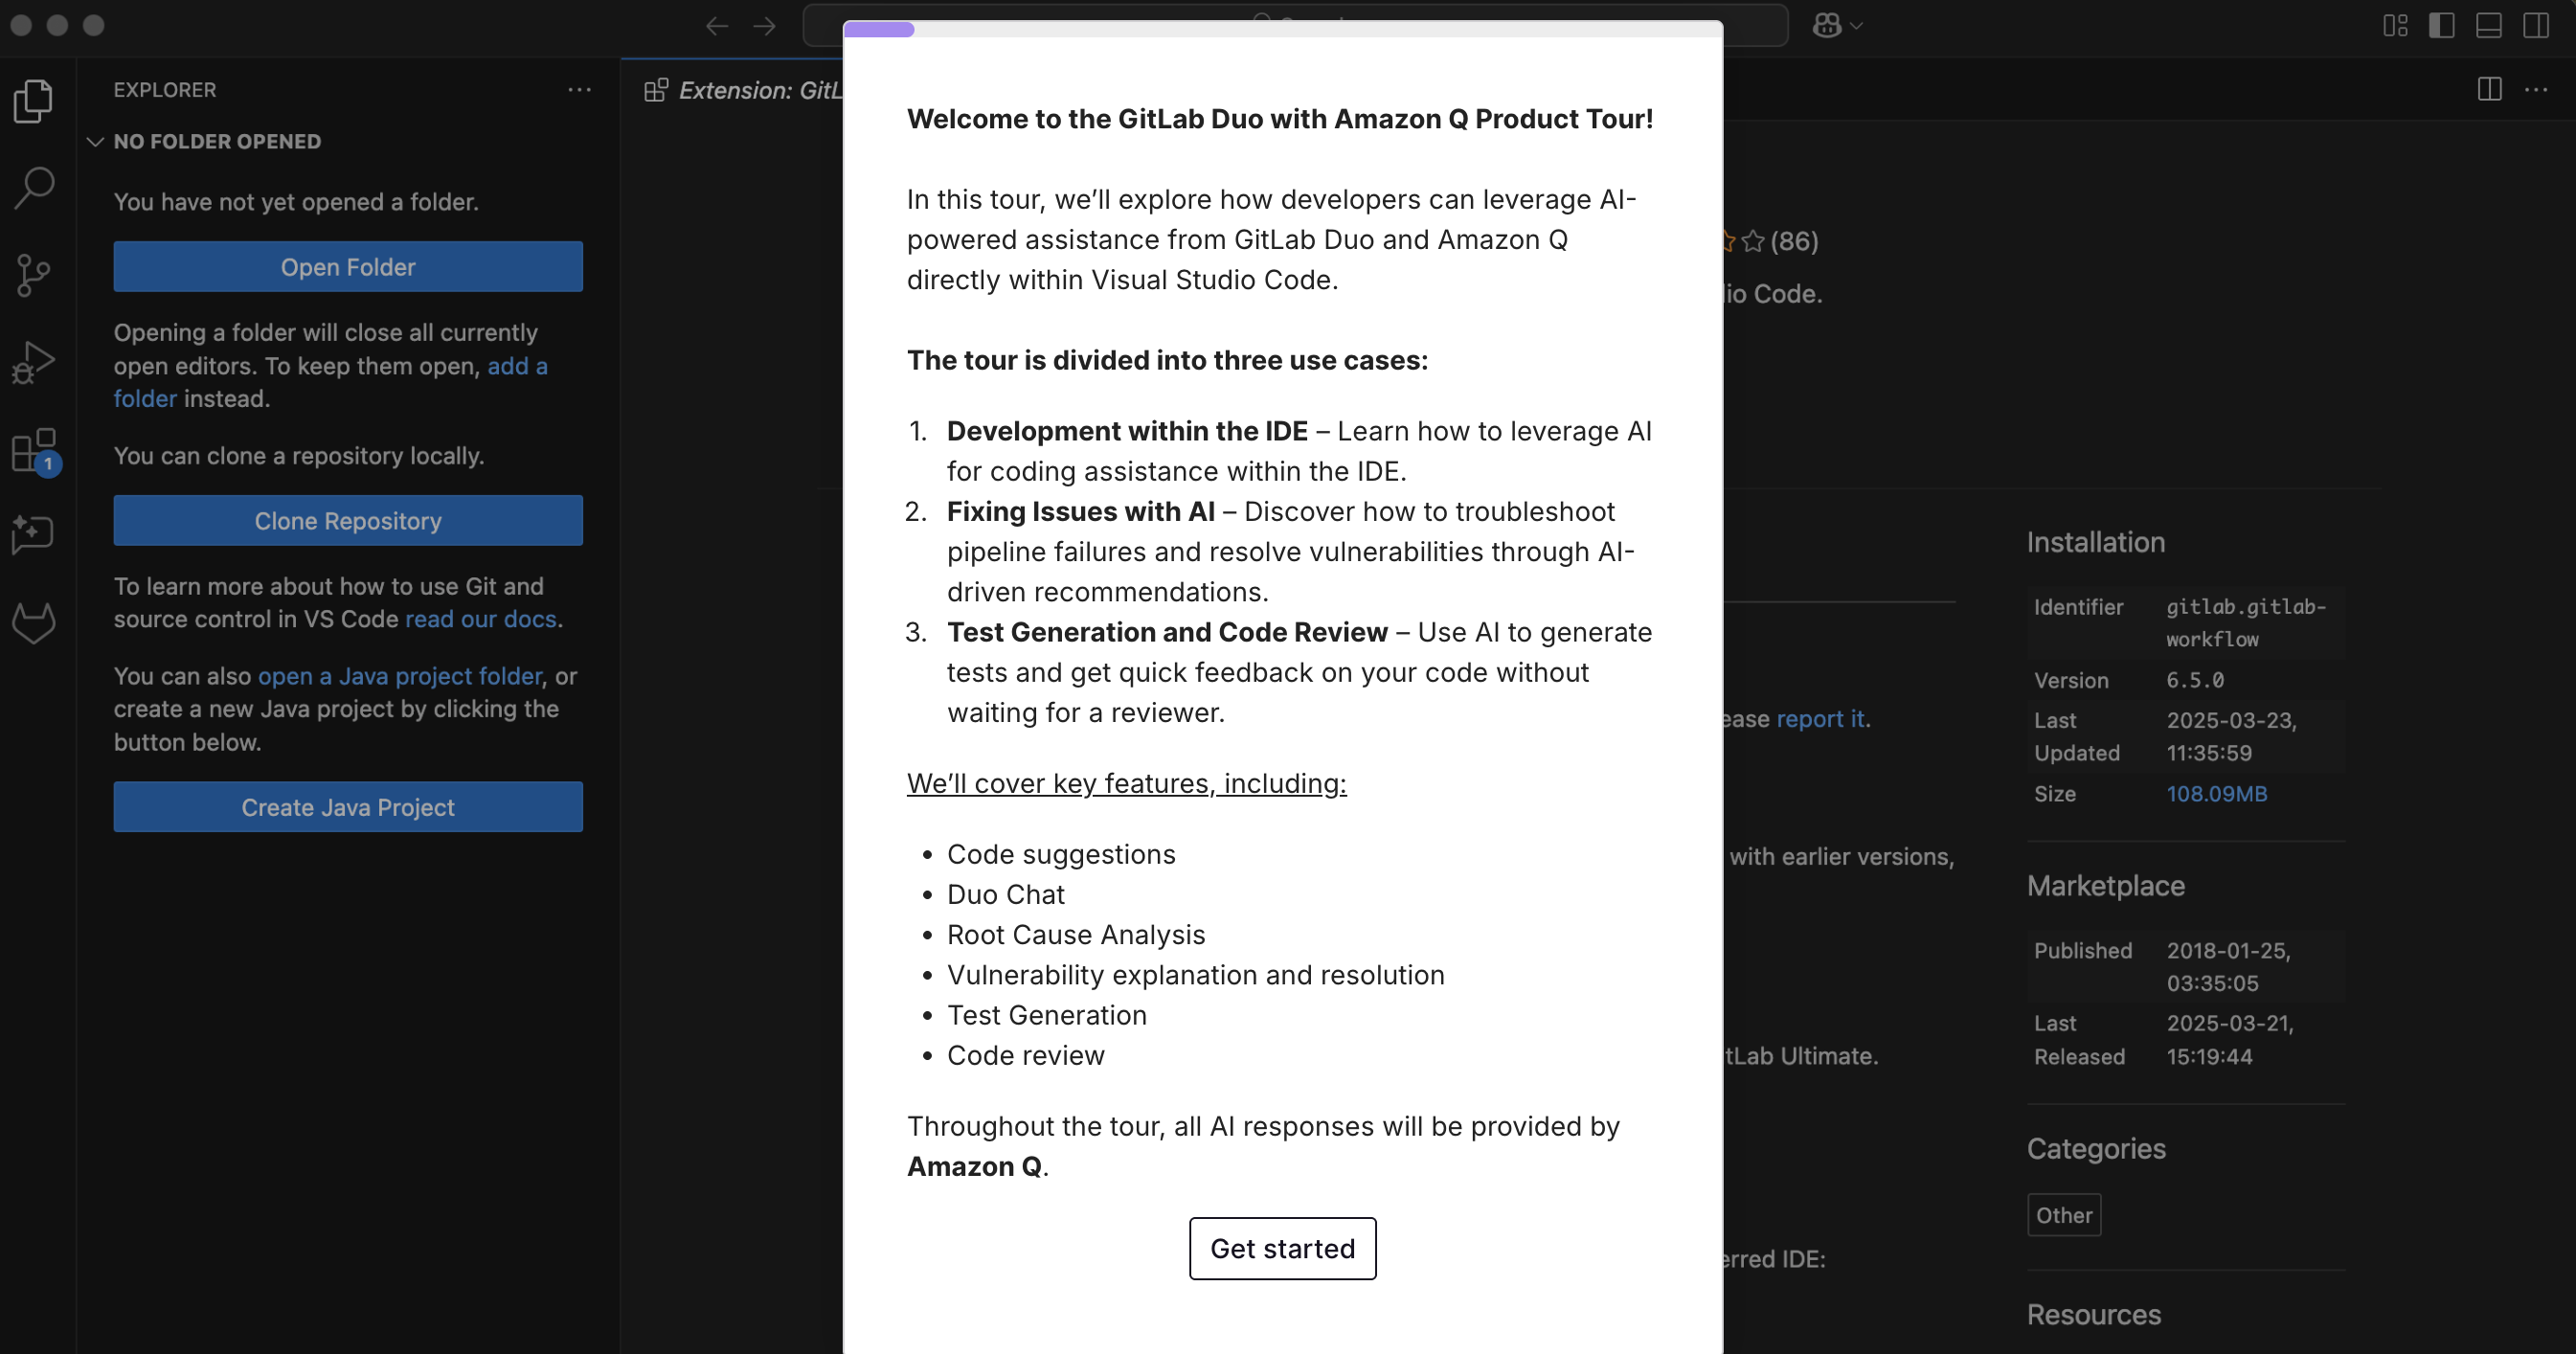
Guided tour
Click on the image to start a tour of GitLab Duo with Amazon Q:
GitLab Duo with Amazon Q tutorials
- Enhance application quality with AI-powered test generation — Learn how GitLab Duo with Amazon Q improves the QA process by automatically generating comprehensive unit tests.
- GitLab Duo + Amazon Q: Transform ideas into code in minutes — The new GitLab Duo with Amazon Q integration analyzes your issue descriptions and automatically generates complete working code solutions, accelerating development workflows.
- Accelerate code reviews with GitLab Duo and Amazon Q — Use AI-powered agents to optimize code reviews by automatically analyzing merge requests and providing comprehensive feedback on bugs, readability, and coding standards.
- Speed up code reviews: Let AI handle the feedback implementation — Discover how GitLab Duo with Amazon Q automates the implementation of code review feedback through AI, transforming a time-consuming manual process into a streamlined workflow.
GitLab Duo Agent Platform
- GitLab Duo Chat gets agentic AI makeover — Our new Duo Chat experience, currently an experimental release, helps developers onboard to projects, understand assignments, implement changes, and more. Watch GitLab Duo Agent Platform in action: <div style="padding:56.25% 0 0 0;position:relative;"><iframe src="https://player.vimeo.com/video/1095679084?badge=0&autopause=0&player_id=0&app_id=58479" frameborder="0" allow="autoplay; fullscreen; picture-in-picture; clipboard-write; encrypted-media; web-share" style="position:absolute;top:0;left:0;width:100%;height:100%;" title="Agent Platform Demo Clip"></iframe></div><script src="https://player.vimeo.com/api/player.js"></script>
GitLab Agent Platform tutorials and use cases
- Vibe coding with GitLab Duo Agent Platform: Issue to MR Flow - Learn how to update your application in minutes with our newest agent Flow that takes developers from idea to code.
- Get started with GitLab Duo Agentic Chat in the web UI - Learn about our new GitLab Duo AI feature that automates tasks by breaking down complex problems and executing operations across multiple sources.
- Custom rules in GitLab Duo Agentic Chat for greater developer efficiency — Discover how AI can understand your codebase, follow your conventions, and generate production-ready code with minimal review cycles.
- Accelerate learning with GitLab Duo Agent Platform — Learn how agentic AI helped generate comprehensive gRPC documentation in minutes, not hours.
- Fast and secure AI agent deployment to Google Cloud with GitLab
Learn more with GitLab University
More AI resources
]]>Now integrated into GitLab Duo Agent Platform, the Model Context Protocol (MCP) gives AI secure access to internal tools so developers can get comprehensive assistance directly within their workflows.
What is MCP?
MCP, first introduced by Anthropic in 2024, is an open standard that connects AI with data and tools. It works as a secure two-way channel: MCP clients (AI applications, autonomous agents, or development tools) request data or actions, and MCP servers provide trusted, authorized responses from their connected data sources.
MCP servers act as secure bridges to various systems: They can connect to databases, APIs, file systems, cloud services, or any external tool to retrieve and provide data. This enables AI tools and agents to go beyond their initial training data by allowing them to access real-time information and execute actions, such as rescheduling meetings or checking calendar availability, while maintaining strict security, privacy, and audit controls.
Why AI use MCP instead of APIs?
You may ask: Why use MCP if AI can already call system APIs directly? The challenge is that each API has its own authentication, data formats, and behaviors, which would require AI to use custom connectors for every system and continuously maintain them as APIs evolve, making direct integrations complex and error-prone. MCP addresses this by providing a standardized, secure interface that handles authentication, permissions, and data translation. This enables AI tools to connect reliably to any system, while simplifying integration and ensuring consistent, safe behavior.
GitLab's MCP support
GitLab extends Duo Agentic Chat with MCP support, shattering the barriers that previously isolated AI from the tools developers use every day. This empowers developers to access their entire toolkit directly from their favorite IDE, in natural language, enabling GitLab Duo Agent Platform to deliver comprehensive assistance without breaking developer flow or forcing disruptive context switches.
GitLab provides comprehensive MCP support through two complementary workflows:
-
MCP client workflow: Duo Agent Platform serves as an MCP client, allowing features to access various external tools and services.
-
MCP server workflow: GitLab also provides MCP server capabilities, enabling AI tools and applications like Claude Desktop, Cursor, and other MCP-compatible tools to connect securely to your GitLab instance.
Interactive walkthrough demo of the MCP client workflow
Picture this common Monday morning scenario: Your company's checkout service is throwing timeout errors. Customers can't complete purchases, and you need to investigate fast. Normally, you'd open Jira to review the incident ticket, scroll through Slack for updates, and check Grafana dashboards for error spikes. With GitLab's MCP support, you can do all of this in natural language directly from the chat in your IDE. MCP correlates data across all your systems, giving you the full picture instantly, without leaving your development workflow.
To experience this capability firsthand, we've created an interactive walkthrough illustrating the payment service scenario above. Click the image below to start the demo.
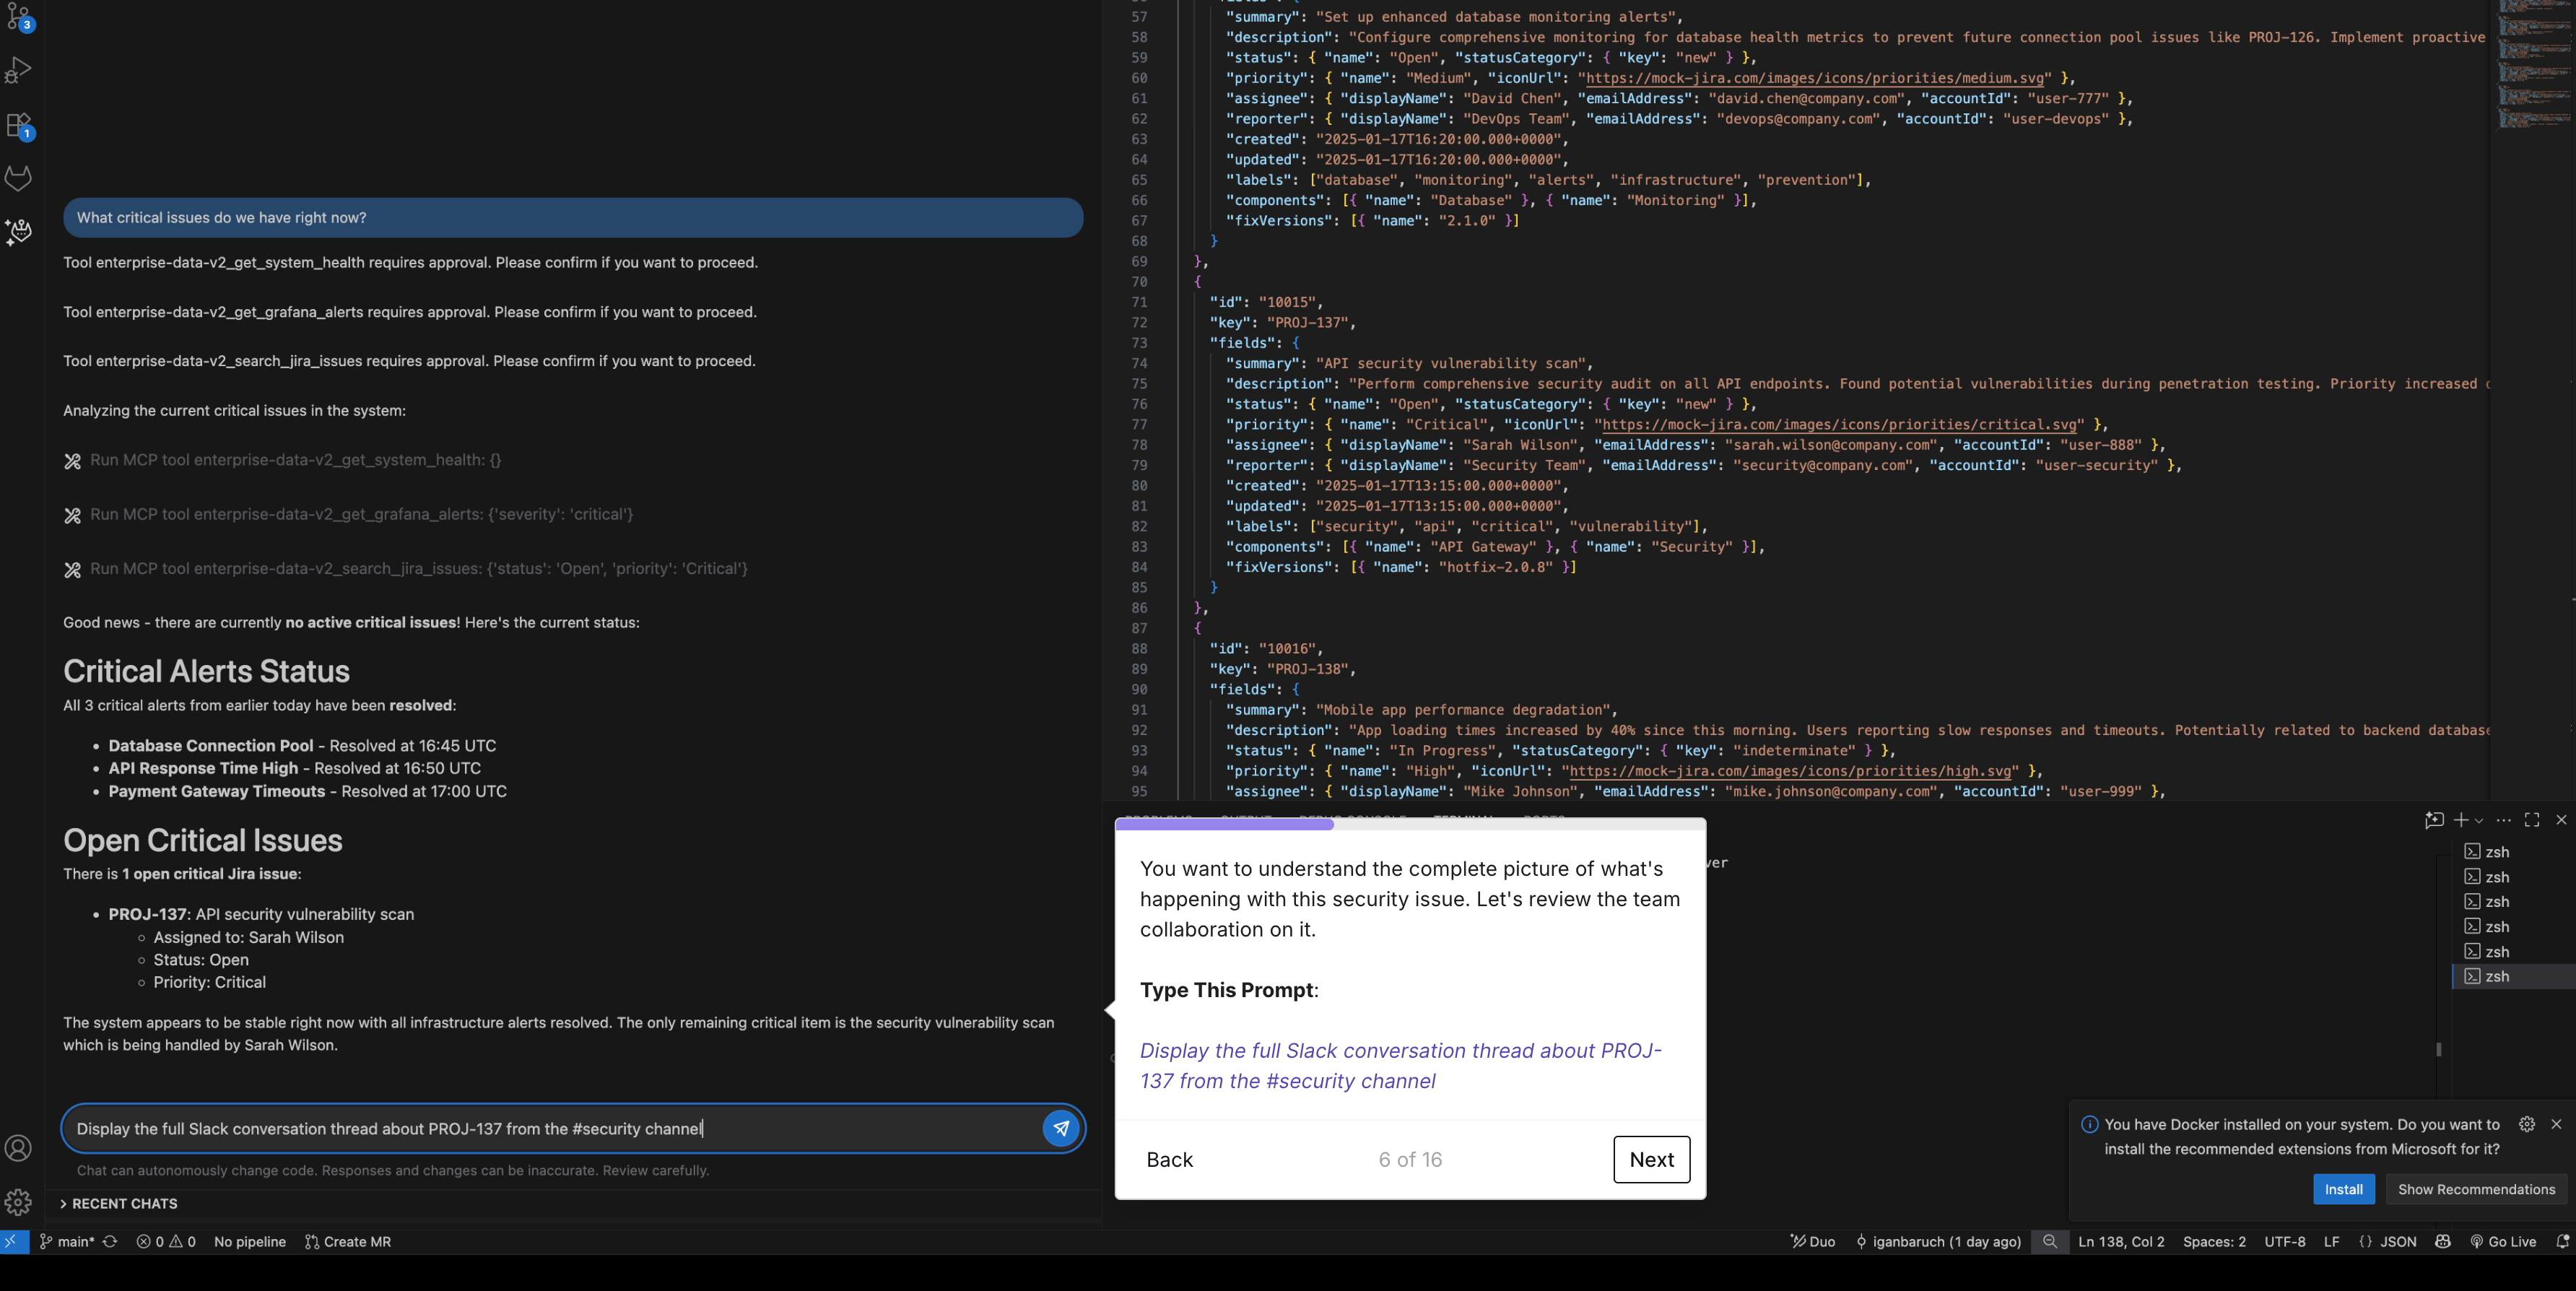
Setting up GitLab MCP client
Before you can start querying data through GitLab Duo Agentic Chat or the software development flow, you need to configure MCP in your development environment. The steps include:
-
Turn on Feature preview — In your Group settings, navigate to GitLab Duo in the left sidebar, then check the box for "Turn on experiment and beta GitLab Duo features" under the Feature preview section.
-
Turn on MCP for your group — Enable MCP support in your GitLab group settings to allow Duo features to connect to external systems.
-
Set up MCP servers — Define the MCP servers in JSON format in the
mcp.jsonfile. Create the file in this location:- Windows:
C:\Users\<username>\AppData\Roaming\GitLab\duo\mcp.json - All other operating systems:
~/.gitlab/duo/mcp.json
- Windows:
For workspace-specific configurations, see workspace configuration setup.
{
  "mcpServers": {
    "server-name": {
      "type": "stdio",
      "command": "path/to/server",
      "args": ["--arg1", "value1"],
      "env": {
        "ENV_VAR": "value"
      }
    },
    "http-server": {
      "type": "http",
      "url": "http://localhost:3000/mcp"
    },
    "sse-server": {
      "type": "sse",
      "url": "http://localhost:3000/mcp/sse"
    }
  }
}
- Install and configure your IDE — Ensure VSCodium or Visual Studio Code is installed along with the GitLab Workflow extension (Version 6.28.2 or later for basic MCP support, 6.35.6 or later for full support).
For full step-by-step instructions, configuration examples, and troubleshooting tips, see the GitLab MCP clients documentation.
Example project
To complement the walkthrough, we are sharing the project that served as its foundation. This project allows you to reproduce the same flow in your own environment and explore GitLab's MCP capabilities hands-on.
It demonstrates MCP functionality in a simulated enterprise setup, using mock data from Jira, Slack, and Grafana to model an incident response scenario. The included mcp.json configuration shows how to connect to a local MCP server (enterprise-data-v2) or optionally extend the setup with AWS services for cloud integration.
{
  "mcpServers": {
    "enterprise-data-v2": {
      "type": "stdio",
      "command": "node",
      "args": ["src/server.js"],
      "cwd": "/path/to/your/project"
    },
    "aws-knowledge": {
      "type": "stdio"
      "command": "npx",
      "args": ["mcp-remote", "https://knowledge-mcp.global.api.aws"]
    },
    "aws-console": {
      "type": "stdio"
      "command": "npx",
      "args": ["@imazhar101/mcp-aws-server"],
      "env": {
        "AWS_REGION": "YOUR_REGION",
        "AWS_PROFILE": "default"
      }
    }
  }
}
Security note: The
aws-consoleuses a community-developed MCP server package (@imazhar101/mcp-aws-server) for AWS integration that has not been independently verified. This is intended for demonstration and learning purposes only. For production use, evaluate packages thoroughly or use official alternatives.Additionally, configure AWS credentials using AWS CLI profiles or IAM roles rather than hardcoding them in the configuration file. The AWS SDK will automatically discover credentials from your environment, which is the recommended approach for enterprise governance and security compliance.
To get started, clone the project, install dependencies with npm install, then start the local MCP server with npm start. Create an ~/.gitlab/duo/mcp.json file with the configuration above, update the file path to match your local setup, and restart VS Code to load the MCP configuration. Optionally, add your AWS credentials to experience live cloud integration.
Clone the project here: GitLab Duo MCP Demo.
Example prompts to try with the demo project
Once you've configured the example project, you can start exploring your data and tools directly from GitLab Duo Agentic Chat in your IDE. Here are some prompts you can try:
- "What tools can you access through MCP?"
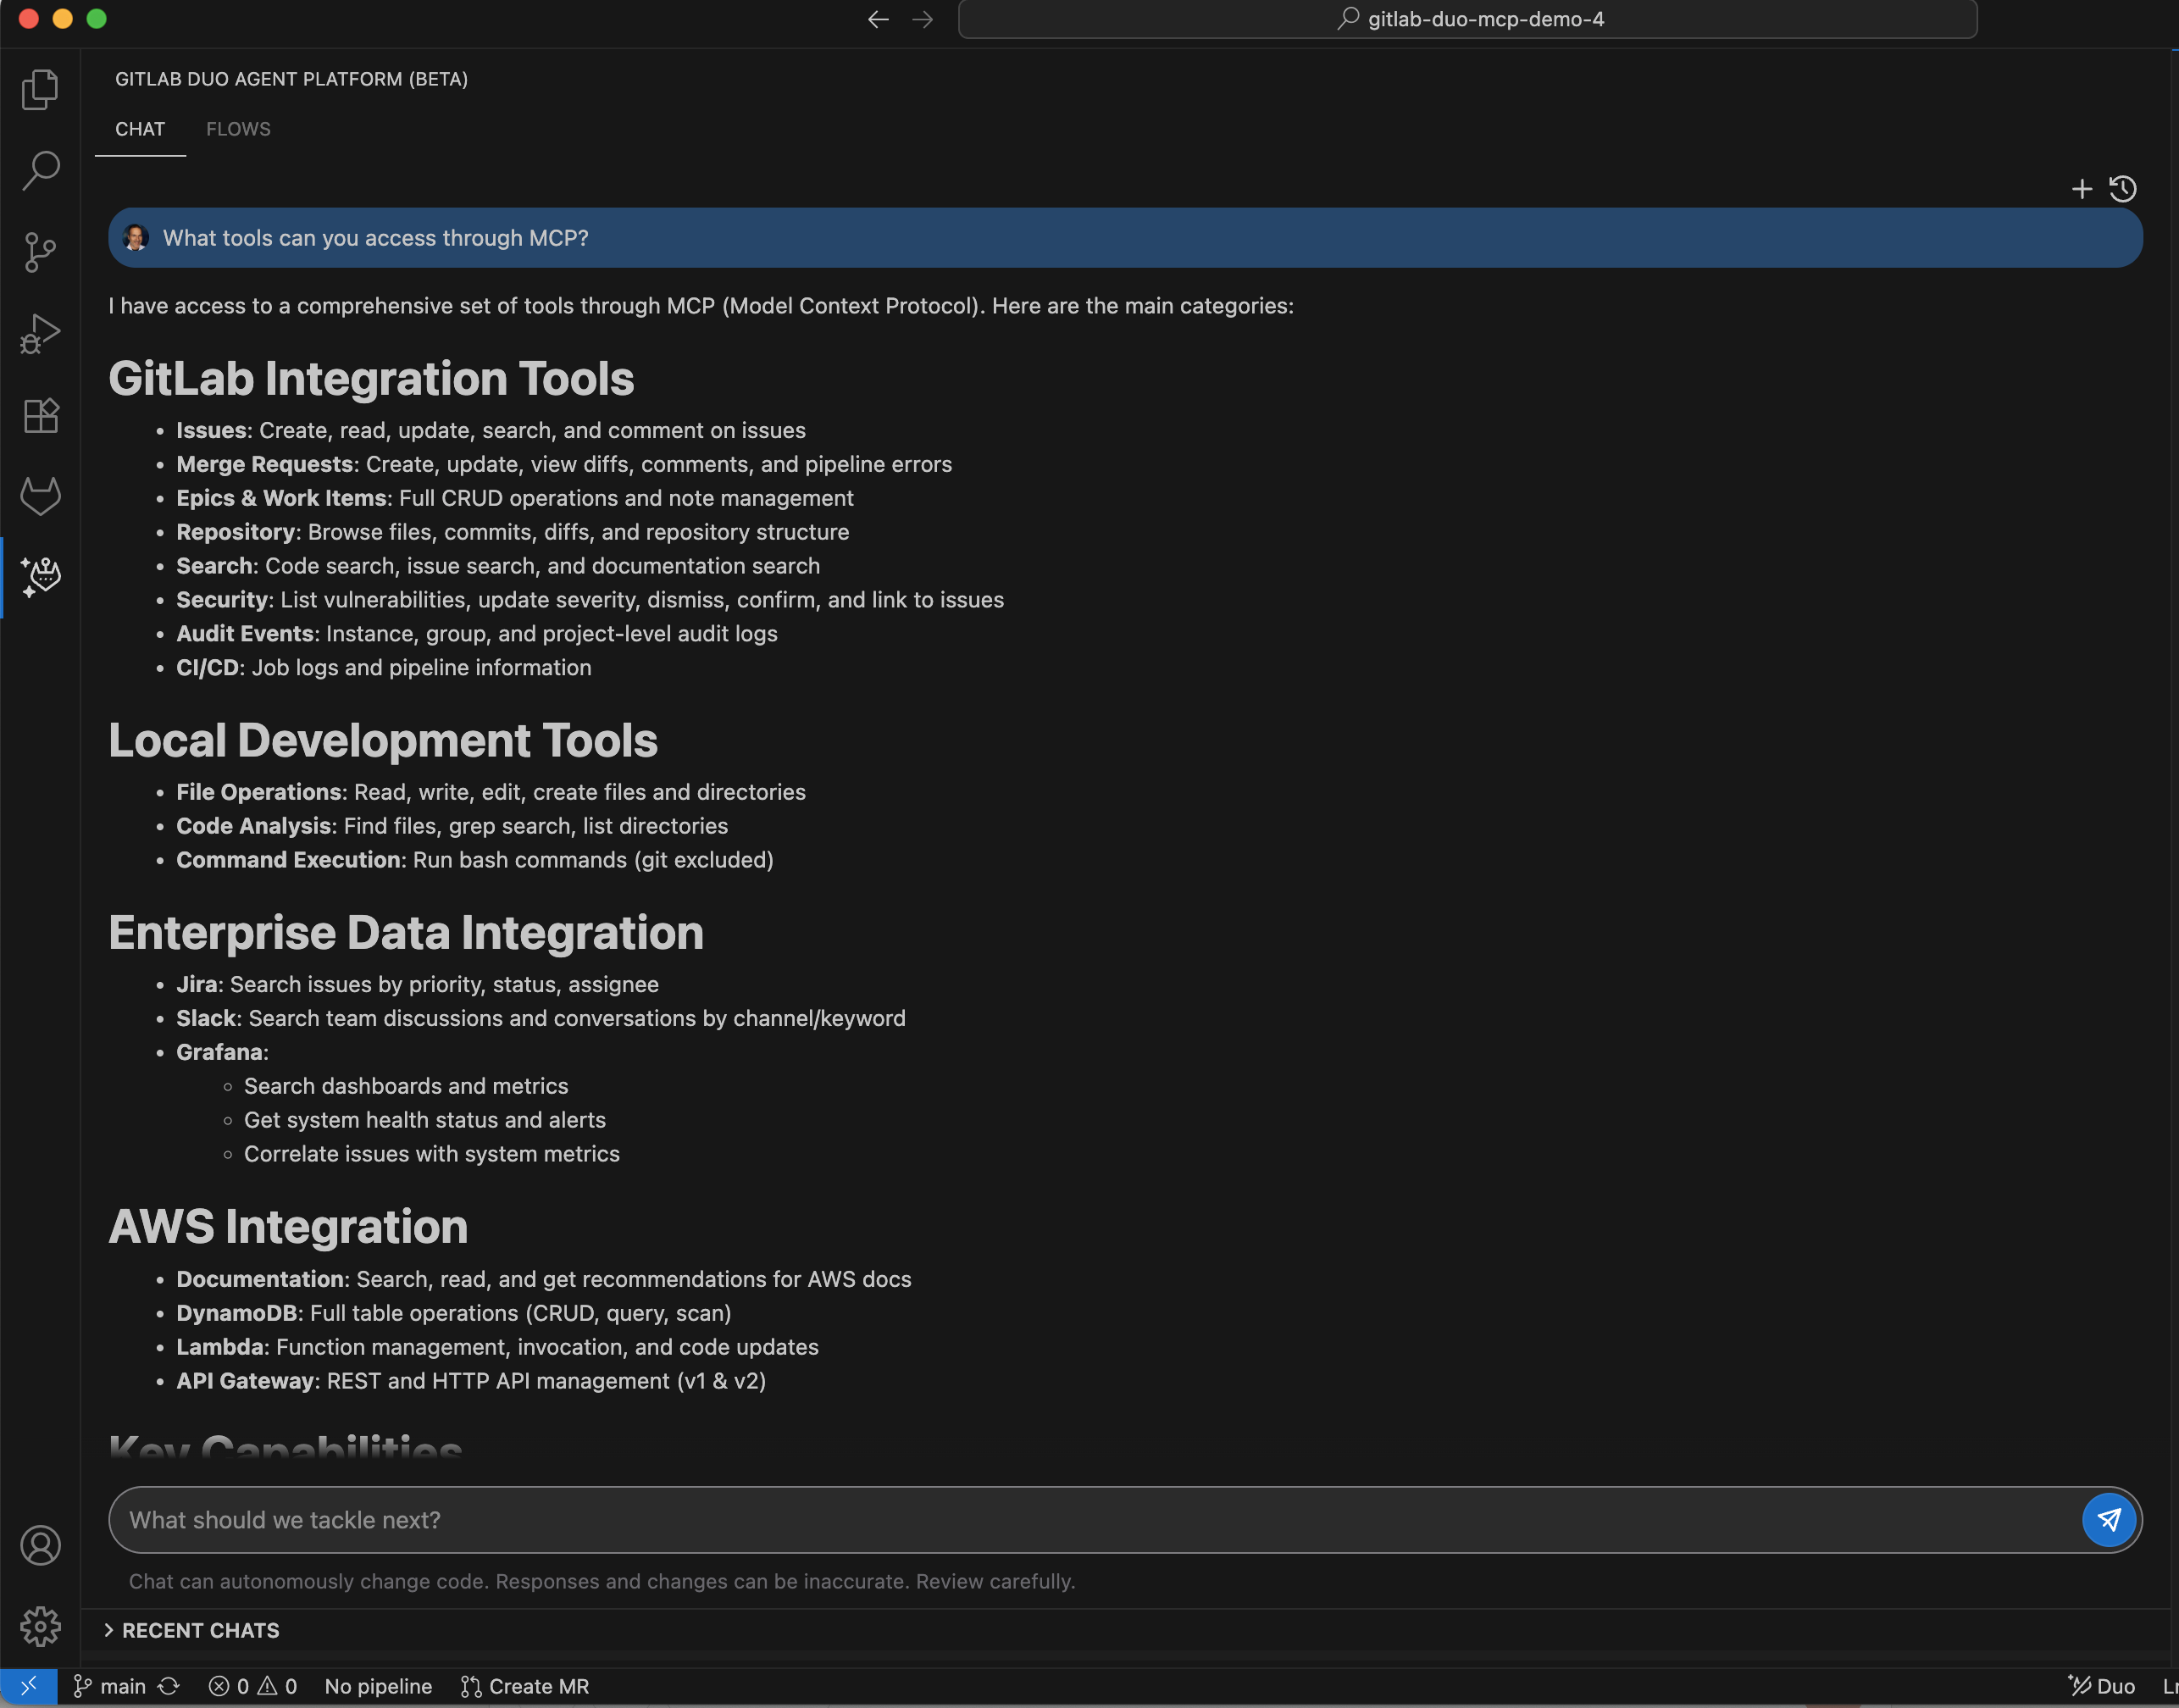
- "Show me recent Slack discussions about the database issues."
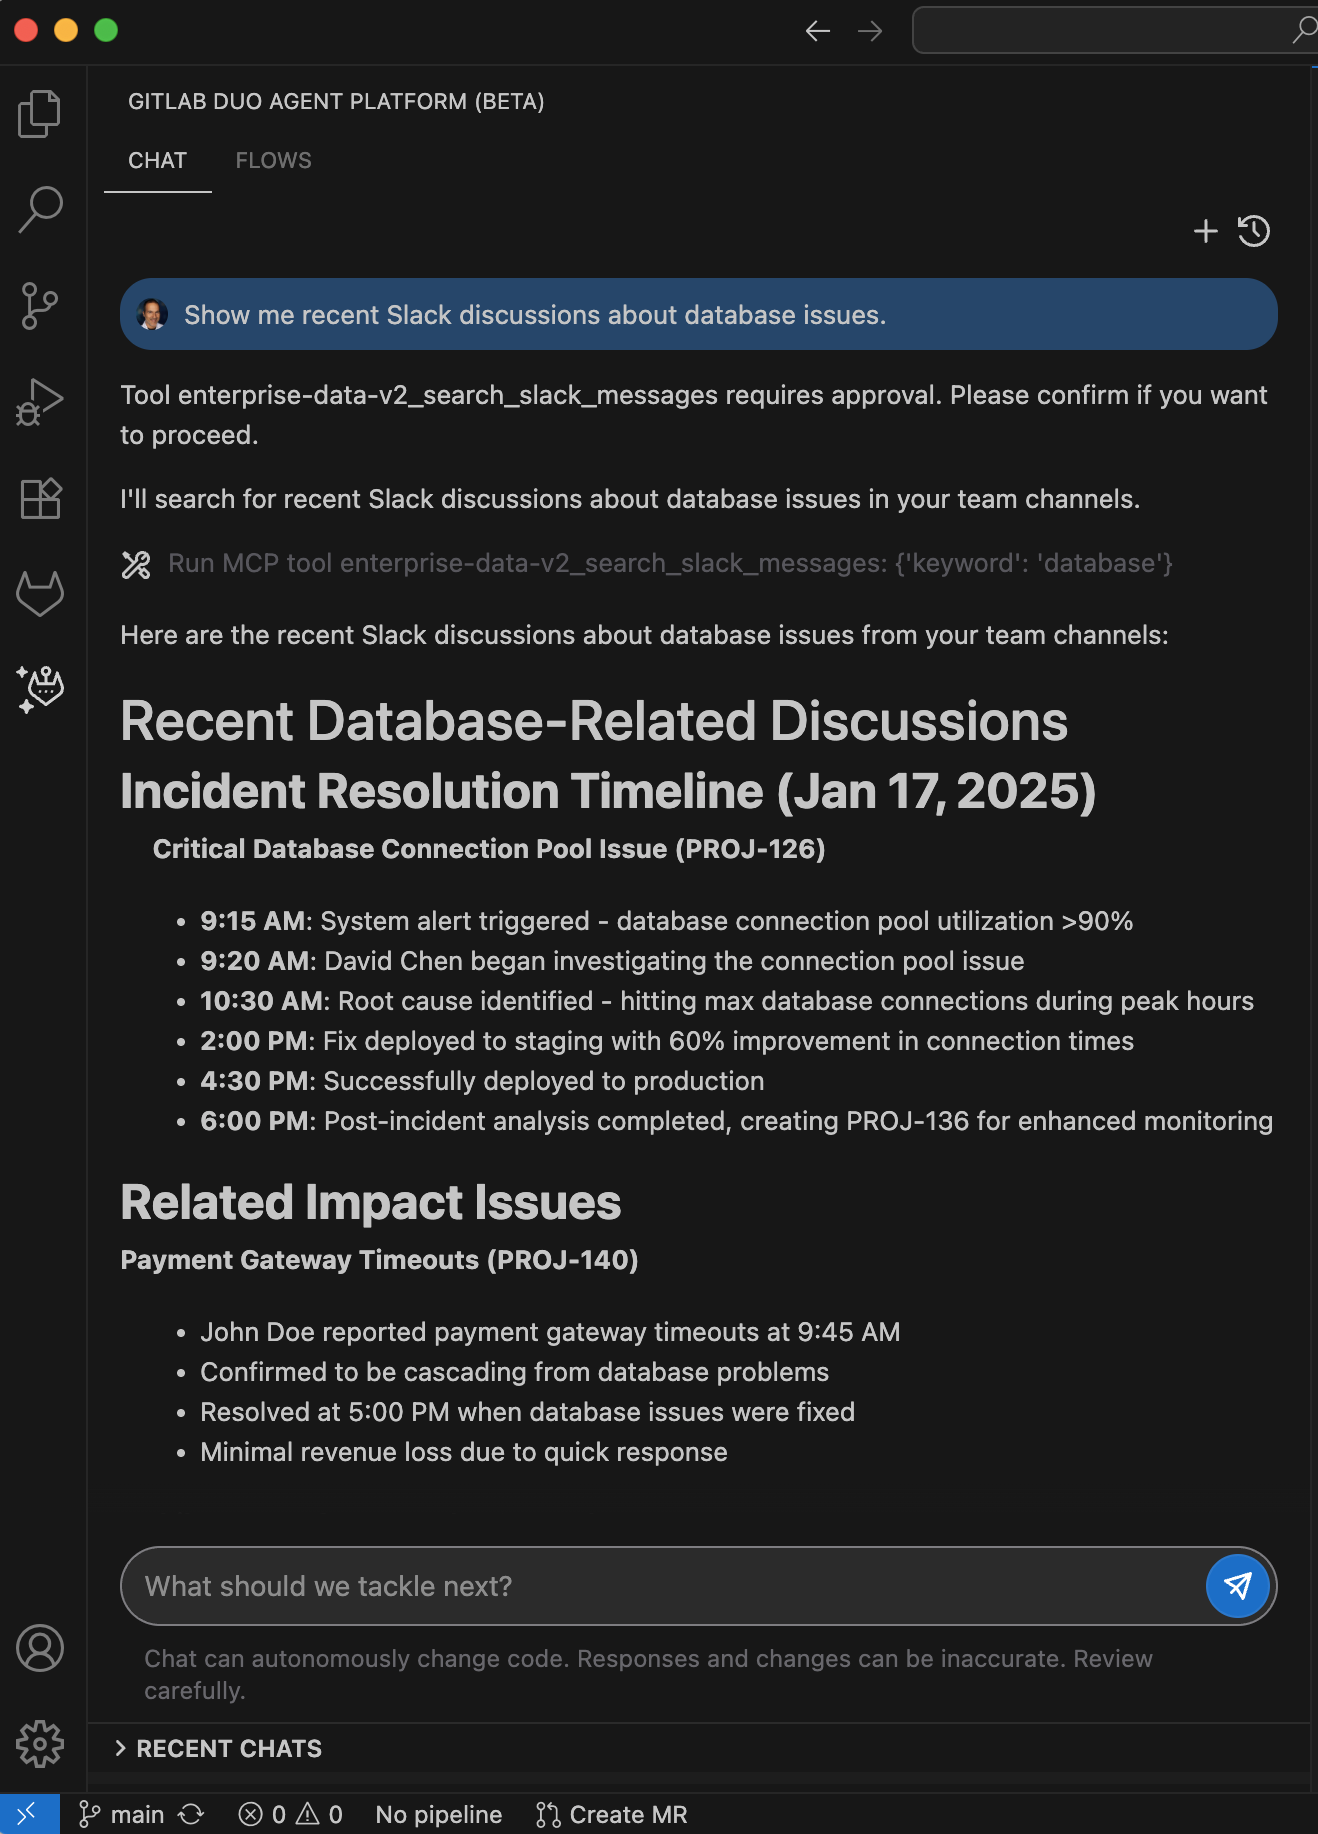
GitLab MCP server capabilities
So far, we've looked at how GitLab Duo Agent Platform acts as an MCP client, connecting to external MCP servers. Now, let's explore the GitLab MCP server capabilities.
The GitLab MCP server lets AI tools like Cursor or Claude Desktop connect securely to your GitLab instance and work with your development data through natural language. Authentication is handled through OAuth 2.0 Dynamic Client Registration, so AI tools can register automatically and access your GitLab data with proper authorization.
Currently, the server supports:
- Issues — get details or create new issues
- Merge requests — view details, commits, and file changes
- Pipelines — list jobs and pipelines for merge requests
- Server info — check the MCP server version
For the complete list of available tools and capabilities, see the MCP server docs.
Interactive walkthrough: GitLab MCP server in action
Experience the GitLab MCP server firsthand with our interactive walkthrough.
It guides you through setting up Cursor with the MCP server and using Cursor Chat to securely connect to your GitLab instance. You'll see how to perform actions like viewing issues, creating a new issue, and checking merge requests, all directly through natural language, without leaving your development environment.
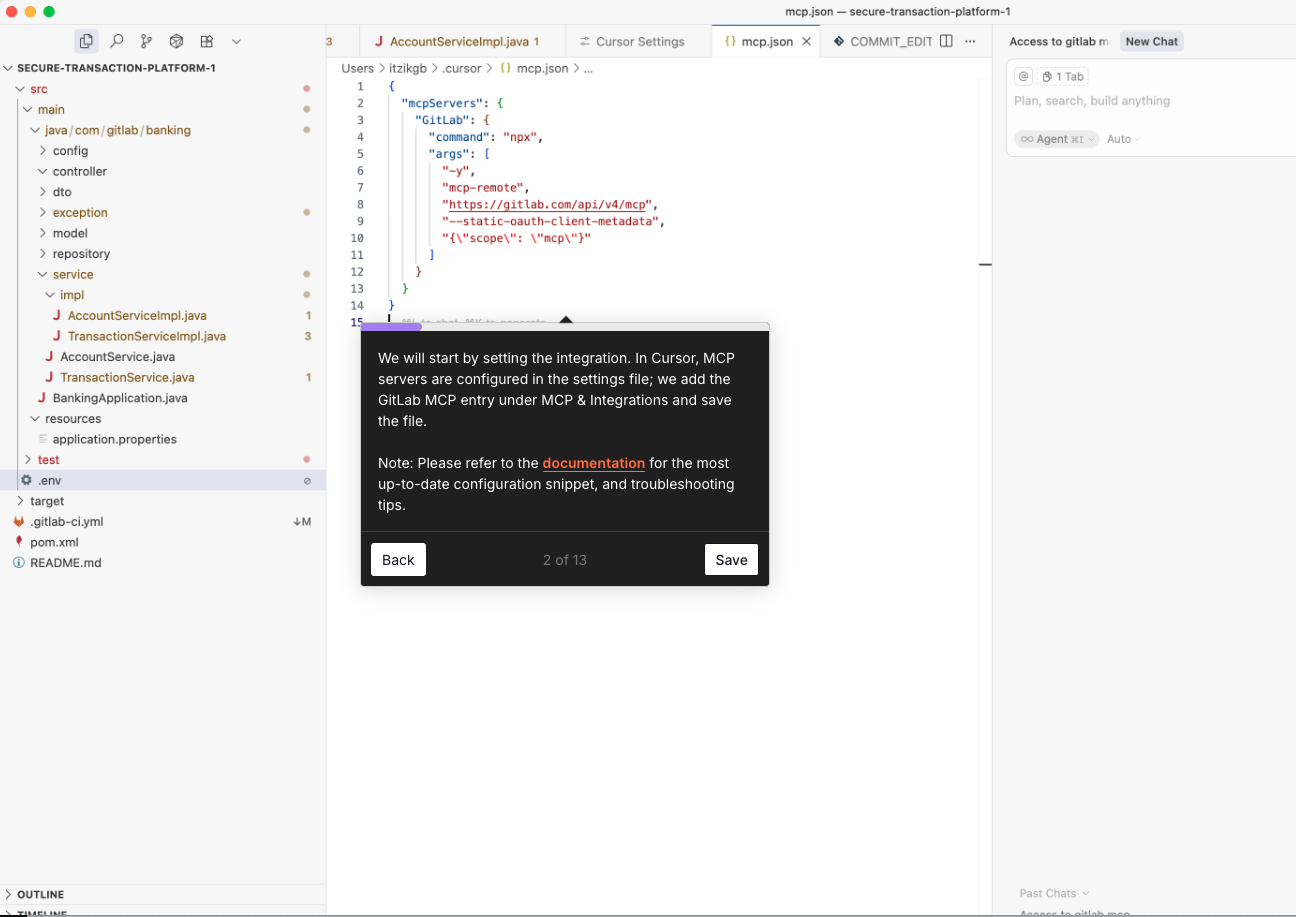
How to configure MCP server in your AI tool
Prerequisites:
-
Ensure Node.js and npm are installed
-
Verify that
npxis globally accessible by runningnpx --versionin your terminal
-
Enable feature flags
- Activate
mcp_serverandoauth_dynamic_client_registrationin your GitLab instance.
- Activate
-
Add GitLab MCP server configuration to your AI tool
- Add the MCP server entry to your tool's configuration file (
mcp.jsonfor Cursor,claude_desktop_config.jsonfor Claude Desktop):
- Add the MCP server entry to your tool's configuration file (
{
  "mcpServers": {
    "GitLab": {
      "command": "npx",
      "args": [
        "mcp-remote",
        "https://<your-gitlab-instance>/api/v4/mcp",
        "--static-oauth-client-metadata",
        "{\"scope\": \"mcp\"}"
      ]
    }
  }
}
Register and authenticate
On first connection, the AI tool will:
-
Automatically register as an OAuth application
-
Request authorization for the mcp scope
Authorize in browser
When connecting, the MCP client will automatically open your default browser to complete the OAuth flow. Review and approve the request in GitLab to grant access and receive an access token for secure API access.
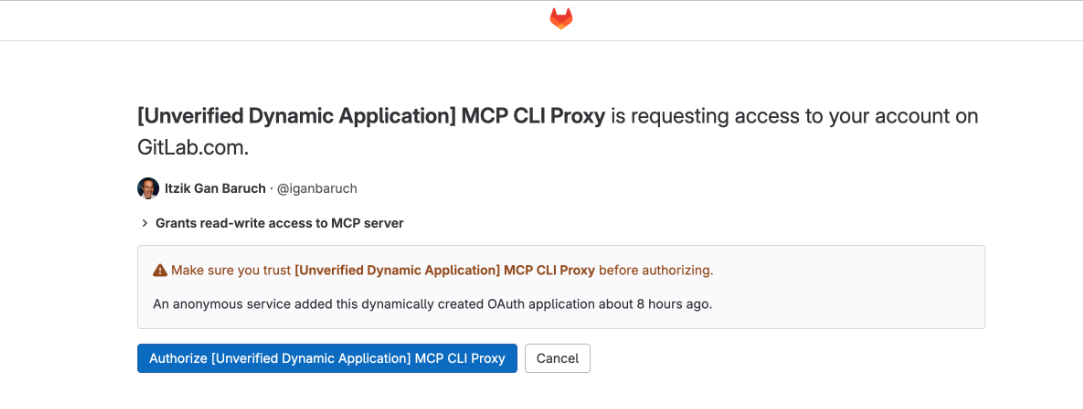
Using the MCP server
Once your AI tool is connected to the MCP server, you can securely fetch and act on GitLab data (issues, merge requests, and pipelines) directly from your development environment using natural language. For example:
-
Get details for issue 42 in project 123 -
Create a new issue titled "Fix login bug" with description about password special characters -
Show me all commits in merge request 15 from the gitlab-org/gitlab project -
What files were changed in merge request 25? -
Show me all jobs in pipeline 12345
This feature is experimental, controlled by a feature flag, and not yet ready for production use.
For full step-by-step instructions, configuration examples, and troubleshooting tips, see the GitLab MCP server documentation.
Summary
GitLab Duo Agent Platform introduces supports for MCP, enabling AI-powered development workflows like never before. With MCP support, GitLab acts as both a client and a server:
-
MCP Client: GitLab Duo Agent Platform can securely access data and tools from external systems, bringing rich context directly into the IDE.
-
MCP server: External AI tools like Cursor or Claude Desktop can connect to your GitLab instance, access project data, and perform actions, all while maintaining strict security and privacy.
This bidirectional support reduces context switching, accelerates developer workflows, and ensures AI can provide meaningful assistance across your entire toolkit.
Try it today
Try the beta of GitLab Duo Agent Platform and explore MCP capabilities.
Read more
]]>We believe this recognition validates our comprehensive platform strategy at a critical moment for software development. Organizations are racing to adopt AI-powered capabilities while maintaining security, compliance, and operational excellence. Success demands a unified platform approach that transforms how teams collaborate and deliver value.
Whether our customers are delivering agile software, building cloud-native applications, or engineering platforms, GitLab empowers them to collaborate in lockstep with AI agents to ship secure and reliable software, faster.
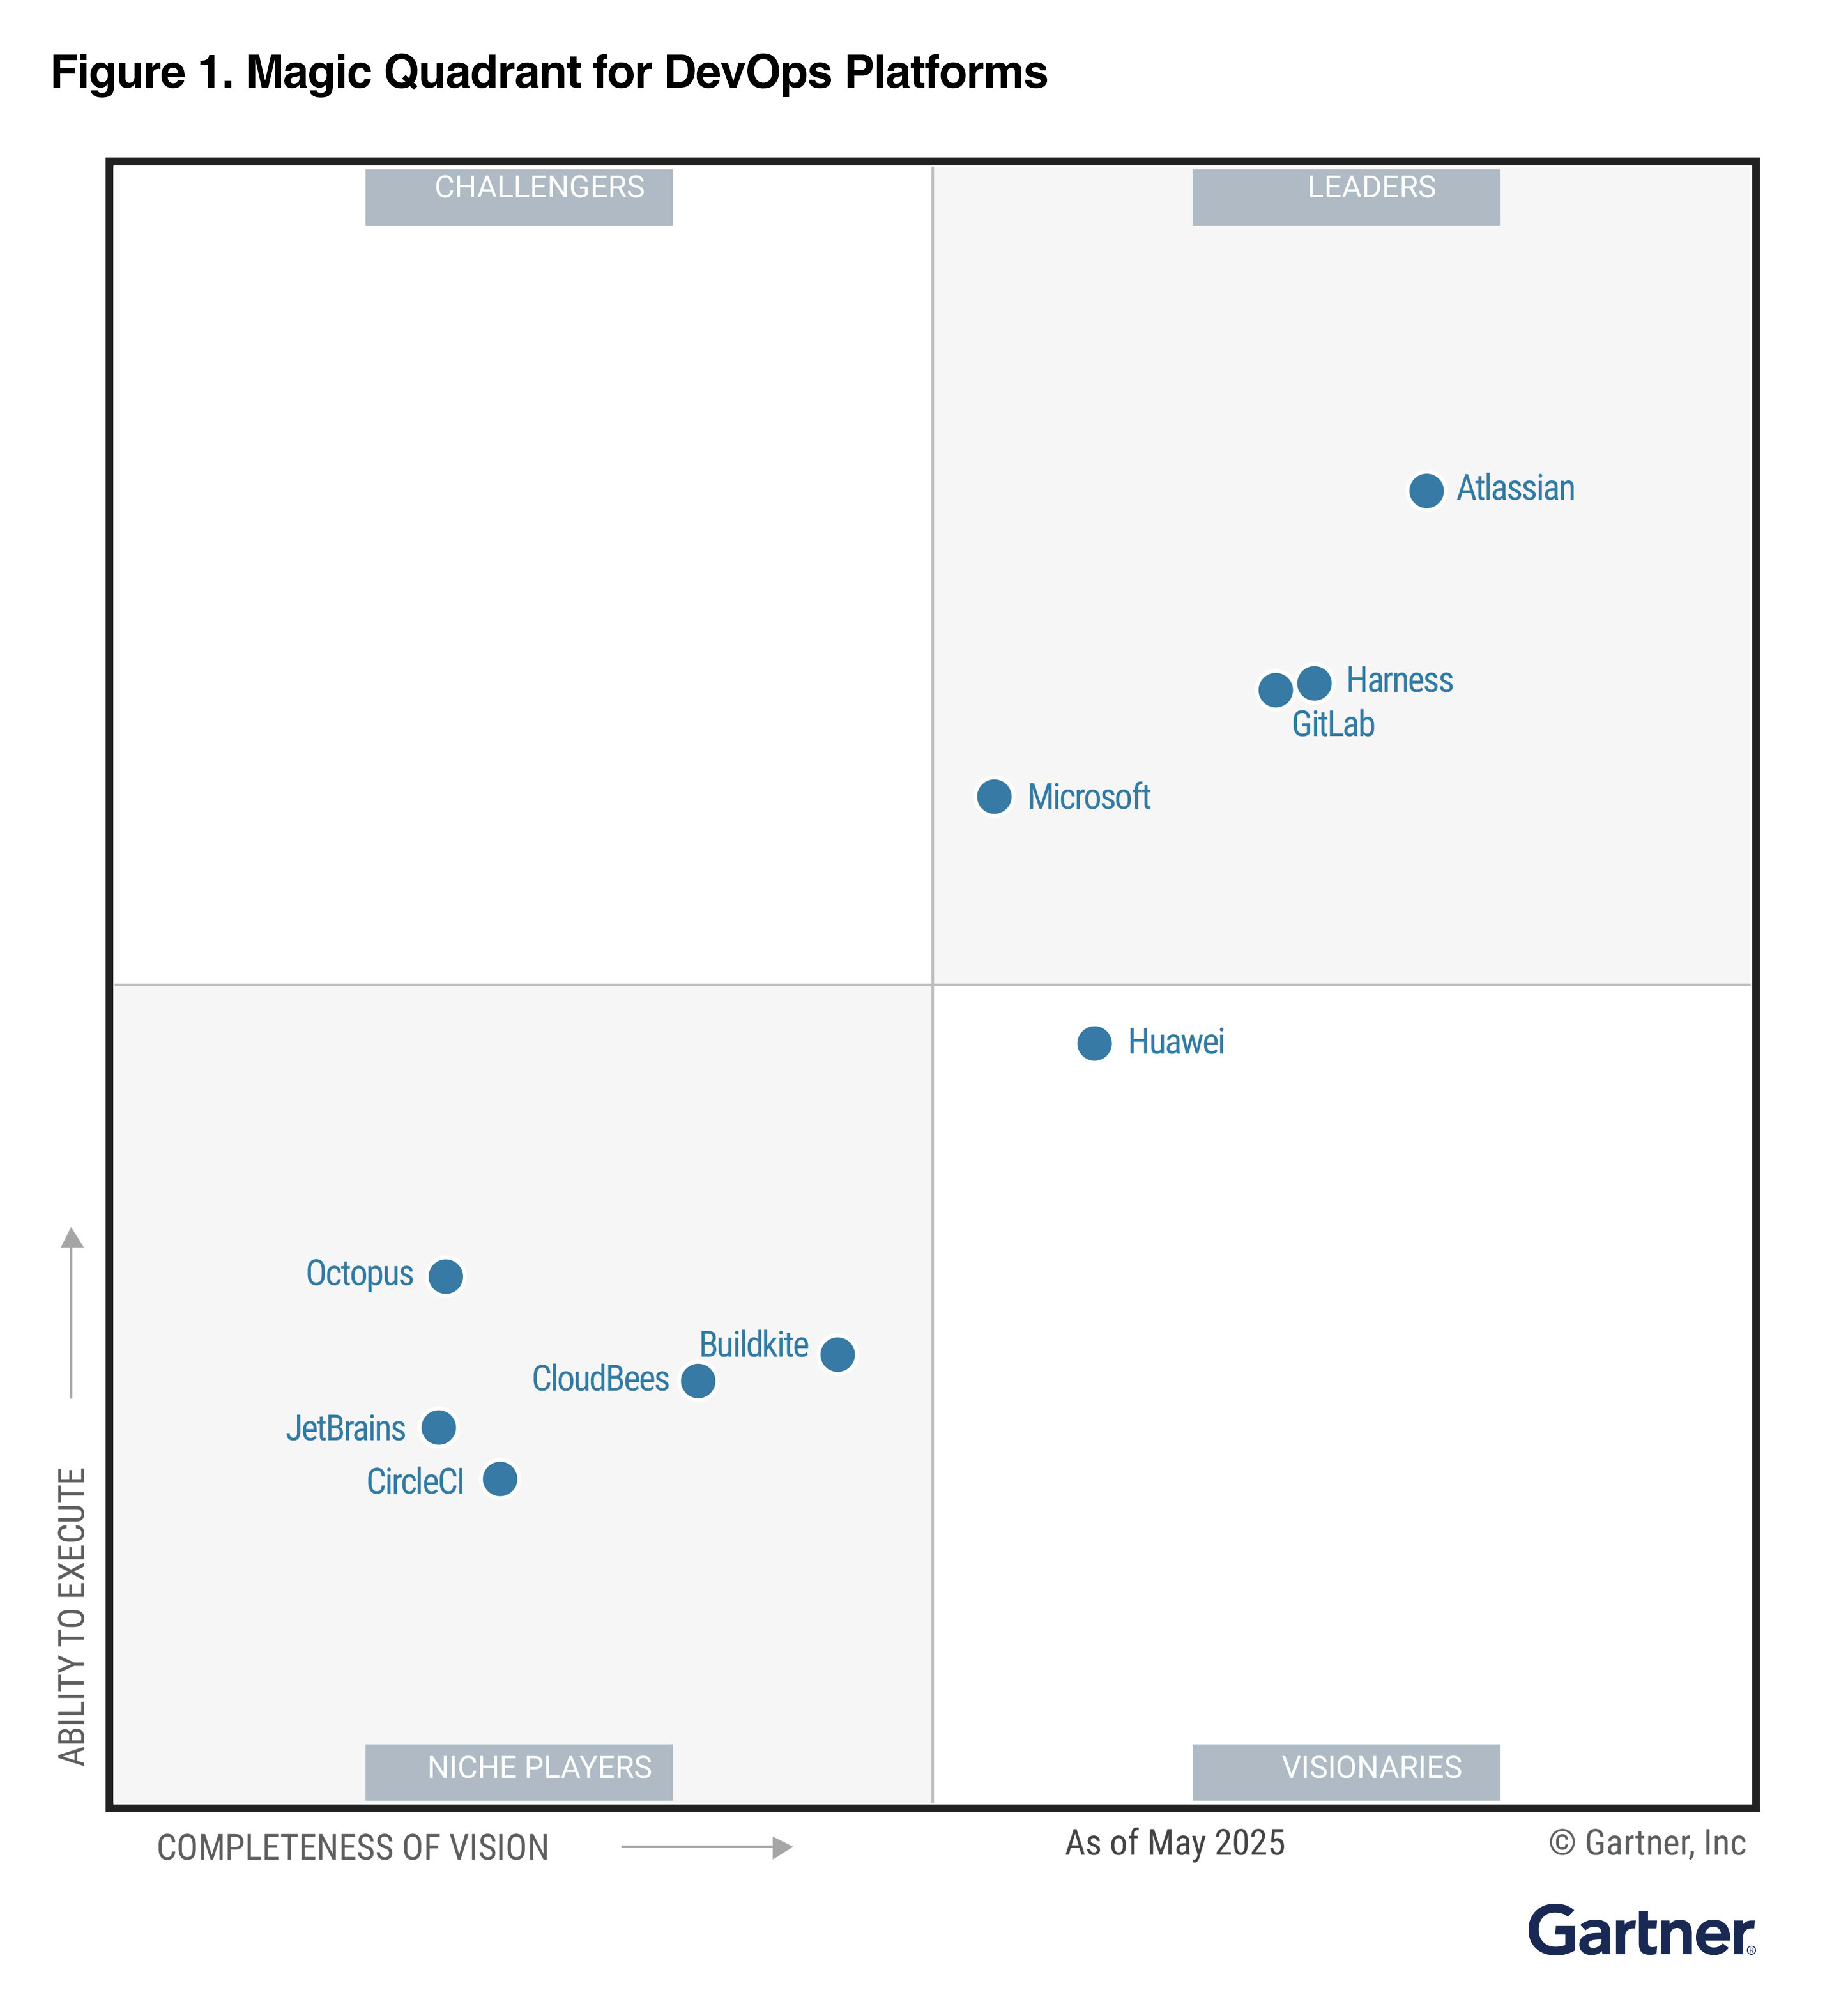
<p></p>
Download the reports to learn more.
Faster time to value
Our mission is to enable everyone to contribute to and co-create the software that powers our world. The rapid pace of our innovation agenda demonstrates that we are far from finished. We have shipped new solutions to our customers every month for 150+ months, and that tradition will continue.
As we lead the industry, we remain committed to helping our customers translate these new capabilities into business value.
We firmly believe that, in this era of accelerating AI-powered innovation across the technology ecosystem, a unified platform approach to tackle our customers’ toughest engineering challenges has never been more important than today. This approach enables organizations to reduce integration overhead, close security gaps, and adopt innovation without disrupting existing software delivery workflows.
Here are a few examples:
- Accelerate releases with agentic AI: Fragmented toolchains slow down code reviews and testing. GitLab Duo agents and flows automate tasks like code reviews, test generation, and vulnerability triage in the context of the full platform, helping teams shorten cycle times and improve quality.
- Build securely from the start: Many organizations treat security as an afterthought, leading to costly rework and compliance gaps. GitLab embeds scanning, policy enforcement, and compliance checks into everyday workflows, catching risks earlier without slowing developers down.
- Deploy with flexibility: Teams with strict regulatory or operational constraints need deployment options beyond multi-tenant SaaS. GitLab supports SaaS, self-managed, air-gapped, and FedRAMP Moderate Authorized environments, ensuring customers maintain control where competitors cannot.
- Deliver consistent innovation: Tool fragmentation makes adopting new features risky and disruptive. GitLab’s monthly releases deliver new capabilities, such as GitLab Duo Agent Platform, expanded AI governance, and cloud integrations that teams can adopt without retooling.
Customer use cases that matter most
Together with the Magic Quadrant, we think the 2025 Gartner Critical Capabilities for DevOps Platforms report evaluates how well platforms serve real-world customer scenarios. GitLab ranked 1st in 4 out of 6 use cases.
GitLab supports the following areas of innovation:
- Integrated toolset for cloud-native delivery and enterprise scale
- Advanced planning tools and extensive security features
- Package management and feature flags for progressive delivery
- Value stream metrics for visibility and improvement across the lifecycle
- AI-native workflows, embedded directly into daily tasks
This versatility translates into real customer value, as Bal Kang, Engineering Platform Lead at NatWest, explains:
“Having GitLab Duo AI agents embedded in our system of record for code, tests, CI/CD, and the entire software development lifecycle boosts productivity, velocity, and efficiency. The agents understand intent, break down problems, and take action — becoming true collaborators to our teams.”
The shift toward unified platforms represents a fundamental change in how organizations approach software development. We believe this is why, recently, Gartner® also named us a Leader in the 2025 Magic Quadrant™ for AI Code Assistants.
As companies look to maximize developer productivity securely and accelerate innovation, a comprehensive platform approach becomes more urgent than ever.
Download the reports to learn more.
Source: Gartner, Magic Quadrant for DevOps Platforms, Keith Mann, Thomas Murphy, Bill Holz, George Spafford, September 22, 2025
Source: Gartner, Critical Capabilities for DevOps Platforms, Thomas Murphy, Keith Mann, George Spafford, Bill Holz, September 22, 2025
GARTNER is a registered trademark and service mark of Gartner, Inc. and/or its affiliates in the U.S. and internationally, and MAGIC QUADRANT is a registered trademark of Gartner, Inc. and/or its affiliates and are used herein with permission. All rights reserved.
Gartner does not endorse any vendor, product or service depicted in its research publications, and does not advise technology users to select only those vendors with the highest ratings or other designation. Gartner research publications consist of the opinions of Gartner’s research organization and should not be construed as statements of fact. Gartner disclaims all warranties, expressed or implied, with respect to this research, including any warranties of merchantability or fitness for a particular purpose. This graphic was published by Gartner Inc. as part of a larger report and should be evaluated in the context of the entire document. The Gartner document is available upon request from Gartner B.V.
]]>In GitLab 18.3, we laid the groundwork for true human-AI collaboration. We introduced leading AI tools such as Claude Code, Codex CLI, Amazon Q CLI, and Gemini CLI as native integrations to GitLab, delivered our first preview of the GitLab Model Context Protocol (MCP) server in partnership with Cursor, and shipped two new flows, Issue to MR and Convert CI File for Jenkins Flows, to help teams tackle every day problems.
With GitLab 18.4 we are expanding your ability to build and share custom agents, collaborate more effectively through Agentic Chat, navigate codebases with the Knowledge Graph, and keep pipelines green with the Fix Failed Pipelines Flow, while also delivering greater security and governance over your AI usage.
<div style="padding:56.25% 0 0 0;position:relative;"><iframe src="https://player.vimeo.com/video/1120293274?badge=0&autopause=0&player_id=0&app_id=58479" frameborder="0" allow="autoplay; fullscreen; picture-in-picture; clipboard-write; encrypted-media; web-share" referrerpolicy="strict-origin-when-cross-origin" style="position:absolute;top:0;left:0;width:100%;height:100%;" title="18.4 Release video placeholder"></iframe></div><script src="https://player.vimeo.com/api/player.js"></script>
Have questions on the latest features in the GitLab 18.4 release? Join us for The Developer Show live on LinkedIn on Sept. 23 at 10:00 am PT, or on-demand shortly after!
Build your experience
Start your day by pulling from the AI Catalog — a library of specialized agents that surface priorities, automate routine work, and keep you focused on building.
AI Catalog as your library of specialized agents (Experimental)
With GitLab 18.4, we're introducing the GitLab Duo AI Catalog — a central library where teams can create, share, and collaborate with custom-built agents across their organization. Every team has ‘their way' of doing things. So creating a custom agent is just like training a fellow engineer on the ‘right way' to do things in your organization.
For example, a custom Product Planning agent can file bugs in the specific format, following your labeling standards, or a Technical Writer agent can draft concise documentation following your conventions, or a Security agent can make sure your security and compliance standards are met for every MR. Instead of functioning as disconnected tools, these agents become part of the natural stream of work inside GitLab — helping accelerate tasks without disrupting established processes.
Note: This capability is currently only available on GitLab.com as an Experiment. We plan to deliver this to our self-managed customers next month in the 18.5 release.
Stay in your flow
GitLab Duo Agentic Chat makes collaboration with agents seamless.
Smarter Agentic Chat to streamline collaboration with agents (Beta)
As the centerpiece of GitLab Duo Agent Platform (Beta), Agentic Chat gives you a seamless way to collaborate with AI agents. The latest update to Agentic Chat with GitLab 18.4 improves the chat experience and expands how sessions are managed and surfaced.
-
Chat with custom agent
Let's start with your newly-created custom agent. Once designed, you can immediately put that agent to work through Agentic Chat. For example, you could ask your new agent “give me a list of assignments” to get started with your priorities for the day. Additionally, you now have the ability to start fresh conversations with new agents and resume previous conversations with agents without losing context.
-
With previous releases, you're able to select models at a namespace level, but in 18.4 you can now choose models at the user level for a given chat session. This empowers you to make the call on which LLM is right for the job, or experiment with different LLMs to see which delivers the best answer for your task.
-
Improved formatting and visual design
We hope you love the new visual design for GitLab Duo Agentic Chat, including improved handling of tool call approvals to ensure your experience is more enjoyable.
-
Agent Sessions available through Agentic Chat
Sessions are expanding to become a core part of the Agentic Chat experience. Any agent run or flow now appears in the Sessions overview available from Agentic Chat. Within each session, you'll see rich details like job logs, user information, and tool metadata — providing critical transparency into how agents are working on your behalf.
Note: Sessions in Agentic Chat is available on GitLab.com only, this enhancement is planned for self-managed customers next month in the 18.5 update.
Unlock your codebase
With agents, context is king. With Knowledge Graph, you can give your agents more context so they can reason faster and give you better results.
Introducing the GitLab Knowledge Graph (Beta)
The GitLab Knowledge Graph in 18.4 transforms how developers and agents understand and navigate complex codebases. The Knowledge Graph provides a connected map of your entire project, linking files, routes, and references across the software development lifecycle. By leveraging tools such as go-to-definition, codebase search, and reference tracking through in-chat queries, developers gain the ability to ask precise questions like “show me all route files” or “what else does this change impact?”
This deeper context helps teams move faster and with more confidence — whether it's onboarding new contributors, conducting deep research across a project, or exploring how a modification impacts dependent code. The more of your ecosystem that lives in GitLab, the more powerful the Knowledge Graph becomes, giving both humans and AI agents the foundation to build with accuracy, speed, and full project awareness. In future releases, we'll be stitching all of your GitLab data into the Knowledge Graph, including plans, MRs, security vulnerabilities, and more.
This release of the Knowledge Graph focuses on local code indexing, where the gkg CLI turns your codebase into a live, embeddable graph database for RAG. You can install it with a simple one-line script, parse local repositories, and connect via MCP to query your workspace.
Our vision for the Knowledge Graph project is twofold: building a vibrant community edition that developers can run locally today, which will serve as the foundation for a future, fully-integrated Knowledge Graph Service within GitLab.com and self-managed instances.
<div style="padding:56.25% 0 0 0;position:relative;"><iframe src="https://player.vimeo.com/video/1121017374?badge=0&autopause=0&player_id=0&app_id=58479" frameborder="0" allow="autoplay; fullscreen; picture-in-picture; clipboard-write; encrypted-media; web-share" referrerpolicy="strict-origin-when-cross-origin" style="position:absolute;top:0;left:0;width:100%;height:100%;" title="18.4 Knowledge Graph Demo"></iframe></div><script src="https://player.vimeo.com/api/player.js"></script>
Automate your pipeline maintenance
Fix pipeline failures faster and stay in the flow with the Fixed Failed Pipelines Flow.
Fix Failed Pipelines Flow with business awareness
Keeping pipelines green is critical for your development velocity, but traditional approaches focus only on technical troubleshooting without considering the business impact. The Fix Failed Pipelines Flow addresses this challenge by combining technical analysis with strategic context. For example, it can automatically prioritize fixing a failed deployment pipeline for a customer-facing service ahead of a nightly test job, or flag build issues in a high-priority release branch differently than experimental feature branches.
- Business-aware failure detection monitors pipeline executions while understanding the importance of different workflows and deployment targets.
- Contextual root cause analysis analyzes failure logs alongside business requirements, recent changes, and cross-project dependencies to identify underlying causes.
- Strategic fix prioritization generates appropriate fixes while considering business impact, deadlines, and resource allocation priorities.
- Workflow-integrated resolution automatically creates merge requests with fixes that maintain proper review processes while providing business context for prioritization decisions.
This flow keeps pipelines green while maintaining strategic alignment, enabling automated fixes to support business objectives rather than just resolving technical issues in isolation.
Customize your AI environment
Automation only works if you trust the models behind it. That's why 18.4 delivers governance features like model selection and GitLab-managed keys.
GitLab Duo model selection to optimize feature performance
Model selection is now generally available, giving you direct control over which large language models (LLMs) power GitLab Duo. You and your team can select the models of your choice, apply them across the organization or tailor them per feature. You can set defaults to ensure consistency across namespaces and tools, with governance, compliance, and security requirements in mind.
For customers using GitLab Duo Self-Hosted, newly added support for GPT OSS and GPT-5 provides additional flexibility for AI-powered development workflows.
Note: GitLab Duo Self-Hosted is not available to GitLab.com customers, and GPT models are not supported on GitLab.com.
Protect your sensitive context
Alongside governance comes data protection, giving you fine-grained control over what AI can and can't see.
GitLab Duo Context Exclusion for granular data protection
It's no surprise — you need granular control over what information AI agents can access. GitLab Duo Context Exclusion in 18.4 provides project-level settings that let teams exclude specific files or file paths from AI access. Capabilities include:
- File-specific exclusions to help protect sensitive files such as password configurations, secrets, and proprietary algorithms.
- Path-based rules to create exclusion patterns based on directory structures or file naming conventions.
- Flexible configuration to apply exclusions at the project level while maintaining development workflow efficiency.
- Audit visibility to track what content is excluded to support compliance with data governance policies.
GitLab Duo Context Exclusion helps you protect sensitive data while you accelerate development with agentic AI.
Extend your AI capabilities with new MCP tools
Expanded MCP tools extend those capabilities even further, connecting your GitLab environment with a broader ecosystem of intelligent agents.
New tools for GitLab MCP server
Expanding on the initial MCP server introduced in 18.3, GitLab 18.4 adds more MCP tools — capabilities that define how MCP clients interact with GitLab. These new tools extend integration possibilities, enabling both first-party and third-party AI agents to take on richer tasks such as accessing project data, performing code operations, or searching across repositories, all while respecting existing security and permissions models. For a full list of MCP tools, including the new additions in 18.4, visit our MCP server documentation.
Experience the future of intelligent software development
With GitLab Duo Agent Platform, engineers can begin to move from working on one issue at a time in single threaded fashion, to multi-threaded collaboration with asynchronous agents that act like teammates to get work done, faster. We are bringing to market this unique vision with our customer's preferences for independence and choice: run in your preferred cloud environments using the LLMs and AI tools that work best for you, within the security and compliance guardrails you set.
As an integral part of this innovation, GitLab 18.4 is more than a software upgrade — it's about making the day-to-day experience of developers smoother, smarter, and more secure. From reusable agents to business-aware pipeline fixes, every feature is designed to keep teams in flow while balancing speed, security, and control. For a deeper look at how these capabilities come together in practice, check out our walkthrough video.
<div style="padding:56.25% 0 0 0;position:relative;"><iframe src="https://player.vimeo.com/video/1120288083?badge=0&autopause=0&player_id=0&app_id=58479" frameborder="0" allow="autoplay; fullscreen; picture-in-picture; clipboard-write; encrypted-media; web-share" referrerpolicy="strict-origin-when-cross-origin" style="position:absolute;top:0;left:0;width:100%;height:100%;" title="A day in the life with GitLab Duo Agent Platform"></iframe></div><script src="https://player.vimeo.com/api/player.js"></script> <p></p>
GitLab Premium and Ultimate users can start using these capabilities today on GitLab.com and self-managed environments, with availability for GitLab Dedicated customers coming next month.
Enable beta and experimental features in GitLab Duo Agent Platform today and experience how full-context AI can transform the way your teams build software. New to GitLab? Start your free trial and see why the future of development is AI-powered, secure, and orchestrated through the world's most comprehensive DevSecOps platform.
Stay up to date with GitLab
To make sure you're getting the latest features, security updates, and performance improvements, we recommend keeping your GitLab instance up to date. The following resources can help you plan and complete your upgrade:
- Upgrade Path Tool – enter your current version and see the exact upgrade steps for your instance
- Upgrade documentation – detailed guides for each supported version, including requirements, step-by-step instructions, and best practices
By upgrading regularly, you'll ensure your team benefits from the newest GitLab capabilities and remains secure and supported.
For organizations that want a hands-off approach, consider GitLab's Managed Maintenance service. With Managed Maintenance, your team stays focused on innovation while GitLab experts keep your Self-Managed instance reliably upgraded, secure, and ready to lead in DevSecOps. Ask your account manager for more information.
This blog post contains "forward-looking statements" within the meaning of Section 27A of the Securities Act of 1933, as amended, and Section 21E of the Securities Exchange Act of 1934. Although we believe that the expectations reflected in these statements are reasonable, they are subject to known and unknown risks, uncertainties, assumptions and other factors that may cause actual results or outcomes to differ materially. Further information on these risks and other factors is included under the caption "Risk Factors" in our filings with the SEC. We do not undertake any obligation to update or revise these statements after the date of this blog post, except as required by law.
]]>While static code analysis catches vulnerabilities in source code, it cannot identify runtime security issues that emerge when applications interact with real-world environments, third-party services, and complex user workflows. This is where Dynamic Application Security Testing (DAST) becomes invaluable. GitLab's integrated DAST solution provides teams with automated security testing capabilities directly within their CI/CD pipelines, on a schedule, or on-demand, enabling continuous security validation without disrupting development workflows.
Why DAST?
DAST should be implemented because it provides critical runtime security validation by testing applications in their actual operating environment, identifying vulnerabilities that static analysis cannot detect. Additionally, GitLab DAST can be seamlessly integrated into shift-left security workflows, and can enhance compliance assurance along with risk management.
Runtime vulnerability detection
DAST excels at identifying security vulnerabilities that only manifest when applications are running. Unlike static analysis tools that examine code at rest, DAST scanners interact with live applications as an external attacker would, uncovering issues such as:
- Authentication and session management flaws that could allow unauthorized access
- Input validation vulnerabilities, including SQL injection, cross-site scripting (XSS), and command injection
- Configuration weaknesses in web servers, databases, and application frameworks
- Business logic flaws that emerge from complex user interactions
- API security issues, including improper authentication, authorization, and data exposure
DAST complements other security testing approaches to provide comprehensive application security coverage. When combined with Static Application Security Testing (SAST), Software Composition Analysis (SCA), manual penetration testing, and many other scanner types, DAST fills critical gaps in security validation:
- Black-box testing perspective that mimics real-world attack scenarios
- Environment-specific testing that validates security in actual deployment configurations
- Third-party component testing, including APIs, libraries, and external services
- Configuration validation across the entire application stack
Seamless shift-left security integration
GitLab DAST seamlessly integrates into existing CI/CD pipelines, enabling teams to identify security issues early in the development lifecycle. This shift-left approach provides several key benefits:
- Cost reduction — Fixing vulnerabilities during development is significantly less expensive than addressing them in production. Studies show that remediation costs can be 10 to 100 times higher in production environments.
- Faster time-to-market — Automated security testing eliminates bottlenecks caused by manual security reviews, allowing teams to maintain rapid deployment schedules while ensuring security standards.
- Developer empowerment — By providing immediate feedback on security issues, DAST helps developers build security awareness and improve their coding practices over time.
Compliance and risk management
Many regulatory frameworks and industry standards require regular security testing of web applications. DAST helps organizations meet compliance requirements for standards such as:
- PCI DSS for applications handling payment card data
- SOC 2 security controls for service organizations
- ISO 27001 information security management requirements
The automated nature of GitLab DAST ensures consistent, repeatable security testing that auditors can rely on, while detailed reporting provides the documentation needed for compliance validation.
Implementing DAST
Before implementing GitLab DAST, ensure your environment meets the following requirements:
- GitLab version and Ultimate subscription — DAST is available in GitLab Ultimate and requires GitLab 13.4 or later for full functionality; however, the latest version is recommended.
- Application accessibility — Your application must be accessible via HTTP/HTTPS with a publicly reachable URL or accessible within your GitLab Runner's network.
- Authentication setup — If your application requires authentication, prepare test credentials or configure authentication bypass mechanisms for security testing.
Basic implementation
The simplest way to add DAST to your pipeline is by including the DAST template in your .gitlab-ci.yml file
and providing a website to scan:
include:
  - template: DAST.gitlab-ci.yml

variables:
  DAST_WEBSITE: "https://your-application.example.com"
This basic configuration will:
- Run a DAST scan against your specified website
- Generate a security report in GitLab's security dashboard
- Fail the pipeline if high-severity vulnerabilities are detected
- Store scan results as pipeline artifacts
However, it is suggested to gain the full benefit of CI/CD, you can first deploy the application and set DAST to run only after an application has been deployed. The application URL can be dynamically created and the DAST job can be configured fully with GitLab Job syntax.
stages:
  - build
  - deploy
  - dast

include:
  - template: Security/DAST.gitlab-ci.yml

# Builds and pushes application to GitLab's built-in container registry
build:
  stage: build
  variables:
    IMAGE: $CI_REGISTRY_IMAGE/$CI_COMMIT_REF_SLUG:$CI_COMMIT_SHA
  before_script:
    - docker login -u $CI_REGISTRY_USER -p $CI_REGISTRY_PASSWORD $CI_REGISTRY
  script:
    - docker build -t $IMAGE .
    - docker push $IMAGE

# Deploys application to your suggested target, setsup the dast site dynamically, requires build to complete
deploy:
  stage: deploy
  script:
    - echo "DAST_WEBSITE=http://your-application.example.com" >> deploy.env
    - echo "Perform deployment here"
  environment:
    name: $DEPLOY_NAME
    url: http://your-application.example.com
  artifacts:
    reports:
      dotenv: deploy.env
  dependencies:
    - build

# Configures DAST to run a an active scan on non-main branches, and a passive scan on the main branches and requires a deployment to complete before it is run
dast:
  stage: dast
  rules:
    - if: $CI_COMMIT_REF_NAME == $CI_DEFAULT_BRANCH
      variables:
        DAST_FULL_SCAN: "false"
    - if: $CI_COMMIT_REF_NAME != $CI_DEFAULT_BRANCH
      variables:
        DAST_FULL_SCAN: "true"
  dependencies:
    - deploy
You can learn from an example by seeing the Tanuki Shop demo application, which generates the following pipeline:
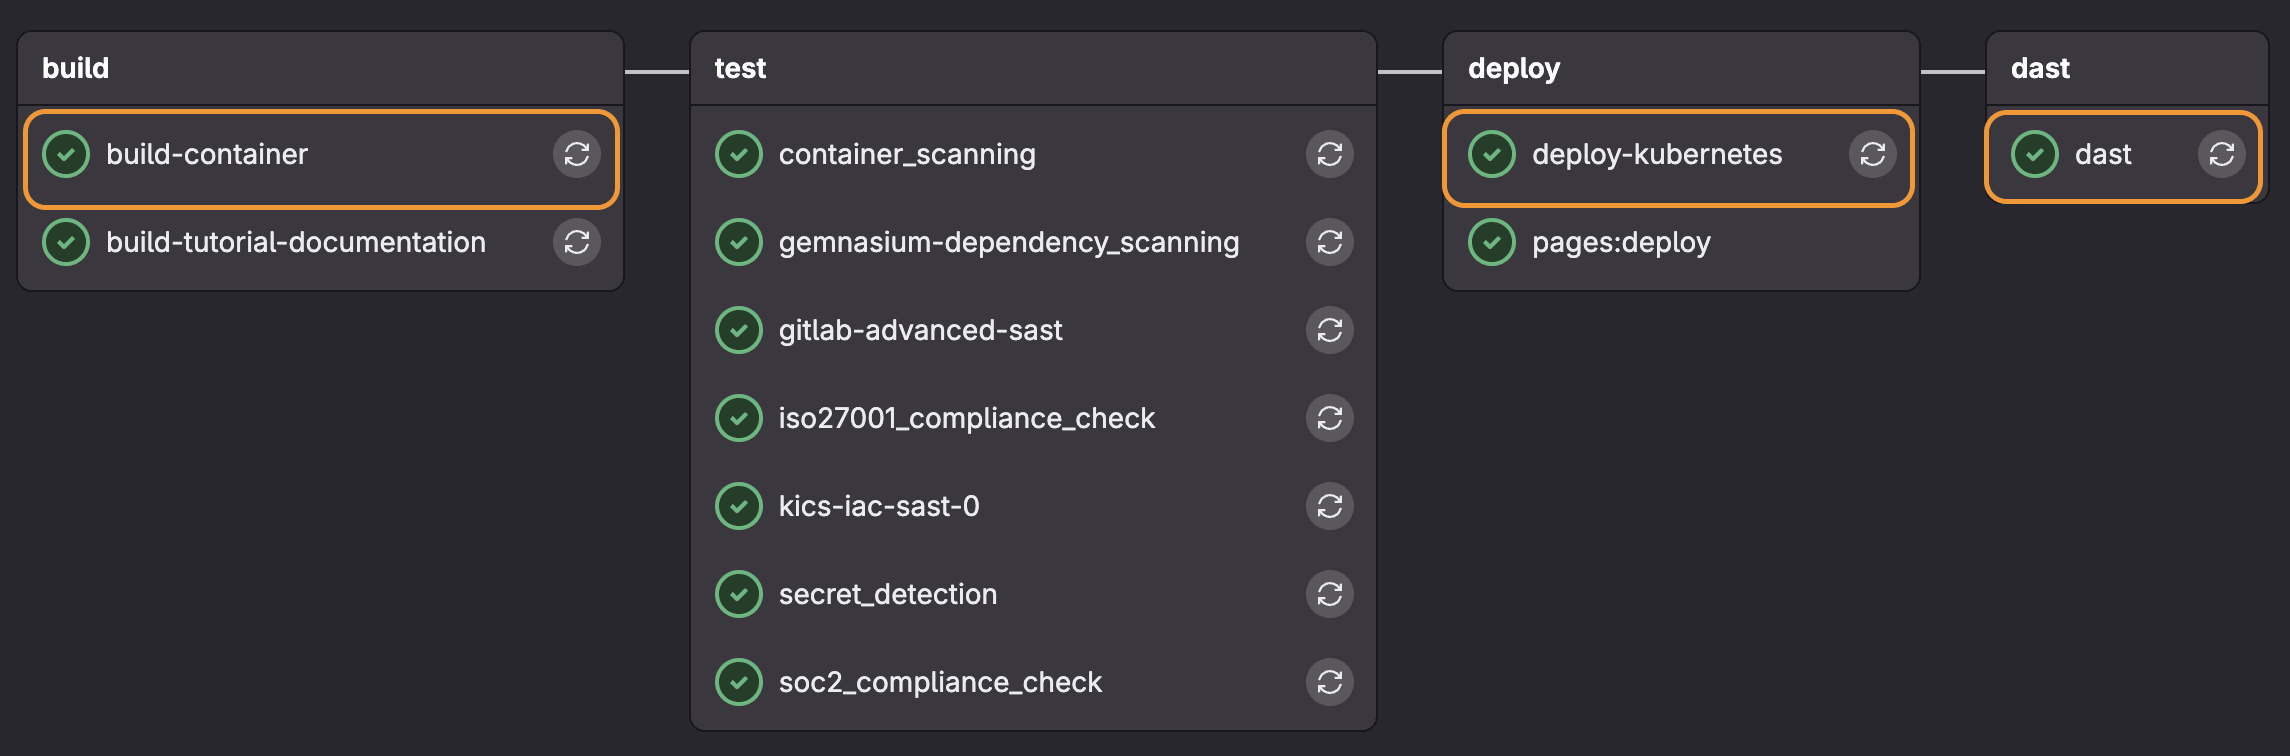
Understanding passive vs. active scans
In the example above we enabled active scanning for non-default branches:
- if: $CI_COMMIT_REF_NAME != $CI_DEFAULT_BRANCH
  variables:
    DAST_FULL_SCAN: "true"
GitLab DAST employs two distinct scanning methodologies (passive and active), each serving different security testing needs.
Passive scans analyze application responses without sending potentially harmful requests. This approach:
- Examines HTTP headers, cookies, and response content for security misconfigurations
- Identifies information disclosure vulnerabilities like exposed server versions or stack traces
- Detects missing security headers (CSP, HSTS, X-Frame-options)
- Analyzes SSL/TLS configuration and certificate issues
Active scans send crafted requests designed to trigger vulnerabilities. This approach:
- Tests for injection vulnerabilities (SQL injection, XSS, command injection)
- Attempts to exploit authentication and authorization flaws
- Validates input sanitization and output encoding
- Tests for business logic vulnerabilities
Note: The DAST scanner is set to passive by default.
DAST has several configuration options that can be applied via environment variables. For a list of all the possible configuration options for DAST, see the DAST documentation.
Authentication configuration
DAST requires authentication configuration in CI/CD jobs to achieve complete security coverage. Authentication enables DAST to simulate real attacks and test user-specific features only accessible after login. The DAST job typically authenticates by submitting login forms in a browser, then verifies success before continuing to crawl the application with saved credentials. Failed authentication stops the job.
Supported authentication methods:
- Single-step login form
- Multi-step login form
- Authentication to URLs outside the target scope
Here is an example for a single-step login form in a Tanuki Shop MR which adds admin authentication to non-default branches.
dast:
  stage: dast
  before_script:
    - echo "DAST_TARGET_URL set to '$DAST_TARGET_URL'" # Dynamically loaded from deploy job
    - echo "DAST_AUTH_URL set to '$DAST_TARGET_URL'" # Dynamically loaded from deploy jobs
  rules:
    - if: $CI_COMMIT_REF_NAME == $CI_DEFAULT_BRANCH
      variables:
        DAST_FULL_SCAN: "false"
    - if: $CI_COMMIT_REF_NAME != $CI_DEFAULT_BRANCH
      variables:
        DAST_FULL_SCAN: "true" # run both passive and active checks
        DAST_AUTH_USERNAME: "admin@tanuki.local" # The username to authenticate to in the website
        DAST_AUTH_PASSWORD: "admin123" # The password to authenticate to in the website
        DAST_AUTH_USERNAME_FIELD: "css:input[id=email]" # A selector describing the element used to enter the username on the login form
        DAST_AUTH_PASSWORD_FIELD: "css:input[id=password]" # A selector describing the element used to enter the password on the login form
        DAST_AUTH_SUBMIT_FIELD: "css:button[id=loginButton]" # A selector describing the element clicked on to submit the login form
        DAST_SCOPE_EXCLUDE_ELEMENTS: "css:[id=navbarLogoutButton]" # Comma-separated list of selectors that are ignored when scanning
        DAST_AUTH_REPORT: "true" # generate a report detailing steps taken during the authentication process
        DAST_REQUEST_COOKIES: "welcomebanner_status:dismiss,cookieconsent_status:dismiss" # A cookie name and value to be added to every request
        DAST_CRAWL_GRAPH: "true" # generate an SVG graph of navigation paths visited during crawl phase of the scan
  dependencies:
    - deploy-kubernetes
You can see if the authentication was successful by viewing the job logs:
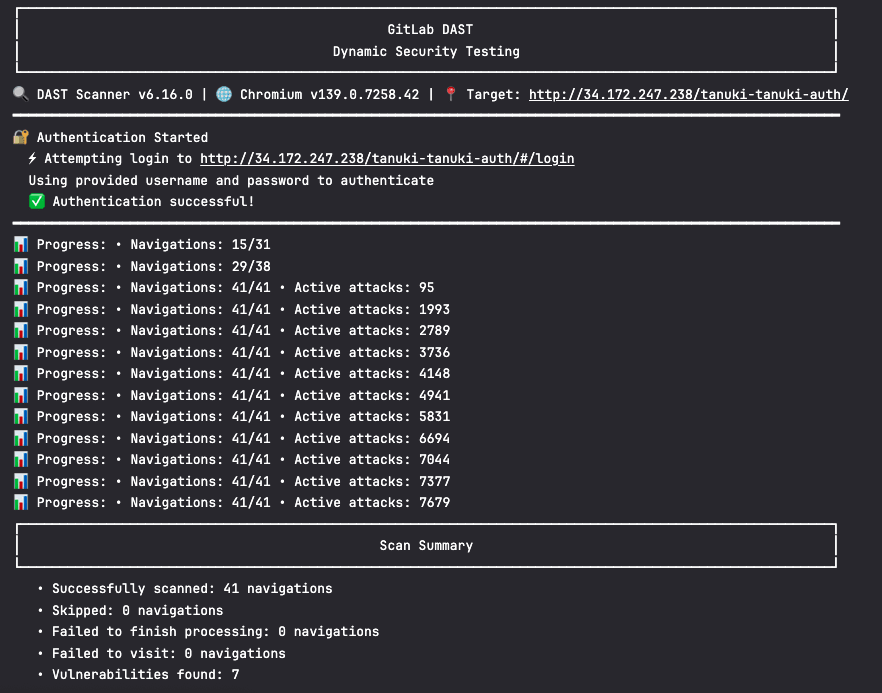
Once this job completes it provides an authentication report which includes screenshots of the login page:
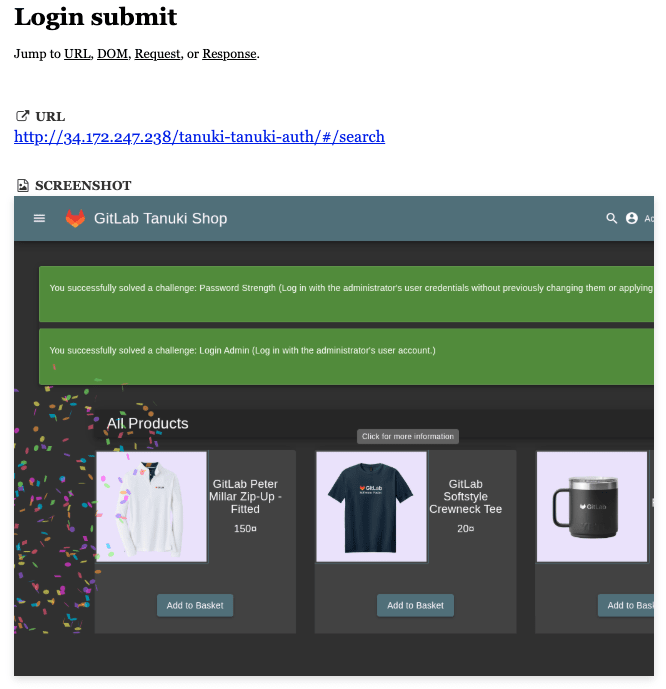
You can also see more examples on DAST with authentication in our DAST demos group. To learn more about how to perform DAST with authentication with your specific requirements, see the DAST authentication documentation.
Viewing results in MR
GitLab's DAST seamlessly integrates security scanning into your development workflow by displaying results directly within merge requests:
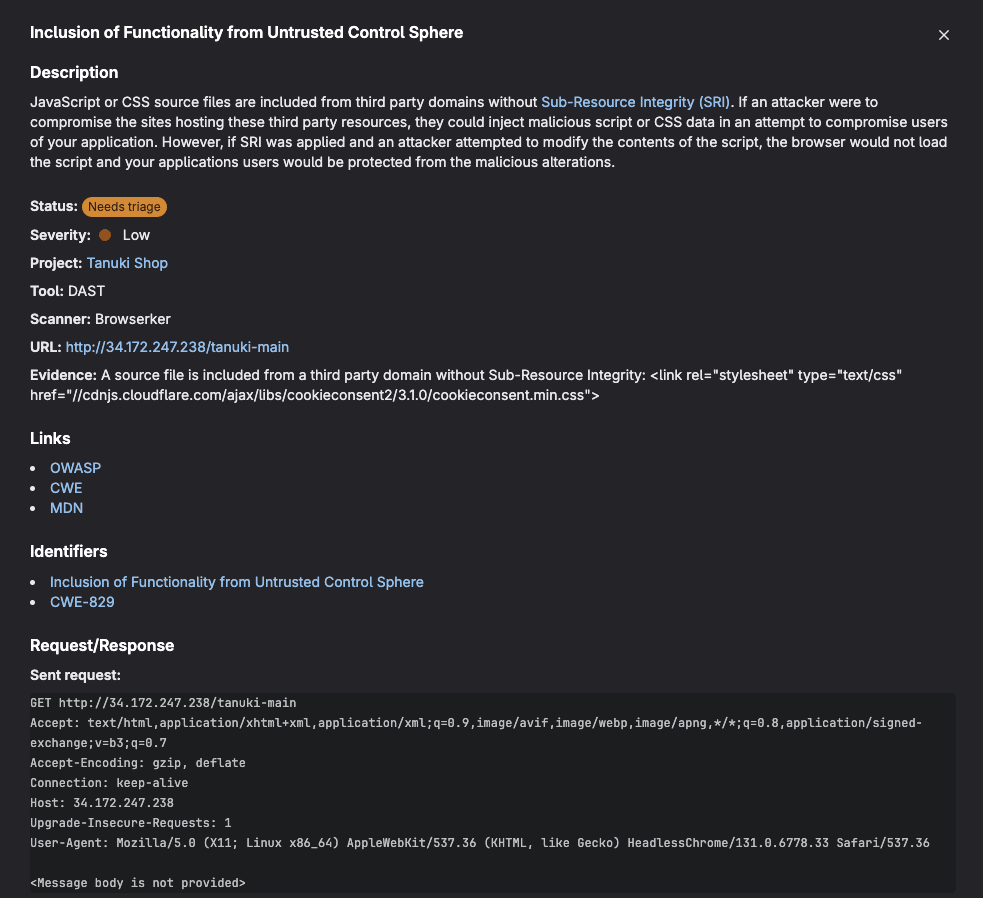
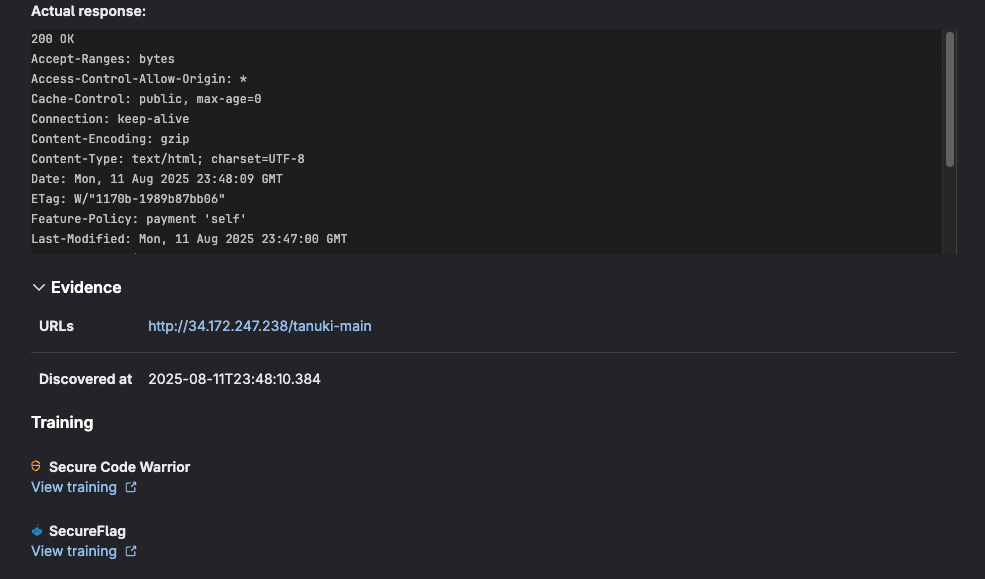
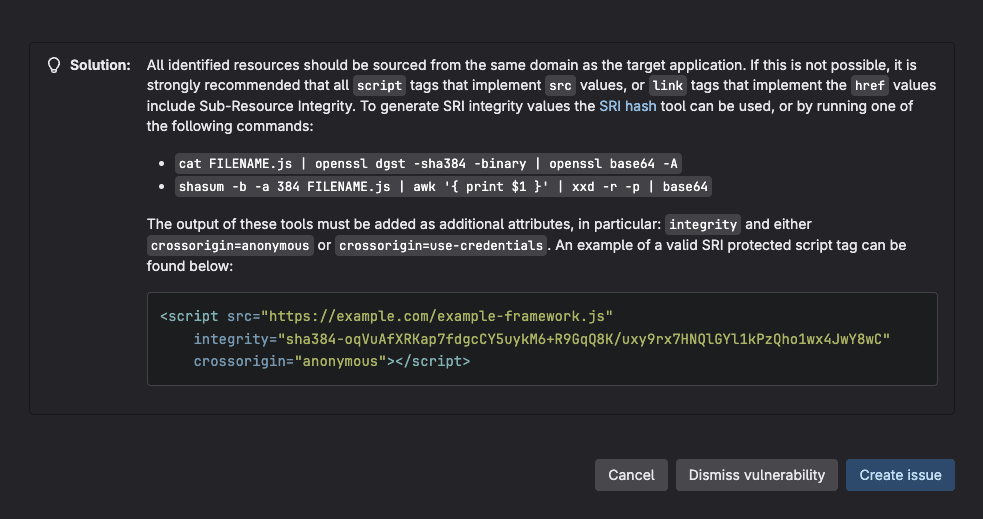
These results include comprehensive vulnerability data within MRs to help developers identify and address security issues before code is merged. Here's what DAST typically reports:
Vulnerability details
- Vulnerability name and type (e.g., SQL injection, XSS, CSRF)
- Severity level (Critical, High, Medium, Low, Info)
- CVSS score when applicable
- Common Weakness Enumeration (CWE) identifier
- Confidence level of the finding
Location information
- URL/endpoint where the vulnerability was detected
- HTTP method used (GET, POST, etc.)
- Request/response details showing the vulnerable interaction
- Parameter names that are vulnerable
- Evidence demonstrating the vulnerability
Technical context
- Description of the vulnerability and potential impact
- Proof of concept showing how the vulnerability can be exploited
- Request/response pairs that triggered the finding
- Scanner details (which DAST tool detected it)
Remediation guidance
- Solution recommendations for fixing the vulnerability
- References to security standards (OWASP, etc.)
- Links to documentation for remediation steps
Viewing results in GitLab Vulnerability Report
For managing vulnerabilities located in the default (or production) branch, the GitLab Vulnerability Report provides a centralized dashboard for monitoring all security findings (in the default branch) across your entire project or organization. This comprehensive view aggregates all security scan results, offering filtering and sorting capabilities to help security teams prioritize remediation efforts.
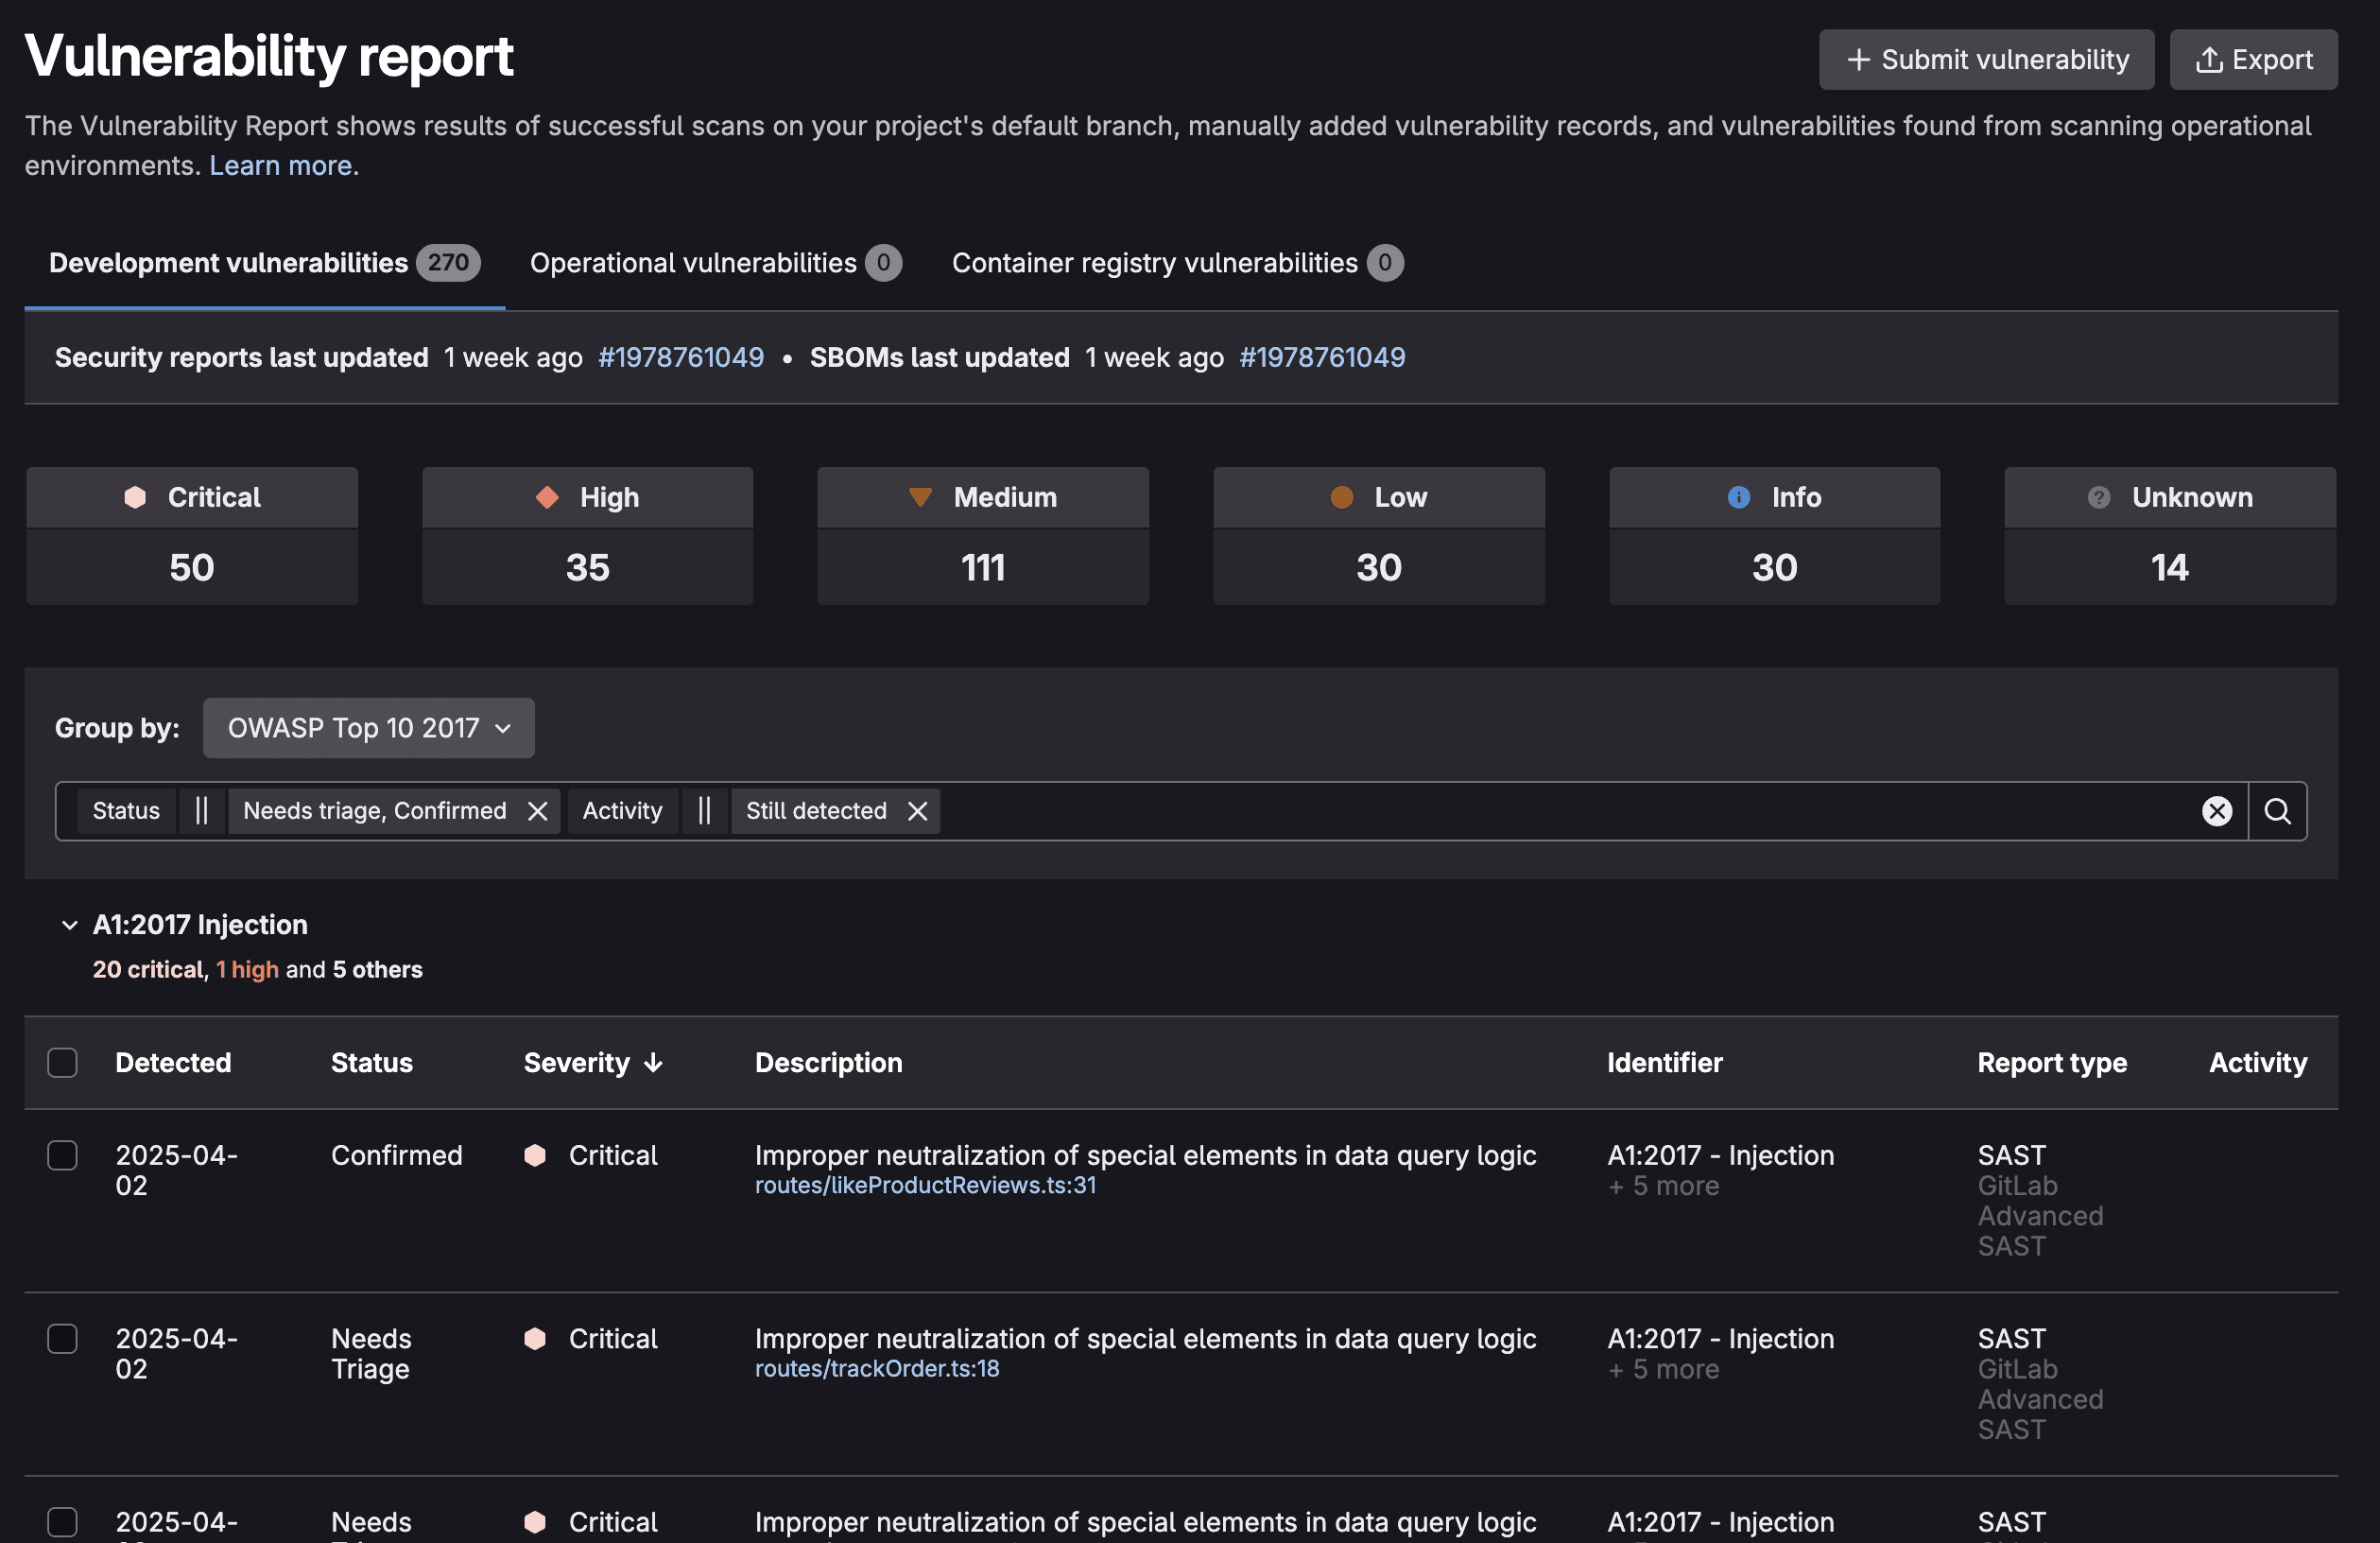
When selecting a vulnerability, you are taken to its vulnerability page:
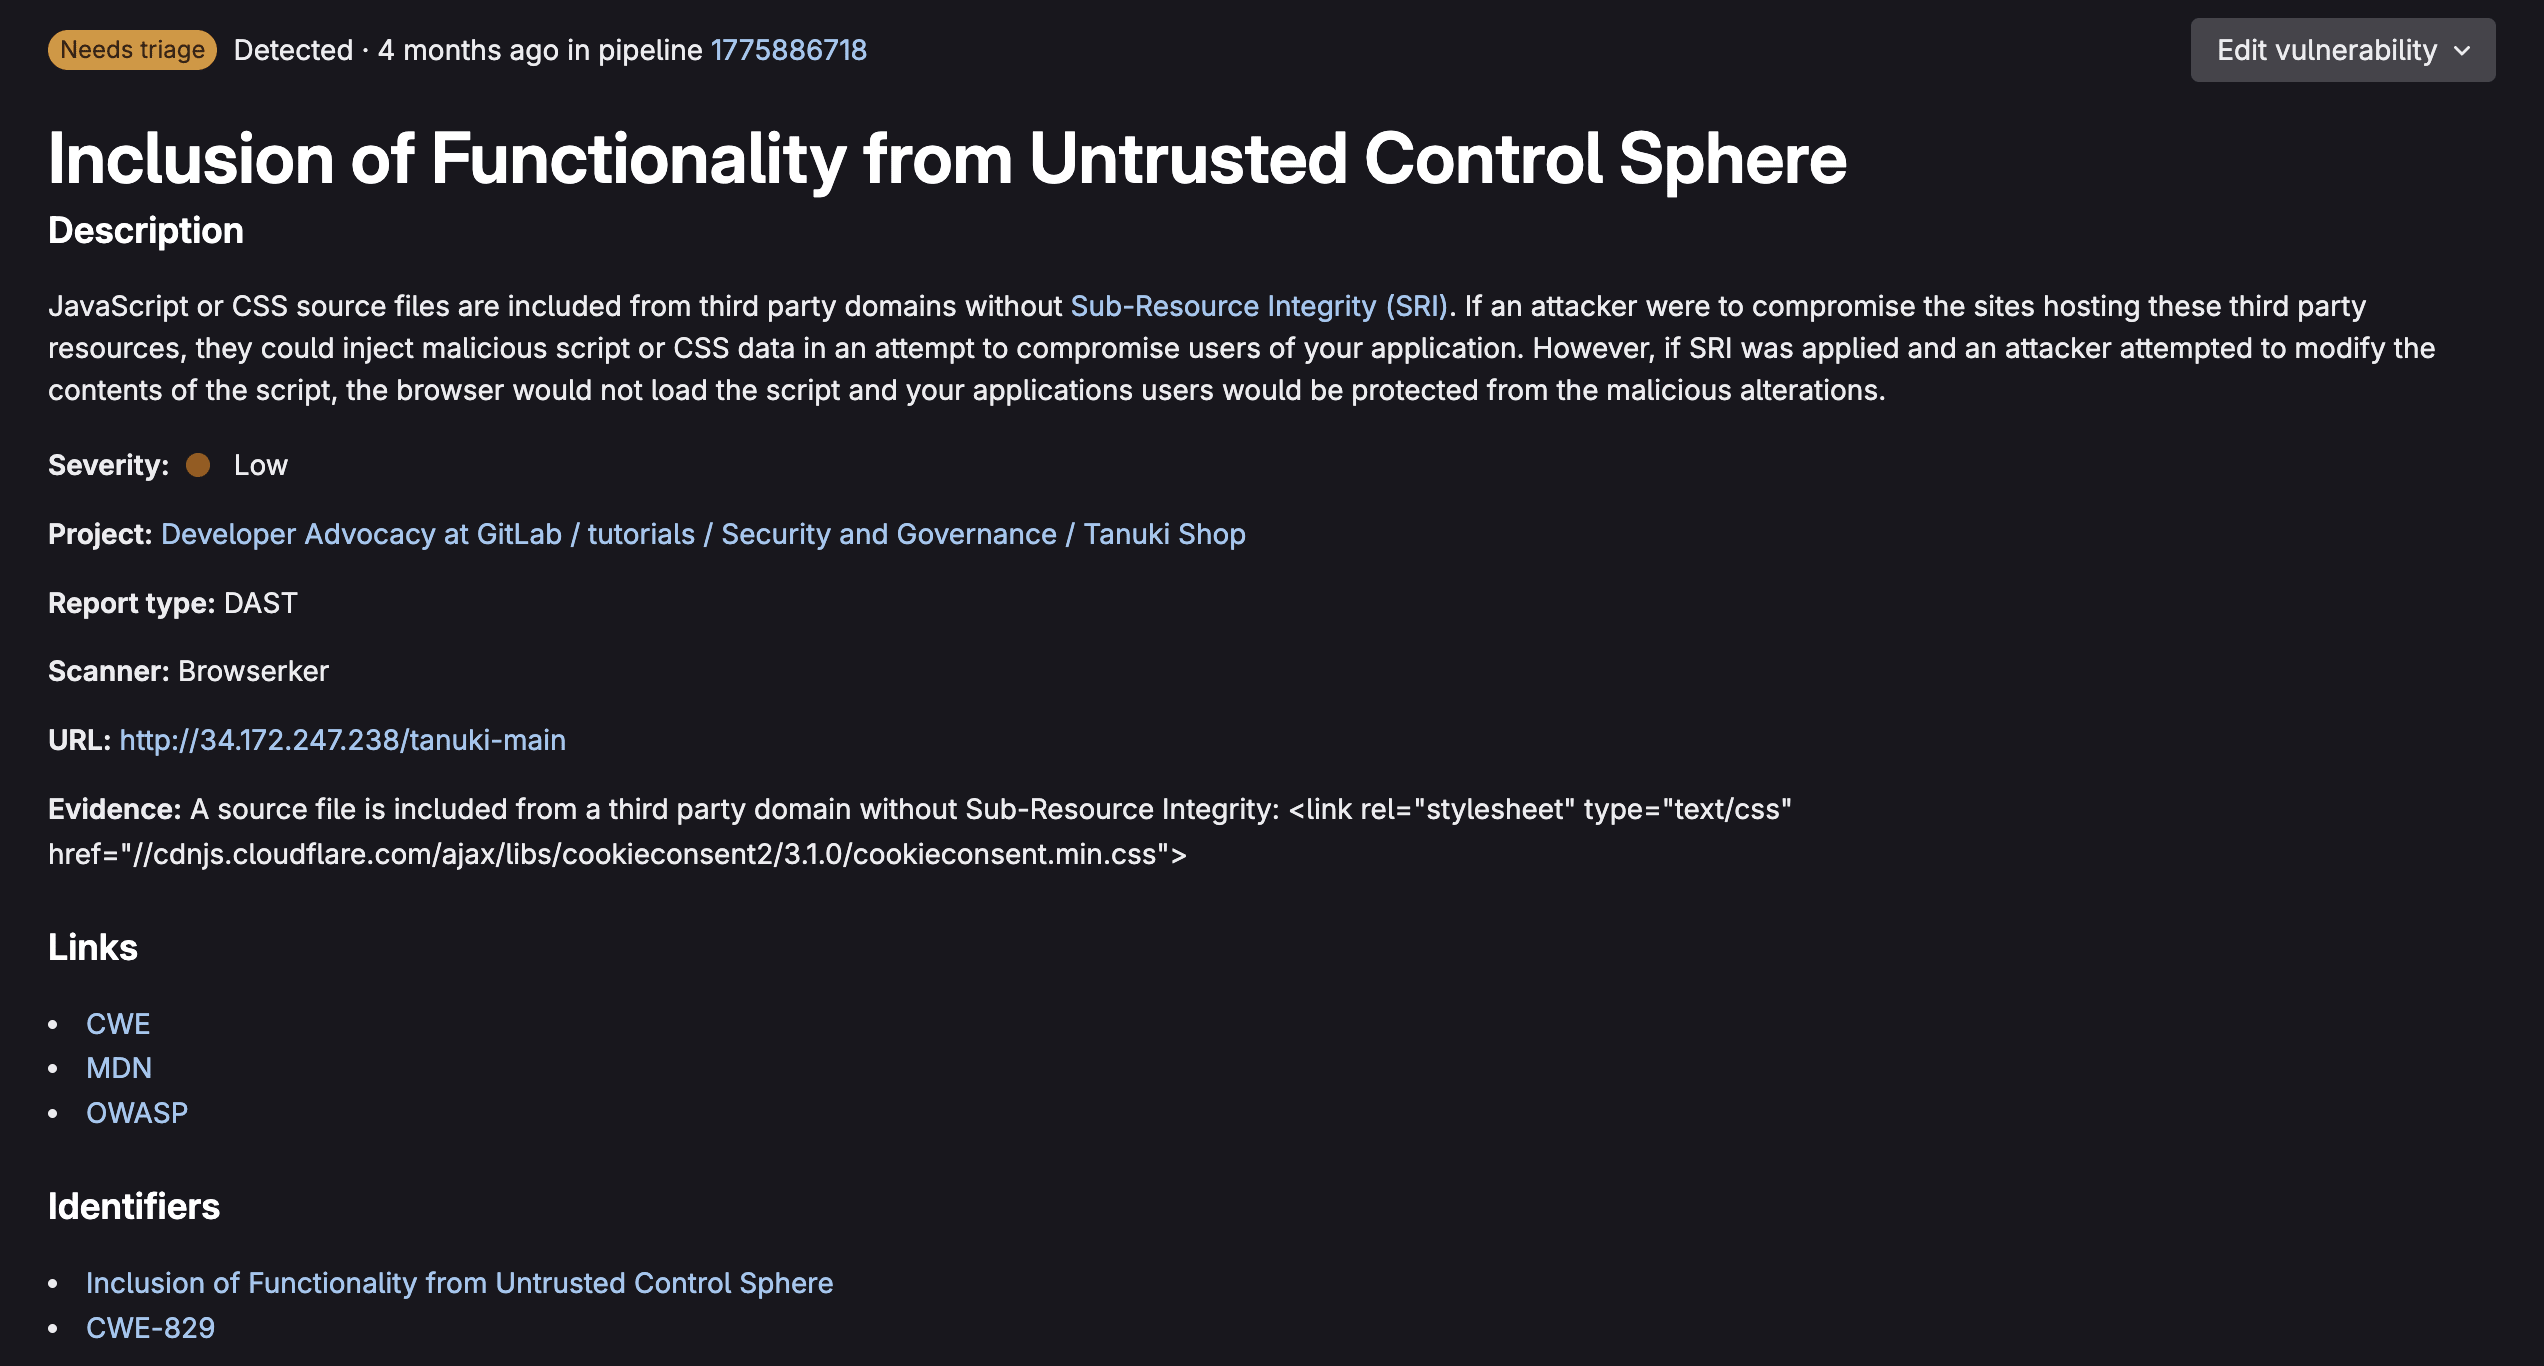
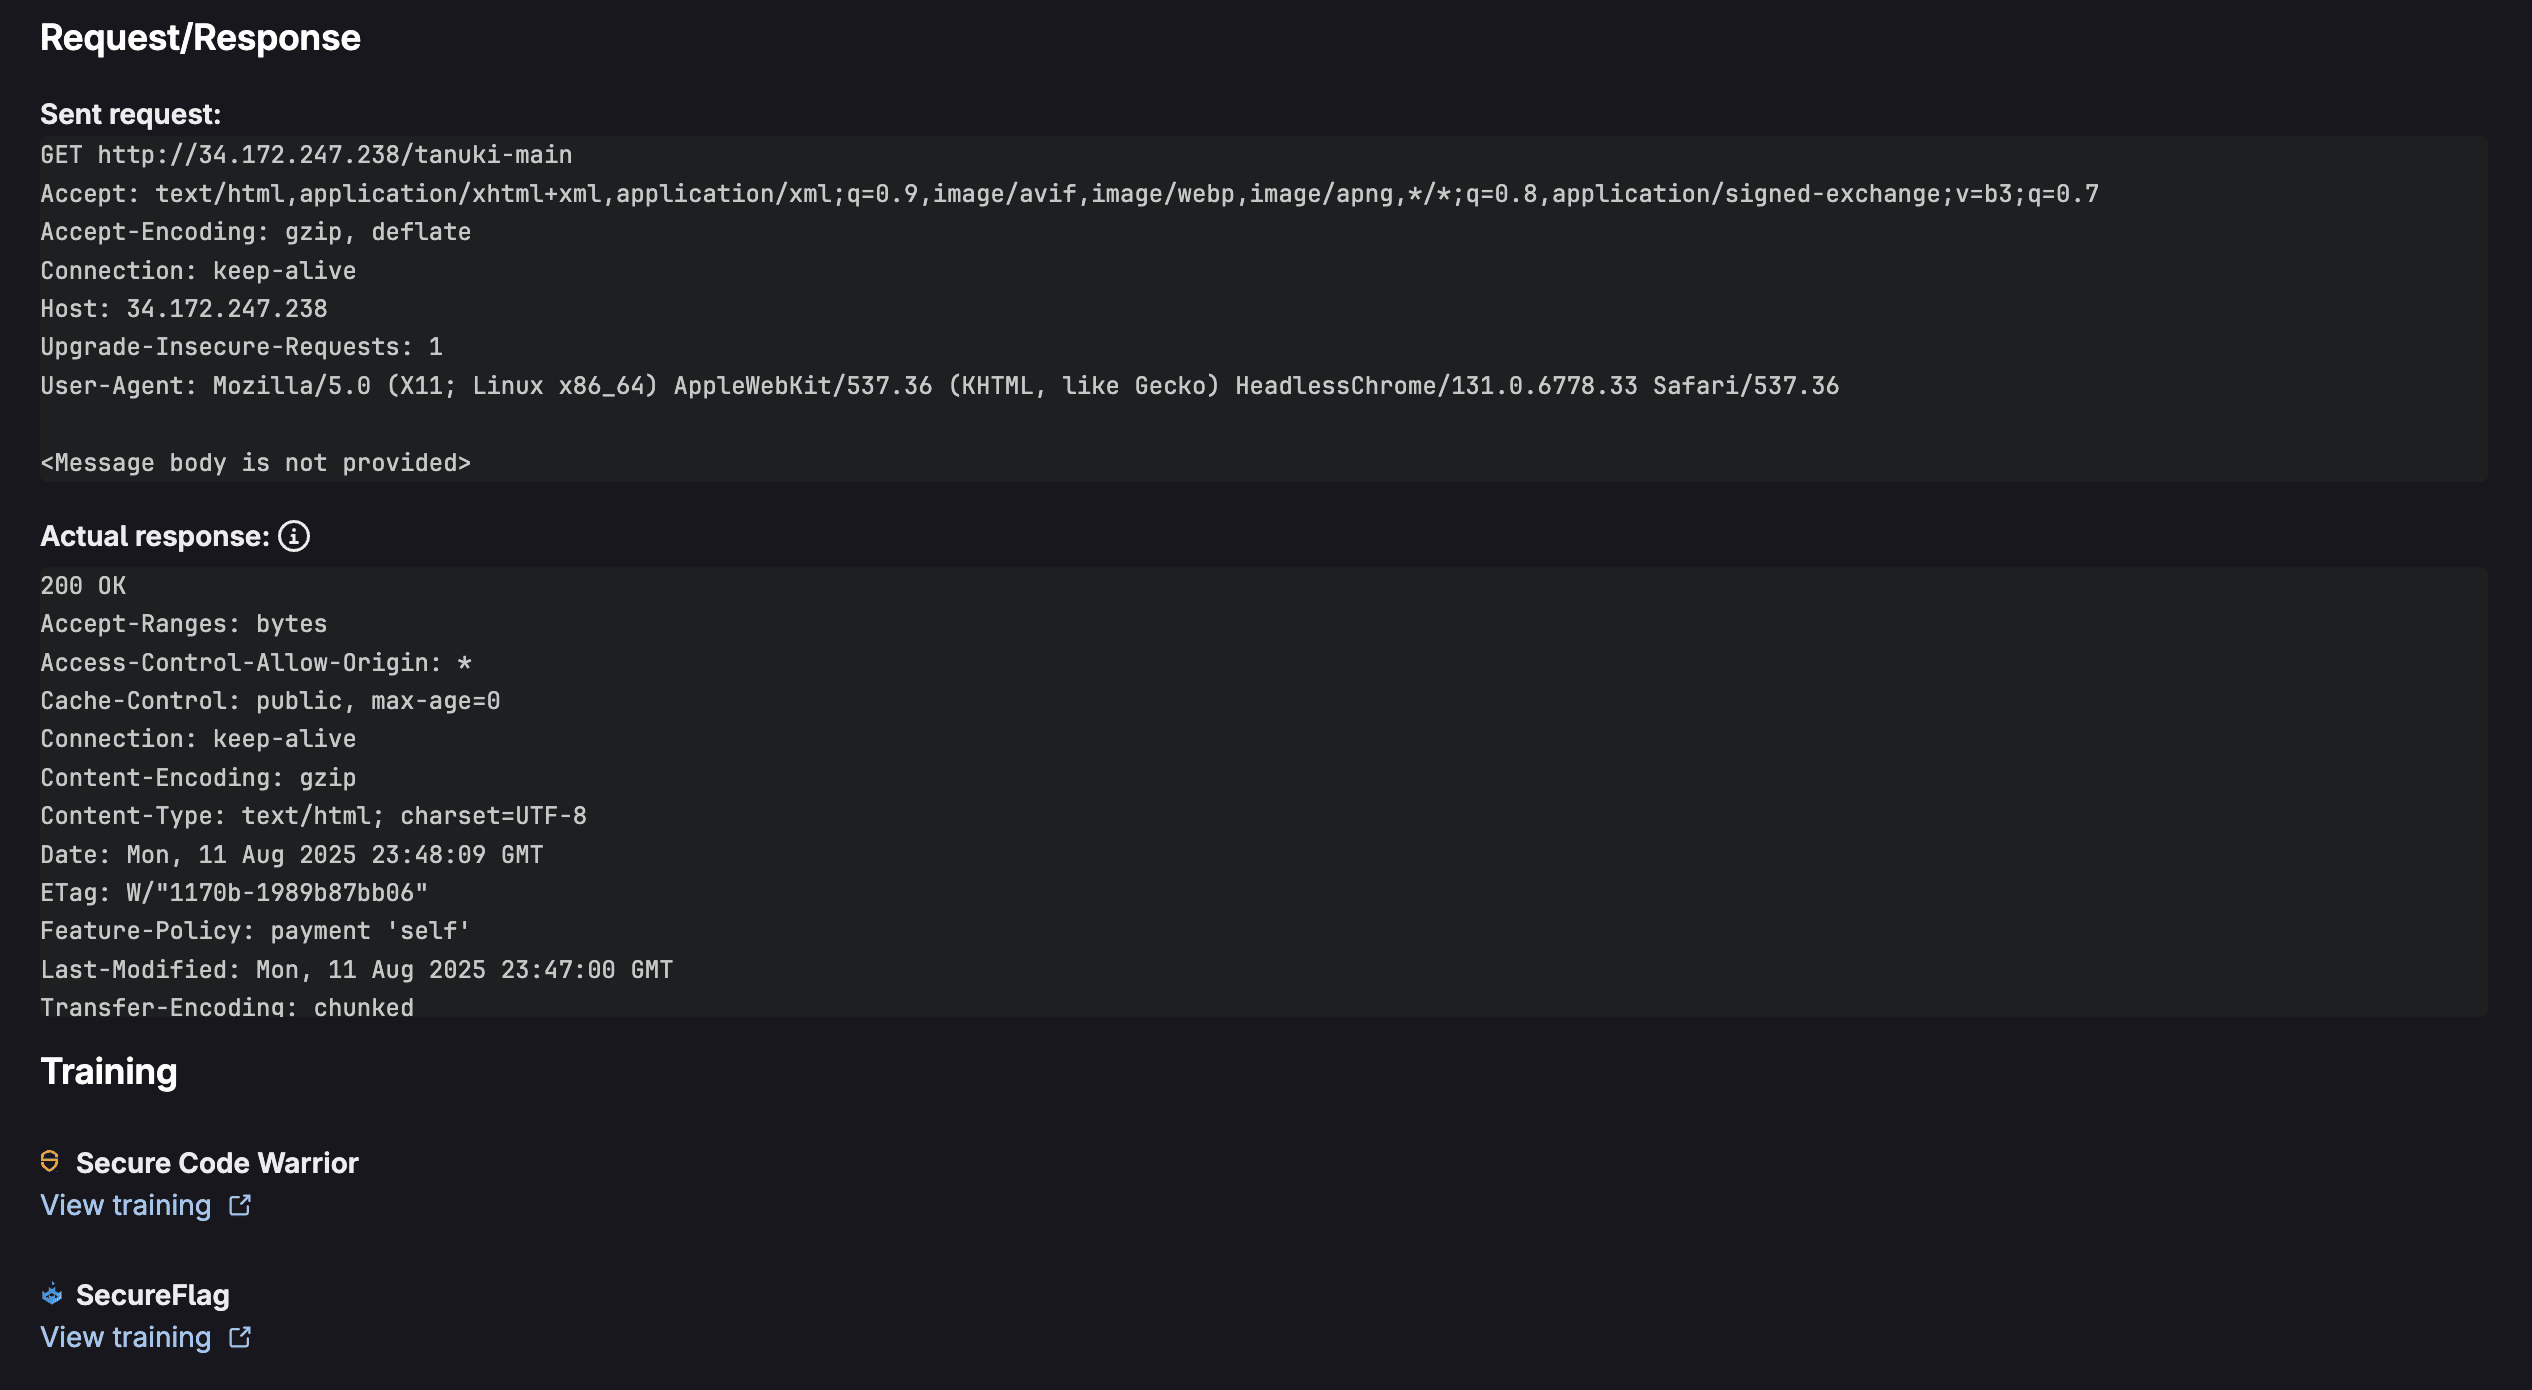
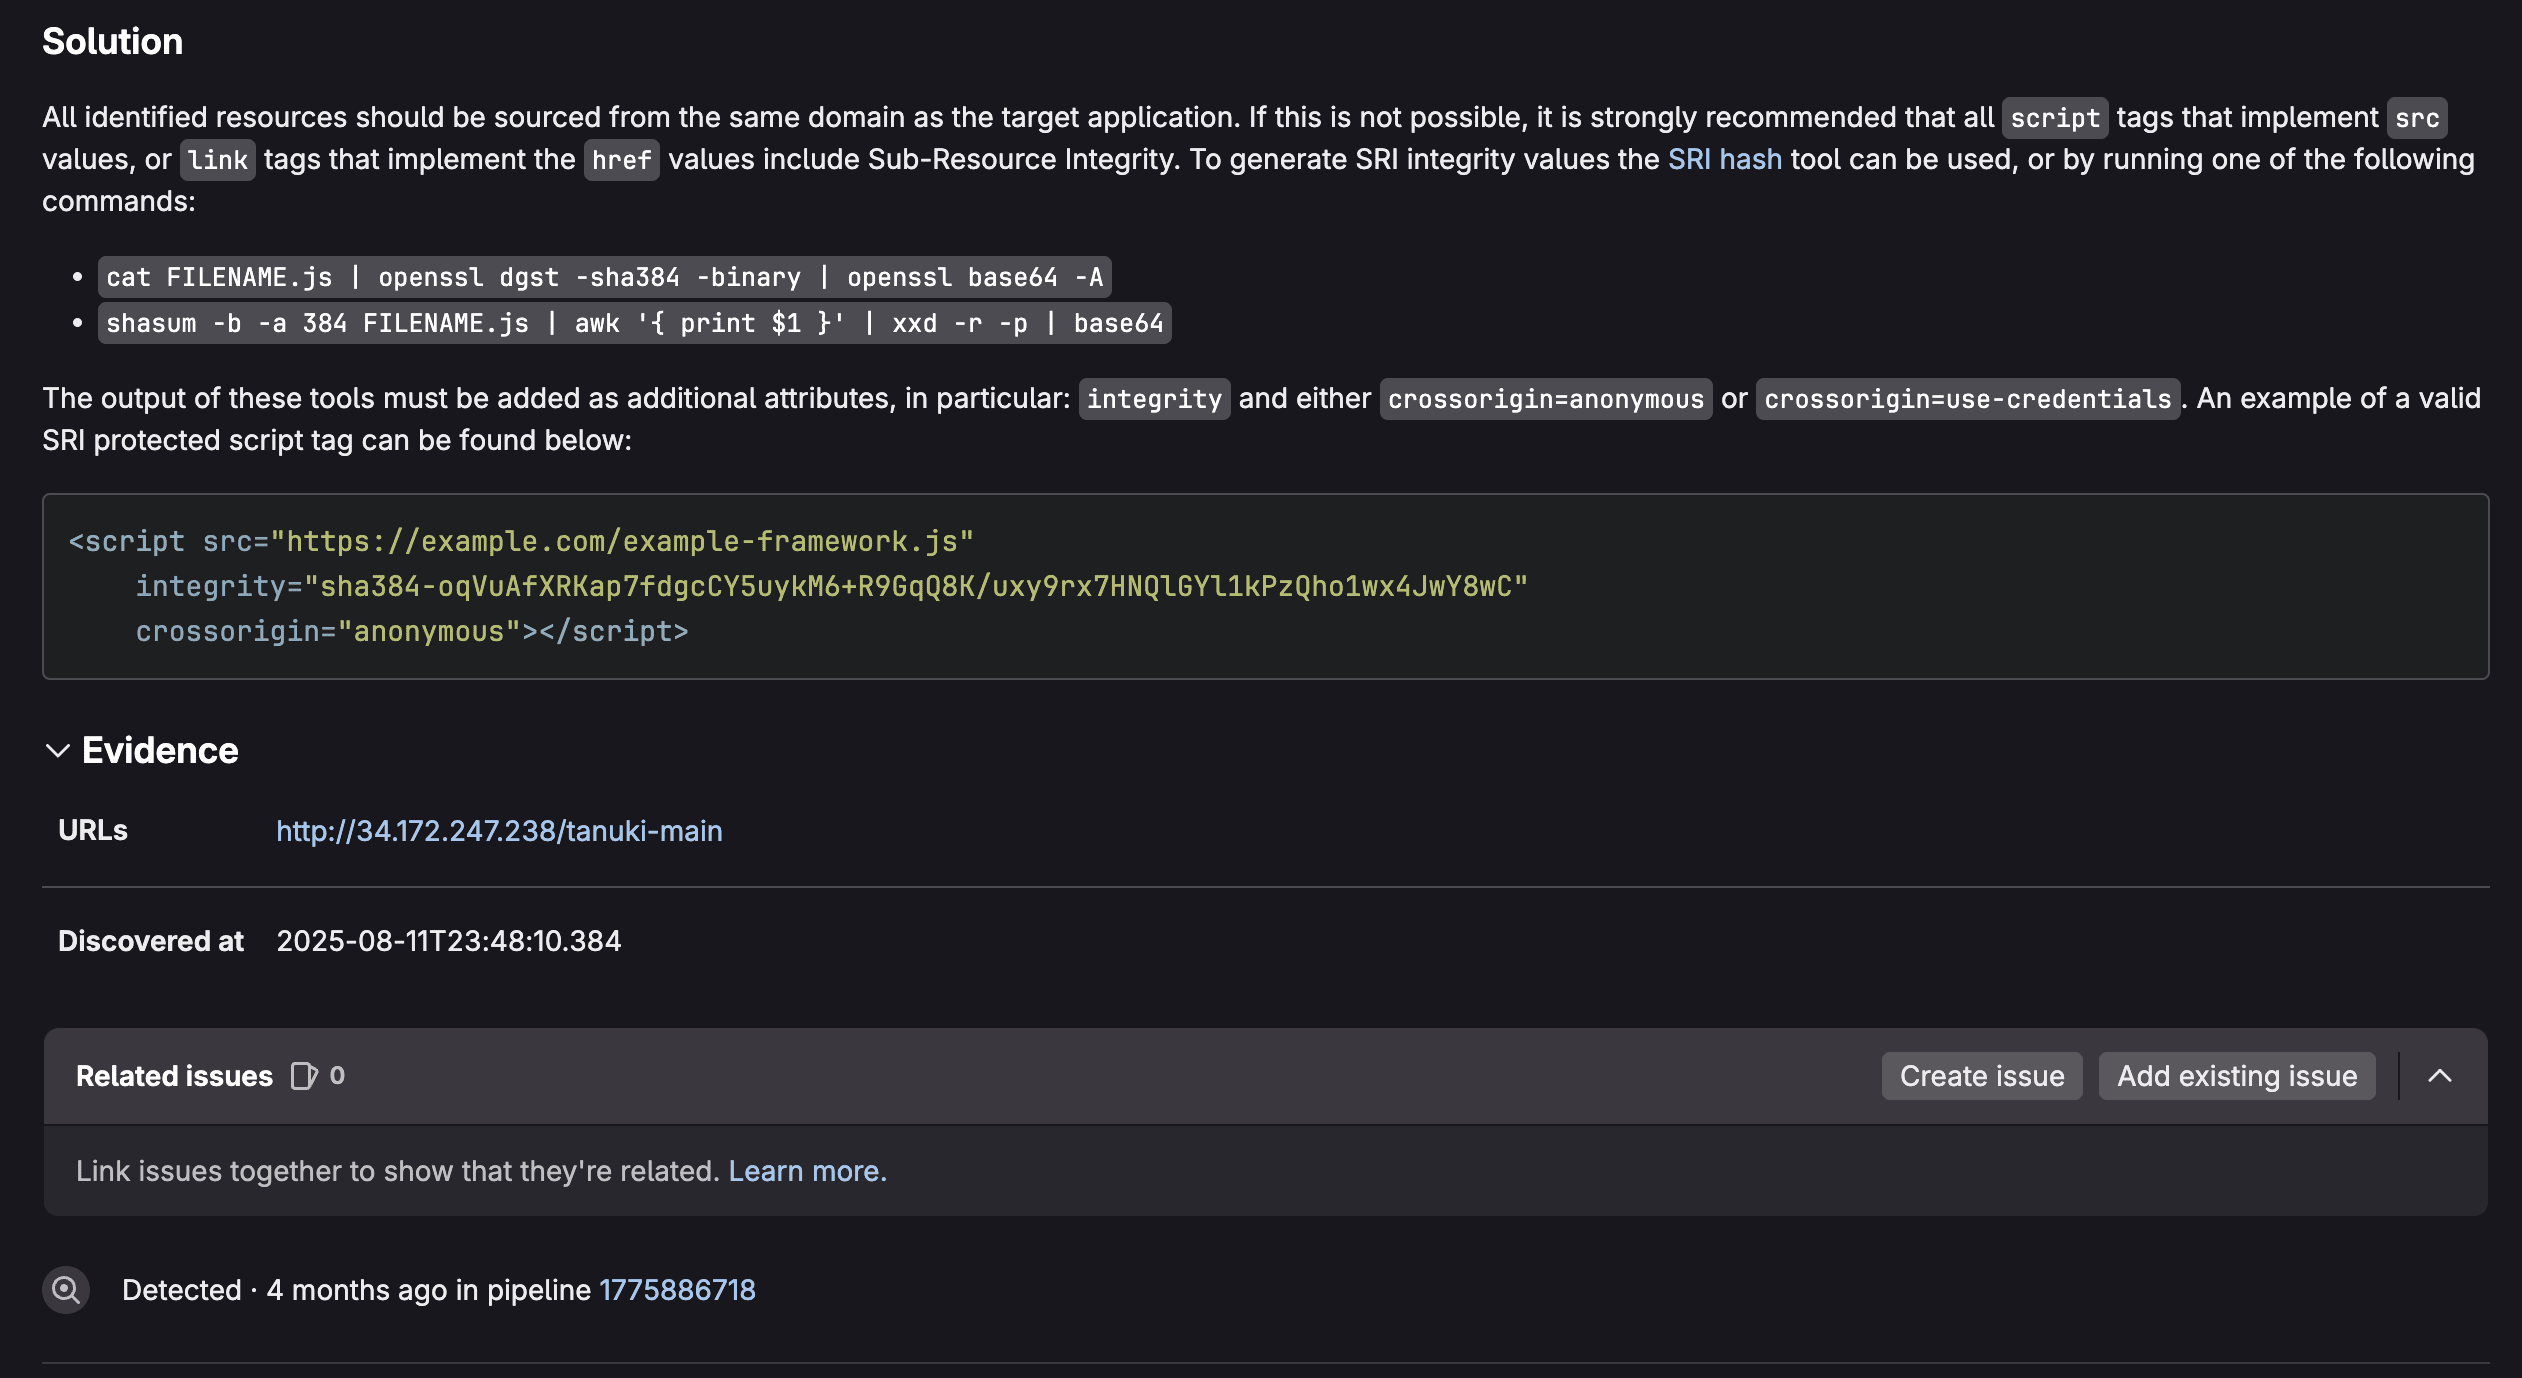
Just like in merge requests, the vulnerability page provides comprehensive vulnerability data, as seen above. From here you can triage vulnerabilities by assigning them with a status:
- Needs triage (Default)
- Confirmed
- Dismissed (Acceptable risk, False positive, Mitigating control, Used in tests, Not applicable)
- Resolved
When a vulnerability status is changed, the audit log includes a note of who changed it, when it was changed, and the reason it was changed. This comprehensive system allows security teams to efficiently prioritize, track, and manage vulnerabilities throughout their lifecycle with clear accountability and detailed risk context.
On-demand and scheduled DAST
GitLab provides flexible scanning options beyond standard CI/CD pipeline integration through on-demand and scheduled DAST scans. On-demand scans allow security teams and developers to initiate DAST testing manually whenever needed, without waiting for code commits or pipeline triggers. This capability is particularly valuable for ad-hoc security assessments, incident response scenarios, or when testing specific application features that may not be covered in regular pipeline scans.
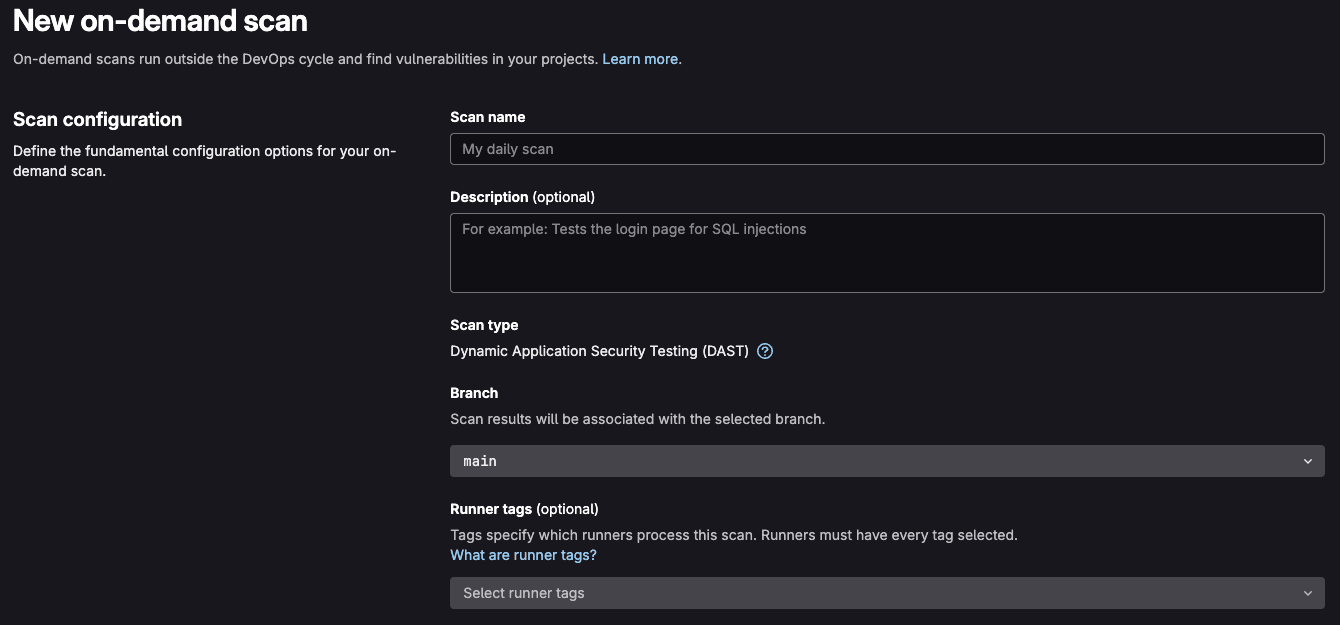
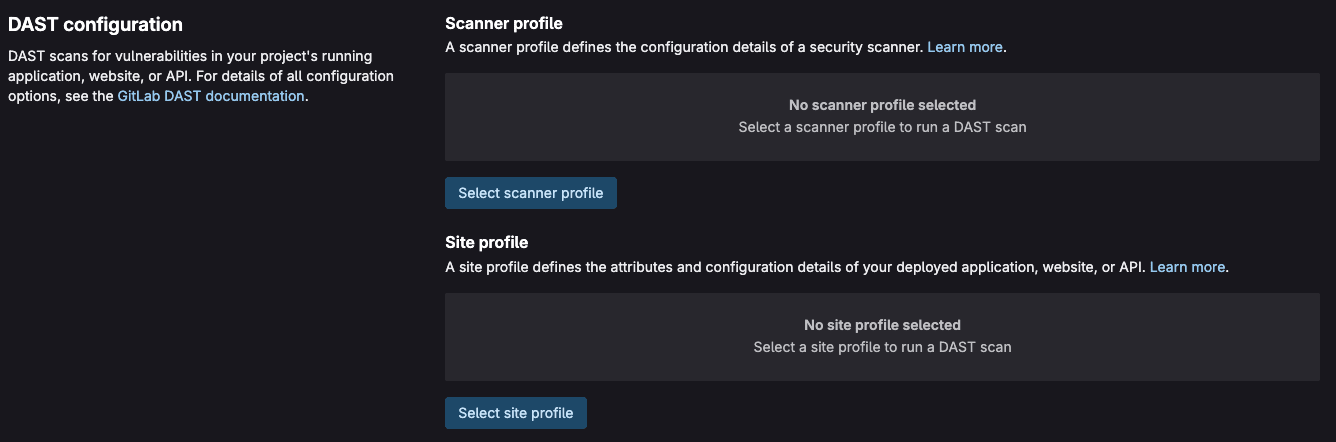
On-demand scans can be configured with custom parameters, target URLs, and scanning profiles, making them ideal for focused security testing of particular application components or newly-deployed features. Scheduled DAST scans provide automated, time-based security testing that operates independently of the development workflow. These scans can be configured to run daily, weekly, or at custom intervals, ensuring continuous security monitoring of production applications.
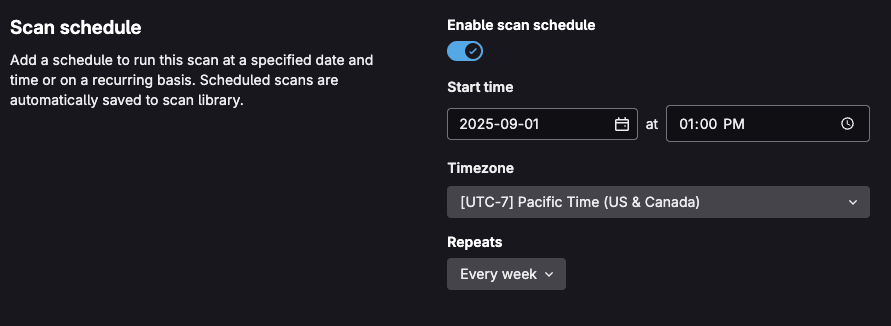
To learn how to implement on-demand or scheduled scans within your project, see the DAST on-demand scan documentation
DAST in compliance workflows
GitLab's security policies framework allows organizations to enforce consistent security standards across all projects, while maintaining flexibility for different teams and environments. Security policies enable centralized governance of DAST scanning requirements, ensuring that critical applications receive appropriate security testing without requiring individual project configuration. By defining security policies at the group or instance level, security teams can mandate DAST scans for specific project types, deployment environments, or risk classifications.
Scan/Pipeline Execution Policies can be configured to automatically trigger DAST scans based on specific conditions such as merge requests to protected branches, scheduled intervals, or deployment events. For example, a policy might require full active DAST scans for all applications before production deployment, while allowing passive scans only for development branches. These policies can include custom variables, authentication configurations, and exclusion rules that are automatically applied to all covered projects, reducing the burden on development teams and ensuring security compliance.
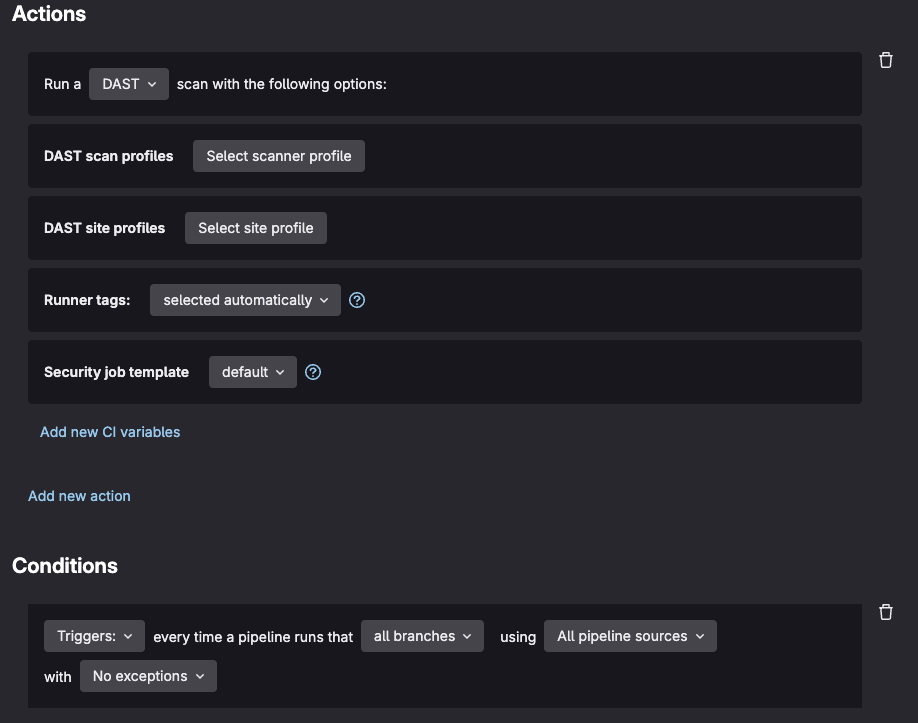
Merge Request Approval Policies provide an additional layer of security governance by enforcing human review for code changes that may impact security. These policies can be configured to require security team approval when DAST scans detect new vulnerabilities, when security findings exceed defined thresholds, or when changes affect security-critical components. For example, a policy might automatically require approval from a designated security engineer when DAST findings include high-severity vulnerabilities, while allowing lower-risk findings to proceed with standard code review processes.
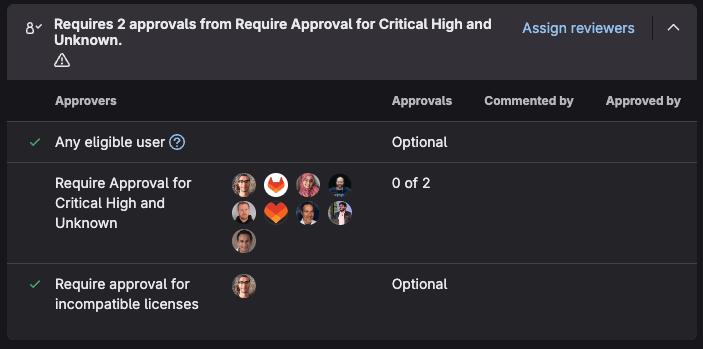
To learn more about GitLab security policies, see the policy documentation. Additionally, for compliance, GitLab provides Security Inventory and Compliance center, which can allow you to oversee if DAST is running in your environment and where it is required.
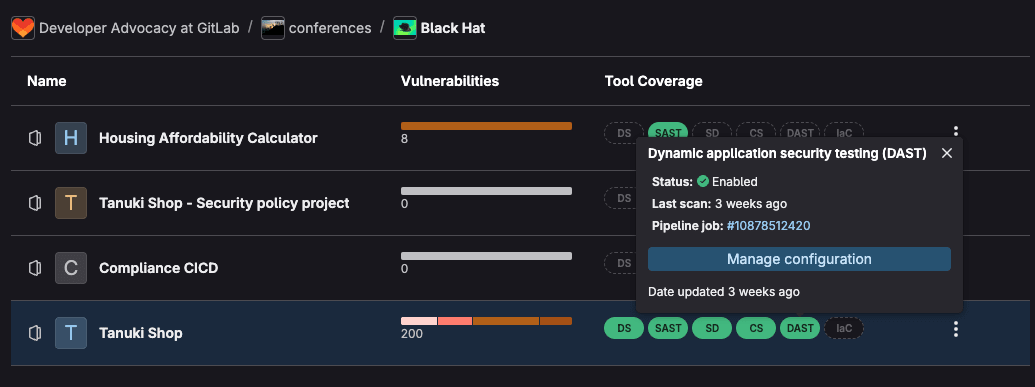
To learn more about these features, visit our software compliance solutions page.
Summary
GitLab DAST represents a powerful solution for integrating dynamic security testing into modern development workflows. By implementing DAST in your CI/CD pipeline, your team gains the ability to automatically detect runtime vulnerabilities, maintain compliance with security standards, and build more secure applications without sacrificing development velocity.
The key to successful DAST implementation lies in starting with basic configuration and gradually expanding to more sophisticated scanning profiles as your security maturity grows. Begin with simple website scanning, then progressively add authentication, custom exclusions, and advanced reporting to match your specific security requirements.
Remember that DAST is most effective when combined with other security testing approaches. Use it alongside static analysis, dependency scanning, and manual security reviews to create a comprehensive security testing strategy. The automated nature of GitLab DAST ensures that security testing becomes a consistent, repeatable part of your development process rather than an afterthought.
]]>To learn more about GitLab security, check out our security testing solutions page. To get started with GitLab DAST, sign up for a free trial of GitLab Ultimate today.
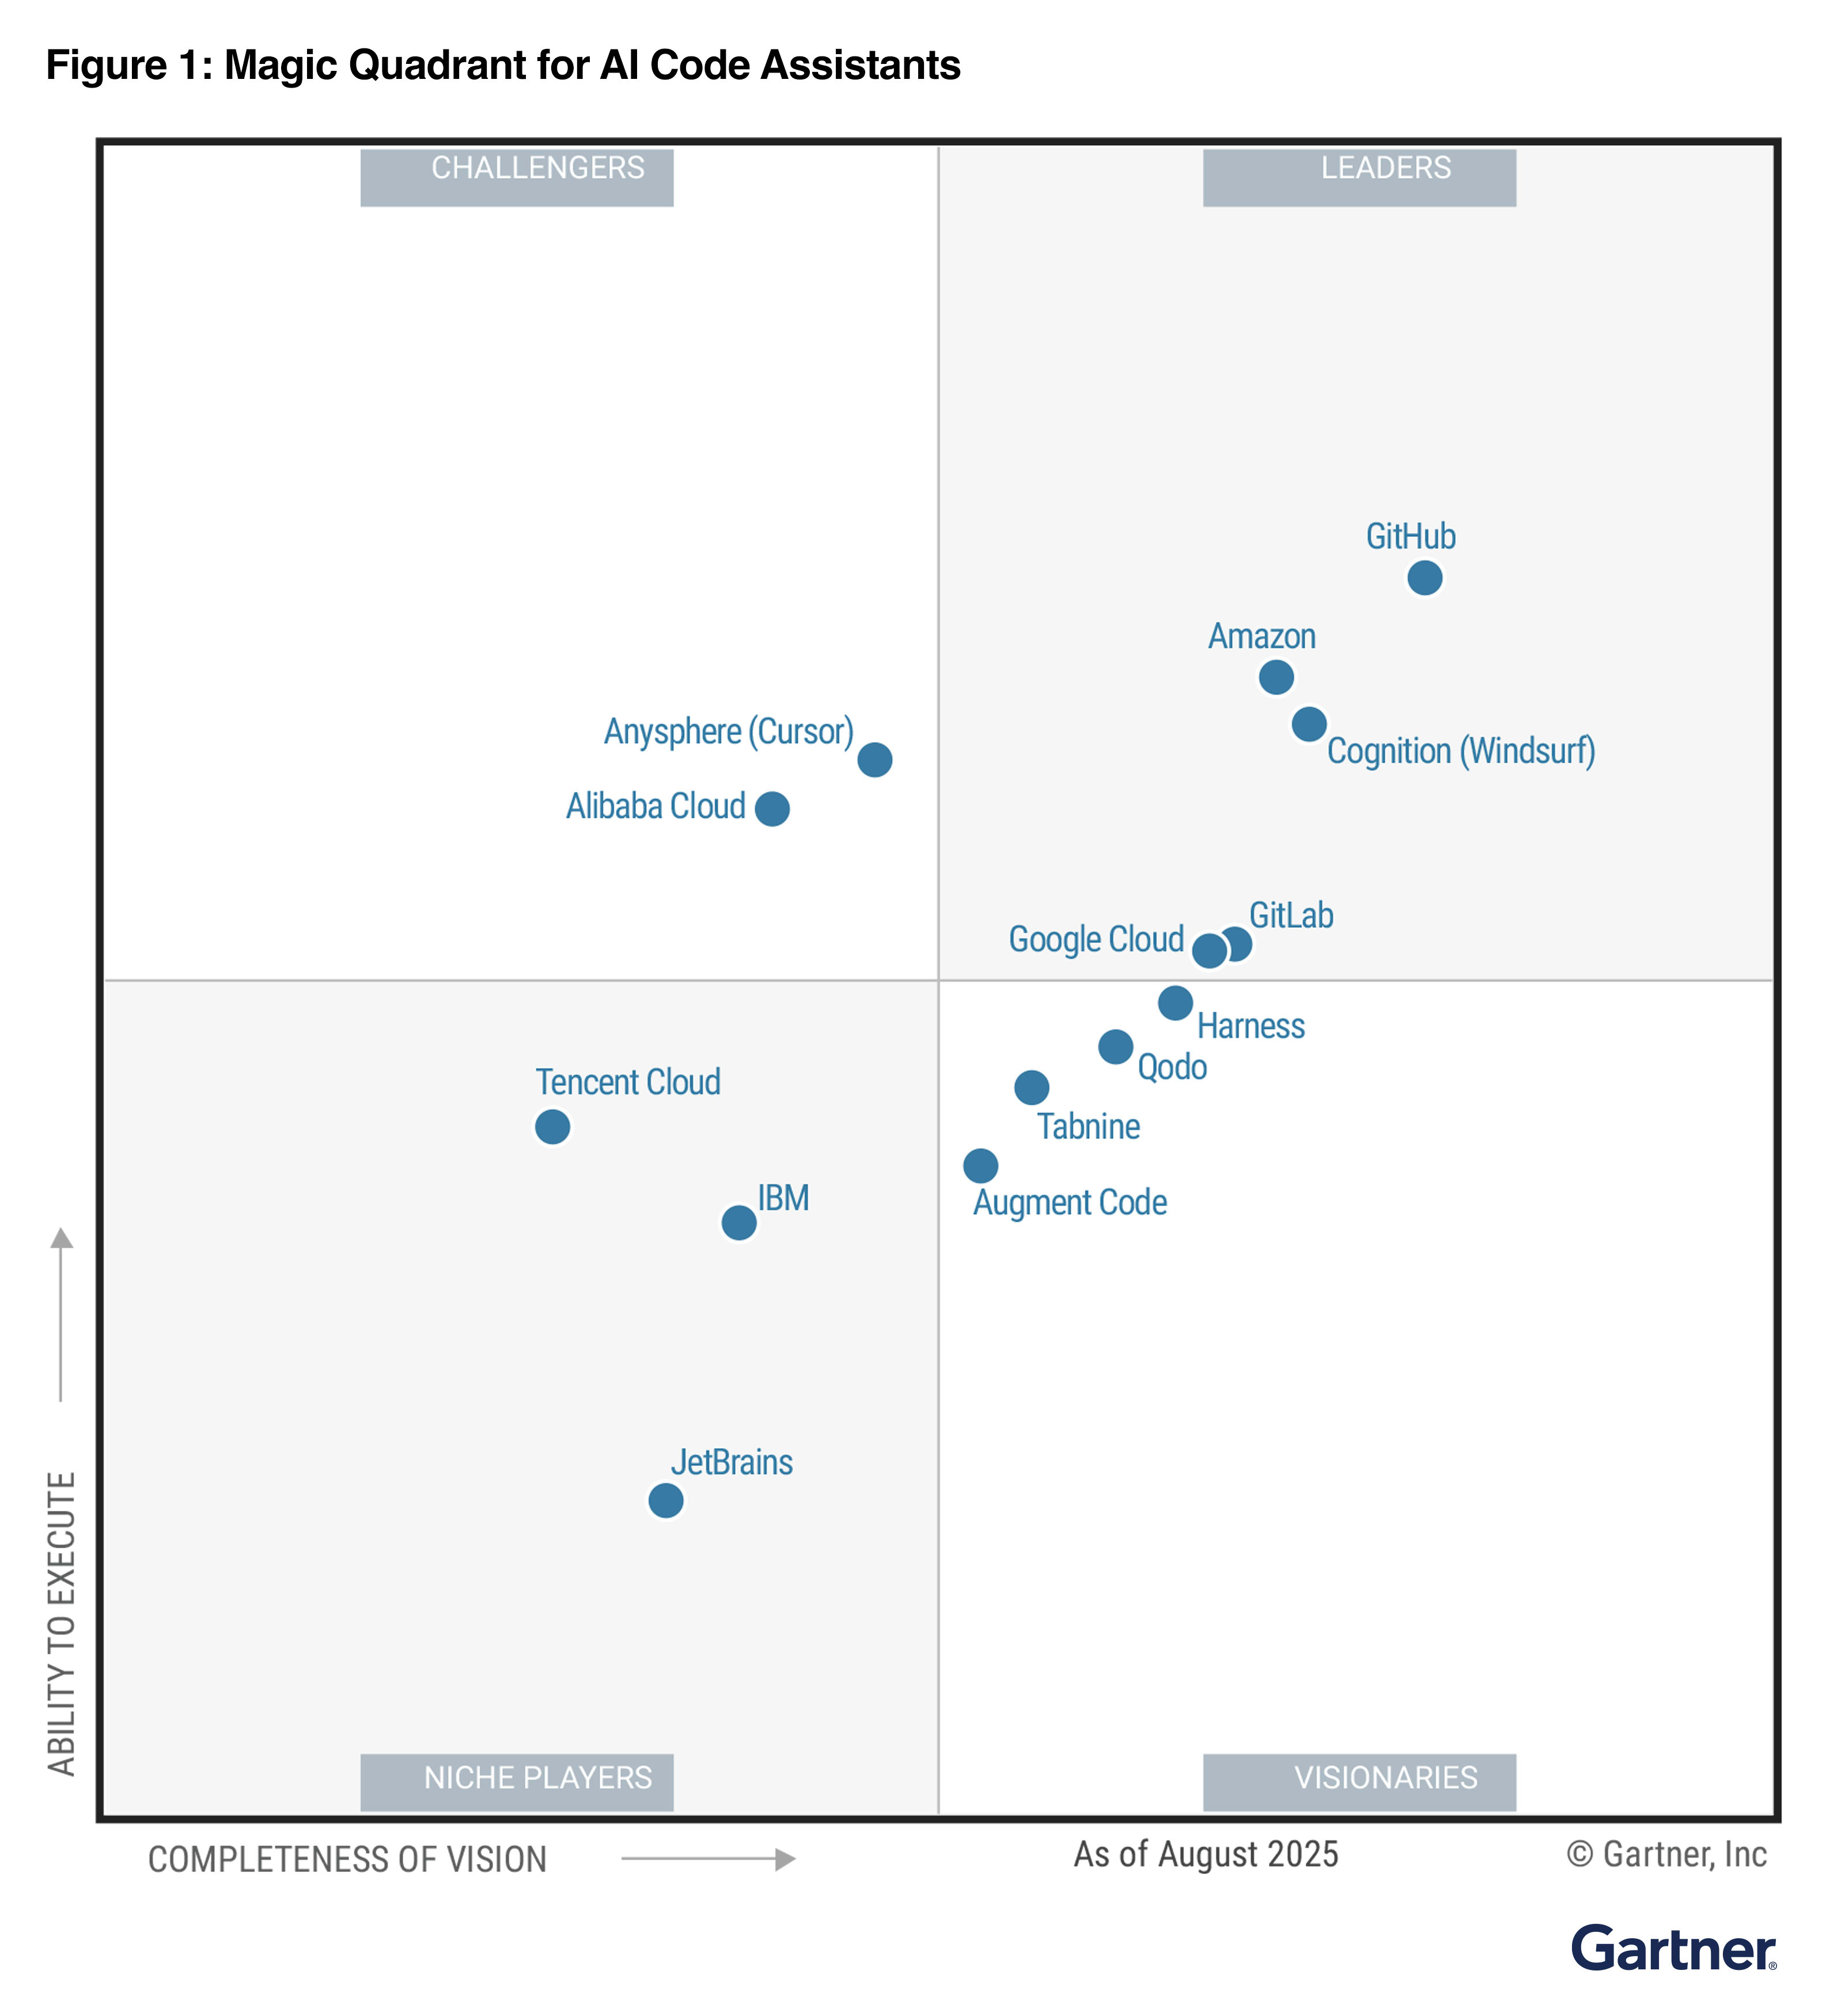
From AI features to intelligent collaboration
The Gartner evaluation, we feel, focused on GitLab Duo's generative AI code assistance capabilities. While GitLab Duo began as an AI add-on to the GitLab DevSecOps platform, it laid the groundwork for where we are going today with agentic AI built natively into the GitLab DevSecOps platform.
GitLab Duo Agent Platform enables developers to work alongside multiple AI agents that automate tasks across the software lifecycle. Agents collaborate with each other and with humans, using GitLab’s Knowledge Graph to act with full project context. This empowers teams to move faster while keeping visibility and control.
-
Specialized agents handle tasks such as code generation, security analysis, and research in parallel.
-
Knowledge Graph connects agents to a unified system of record across code, issues, pipelines, and compliance data.
-
Human + agent collaboration happens through natural-language chat and customizable flows, with review and oversight built in.
-
Interoperability with external tools and systems is supported through Model Context Protocol (MCP) and agent-to-agent frameworks.
With agents handling routine work under human guidance, teams can move faster, focus on higher-value tasks, and keep projects secure and compliant.
Secure by design, flexible in practice
The GitLab Duo Agent Platform is designed to keep security and compliance front and center. Agents run inside GitLab’s trusted DevSecOps environment, with every action visible and reviewable before changes are made. Secure integrations help ensure credentials and sensitive data are handled safely, while interoperability through open standards connects agents to external tools without exposing an organization to risk.
The platform gives teams confidence that AI is enhancing productivity without compromising governance. Here's how:
-
Developers can stay focused on complex, high-impact work, while handing off routine tasks to agents for faster results and more granular context delivered through their existing workflows.
-
Engineering leaders gain visibility into how work moves across the lifecycle, with agents operating within clear guardrails. They also can ensure their teams stay aligned to priorities and simplify onboarding with guided support through agent-driven context and workflows.
-
IT organizations maintain control over agent activity with governance features that enforce coding and security policies, offer model selection flexibility, and ensure secure interoperability — all while keeping humans in the loop.
Leading the move to AI-native development
GitLab continues to build on the vision that began with Duo, and will continue to expand GitLab Duo Agent Platform with new agents, advanced workflows, and more orchestration capabilities. This commitment to innovation ensures you can amplify team productivity on the platform you know and trust. Stay tuned for exciting updates on our roadmap as we continue to revolutionize AI-native DevSecOps.
Download the 2025 Gartner® Magic Quadrant™ for AI Code Assistants and try GitLab Duo Agent Platform today.
Source: Gartner, Magic Quadrant for AI Code Assistants, Philip Walsh, Haritha Khandabattu, Matt Brasier, Keith Holloway, Arun Batchu, 15 September 2025
GARTNER is a registered trademark and service mark of Gartner, Inc. and/or its affiliates in the U.S. and internationally, and MAGIC QUADRANT is a registered trademark of Gartner, Inc. and/or its affiliates and are used herein with permission. All rights reserved.
Gartner does not endorse any vendor, product or service depicted in its research publications, and does not advise technology users to select only those vendors with the highest ratings or other designation. Gartner research publications consist of the opinions of Gartner’s research organization and should not be construed as statements of fact. Gartner disclaims all warranties, expressed or implied, with respect to this research, including any warranties of merchantability or fitness for a particular purpose.
This graphic was published by Gartner Inc. as part of a larger report and should be evaluated in the context of the entire document. The Gartner document is available upon request from Gartner B.V.
]]>But what if you could automate this entire process? In this walkthrough, I'll show you exactly how GitLab Duo Agent Platform can generate comprehensive dbt models in just minutes, complete with proper structure, tests, and documentation.
What we're building
Our marketing team wants to effectively manage and optimize advertising investments. One of the advertising platforms is Reddit, so, therefore, we are extracting data from the Reddit Ads API to our enterprise Data Platform Snowflake. At GitLab, we have three layers of storage:
rawlayer - first landing point for unprocessed data from external sources; not ready for business usepreplayer - first transformation layer with source models; still not ready for general business useprodlayer - final transformed data ready for business use and Tableau reporting

For this walkthrough, data has already landed in the raw layer by our extraction solution Fivetran, and we'll generate dbt models that handle the data through the prep layer to the prod layer.
Without having to write a single line of dbt code ourselves, by the end of the walkthrough we will have:
- Source models in the prep layer
- Workspace models in the prod layer
- Complete dbt configurations for all 13 tables (which includes 112 columns) in the Reddit Ads dataset
- Test queries to validate the outcomes
The entire process will take less than 10 minutes, compared to the hours it would typically require manually. Here are the steps to follow:
1. Prepare the data structure
Before GitLab Duo can generate our models, it needs to understand the complete table structure. The key is running a query against Snowflake's information schema, because we are currently investigating how to connect GitLab Duo via Model Context Protocol (MCP) to our Snowflake instance:
SELECT
    table_name,
    column_name,
    data_type,
    is_nullable,
    CASE
        WHEN is_nullable = 'NO' THEN 'PRIMARY_KEY'
        ELSE NULL
    END as key_type
FROM raw.information_schema.columns
WHERE table_schema = 'REDDIT_ADS'
ORDER BY table_name, ordinal_position;
This query captures:
- All table and column names
- Data types for proper model structure
- Nullable constraints
- Primary key identification (non-nullable columns in this dataset)
Pro tip: In the Reddit Ads dataset, all non-nullable columns serve as primary keys — a pattern. I validated by checking tables like ad_group, which has two non-nullable columns (account_id and id) that are both marked as primary keys. Running this query returned 112 rows of metadata that I exported as a CSV file for model generation. While this manual step works well today, we're investigating a direct GitLab Duo integration with our Data Platform via MCP to automate this process entirely.
2. Set up GitLab Duo
There are two ways to interact with GitLab Duo:
- Web UI chat function
- Visual Studio Code plugin
I chose the VS Code plugin because I can run the dbt models locally to test them.
3. Enter the 'magic' prompt
Here's the exact prompt I used to generate all the dbt code:
Create dbt models for all the tables in the file structure.csv.

I want to have the source models created, with a filter that dedupes the data based on the primary key. Create these in a new folder reddit_ads.
I want to have workspace models created and store these in the workspace_marketing schema.

Take this MR as example: [I've referenced to previous source implementation]. Here is the same done for Source A, but now it needs to be done for Reddit Ads.

Please check the dbt style guide when creating the code: https://handbook.gitlab.com/handbook/enterprise-data/platform/dbt-guide/
Key elements that made this prompt effective:
- Clear specifications for both source and workspace models.
- Reference example from a previous similar merge request.
- Style guide reference to ensure code quality and consistency.
- Specific schema targeting for proper organization.
4. GitLab Duo's process
After submitting the prompt, GitLab Duo got to work. The entire generation process took a few minutes, during which GitLab Duo:
- Read and analyzed the CSV input file.
- Examined table structures from the metadata.
- Referenced our dbt style guide for coding standards.
- Took similar merge request into account to properly structure.
- Generated source models for all 13 tables.
- Created workspace models for all 13 tables.
- Generated supporting dbt files:
sources.ymlconfiguration.schema.ymlfiles with tests and documentation.- Updated
dbt_project.ymlwith schema references.
The results
The output was remarkable:
- 1 modified file: dbt_project.yml (added reddit_ads schema configuration)
- 29 new files:
- 26 dbt models (13 source + 13 workspace)
- 3 YAML files
- Nearly 900 lines of code generated automatically
- Built-in data tests, including unique constraints on primary key columns
- Generic descriptions for all models and columns
- Proper deduplication logic in source models
- Clean, consistent code structure following the GitLab dbt style guide
transform/snowflake-dbt/
├── dbt_project.yml                                                    [MODIFIED]
└── models/
    ├── sources/
    │   └── reddit_ads/
    │       ├── reddit_ads_ad_group_source.sql                        [NEW]
    │       ├── reddit_ads_ad_source.sql                              [NEW]
    │       ├── reddit_ads_business_account_source.sql                [NEW]
    │       ├── reddit_ads_campaign_source.sql                        [NEW]
    │       ├── reddit_ads_custom_audience_history_source.sql         [NEW]
    │       ├── reddit_ads_geolocation_source.sql                     [NEW]
    │       ├── reddit_ads_interest_source.sql                        [NEW]
    │       ├── reddit_ads_targeting_community_source.sql             [NEW]
    │       ├── reddit_ads_targeting_custom_audience_source.sql       [NEW]
    │       ├── reddit_ads_targeting_device_source.sql                [NEW]
    │       ├── reddit_ads_targeting_geolocation_source.sql           [NEW]
    │       ├── reddit_ads_targeting_interest_source.sql              [NEW]
    │       ├── reddit_ads_time_zone_source.sql                       [NEW]
    │       ├── schema.yml                                            [NEW]
    │       └── sources.yml                                           [NEW]
    └── workspaces/
        └── workspace_marketing/
            └── reddit_ads/
                ├── schema.yml                                        [NEW]
                ├── wk_reddit_ads_ad.sql                              [NEW]
                ├── wk_reddit_ads_ad_group.sql                        [NEW]
                ├── wk_reddit_ads_business_account.sql                [NEW]
                ├── wk_reddit_ads_campaign.sql                        [NEW]
                ├── wk_reddit_ads_custom_audience_history.sql         [NEW]
                ├── wk_reddit_ads_geolocation.sql                     [NEW]
                ├── wk_reddit_ads_interest.sql                        [NEW]
                ├── wk_reddit_ads_targeting_community.sql             [NEW]
                ├── wk_reddit_ads_targeting_custom_audience.sql       [NEW]
                ├── wk_reddit_ads_targeting_device.sql                [NEW]
                ├── wk_reddit_ads_targeting_geolocation.sql           [NEW]
                ├── wk_reddit_ads_targeting_interest.sql              [NEW]
                └── wk_reddit_ads_time_zone.sql                       [NEW]
Sample generated code
Here's an example of the generated code quality. For the time_zone table, GitLab Duo created:
Prep Layer Source Model
WITH source AS (
  SELECT *
  FROM {{ source('reddit_ads','time_zone') }}
  QUALIFY ROW_NUMBER() OVER (PARTITION BY id ORDER BY _fivetran_synced DESC) = 1
),

renamed AS (
  SELECT
    id::VARCHAR                               AS time_zone_id,
    code::VARCHAR                             AS time_zone_code,
    dst_offset::NUMBER                        AS time_zone_dst_offset,
    is_dst_active::BOOLEAN                    AS is_time_zone_dst_active,
    name::VARCHAR                             AS time_zone_name,
    offset::NUMBER                            AS time_zone_offset,
    _fivetran_synced::TIMESTAMP               AS fivetran_synced_at
  FROM source
)

SELECT * FROM renamed
Schema.yml
models:
  - name: reddit_ads_time_zone_source
    description: Time zone data from Reddit Ads system
    columns:
      - name: time_zone_id
        description: Unique identifier for time zone records
        data_tests:
          - unique
          - not_null
      - name: time_zone_code
        description: Code for the time zone
      - name: time_zone_dst_offset
        description: Daylight saving time offset for the time zone
      - name: is_time_zone_dst_active
        description: Flag indicating if daylight saving time is active
      - name: time_zone_name
        description: Name of the time zone
      - name: time_zone_offset
        description: Offset for the time zone
      - name: fivetran_synced_at
        description: Timestamp when the record was last synced by Fivetran
Source.yml
sources:
  - name: reddit_ads
    database: RAW
    schema: reddit_ads
    loaded_at_field: _fivetran_synced
    loader: fivetran
    description: Reddit Ads data

    quoting:
      database: true
      schema: false
      identifier: false

    tables:
      - name: time_zone
Workspace Model
WITH source AS (
  SELECT *
  FROM {{ ref('reddit_ads_time_zone_source') }}
)

SELECT * FROM source
5. Quality validation
Now that the code looks good, I pushed it to the MR and executed CI test pipeline to test the code and validate the outcome. I asked GitLab Duo to create a validation query:
Create a test query to test the row counts between the raw layer and the workspace layer. Keep in mind that we do deduplication, so we can compare both using distinct on the primary keys.
The AI generated a comprehensive validation query that:
- Compared row counts between raw and workspace layers.
- Accounted for deduplication logic.
- Tested all 13 tables.
- Calculated data retention percentages.
<details> <summary>Generated SQL Test query</summary>
-- Reddit Ads Row Count Validation Test
-- Compares distinct counts between RAW layer and WORKSPACE_MARKETING layer
-- Accounts for deduplication logic in source models

WITH raw_counts AS (
  -- Single primary key tables
  SELECT 'ad' AS table_name, COUNT(DISTINCT id) AS raw_count
  FROM RAW.REDDIT_ADS.AD

  UNION ALL

  SELECT 'business_account' AS table_name, COUNT(DISTINCT id) AS raw_count
  FROM RAW.REDDIT_ADS.BUSINESS_ACCOUNT

  UNION ALL

  SELECT 'campaign' AS table_name, COUNT(DISTINCT id) AS raw_count
  FROM RAW.REDDIT_ADS.CAMPAIGN

  UNION ALL

  SELECT 'custom_audience_history' AS table_name, COUNT(DISTINCT id) AS raw_count
  FROM RAW.REDDIT_ADS.CUSTOM_AUDIENCE_HISTORY

  UNION ALL

  SELECT 'geolocation' AS table_name, COUNT(DISTINCT id) AS raw_count
  FROM RAW.REDDIT_ADS.GEOLOCATION

  UNION ALL

  SELECT 'interest' AS table_name, COUNT(DISTINCT id) AS raw_count
  FROM RAW.REDDIT_ADS.INTEREST

  UNION ALL

  SELECT 'time_zone' AS table_name, COUNT(DISTINCT id) AS raw_count
  FROM RAW.REDDIT_ADS.TIME_ZONE

  -- Composite primary key tables
  UNION ALL

  SELECT 'ad_group' AS table_name, COUNT(DISTINCT CONCAT(account_id, '|', id)) AS raw_count
  FROM RAW.REDDIT_ADS.AD_GROUP

  UNION ALL

  SELECT 'targeting_community' AS table_name, COUNT(DISTINCT CONCAT(ad_group_id, '|', community_id)) AS raw_count
  FROM RAW.REDDIT_ADS.TARGETING_COMMUNITY

  UNION ALL

  SELECT 'targeting_custom_audience' AS table_name, COUNT(DISTINCT CONCAT(ad_group_id, '|', custom_audience_id)) AS raw_count
  FROM RAW.REDDIT_ADS.TARGETING_CUSTOM_AUDIENCE

  UNION ALL

  SELECT 'targeting_device' AS table_name, COUNT(DISTINCT _fivetran_id) AS raw_count
  FROM RAW.REDDIT_ADS.TARGETING_DEVICE

  UNION ALL

  SELECT 'targeting_geolocation' AS table_name, COUNT(DISTINCT CONCAT(ad_group_id, '|', geolocation_id)) AS raw_count
  FROM RAW.REDDIT_ADS.TARGETING_GEOLOCATION

  UNION ALL

  SELECT 'targeting_interest' AS table_name, COUNT(DISTINCT CONCAT(ad_group_id, '|', interest_id)) AS raw_count
  FROM RAW.REDDIT_ADS.TARGETING_INTEREST
),

workspace_counts AS (
  -- Workspace layer counts using primary keys from schema.yml
  SELECT 'ad' AS table_name, COUNT(DISTINCT ad_id) AS workspace_count
  FROM REDDIT_DBT_MODEL_GENERATION_PROD.WORKSPACE_MARKETING.WK_REDDIT_ADS_AD

  UNION ALL

  SELECT 'business_account' AS table_name, COUNT(DISTINCT business_account_id) AS workspace_count
  FROM REDDIT_DBT_MODEL_GENERATION_PROD.WORKSPACE_MARKETING.WK_REDDIT_ADS_BUSINESS_ACCOUNT

  UNION ALL

  SELECT 'campaign' AS table_name, COUNT(DISTINCT campaign_id) AS workspace_count
  FROM REDDIT_DBT_MODEL_GENERATION_PROD.WORKSPACE_MARKETING.WK_REDDIT_ADS_CAMPAIGN

  UNION ALL

  SELECT 'custom_audience_history' AS table_name, COUNT(DISTINCT custom_audience_id) AS workspace_count
  FROM REDDIT_DBT_MODEL_GENERATION_PROD.WORKSPACE_MARKETING.WK_REDDIT_ADS_CUSTOM_AUDIENCE_HISTORY

  UNION ALL

  SELECT 'geolocation' AS table_name, COUNT(DISTINCT geolocation_id) AS workspace_count
  FROM REDDIT_DBT_MODEL_GENERATION_PROD.WORKSPACE_MARKETING.WK_REDDIT_ADS_GEOLOCATION

  UNION ALL

  SELECT 'interest' AS table_name, COUNT(DISTINCT interest_id) AS workspace_count
  FROM REDDIT_DBT_MODEL_GENERATION_PROD.WORKSPACE_MARKETING.WK_REDDIT_ADS_INTEREST

  UNION ALL

  SELECT 'time_zone' AS table_name, COUNT(DISTINCT time_zone_id) AS workspace_count
  FROM REDDIT_DBT_MODEL_GENERATION_PROD.WORKSPACE_MARKETING.WK_REDDIT_ADS_TIME_ZONE

  -- Composite primary key tables
  UNION ALL

  SELECT 'ad_group' AS table_name, COUNT(DISTINCT CONCAT(ad_group_account_id, '|', ad_group_id)) AS workspace_count
  FROM REDDIT_DBT_MODEL_GENERATION_PROD.WORKSPACE_MARKETING.WK_REDDIT_ADS_AD_GROUP

  UNION ALL

  SELECT 'targeting_community' AS table_name, COUNT(DISTINCT CONCAT(targeting_community_ad_group_id, '|', targeting_community_id)) AS workspace_count
  FROM REDDIT_DBT_MODEL_GENERATION_PROD.WORKSPACE_MARKETING.WK_REDDIT_ADS_TARGETING_COMMUNITY

  UNION ALL

  SELECT 'targeting_custom_audience' AS table_name, COUNT(DISTINCT CONCAT(targeting_custom_audience_ad_group_id, '|', targeting_custom_audience_id)) AS workspace_count
  FROM REDDIT_DBT_MODEL_GENERATION_PROD.WORKSPACE_MARKETING.WK_REDDIT_ADS_TARGETING_CUSTOM_AUDIENCE

  UNION ALL

  SELECT 'targeting_device' AS table_name, COUNT(DISTINCT targeting_device_fivetran_id) AS workspace_count
  FROM REDDIT_DBT_MODEL_GENERATION_PROD.WORKSPACE_MARKETING.WK_REDDIT_ADS_TARGETING_DEVICE

  UNION ALL

  SELECT 'targeting_geolocation' AS table_name, COUNT(DISTINCT CONCAT(targeting_geolocation_ad_group_id, '|', targeting_geolocation_id)) AS workspace_count
  FROM REDDIT_DBT_MODEL_GENERATION_PROD.WORKSPACE_MARKETING.WK_REDDIT_ADS_TARGETING_GEOLOCATION

  UNION ALL

  SELECT 'targeting_interest' AS table_name, COUNT(DISTINCT CONCAT(targeting_interest_ad_group_id, '|', targeting_interest_id)) AS workspace_count
  FROM REDDIT_DBT_MODEL_GENERATION_PROD.WORKSPACE_MARKETING.WK_REDDIT_ADS_TARGETING_INTEREST
)

-- Final comparison with validation results
SELECT
  r.table_name,
  r.raw_count,
  w.workspace_count,
  r.raw_count - w.workspace_count AS count_difference,
  CASE
    WHEN r.raw_count = w.workspace_count THEN '✅ PASS'
    WHEN r.raw_count > w.workspace_count THEN '⚠️ RAW > WORKSPACE (Expected due to deduplication)'
    ELSE '❌ FAIL - WORKSPACE > RAW (Unexpected)'
  END AS validation_status,
  ROUND((w.workspace_count::FLOAT / r.raw_count::FLOAT) * 100, 2) AS data_retention_percentage
FROM raw_counts r
JOIN workspace_counts w ON r.table_name = w.table_name
ORDER BY r.table_name;
</details>
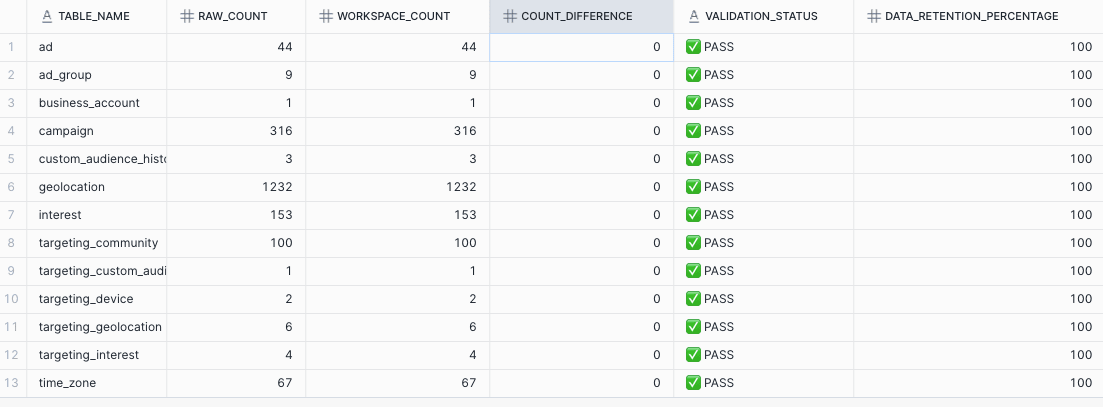
Running this query showed:
- Zero differences in row counts after deduplication
- 100% data retention across all tables
- All tests passed successfully
The bottom line: Massive time savings
-
Traditional approach: 6-8 hours of manual coding, testing, and debugging
-
GitLab Duo approach: 6-8 minutes of generation + review time
This represents a 60x improvement in developer efficiency (from 6-8 hours to 6-8 minutes), while maintaining high code quality.
Best practices for success
Based on this experience, here are key recommendations:
Prepare your metadata
- Extract complete table structures including data types and constraints.
- Identify primary keys and relationships upfront.
- Export clean, well-formatted CSV input files.
Note: By connecting GitLab Duo via MCP to your (meta)data, you could exclude this manual step.
Provide clear context
- Reference existing example MRs when possible.
- Specify your coding standards and style guides.
- Be explicit about folder structure and naming conventions.
Validate thoroughly
- Always create validation queries for data integrity.
- Test locally before merging.
- Run your CI/CD pipeline to catch any issues.
Leverage AI for follow-up tasks
- Generate test queries automatically.
- Create documentation templates.
- Build validation scripts.
What's next
This demonstration shows how AI-powered development tools like GitLab Duo are also transforming data engineering workflows. The ability to generate hundreds of lines of production-ready code in minutes — complete with tests, documentation, and proper structure — represents a fundamental shift in how we approach repetitive development tasks.
By leveraging AI to handle the repetitive aspects of dbt model creation, data engineers can focus on higher-value activities like data modeling strategy, performance optimization, and business logic implementation.
Ready to try this yourself? Start with a small dataset, prepare your metadata carefully, and watch as GitLab Duo transforms hours of work into minutes of automated generation.
Read more
]]>A milestone in collaboration
This collaboration combines GitLab's comprehensive, intelligent DevSecOps platform with Accenture's extensive expertise in digital transformation and implementation services, enabling organizations to build and deliver secure software at scale. The global reseller agreement provides a global framework that can be easily adapted to local conditions.
The collaboration will initially focus on several key areas:
- Enterprise-scale DevSecOps Transformation: Helping organizations modernize their development practices and streamline their software delivery lifecycle
- Mainframe Modernization: Assisting customers with migrating from legacy systems
- GitLab Duo with Amazon Q: Offering AI-driven software development to organizations looking to accelerate development velocity while maintaining end-to-end security and compliance
Looking ahead
We’re looking forward to helping our joint customers accelerate innovation, streamline development processes, and strengthen their security posture to achieve their business objectives more effectively.
For more information about how GitLab and Accenture can help your organization, please visit our partner site or contact your Accenture or GitLab representative.
]]>The problem: Polling in 2025
It's 2025, WebSockets are in and polling is out. Polling is more of a legacy method of getting "real-time" updates for software. It's time-driven, meaning clients make network calls to a server on an interval usually between 5 and 30 seconds. Even if the data hasn't changed, those network requests are made to try and get the most accurate data served to the client.
WebSockets are event-driven, so you only make network requests to the server when the data has actually changed, i.e., a status in a database column changes from pending to running. Unlike traditional HTTP requests where the client repeatedly asks the server for updates (polling), WebSockets establish a persistent, two-way connection between the client and server. This means the server can instantly push updates to the client the moment something changes, eliminating unnecessary network traffic and reducing latency. For monitoring job statuses or real-time data, this is far more efficient than having clients poll the server every few seconds just to check if anything is different.
The transformation
Previously, the job header on the job log view was utilizing polling to get the most recent status for a single job. That component made a network request every 30 seconds no matter what to try and get the true state of the job.
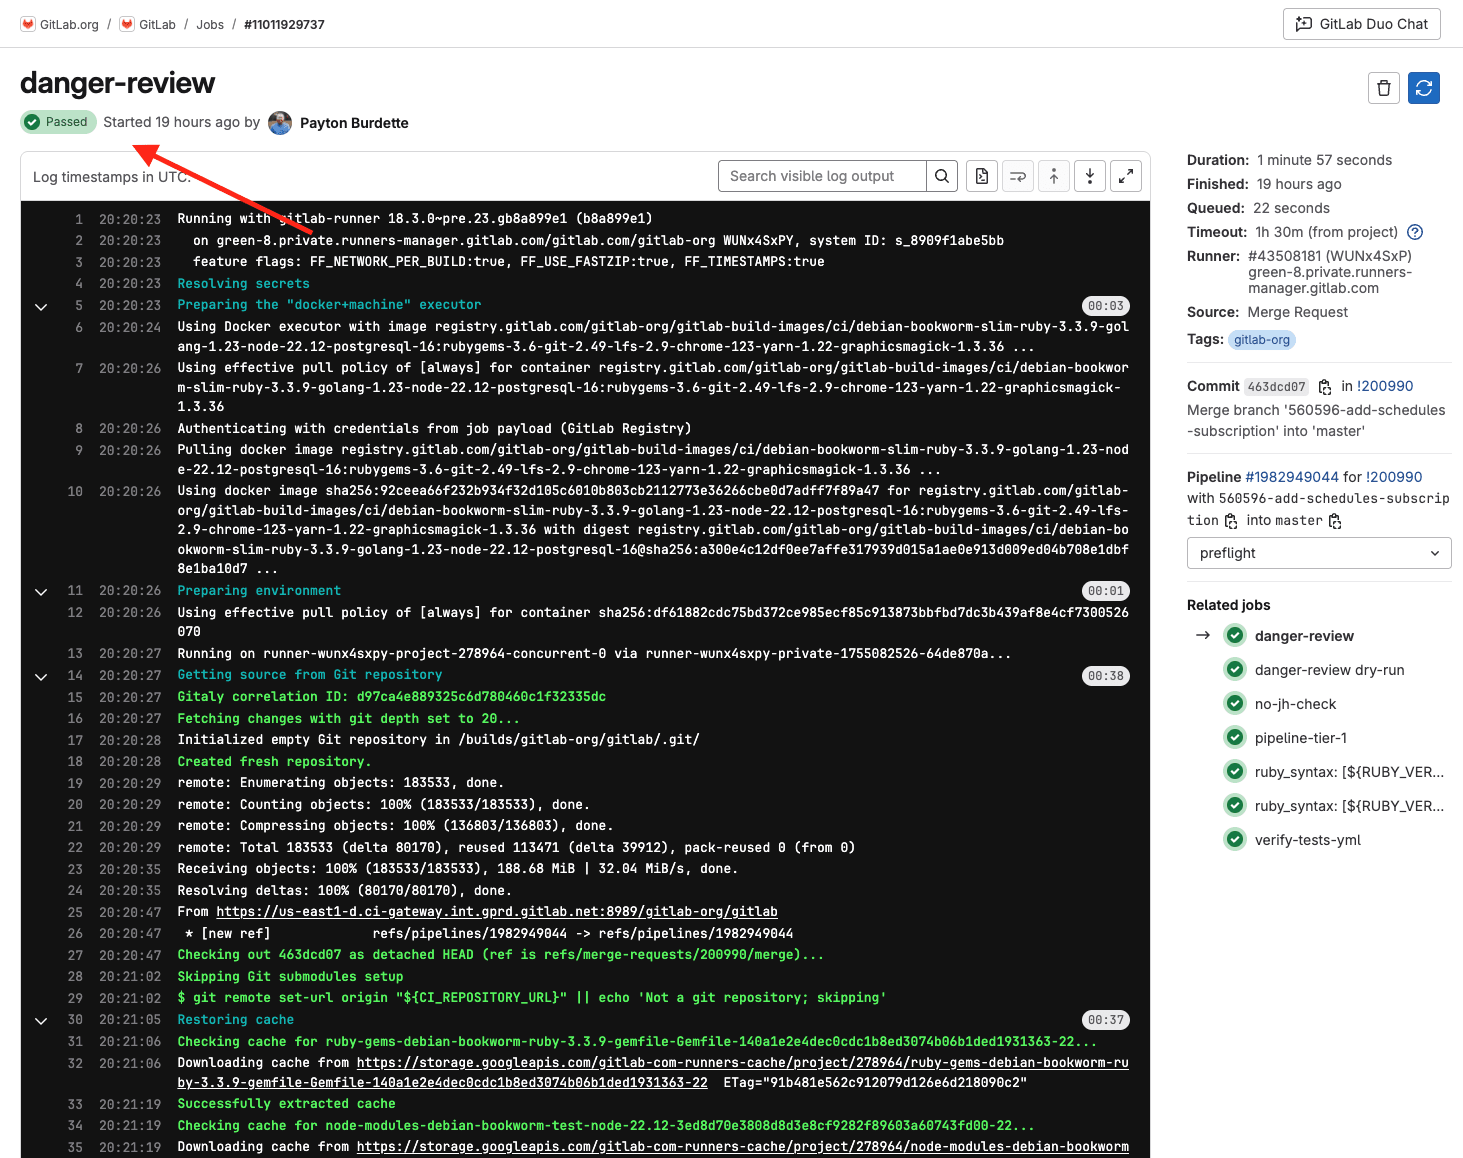
Our metrics showed that:
- 547,145 network calls happened per 15 minutes
- 45,729,530 network calls happened per 24 hours Users experienced frustrating delays seeing status updates, and we were hammering our database.
Enter GraphQL subscriptions
In comes GraphQL subscriptions with WebSockets. GraphQL subscriptions are a feature that extends GraphQL beyond simple request-response queries and mutations, allowing clients to maintain a real-time connection to the server. While regular GraphQL queries fetch data once and return it, subscriptions let you say 'notify me whenever this specific data changes.' Under the hood, GraphQL subscriptions typically use WebSockets to maintain that persistent connection. Here's what we did:
- First, we refactored the job header component to use GraphQL for its data
- Then we implemented a GraphQL subscription to serve real-time updates with ActionCable (Rails' WebSocket framework).
The results
After this implementation, our users now get truly real-time accurate job status – updates appear instantly when jobs change state. The performance gains are remarkable:
- 92.56% reduction in API calls for this component
- Now averaging 39,670 network calls per 15 minutes (down from 547,145)
- Only 3,403,395 network calls per 24 hours (down from 45,729,530) We also monitored CPU utilization and operation rate per command over the last week and have not seen any significant increase on our services. Win-win for the software and the team.
What's next
This is just the beginning. We're working on making every CI status in the GitLab product real-time. Currently, many parts of GitLab's UI still rely on polling to check for updates. Our goal is to systematically replace these polling mechanisms with GraphQL subscriptions, giving users instant feedback across the entire CI/CD workflow. Want to see this capability in action? Check out any job log view and watch those status updates fly. Not a GitLab user yet? Try GitLab Ultimate with GitLab Duo Enterprise for free for 30 days.
]]>git clone, grab a coffee, check your email, maybe take a lunch break, and 95 minutes later, you finally have your working directory. This is the reality for developers working with large repositories containing 50GB+ of data.
The productivity impact is staggering. CI/CD pipelines grind to a halt waiting for repository clones. Infrastructure costs skyrocket as compute resources sit idle. Developer frustration mounts as context-switching becomes the norm.
But what if that 95-minute wait could be reduced to just 6 minutes? What if you could achieve a 93% reduction in clone times using proven techniques?
Enter Git Much Faster — a comprehensive benchmarking and optimization script that transforms how you work with large Git repositories. Built from real-world experience optimizing embedded development workflows, this script provides practical strategies delivering measurable performance improvements across standard git clones, optimized configurations, and Git's built-in Scalar tool.
You'll discover how to dramatically reduce git clone times using optimization strategies, explore real-world performance benchmarks from major repositories like the Linux kernel and Chromium, and understand how to implement these optimizations safely in both development and CI/CD environments.
Project overview: What is Git Much Faster?
Git Much Faster is a script I wrote as an enablement tool to allow you to benchmark multiple clone optimization approaches on the same client — whether that is a traditional developer workstation, CI, cloud-hosted development environments or specialized clones for GitOps. It also contains the curated configuration settings for the fastest clone optimization. You can use these settings as a starting point and adapt or remove configurations that create too lean of a clone for your client's intended use of the repository clone.
Git Much Faster addresses a fundamental challenge: Git's default clone behavior prioritizes safety over speed. While this works for small repositories, it becomes a significant bottleneck with large codebases, extensive binary assets, or complex monorepo structures.
The problem manifests across increasingly common scenarios. Embedded development teams inherit repositories filled with legacy firmware binaries, bootloaders, and vendor SDKs stored directly in version control. Web applications accumulate years of marketing assets and design files. Game development projects contain massive 3D models and audio files growing repository sizes into tens of gigabytes.
Enterprise CI/CD pipelines suffer particularly acute pain. Each job requires a fresh repository clone, and when operations take 20 to 90 minutes, entire development workflows grind to a halt. Infrastructure costs multiply as compute resources remain idle during lengthy clone operations.
Git Much Faster solves this through comprehensive benchmarking comparing four distinct strategies: standard git clone (baseline with full history), optimized git clone (custom configurations with compression disabled and sparse checkout), Git's Scalar clone (integrated partial cloning), and current directory assessment (analyzing existing repositories without re-cloning).
The tool provides measurable, repeatable benchmarking in controlled AWS environments, eliminating variables that make performance testing unreliable. The real power of Git Much Faster is to run all the benchmarks in whatever your target environment looks like — so if slow network connections are a reality for some developers, you can decipher the best clone optimization for their situation.
Technical deep dive: The optimization strategies
Understanding Git Much Faster's effectiveness requires examining specific configurations that address Git's performance bottlenecks through a layered approach tackling network transfer efficiency, CPU utilization, and storage patterns.
The most significant gains come from two key optimizations. The first, core.compression=0, eliminates CPU-intensive compression during network operations. CPU cycles spent compressing often exceed bandwidth savings on modern high-speed networks. This optimization alone reduces clone times by 40% to 60%.
The second major optimization, http.postBuffer=1024M, addresses Git's conservative HTTP buffer sizing. Large repositories benefit tremendously from increased buffer sizes, allowing Git to handle larger operations without breaking them into multiple requests, reducing protocol overhead.
Git Much Faster leverages shallow clones using --depth=1 (fetching only the latest commit) and partial clones with --filter=blob:none (deferring file content downloads until checkout). Shallow clones reduce data by 70%-90% for mature repositories, while partial clones prove particularly effective for repositories with large binary assets.
Sparse checkout provides surgical precision in controlling checked-out files. Git Much Faster implements comprehensive exclusion covering 30+ binary file types — images, documents, archives, media files, and executables — reducing working directory size by up to 78% while maintaining full source code access.
Git's Scalar tool, integrated into Git since Version 2.38, combines partial clone, sparse checkout, and background maintenance. However, benchmarking reveals Scalar doesn't implement the aggressive compression and buffer optimizations providing the most significant performance gains. Testing shows the custom optimized approach typically outperforms Scalar by 48%-67% while achieving similar disk space savings.
End-to-end load reduction
An interesting thing about optimizing the clone operation is that it also reduces complete system loading because you are reducing the size of your request. GitLab has a specialized, horizontal scaling layer known as Gitaly Cluster. When full history clones and large monorepos are the norm, the sizing of Gitaly Cluster is driven higher. This is because all git clone requests are serviced by a server-side binary to create “pack files” to be sent over the wire. Since these server-side git operations involve running compression utilities, it drives all three of memory, CPU, and I/O requirements at once.
When git clone operations are optimized to reduce the size of the total content ask, it reduces load on the end-to-end stack: Client, Network, Gitaly Service and Storage. All layers speed up and become cheaper at the same time.
Real-world performance results
Git Much Faster's effectiveness is demonstrated through rigorous benchmarking across diverse, real-world repositories using consistent AWS infrastructure with Arm instances and controlled network conditions.
Linux kernel repository (7.5GB total): Standard clone took 6 minutes 29 seconds. Optimized clone achieved 46.28 seconds — an 88.1% improvement, reducing the .git directory from 5.9GB to 284MB. Scalar took 2 minutes 21 seconds (63.7% improvement), completing 67.3% slower than the optimized approach.
Chromium repository (60.9GB total): Standard clone required 95 minutes 12 seconds. Optimized clone achieved 6 minutes 41 seconds — a dramatic 93% improvement, compressing the .git directory from 55.7GB to 850MB. Scalar took 13 minutes 3 seconds (86.3% improvement) but remained 48.8% slower than the optimized approach.
GitLab website repository (8.9GB total): Standard clone took 6 minutes 23 seconds. Optimized clone achieved 6.49 seconds — a remarkable 98.3% improvement, reducing the .git directory to 37MB. Scalar took 33.60 seconds (91.2% improvement) while remaining 80.7% slower.
The benchmarking reveals clear patterns: Larger repositories show more dramatic improvements, binary-heavy repositories benefit most from sparse checkout filtering, and the custom optimization approach consistently outperforms both standard Git and Scalar across all repository types.
Practical implementation guide
Implementation requires understanding when to apply each technique based on use case and risk tolerance. For development requiring full repository access, use standard Git cloning. For read-heavy workflows needing rapid access to current code, deploy optimized cloning. For CI/CD pipelines where speed is paramount, optimized cloning provides maximum benefit.
Getting started requires only simple download and execution:
curl -L https://gitlab.com/gitlab-accelerates-embedded/misc/git-much-faster/-/raw/master/git-much-faster.sh -o ./git-much-faster.sh

# For benchmarking
bash ./git-much-faster.sh --methods=optimized,standard --repo=https://github.com/your-org/your-repo.git
For production-grade testing, Git Much Faster project includes complete Terraform infrastructure for AWS deployment, eliminating variables that skew local testing results.
Optimized clones require careful consideration of limitations. Shallow clones prevent access to historical commits, limiting operations like git log across file history. For teams adopting optimizations it is best to create specific optimizations for high volume usage. For instance, developers can perform an optimized clone, and if and when needed, convert to full clones when needed via git fetch --unshallow. If a given CI job accesses commit history (e.g. using GitVersion), then you may need the full history, but not a checkout.
Use cases and industry applications
Embedded development presents unique challenges where projects historically stored compiled firmware and hardware design files directly in version control. These repositories often contain FPGA bitstreams, PCB layouts, and vendor SDK distributions ballooning sizes into tens of gigabytes. Build processes frequently require cloning dozens of external repositories, multiplying performance impact.
Enterprise monorepos encounter Git performance challenges as repositories grow encompassing multiple projects and accumulated historical data. Media and asset-heavy projects compound challenges, as mentioned above — web applications accumulate marketing assets over years, while game development faces severe challenges with 3D models and audio files pushing repositories beyond 100GB. More use cases can be found in the project.
CI/CD pipelines represent the most impactful application. Each container-based CI job requires a fresh repository clone, and when operations consume 20 to 90 minutes, entire development workflows become unviable.
Geographically spread out development teams may have team members whose network performance to their primary development workstation is extremely limited or varies dramatically. Optimizing the Git clone can help by reducing over the wire sizes dramatically.
Next steps
Git clone optimization represents a transformative opportunity delivering measurable improvements — up to 93% reduction in clone times and 98% reduction in disk space usage — that fundamentally change how teams interact with codebases.
The key insight is that Git's default conservative approach leaves substantial performance opportunities untapped. By understanding specific bottlenecks — network transfer inefficiency, CPU-intensive compression, unnecessary data downloads — teams can implement targeted optimizations delivering transformative results.
Ready to revolutionize your Git workflows?
Read the docs in the Git Much Faster repository and get started running benchmarks against your largest repositories. Begin with read-only optimization in CI/CD pipelines where benefits are immediate and risks minimal. As your team gains confidence, gradually expand optimization to development workflows based on measured results.
The future of Git performance optimization continues evolving, but fundamental principles — eliminating unnecessary work, optimizing for actual bottlenecks, measuring results rigorously — remain valuable regardless of future tooling evolution. Teams mastering these concepts today position themselves to leverage whatever improvements tomorrow's Git ecosystem provides.
]]>Traditional security approaches that once worked in simpler retail environments now struggle to keep up. Security processes are often bolted on as an afterthought, slowing teams down and increasing risk. But it doesn’t have to be this way.
Modern platforms embed security throughout the development lifecycle, making protection a seamless part of the developer workflow, not a barrier to delivery. This approach turns security into a strategic advantage, enabling innovation without compromising resilience.
In this article, you'll discover how an integrated DevSecOps platform helps retail teams meet rising security demands without slowing down delivery or compromising customer experience.
Why retail security demands a different approach
In retail, security is about more than protecting data — it’s about protecting the customer experience that drives revenue. Any slowdown, outage, or vulnerability can lead to lost sales and broken trust. Retail platforms must stay online, meet compliance standards, and defend against nonstop attacks from the open internet. Unlike enterprise systems, they’re fully public-facing, with a much broader attack surface. Add in third-party integrations, APIs, and legacy systems, and it’s clear: traditional security approaches aren’t enough.
Adding to the complexity, retailers face a unique set of challenges that further increase their security risks, including:
Supply chain fragility and API sprawl
Shipping delays, global instability, and interconnected systems disrupt logistics. Nearly half of retailers report product availability issues, and 25% lack real-time inventory visibility, according to a 2024 Fluent Commerce survey. While AI-powered forecasting helps, insecure APIs and fragile integrations across the digital supply chain create attack vectors.
Legacy systems meet modern demands
Many retailers operate on monolithic, outdated systems that struggle to support mobile apps, IoT devices, and real-time analytics securely. Without secure, agile foundations, each new digital touchpoint becomes a potential vulnerability.
AI and compliance complexity
AI reshapes retail experiences through personalized recommendations and advanced customer tracking technologies like beacon sensors, facial recognition, and mobile app location services that monitor movement and behavior within physical stores. These AI-powered systems enhance both customer experiences and demand forecasting capabilities for retailers. However, GDPR (the European Union's General Data Protection Regulation) and similar global privacy laws require secure data handling and transparent AI logic. Security missteps can result in significant fines and lasting reputational damage.
Customer-facing automation risks
Self-checkouts, kiosks, and chatbots promise convenience and cost savings but often lack security hardening. These touchpoints become entry points for cyber attackers and enable traditional theft through weak fraud detection, limited monitoring, and easily manipulated systems that make shoplifting harder to detect.
Disparate threat surfaces
Retailers are in a unique position where they must secure across multiple vectors, often maintained by globally distributed teams (depending on the size of the organization). E-commerce platforms, mobile applications, point-of-sale (POS) systems, and in-store IoT devices all provide an entry point for threat actors with unique characteristics requiring different security solutions to ensure resiliency.
This creates a unique paradox: Retailers must innovate faster than ever while maintaining higher security standards than most industries, all while delivering seamless customer experiences across every channel.
Why traditional AppSec falls short in retail
Most retailers rely on disconnected security tools such as static application security testing (SAST) scanners, license checkers, and vulnerability assessments that work in isolation. This fragmented approach creates critical gaps:
-
Limited lifecycle coverage: Tools focus on narrow development phases, missing supply chain and runtime risks.
-
Integration challenges: Legacy system gaps and poor tool connectivity create security blind spots between teams and solutions.
-
Manual processes: Security handoffs create bottlenecks, and issues are often discovered late, when they’re more costly to fix.
-
Team silos: Security remains isolated from daily development workflows and separate from compliance and IT teams.
The path forward
In today’s fast-paced retail landscape, security can’t slow down innovation. Embedding it directly into the development lifecycle and bringing every team together on a single unified DevSecOps platform makes security a strategic advantage rather than a bottleneck.
A DevSecOps platform enables secure innovation at scale
GitLab provides the most comprehensive set of security scanners to maximize application coverage, including:
- SAST
- DAST
- Dependency scanning
- Container scanning
- Secret detection
- Infrastructure-as-code scanning
- Fuzz testing
But security isn’t just about scanning. It's about enforcing the right policies to ensure vulnerabilities are identified and remediated consistently. With GitLab, security teams get full control to ensure the right scan is run on the right application, at the right time, and that the findings are addressed before they reach production.
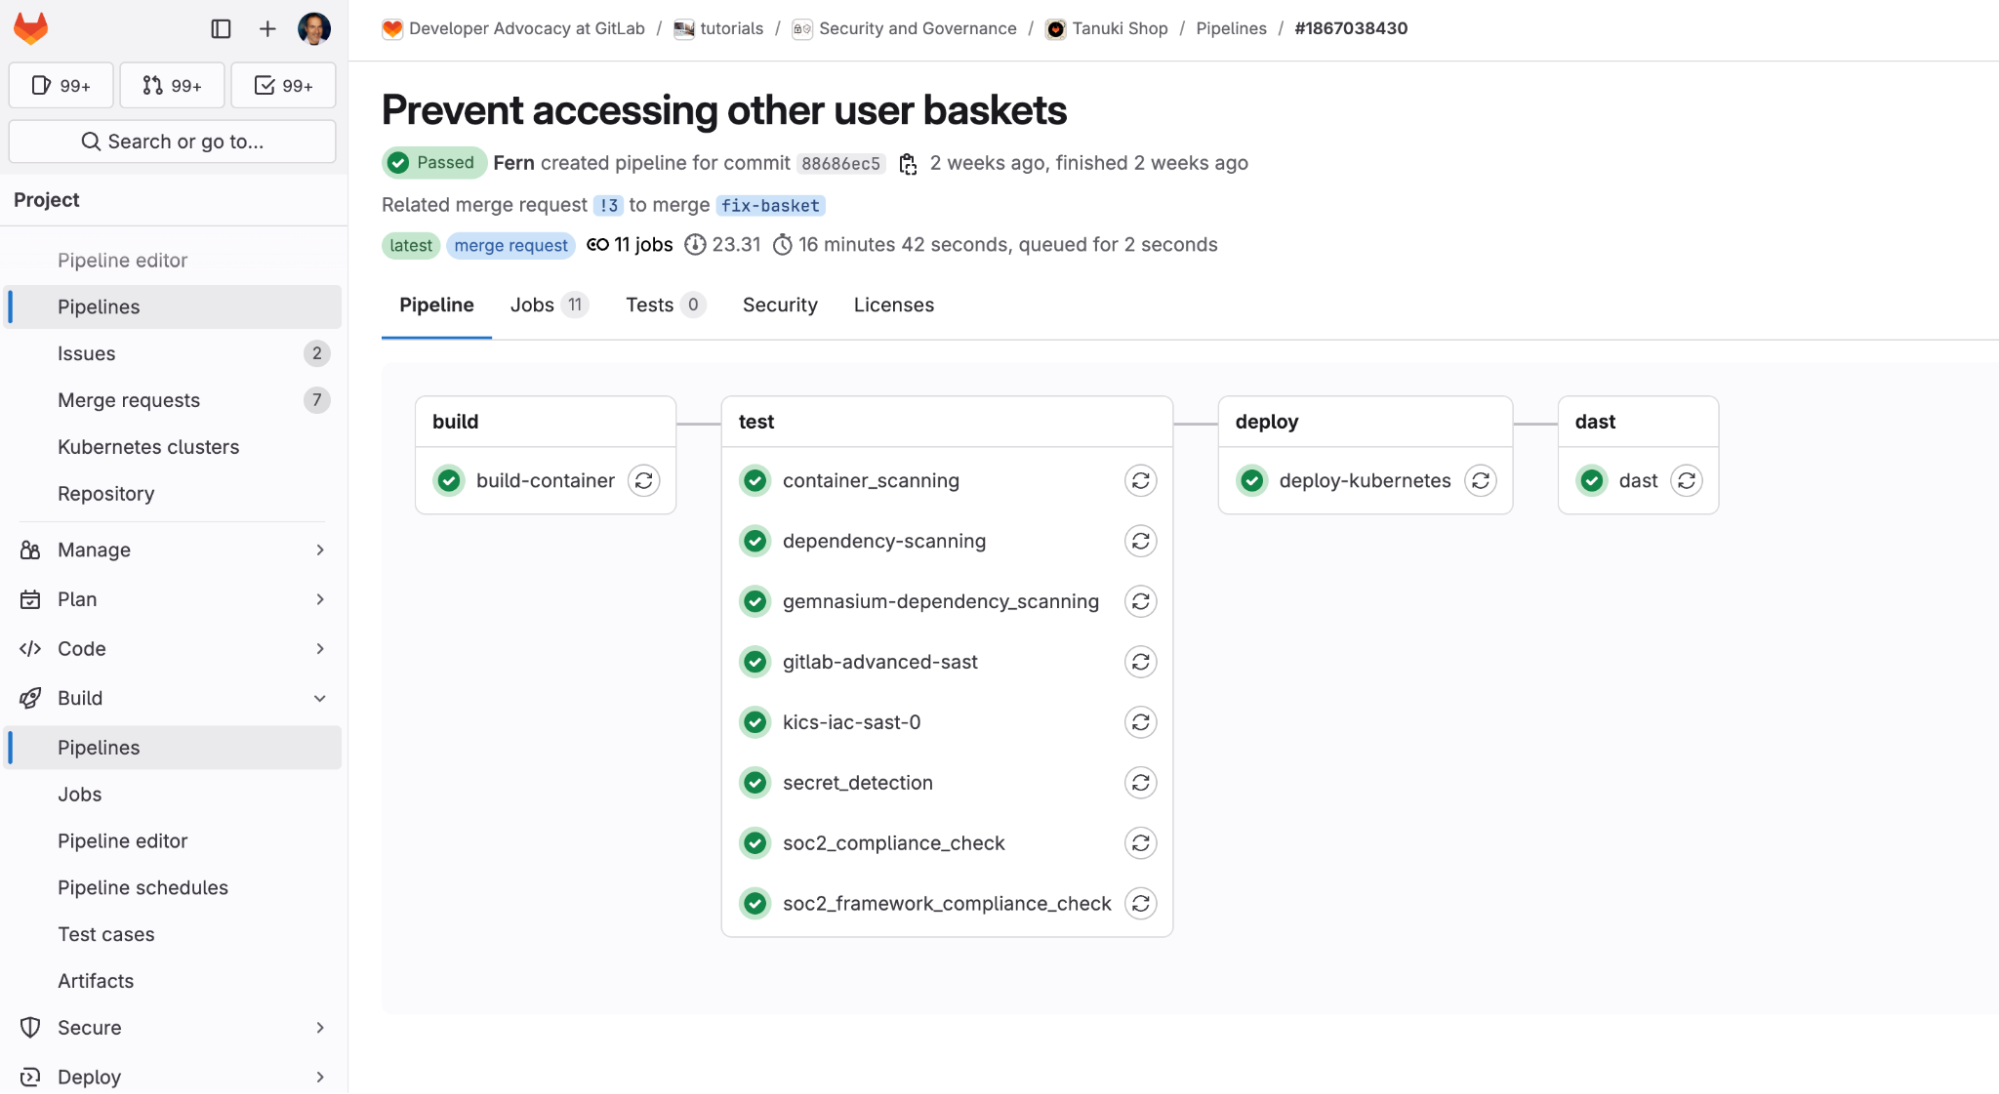
<center><i>Security scans run in the CI/CD pipeline, ensuring immediate feedback on potential vulnerabilities.</i></center> <p></p>
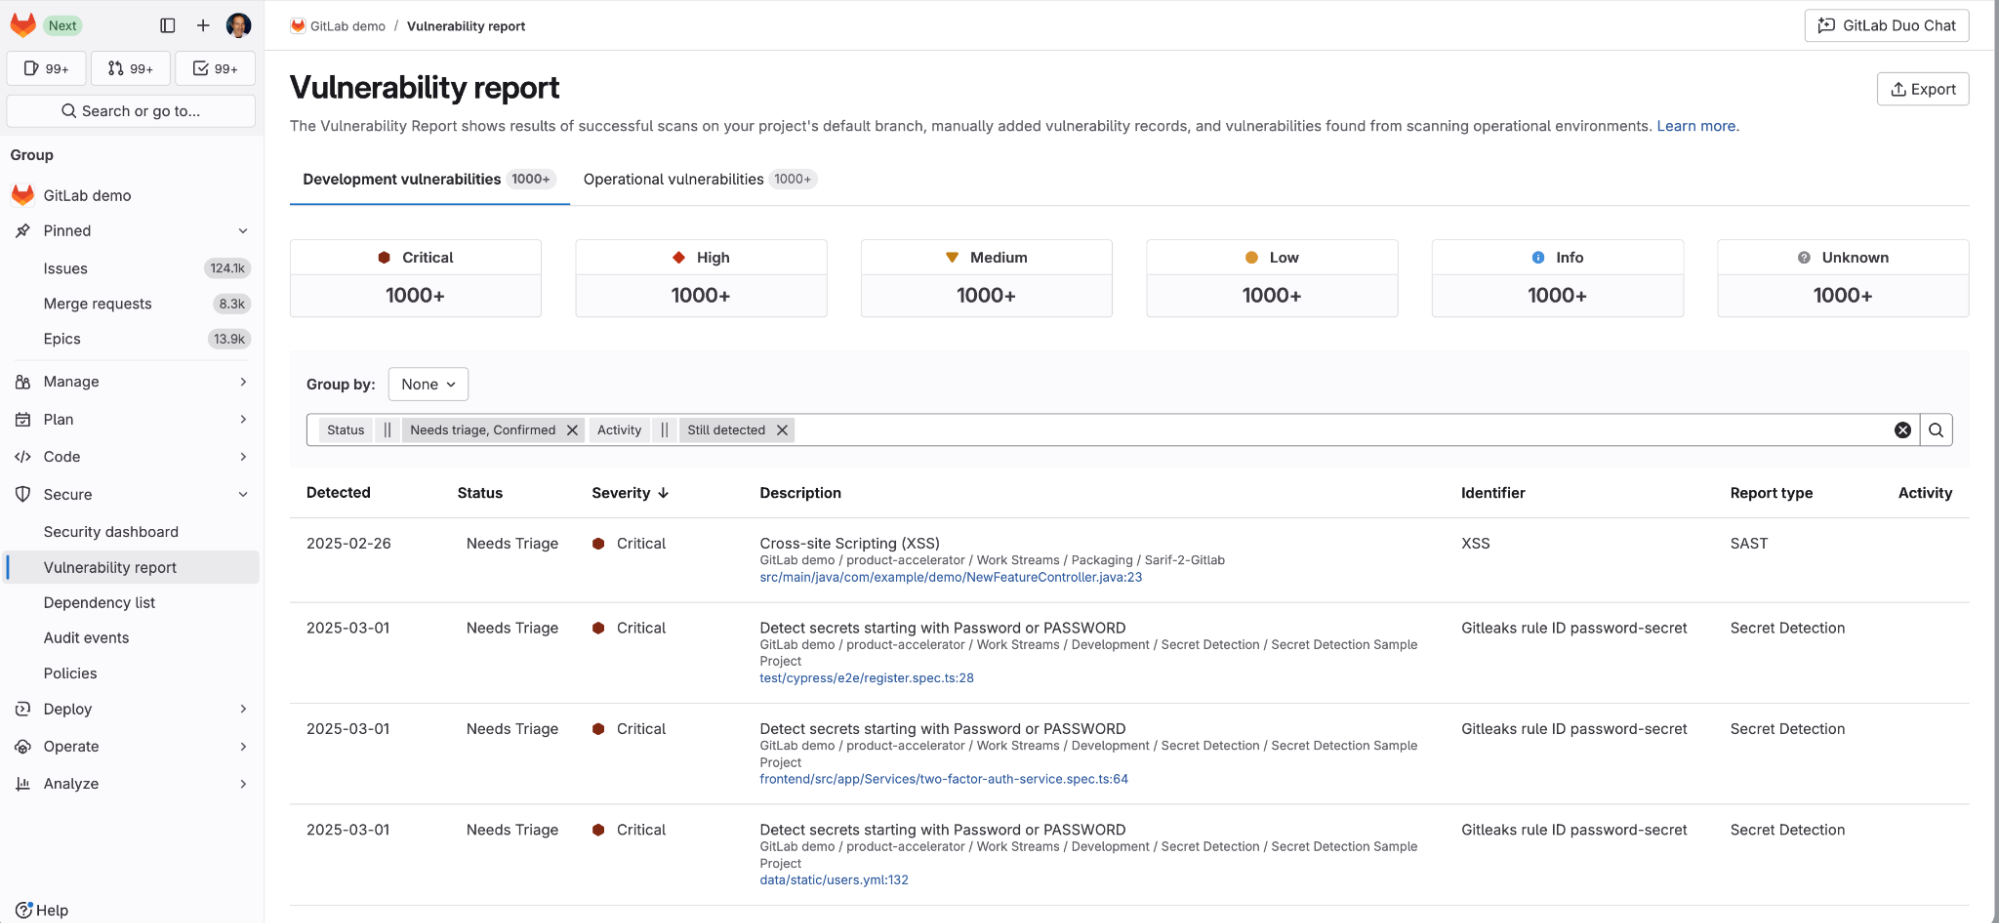
<center><i>Vulnerability Report shows all vulnerabilities for a specific project or group.</i></center>
One platform for Dev, Sec, and Ops
Retail teams waste countless hours switching between tools, manually transferring data, losing information between systems due to fragile integrations, and reconciling conflicting reports. A unified platform eliminates this friction:
- Single source of truth for source code, pipelines, vulnerabilities, and compliance
- No integration overhead or tool compatibility issues
- Consistent workflows across all teams and projects
The result? Teams spend time solving problems instead of managing tools.
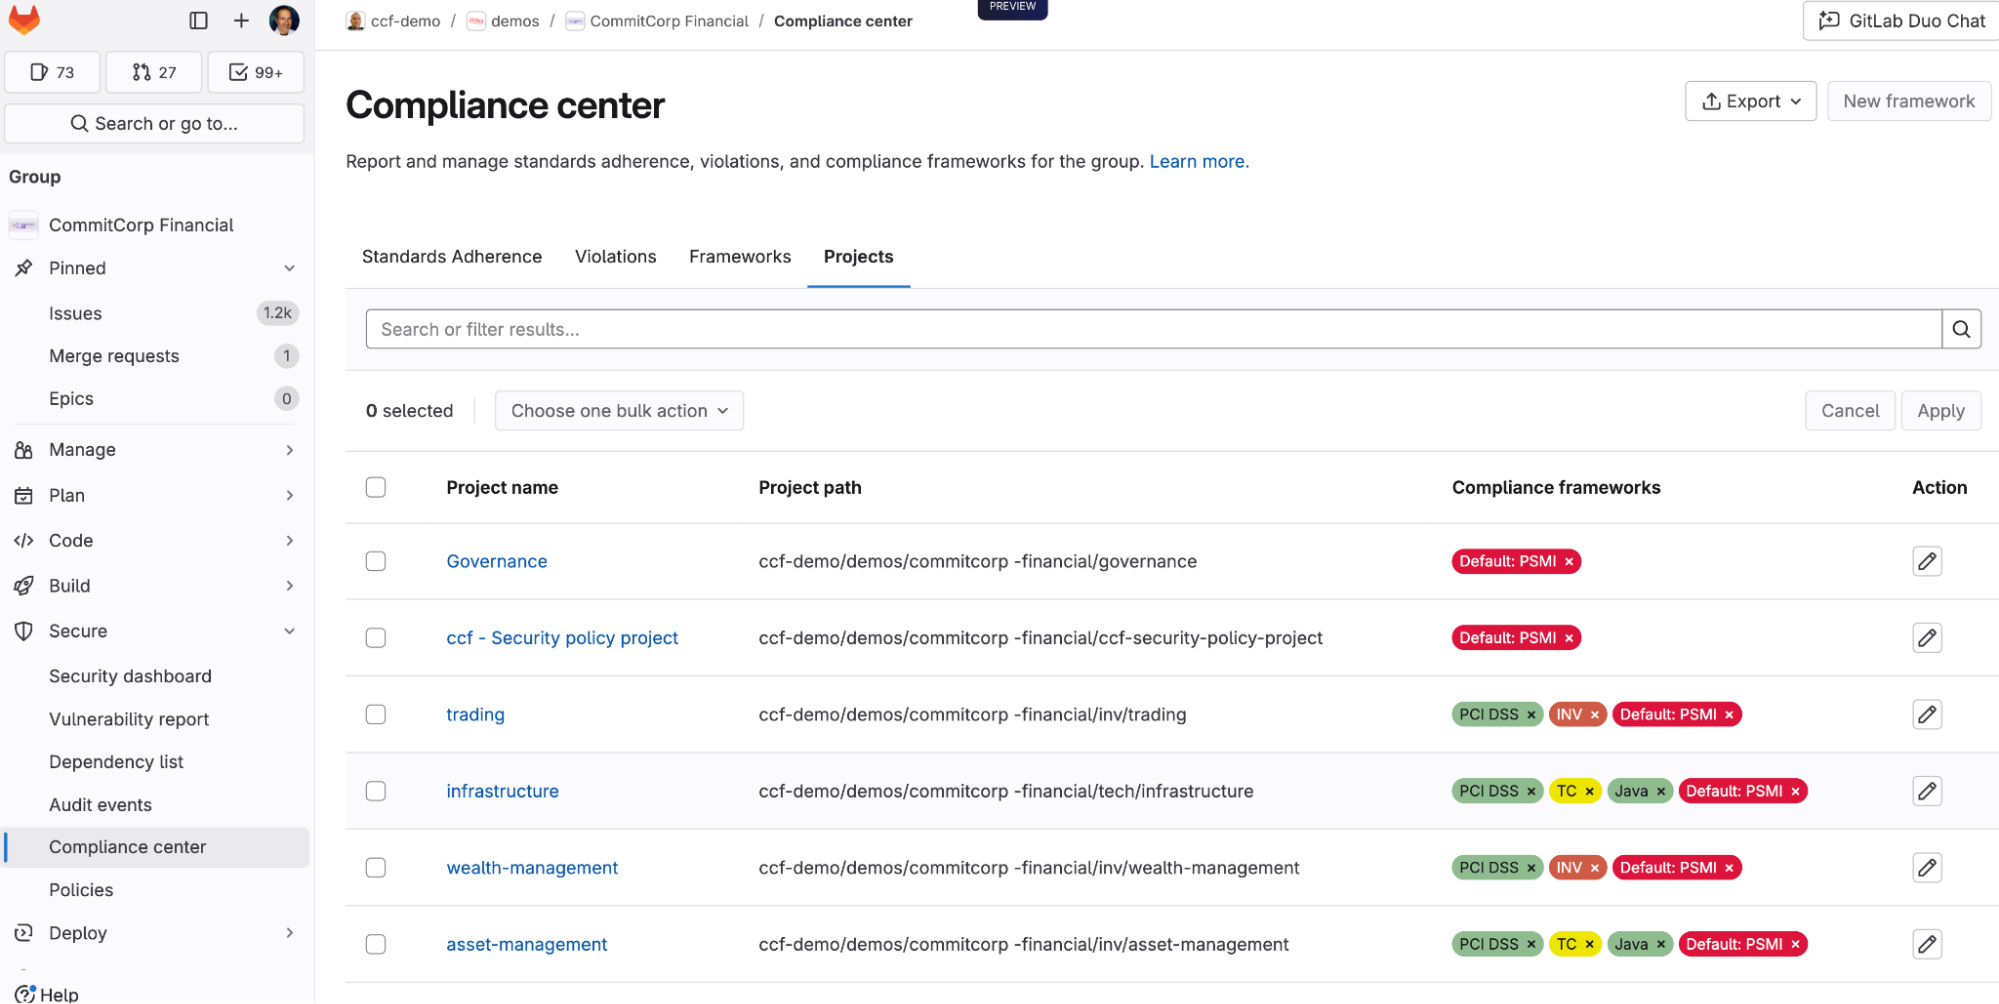
<center><i>The compliance center is where you can enforce compliance frameworks for your projects.</i></center> <p></p>
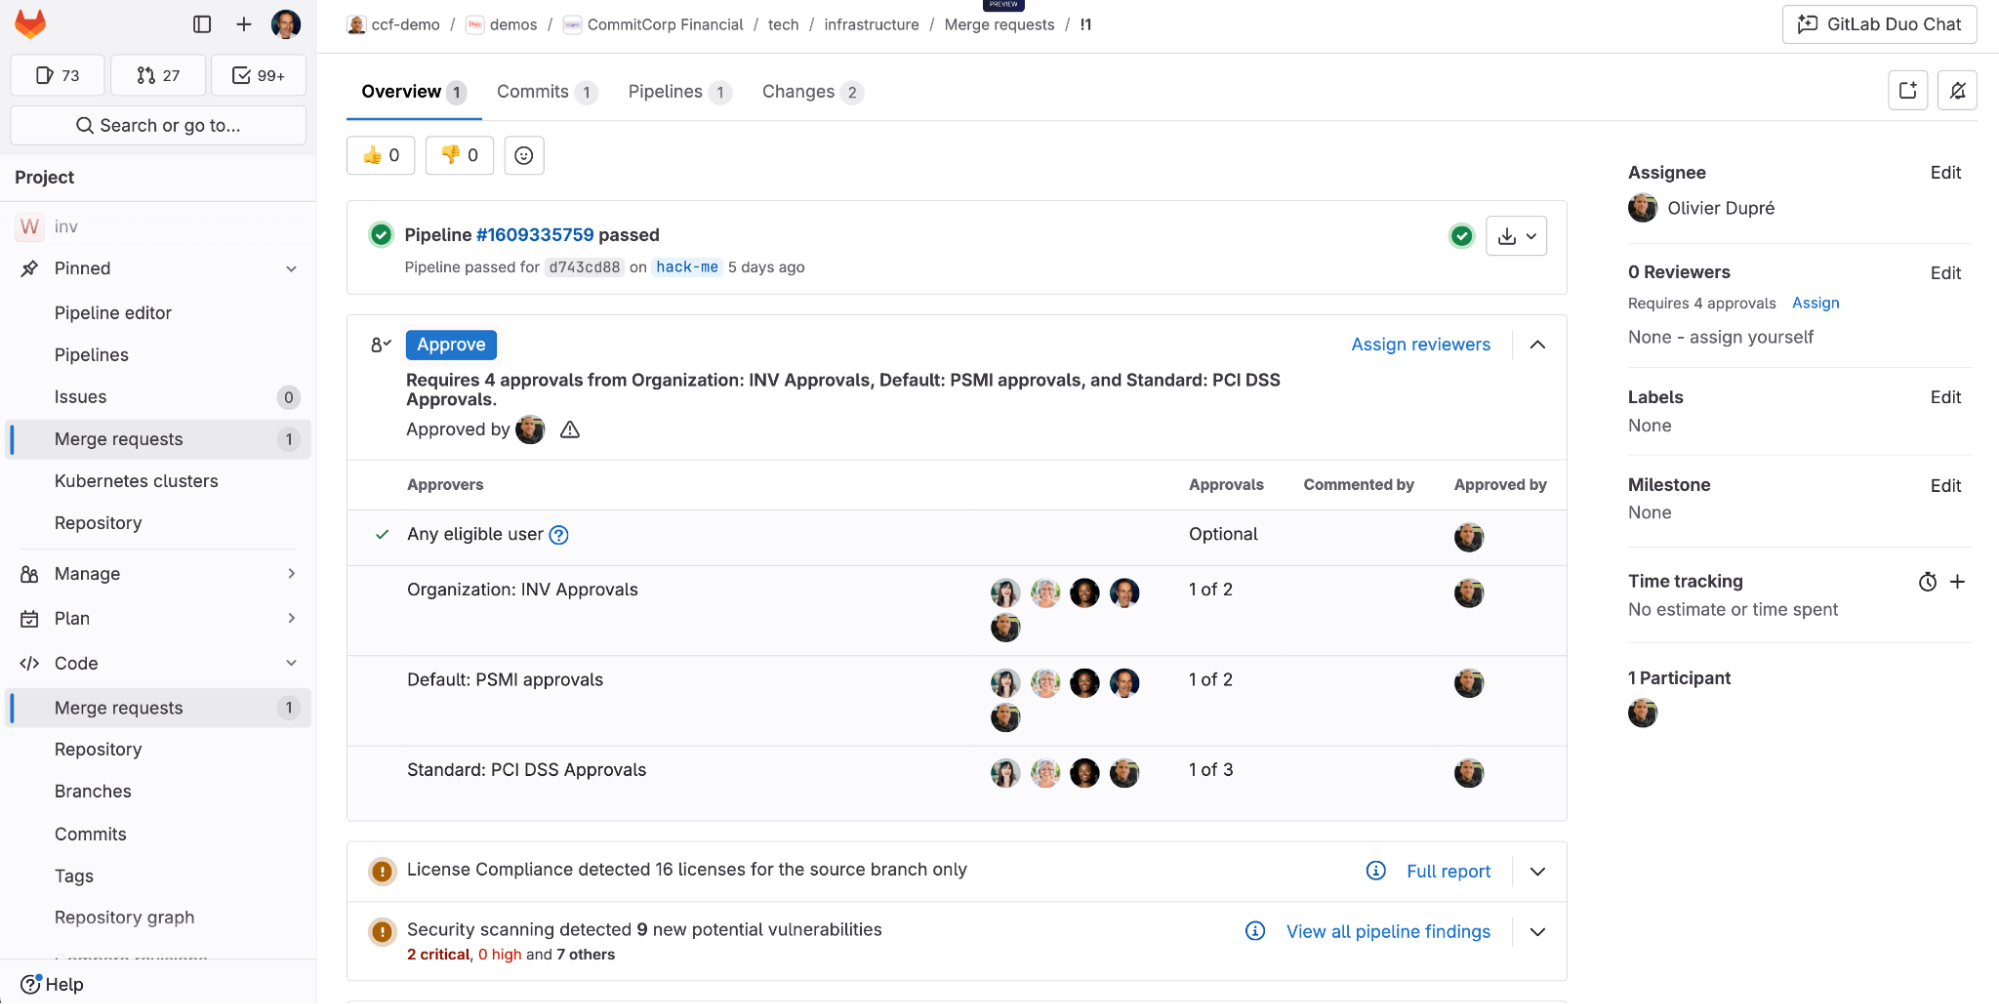
<center><i>In the merge request, developers require approval if risks are detected before merging code, according to defined policies.</i></center>
Shared security responsibility, not silos
The most successful retail security programs make security everyone's responsibility, not just the security team's burden.
Developer empowerment
Security and compliance guidance appears directly in merge requests, making it impossible to miss critical issues. Developers get immediate feedback on each commit, with clear explanations of risks and remediation steps. For example, AI-powered vulnerability explanation and vulnerability resolution help developers understand and fix security issues independently, reducing bottlenecks and building security expertise across the team.
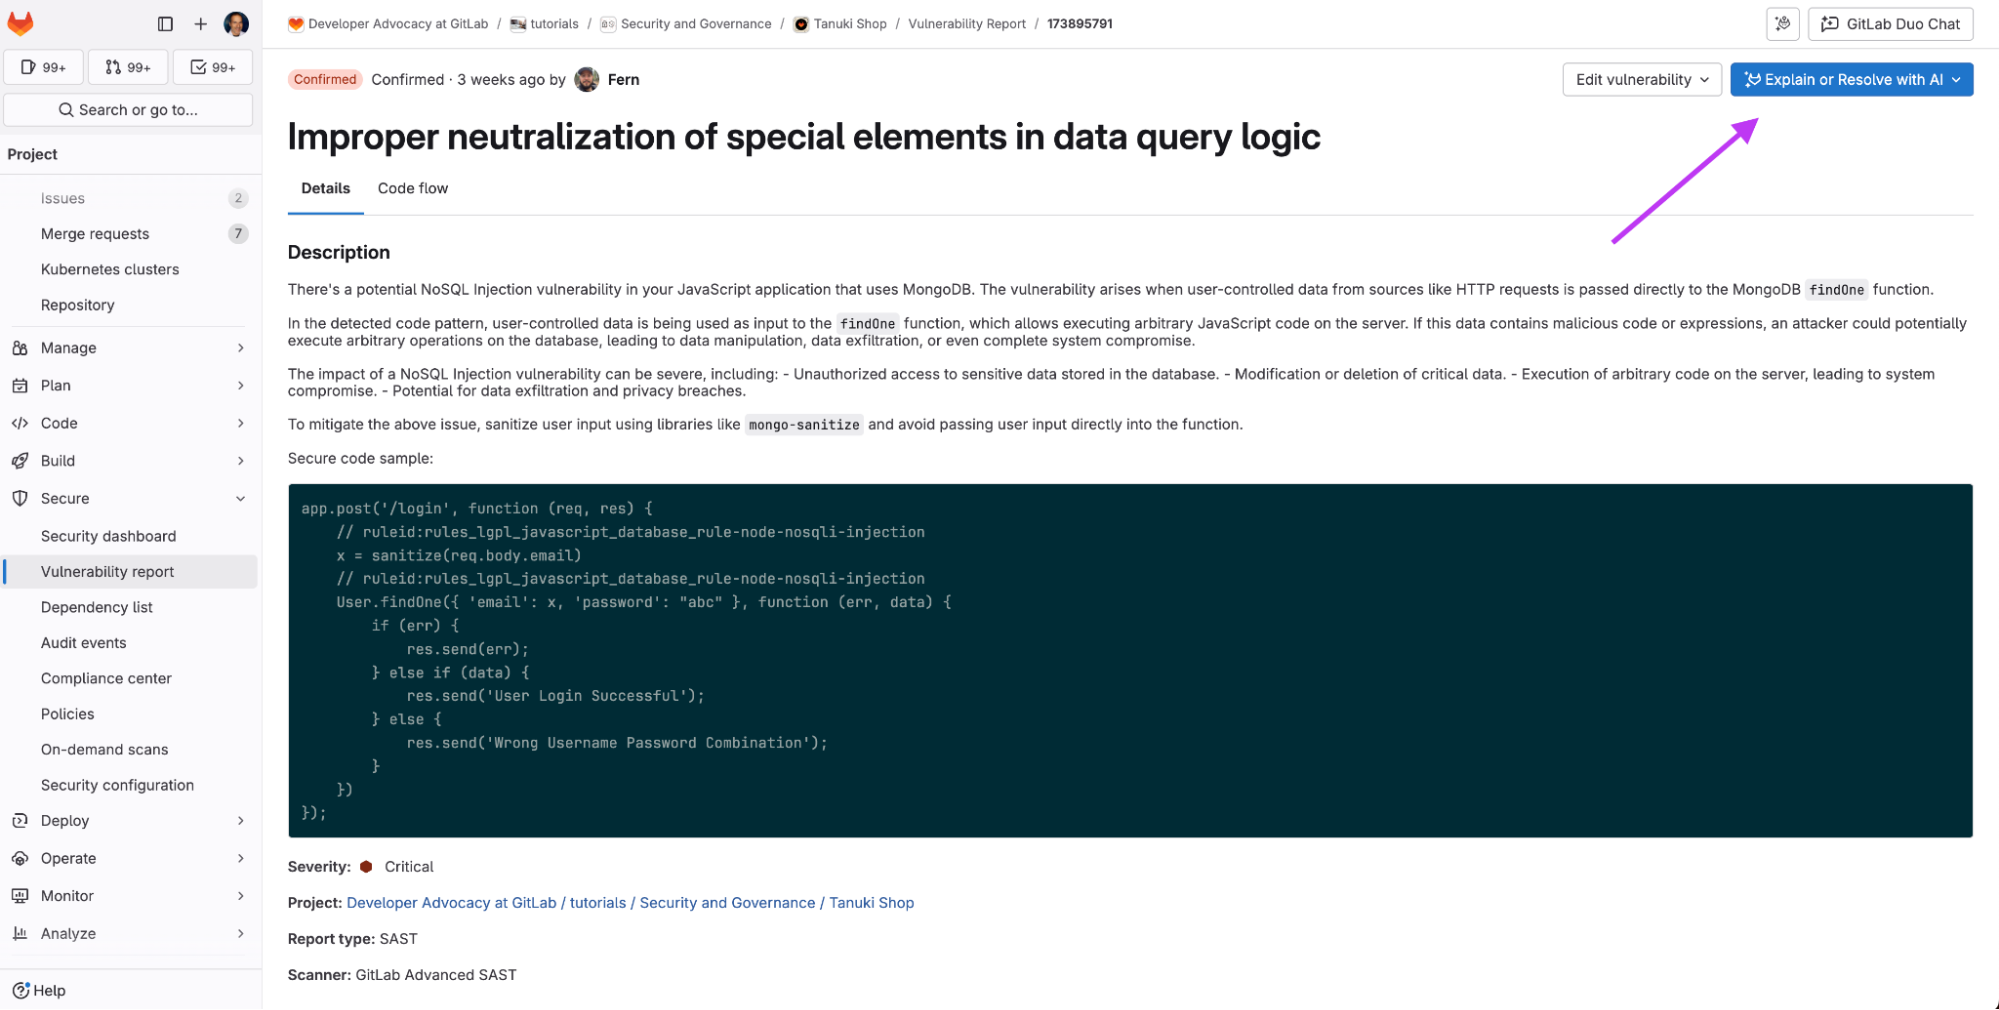
<center><i>Vulnerability page with a button for explaining or resolving issues with AI. Helps to bridge the knowledge gap with AI.</i></center>
<p></p>
Automated compliance
Generate audit reports, track license usage, and maintain a software bill of materials (SBOM) without manual effort.
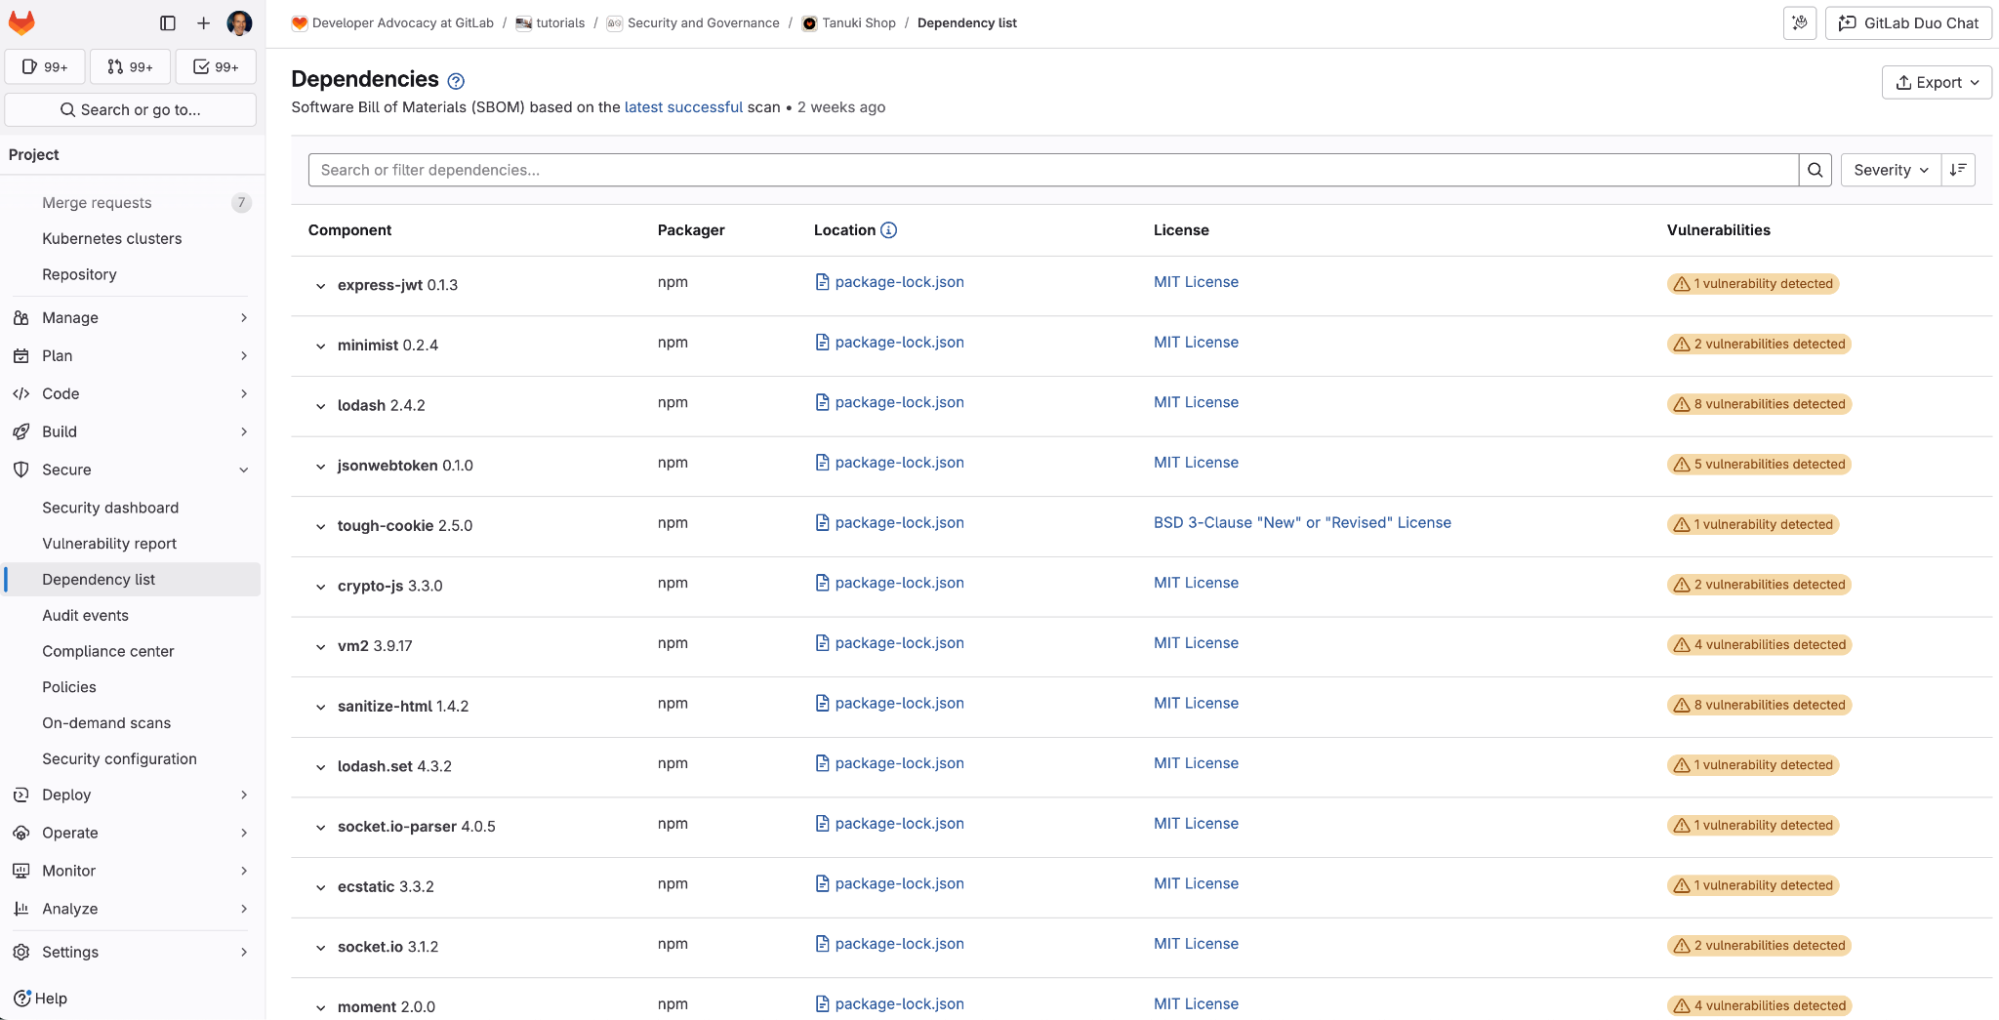
<center><i>GitLab's automated dependency report provides a comprehensive SBOM, displaying all project dependencies with their vulnerability status, license details, and security findings for complete transparency and compliance.</i></center> <p></p>
This approach transforms security from a gate that slows delivery into a foundation that enables confident, rapid innovation.
Platform vs. point tools: What retailers need to know
| Capability | Point Tools | GitLab DevSecOps Platform |
|---|---|---|
| SAST/DAST/API/Fuzz | Separate & limited | Fully integrated |
| License & dependency scanning | Often external tools | Built-in |
| Compliance & audit reporting | Manual or disconnected | Automated with traceability |
| Collaboration across teams | Fragmented | Unified environment |
| End-to-end visibility | Tool-specific | Full lifecycle + value stream view |
The bottom line: Security excellence drives retail success
In retail, security isn't just about protecting data, it's about protecting the customer experience that drives revenue. When security slows down releases or creates vulnerabilities, it directly impacts sales. Your customers expect secure, seamless experiences every time.
GitLab's integrated DevSecOps platform helps retailers:
- Deploy faster without compromising security with automated scans that catch issues before customers do.
- Meet compliance requirements effortlessly through built-in reporting for GDPR, PCI-DSS, and industry standards.
- Significantly reduce security tool costs by replacing multiple point solutions with one platform.
- Turn developers into security advocates with guidance and automation, not roadblocks.
Take a tour of some of GitLab's security capabilities:
- Resolving vulnerabilities with GitLab Duo
- Adding scans to pipeline
- Compliance frameworks
- Advanced SAST
]]>Ready to get started? Discover how GitLab Ultimate with Duo Enterprise can streamline your retail security strategy with a free trial.
"Issue to MR" is an agent Flow that streamlines turning a well-scoped issue into a draft merge request (MR). The Flow analyzes an issue’s description and requirements, opens a draft MR linked to the issue, creates a development plan, and proposes an implementation — right from the GitLab UI.
The developer challenge
Product tweaks such as rearranging a UI layout, adjusting component sizing, or making a minor workflow change shouldn't require hours of setup work. Yet developers find themselves caught in a frustrating cycle: hunting through codebases to locate the right files, creating branches, piecing together scattered changes across multiple components, and navigating complex review processes. And this is all before they can even see if their solution works. Development overhead transforms what should be quick iterations into time-consuming tasks, slowing down feedback loops and making simple product improvements feel like major undertakings.
How to use the Issue to MR Flow to accelerate an application update
You first need to fulfill these prerequisites before using the Issue to MR Flow.
Prerequisites:
- An existing issue with clear requirements and acceptance criteria. This will help GitLab Duo Agent Platform better understand what you're trying to achieve and improve the quality of your output.
- Project access at Developer or higher permissions as the Flow will be making edits to your project's source code.
- GitLab Duo Agent Platform enabled for your group or project, with Flows allowed. For this, go to your project’s Settings > General > GitLab Duo > Allow flow execution toggle and enable it. GitLab is committed to helping provide guardrails, so agentic AI features require turning on these toggles to protect sensitive projects and ensure only the projects you want are accessible to GitLab Duo Agent Platform.
Once you have fulfilled all the prerequisites above, you can follow these steps to take advantage of the Issue to MR Flow:
-
Create a project issue that describes what you’d like GitLab Duo Agent Platform to accomplish for you. Provide as much detail as possible in the issue description. If the issue already exists, open it by going to Plan > Issues and clicking on the issue describing the update you want. Keep the issue well-scoped and specific.
-
Below the issue header, click on Generate MR with Duo to kick off the Flow.
-
If you’d like to track the progress of the agents working on implementing your issue, go to Automate > Agent sessions to see the live session log as agents plan and propose changes.
-
When the pipeline completes, a link to the MR appears in the issue’s activity. Open it to review the summary and file-level changes.
-
If you’d like to validate the proposed updates by GitLab Duo Agent Platform locally, you can pull the branch on your laptop, build and run your app, and verify that the update behaves as expected. If needed, make edits in the MR and proceed with normal review.
-
If you’re happy with all the proposed application updates, merge the MR to the main branch.
Why the Issue to MR Flow works well for application changes
The Issue to MR Flow proposes code changes and updates the MR directly, so you spend less time locating files and only have to evaluate and review the result. In addition, the MR is automatically linked to the originating issue, keeping context tight for reviewers and stakeholders. Finally, you can monitor the agent session to understand what’s happening at each step.
Benefits of GitLab Duo Agent Platform
GitLab Duo Agent Platform is an agentic orchestration layer that brings full project context, including planning to coding, building, securing, deploying, and monitoring, so agents can help across the entire software development lifecycle (SDLC), not just code editing.
-
Unified data model: GitLab Duo Agents operate on GitLab’s unified SDLC data, enabling higher-quality decisions and collaboration across tasks — including non-coding ones.
-
Security and compliance are built-in: GitLab Duo Agents run within enterprise guardrails and are usable even in highly-regulated or offline/air-gapped environments.
-
Interoperability and extensibility: Orchestrate flows across vendors and tools; connect external data via MCP/A2A for richer context.
-
Scale collaboration: GitLab Duo Agents work in the GitLab UI and IDEs, enabling many-to-many human-agent collaboration.
-
Discoverable and shareable: Find and share agents and Flows in a centralized AI Catalog.
Try the Issue to MR Flow today
For application updates, like a modest UI adjustment, the Issue to MR Flow helps you move from a clear issue to a reviewable MR quickly, with progress you can monitor and changes you can validate and merge through your standard workflow. It keeps context, reduces handoffs, and lets your team focus on quality rather than busywork.
Watch the Issue to MR Flow in action:
<!-- blank line --> <figure class="video_container"> <iframe src="https://www.youtube.com/embed/BrrMHN4gXF4?si=J7beTgWOLxvS4hOw" frameborder="0" allowfullscreen="true"> </iframe> </figure> <!-- blank line -->
]]>Try the Issue to MR Flow on GitLab Duo Agent Platform now with a free trial of GitLab Ultimate with Duo Enterprise.