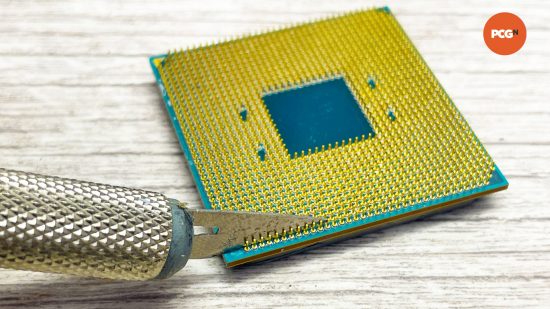
In this guide, we’ll show you how to fix bent CPU pins, as well as how to fix bent motherboard socket pins if you have an LGA motherboard. Bent socket pins are one of the main reasons for motherboard returns, and if you mash a bunch of pins accidentally by dropping an object into the CPU socket, it’s usually game over.
We can’t overstate their delicacy and the ease with which you can make silly mistakes here, so taking care when building your PC is essential. If the worst happens, though, and you end up with a wonky pin on your CPU or motherboard socket, then it’s worth carefully trying to fix it before paying out for new components.
Bend those pins back into line
Processor maker AMD has recently moved away from using pins on its latest Zen 4 CPUs, such as the Ryzen 7 7800X3D, and instead uses a land grid array like Intel – you’ll find plenty of these CPUs on our best gaming CPU guide. However, many people are still using the veteran Socket AM4 platform, with CPUs such as the Ryzen 7 5800X3D still having pins on the rear of the CPU itself.
These pins are more durable than the pins in motherboard CPU sockets, but they can still be bent if you drop or ding your CPU, or if you accidentally wrench it out of a latched socket while trying to remove your cooler (more on how to avoid this later).
You can use a small craft knife or scalpel to maneuver any bent pins back in line, checking the rows from both sides to make sure they line up. If you’re careful, patient, and do it right, eventually you should find a CPU that resisted slotting into the socket will now drop into it again. Take your time here, and concentrate.
How to fix bent motherboard socket pins
Fixing the pins in an LGA motherboard socket is tougher than rebending the pins on a CPU, but it’s still achievable. If you have a delicate hand, and you’re very careful, you can use a pin and magnifying glass to identify a bent socket pin and use the pin to bend it back in line with the rest. This won’t always work, but it’s worth a try, especially if it’s just a couple of pins that are out of line and preventing your PC from booting.
How to avoid bending CPU pins
There are several steps you can take to ensure that you don’t accidentally bend any delicate pins in the first place. Firstly, don’t open the motherboard socket or remove the protective cap until it’s wholly necessary.
Secondly, avoid lowering the CPU from a height into the socket. Instead, lower it down next to the socket, then move it over. If you lose your grip, the CPU will then probably land next to the socket rather than inside it. The socket cap is designed to be pressed outwards by the CPU when you close the latch, so leave it in place until this point.
If you’ve ever owned an AMD Socket AM4 CPU, you may well have encountered the dreaded problem of the CPU being wrenched out of the socket when you remove your heatsink. The problem arises from thermal paste acting like glue between the CPU and heatsink – when the latter is removed, it takes the CPU out with it.
This can easily lead to bent pins if you don’t realize what’s happened. To avoid this from happening, twist the heatsink on top of the CPU before removing it. This can loosen the thermal paste and stop the CPU from being pulled out of the socket.
If you’re considering buying a new CPU, make sure you check out our full guide to the best gaming CPU, where we take you through the best options at a range of prices – just be careful when it comes to dropping it into your motherboard.
When it comes to CPU installation, you can also read our full guide on how to apply thermal paste, as well as our guide on how to build a gaming PC, where we take you through every step of the process.
